
Beliebte Kategorien
Suchen Sie nach einem Garn?


Kommentare / Fragen (114)
![]() Caitlynn hat geschrieben:
Caitlynn hat geschrieben:
Hi, I really want to knit this but I'm strugling with the size. I'm right inbetween the S and M/L but I don't know how to change the pattern/ downsize it to fit. Is there a formula I can use to help with that?
23.10.2025 - 14:31DROPS Design hat geantwortet:
Hi Caithlynn,
Based on the gauge, which tells you how many stitches there are in 10 cm, you can calculate how many stitches you need to cast on, etc., to get different measurements. 23.10.2025 - 17:54
![]() Gudrun hat geschrieben:
Gudrun hat geschrieben:
Cast on 402 sts on needle 3.5 mm. Work 2 ridges in GARTER ST. Switch to needle 4 mm. Then work as follows: * P 6, A.1 *, repeat from *-* 12 more times, P 6, insert 1 marker (= back piece), * P 6, A.1 *, repeat from *-* 12 more times, P 6, insert 1 marker (= front piece). Move the markers upwards when working. When A.1 has been worked 1 time vertically, there are 350 sts on needle. 6+13*9+6+6+13*9+6=258, what do i do with the other 144 sts?
15.07.2025 - 11:22DROPS Design hat geantwortet:
Hi Gudrun, in second row of A.1 you have 7 stitches insted of 9. [(6+A.1)*13]+6= [(6+7)*13+6}=(13*13)+6=169+6=175. 175*2 (front and back)=350. Happy knitting!
17.07.2025 - 11:00
![]() Reiah N hat geschrieben:
Reiah N hat geschrieben:
Hi! So I’m at the decrease section in the top where it says to continue decreasing every 4 cm 3 more times for size M. does that mean I have to purl 2 together every 4cm? Or do I have to purl 2 together in every purl section in a row, then leave 4 cm until I start the next decrease row and purl 2 together again and repeat it for the third time, all while doing A.2 between each purl section? Sorry for the bother 😰!
23.01.2025 - 09:39DROPS Design hat geantwortet:
Dear Reiah, you will decrease as indicated in the first row every 4cm vertically. That is, work 1 decrease row as indicated, work normally until you have worked 4cm from the decrease row, work a decrease row as the previous one (the decreases and the charts); repeat once more 4cm later. Happy knitting!
25.01.2025 - 19:54
![]() Reiah N hat geschrieben:
Reiah N hat geschrieben:
Hi! Thank you so much for the answer last time 😍. After finishing the row of A.1, and starting the next row do we have to p 6 (for size m) every time before working A.2 like with A.1 ? Until the piece measures 10 cm? Thank you so much 😁
14.01.2025 - 16:54DROPS Design hat geantwortet:
Dear Reiah, when A.1 is done, there are 7 sts between each purl section, work now *purl 6, A.2* all the round, then after 10 cm from cast on edge, start decreasing in the purl section as explained in the written pattern. Happy knitting!
15.01.2025 - 08:03
![]() Reiah N hat geschrieben:
Reiah N hat geschrieben:
Hi! I’m knitting this in size medium and it says that I’m supposed to p6+7(A.1) x10 , p6, p6+7(A.1) x10 , p6. I have 30 stitches left What do I do with them? Thank you so much 🥰
11.01.2025 - 08:36DROPS Design hat geantwortet:
Dear Reiah, you work: (purl 6, A.1)x 11 times (10 more, so 11 in total), purl 6, (marker), (purl 6, A.1) x 11 times (total), purl 6, (marker). The charts are read from the bottom up so in the first row of A.1 you have 9 stitches (which are decreased to 7). So you will have: (6+9)x11 + 6 + (6+9)x11 +6 = 342 stitches. Happy knitting!
12.01.2025 - 16:04
![]() Penny hat geschrieben:
Penny hat geschrieben:
Is there a straight needle instruction available for this pattern.
18.09.2024 - 06:24DROPS Design hat geantwortet:
Dear Penny, this lesson might help you adjusting the pattern for straight needles. Happy knitting!
18.09.2024 - 08:57
![]() Nina hat geschrieben:
Nina hat geschrieben:
On the back piece when the 33 sts or slipped on a holder are the 22 stitches worked first as before and when the project is turned that's when K together close to the neck sts holder or are they K together at the beginning of the row?
03.06.2024 - 07:30DROPS Design hat geantwortet:
Dear Nina, work 1 row from RS as before working the first 22 sts and slipping them on a thread or keeping them on the needle but they will be worked later; slip the next 33 sts on a thread for neck and work the last 22 sts for shoulder as before, finish now each shoulder separately. Happy knitting!
03.06.2024 - 08:24
![]() Nina hat geschrieben:
Nina hat geschrieben:
When working in round and doing A1 and A2 it says k from RS and P from WS. Does that mean we P6 before A1 and k3 before the passo then k3 after then back to P6 or is the 3 st before the passo part of the P6 or is it P6, P3 then passo?
20.05.2024 - 10:01DROPS Design hat geantwortet:
Dear Nina, when working in the round you will always work from RS, ie the stitches in A.1 and in A.2 will be knitted on every round, and the purl stitches between diagrams will be always purled. When working in rows after dividing for armholes, you will then purl the stitches in A.2 from wrong side and knit the stitches between diagrams (reversed stocking stitch). Happy knitting!
21.05.2024 - 13:22
![]() Carina hat geschrieben:
Carina hat geschrieben:
Hej, Gäller garnval. Om jag vill byta Muskat till t.ex. Cotton Merino eller Merino extra fine, är det möjligt och hur mycket garn behöver jag då. Garnkonverteraren kunde inte svara! TACK
18.04.2024 - 11:53DROPS Design hat geantwortet:
Hej Carina, jo det kan den, vælg Muskat, vælg antal gram for din størrelse, vælg 1 tråd, så får du både Cotton Merino og Merino Extra Fine med flere :)
19.04.2024 - 14:31
![]() Jenny hat geschrieben:
Jenny hat geschrieben:
Hello, in A.2, there should be a yarn-over at the beginning and at the end of each 7 stitches? I just know how to do a yarn-over before knitting the actual stitch, how is it done after knitting a stitch? Or am I misreading this, and there should only be one yarn-over in the first row? But then the total amount of stitches would be exactly the same, whereas there would be more stitches in row 3. thanks!
17.01.2024 - 13:00DROPS Design hat geantwortet:
Dear Jenny, on first row in A.2 you start and end A.2 with a yarn over and make a double decrease in the middle, so that the number of stitches remains the same, this means work the first row in A.2 as follows: YO, K2, slip 1, K2 tog, psso, K2, YO. Happy knitting!
18.01.2024 - 08:19
|
||||||||||
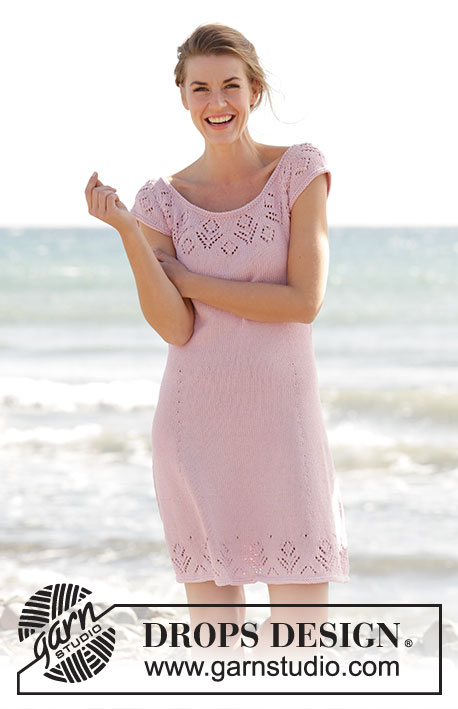
Love Is In The Air#loveisintheairtop |
||||||||||
 |
 |
|||||||||
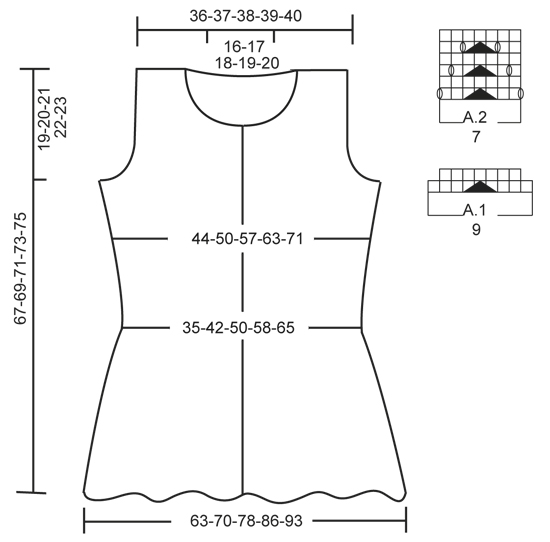
Gestricktes DROPS Top in ”Muskat” mit Lochmuster. Größe S - XXXL.
DROPS 160-24 |
||||||||||
|
KRAUSRIPPEN (in Runden): 1 Krausrippe = 2 Rd kraus re = 1 Rd re und 1 Rd li. KRAUSRIPPEN (in Hin- und Rück-R): 1 Krausrippe = 2 R kraus re = 2 R re MUSTER: Siehe Diagramme A.1 und A.2. ZUNAHMETIPP: Bis 1 M vor dem Markierer str, 1 Umschlag, 2 M li (der Markierer sitzt dazwischen), 1 Umschlag (= 2 M zugenommen). In der nächsten Rd den Umschlag jeweils li verschr str, um ein Loch zu vermeiden. ---------------------------------------------------------- TOP: Die Arb wird in Runden gestr. 302-342-402-430-486 M auf Rundnadel Nr. 3,5 mit Muskat anschlagen. In Rd 2 KRAUSRIPPEN (= 4 Rd kraus re, siehe oben) str. Zu Rundnadel Nr. 4 wechseln. Dann wie folgt str: * 7-6-6-5-5 M li, A.1 *, von *-* noch weitere 8-10-12-14-16 x wdh, 7-6-6-5-5 M li, 1 Markierer setzen (= Rückenteil), * 7-6-6-5-5 M li, A.1 *, von *-* noch weitere 8-10-12-14-16 x wdh, 7-6-6-5-5 M li, 1 Markierer setzen (= Vorderteil). Die Markierer beim Str mitführen. Wenn A.1 1 x in der Höhe gestr wurde, sind 266-298-350-370-418 M auf der Nadel. Dann A.2 (= 7 M) über A.1 str, A.2 wird bis zum fertigen Maß gestr. Bei einer Gesamtlänge von 10 cm wie folgt abnehmen: * 2 M li zusstr, 5-4-4-3-3 M li, A.2 *, von *-* noch weitere 8-10-12-14-16 x wdh, 2 M li zusstr, 5-4-4-3-3 M li, Markierer, * 2 M li zusstr, 5-4-4-3-3 M li, A.2 *, von *-* noch weitere 8-10-12-14-16 x wdh, 2 M li zusstr, 5-4-4-3-3 M li, Markierer (= 246-274-322-338-382 M übrig, 20-24-28-32-36 M abgenommen). Weiter wie zuvor li und im Muster str, bis die Arb eine Gesamtlänge von 13-14-14-15-15 cm hat. Dann wie folgt abnehmen: * 4-3-3-2-2 M li, 2 M li zusstr, A.2 *, von *-* noch weitere 8-10-12-14-16 x wdh, 4-3-3-2-2 M li, 2 M li zusstr, Markierer, * 4-3-3-2-2 M li, 2 M li zusstr, A.2 *, von *-* noch weitere 8-10-12-14-16 x wdh, 4-3-3-2-2 M li, 2 M li zusstr, Markierer (= 226-250-294-306-346 M übrig, 20-24-28-32-36 M abgenommen). Die Abnahmen wie zuvor (d.h. abwechselnd an jeder Seite der Linksbereiche) alle 3-4-4-5-5 cm noch weitere 4-3-3-2-2 x wdh (= 146-178-210-242-274 M). Die nächste Rd wie folgt str: * 1 M li, A.2 *, von *-* noch weitere 8-10-12-14-16 x wdh, 1 M li, Markierer, * 1 M li, A.2 *, von *-* noch weitere 8-10-12-14-16 x wdh, 1 M li, Markierer. In diesem Muster weiterstr. Bei einer Gesamtlänge von 30 cm beidseitig jedes Markierers je 1 M zunehmen (= 4 M zugenommen) – ZUNAHMETIPP lesen. Die zugenommenen M li str. Diese Zunahmen alle 1½-2-2½-3½-3½ cm noch weitere 9-7-6-5-5 x wdh (= 186-210-238-266-298 M). Bei einer Gesamtlänge von 46-47-48-49-50 cm an beiden Seiten des Tops beidseitig jedes Markierers je 7 M kraus re str (= je 14 M kraus re an beiden Seiten), die restlichen M wie zuvor str. Bei einer Gesamtlänge von 48-49-50-51-52 cm nur über die ersten 93-105-119-133-149 M der Rd str (= Rückenteil), die M für das Vorderteil stilllegen. RÜCKENTEIL: = 93-105-119-133-149. Die Arb wird nun in Hin- und Rück-R gestr. Am Anfang der nächsten 2 R je 4 M für die Armausschnitte abketten (= 85-97-111-125-141 M). Dann wird für die Armausschnitte innerhalb von 3 M kraus re am Rand abgenommen, beidseitig in jeder 2. R je 1 M 4-10-16-23-29 x abnehmen, indem jeweils 2 M li zusgestr werden (wenn die Abnahmen in A.2 hinüberreichen, abnehmen, indem 2 M re zusgestr werden, und die M, die nicht mehr im Muster aufgehen, glatt re str) (= 77-77-79-79-83 M). Bei einer Gesamtlänge von 65-67-69-71-73 cm die mittleren 31-33-35-37-39 M für den Halsausschnitt stilllegen. Jede Schulter einzeln weiterstr (= 23-22-22-21-22 M), dabei am Anfang der nächsten R, die am Halsrand beginnt, die ersten 2 M re zusstr (= 22-21-21-20-21 M). Die M, die nicht mehr in A.2 aufgehen, glatt re str. Weiter wie zuvor A.2, li und glatt re str. Bei einer Gesamtlänge von 66-68-70-72-74 cm 1 KRAUSRIPPE (= 2 R kraus re, siehe oben) über alle M str, dann abketten. Die andere Schulter ebenso str. VORDERTEIL: = 93-105-119-133-149 M. Die Arb wird nun in Hin- und Rück-R gestr. Bis zu einer Gesamtlänge von 57-59-61-63-65 cm wie das Rückenteil str. Nun die mittleren 21-23-25-27-29 M für den Halsausschnitt stilllegen. Jede Schulter einzeln weiterstr, dabei am Anfang jeder R, die am Halsrand beginnt, wie folgt abketten: 2 M 2 x und 1 M 2 x. Die Armausschnitte weiter wie beim Rückenteil arb, nach allen Abnahmen sind noch 22-21-21-20-21 M auf der Nadel. Die M, die nicht mehr in A.2 aufgehen, glatt re str. Weiter wie zuvor A.2, li und glatt re str. 1 Krausrippe (= 2 R kraus re) über alle M str, dann abketten. Die andere Schulter ebenso str. FERTIGSTELLEN: Die Schulternähte schließen. HALSBLENDE: 100 bis 120 M (einschl. der stillgelegten M für den Halsausschnitt) aus dem ganzen Halsrand mit Rundnadel Nr. 3,5 mit Muskat auffassen. In Rd 2 Krausrippen (= 4 Rd kraus re) str. Abketten. |
||||||||||
Erklärungen zum Diagramm |
||||||||||
|
||||||||||
 |
||||||||||
Haben Sie diese Anleitung nachgearbeitet?Dann taggen Sie Ihre Fotos mit #dropspattern #loveisintheairtop oder schicken Sie sie an die #dropsfan Galerie Brauchen Sie Hilfe bei dieser Anleitung?Sie finden 26 Videotutorials, einen Kommentar/Fragen-Bereich und vieles mehr, wenn sie die Anleitung bei garnstudio.com aufrufen. © 1982-2026 DROPS Design A/S. Wir besitzen alle Rechte. Dieses Dokument, einschließlich aller Untersektionen, hat Urheberrechte. Mehr dazu, was Sie mit unseren Anleitungen machen können, finden Sie ganz unten auf der Seite zu jeder Anleitung. |
||||||||||


Mit über 40 Jahren Tätigkeit im Entwerfen von Strick- und Häkelmustern bietet Ihnen DROPS Design eine der umfangreichsten Sammlungen von kostenlosen Anleitungen im Internet - in 17 Sprachen übersetzt. Zum jetzigen Zeitpunkt haben wir insgesamt 324 Handarbeitshefte und 12290 Anleitungen auf Deutsch. 12202
Unser Ziel ist es, Ihnen die besten Angebote zum Stricken und Häkeln, Inspirationen und Ratschläge sowie qualitativ hochstehende Garne zu unglaublichen Preisen zu bieten! Möchten Sie unsere Anleitungen nicht nur für den persönlichen Gebrauch nutzen? Unsere Copyright Bedingungen finden Sie bei allen unseren Anleitungen ganz unten auf der jeweiligen Seite. Viel Spaß beim Handarbeiten!
Kommentieren Sie die Anleitung DROPS 160-24
Wir würden gerne Ihre Meinung zu diesem Modell erfahren!
Wenn Sie eine Frage stellen möchten, prüfen Sie bitte, dass Sie die richtige Kategorie im unten stehenden Formular gewählt haben - so bekommen Sie schneller eine Antwort. Die obligatorischen Felder sind mit einem * gekennzeichnet.