
Beliebte Kategorien
Suchen Sie nach einem Garn?


Kommentare / Fragen (91)
![]() Knitting Well Done hat geschrieben:
Knitting Well Done hat geschrieben:
Hello , I don't understand how to centered the diagram even if I follow the lesson... do you have a video that show exactly what to do to center it and make the sleeve? Thank you 👱🏻♀️
13.03.2022 - 11:29
![]() Vale hat geschrieben:
Vale hat geschrieben:
I'm so sorry to have to ask again but I don't understand: how can I decrease every 2,5 cm if there's a pattern? With 2 tog decrease, it will be deformed the pattern motif... I'm so confused .. I'm referring to this "When A.2 has been worked, continue with A.3. NOTE: Adjust pattern so that the middle st in diagram (see arrow) is one of the 2 middle sts on sleeve, AT THE SAME TIME beg dec under sleeve - remember DECREASE TIP" The decrease tip mean to knit just 2 stitches together?
20.02.2022 - 00:33DROPS Design hat geantwortet:
Dear Vale, if your tension is right in height, you should decrease approx. on every 7th round in size M = ca on every 2,5 cm; decrease as explained under DECREASE TIP , ie work until 3 sts remain before marker and decrease as shown in this video - the pattern will not match anymore at the transitions between rounds, that's just okay. Happy knitting!
21.02.2022 - 09:58
![]() Vale hat geschrieben:
Vale hat geschrieben:
I'm sorry to ask but: I don't understand how to decrease every 2,5 cm, if I have a pattern? If I decrease, the pattern will be deformed... also, what decrease I should do? (2 tog?) how? This is the pattern I'm referring: "When A.2 has been worked, continue with A.3. NOTE: Adjust pattern so that the middle st in diagram (see arrow) is one of the 2 middle sts on sleeve, AT THE SAME TIME beg dec under sleeve - remember DECREASE TIP" Thank you...seems difficult without a chart.
20.02.2022 - 00:29
![]() Vale hat geschrieben:
Vale hat geschrieben:
Sorry, I have problems again in the instructions " When A.2 has been worked, continue with A.3. NOTE: Adjust pattern so that the middle st in diagram (see arrow) is one of the 2 middle sts on sleeve, AT THE SAME TIME beg dec under sleeve - remember DECREASE TIP. Repeat dec every 3-2½-2½-2½-2½-2½ cm / 1 1/8"-7/8"-7/8"-7/8"-7/8"-7/8" 9-12-12" etc . I don't also understand how to adjust "pattern so that the middle st in diagram is one of the 2 middle". what mean? Please..help...
19.02.2022 - 15:30DROPS Design hat geantwortet:
Dear Vale, this lesson will explain you how to center a diagram. Happy knitting!
21.02.2022 - 09:17
![]() Pattern hat geschrieben:
Pattern hat geschrieben:
Sorry again but I don't understand the previously answer, in your comment says "you should increase a total of 60 sts in size L and get so 228", but I don't know what increase of 60 stitches is it exactly? Thank you again....
01.02.2022 - 17:29DROPS Design hat geantwortet:
Oops sorry, I mistyped, I meant you have 204 sts on the needle in size L - you now increase 24 sts evenly (this lesson explains how to increase evenly on a round), there are now 228 sts and you will repeat K2, P2 all the round - US-pattern will be edited asap. Happy knitting!
02.02.2022 - 07:34
![]() Patterns Difficult hat geschrieben:
Patterns Difficult hat geschrieben:
Hello, this pattern have a mistake in the Body instructions. Yesterday I had to try and try. I have 230 stitches and it says to "Continue to work rib as follows: * K 2, P 2 *, repeat from *-* until 2 sts remain, K 2. When rib has been worked for 4 cm / 1½'', bind off with K over K and P over P." But with 230 stitches, it will end with 2Kand start with 2K so I will have 4 K between the others 2k p2 2k p2 etc. What happened? Why 230 stitches?It's not an Even number to do ribbing...Thanks..
01.02.2022 - 12:22DROPS Design hat geantwortet:
Hi, it looks like there is a mistake in the US-English pattern, you should increase a total of 60 sts in size L and get so 228 sts and work K2 P2 over these 228 sts (= 57 times (K2,P2). thanks for noticing. Happy knitting!
01.02.2022 - 16:13
![]() Karine hat geschrieben:
Karine hat geschrieben:
Koon L suurust. Siis kui on vaja kududa varrukale mustrit A4 (5silmust) on silmuseid 48 3 simust jääb üle kuidas neid kududa?
03.01.2022 - 19:49DROPS Design hat geantwortet:
Tere Karine! Koo nii palju silmuseid mustrisse, kui mahub, ülejäänud nii, kuidas ilusam jääb. Head kudumist!
07.01.2022 - 21:55
![]() Val hat geschrieben:
Val hat geschrieben:
Sorry , I have to ask again, is it sure that decrease is "work until 3 sts remain before the marker this: K2 tog, K1, slip marker, K1, slip 1 as if to K, K1, psso, and work until 3 sts remain before next marker on the other side of the jumper and repeat the decrease.”" I see that in the psso passage, Should not be simply : slip marker, K1, slip 1 as if to K , and psso? Why K1 is repeated 2 times? the video tutorial says this only (not 2 times k2) : K1, slip 1 psso
14.12.2021 - 18:16DROPS Design hat geantwortet:
Dear Val, when working body you will decrease a total of 4 stitches on the round (= 2 sts decreased at each marker) / when working sleeve you will decrease that way only 2 sts (only 1 marker, mid under sleeve). Happy knitting!
15.12.2021 - 08:25
![]() Val hat geschrieben:
Val hat geschrieben:
Sorry >
14.12.2021 - 18:13
![]() Val hat geschrieben:
Val hat geschrieben:
Hello,I was able to adjust everything.I'm now again the beginning of the round, before start the dec tip. So, I hope this time I 've understood well: So I have to: knit the first 12 stitches, but before reach the first stitch marker of the round, 3 stitches before, I have to “work until 3 sts remain before the marker, K2 tog, K1, slip marker, K1, slip 1 as if to K, K1, psso, and work until 3 sts remain before next marker on the other side of the jumper and repeat. Right? Thank you again!
14.12.2021 - 17:43DROPS Design hat geantwortet:
Dear Val, looks right, I'm just wondering about the first 12 stitches, rounds were worked on yoke from mid back, so that you continue from mid back towards the side, and then work until 3 sts remain before 1st marker on the side and decrease etc.. But if you could find the sides of the jumper, it looks then fine, as the decreases are worked on each side (below sleeves). Happy knitting!
15.12.2021 - 07:55
|
||||||||||
Silver Stag#silverstagsweater |
||||||||||
 |
 |
|||||||||
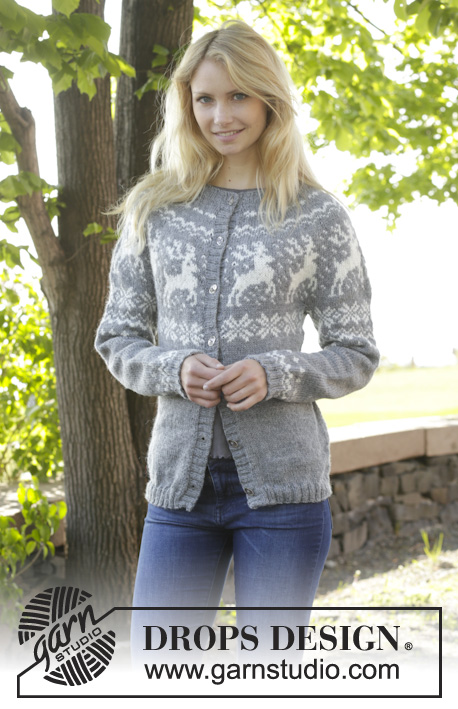
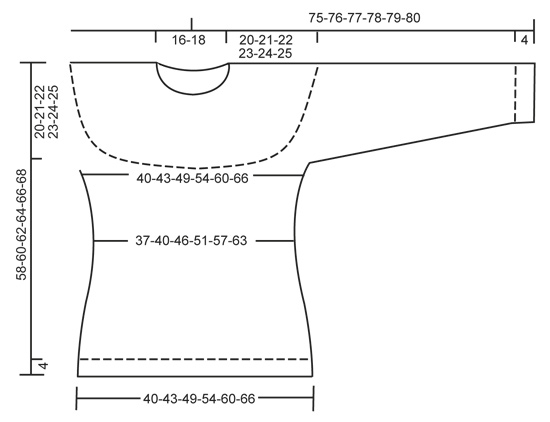
Von oben nach unten gestrickter Pullover mit Wintermotiv / Weihnachtspullover mit Rundpasse und Rentieren / Norwegermuster in DROPS Karisma. Größe S - XXXL.
DROPS 157-23 |
||||||||||
|
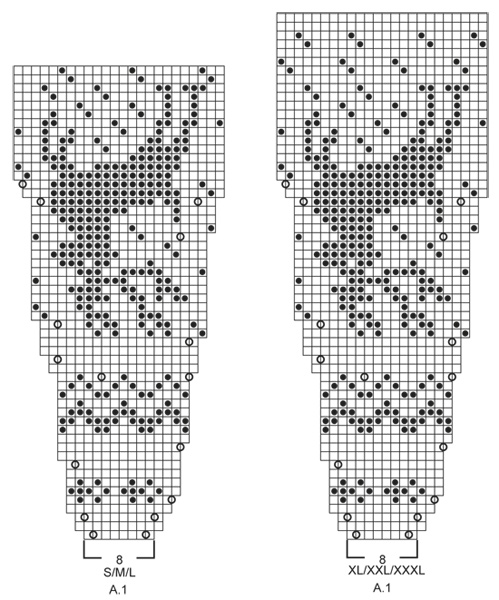
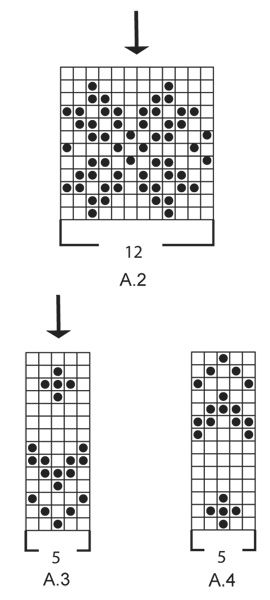
MUSTER: Siehe Diagramme A.1- A.4. Die Diagramme zeigen alle Muster-Rd von der Vorderseite. Das ganze Muster wird glatt re gestrickt. ABNAHMETIPP (gilt für die Seiten und die Ärmel): Vor dem Markierer und 1 Rechts-M wie folgt abnehmen: 2 M re zusammenstricken. Nach dem Markierer und 1 Rechts-M wie folgt abnehmen: 1 M wie zum Rechtsstricken abheben, 1 M re, die abgehobene M überziehen. ZUNAHMETIPP (gilt für die Seiten): Es werden in der Rd insgesamt 4 M zugenommen. Stricken bis noch 1 M vor dem Markierer übrig ist, 1 Umschlag, 2 M glatt re (der Markierer liegt dazwischen), 1 Umschlag (= 2 M zugenommen). In der nächsten Rd die Umschläge re verschränkt stricken (d.h. in das hintere M-Glied einstechen statt in das vordere), um Löcher zu vermeiden. ---------------------------------------------------------- PULLOVER: Der Pullover wird in Runden von OBEN nach UNTEN gestrickt. Die Ärmel werden in Rd auf dem Nadelspiel angestrickt. RUNDPASSE: 88-92-96-100-104-108 M auf Rundnadel Nr. 3 mit Farbe mittelgrau anschlagen. Für das Bündchen 3 cm im Rippenmuster (= 2 M li, 2 M re im Wechsel) stricken. Zu Rundnadel Nr. 4 wechseln und 1 Rd re stricken, dabei GLEICHZEITIG 0-4-8-20-24-28 M gleichmäßig verteilt zunehmen (= 88-96-104-120-128-136 M). Ab der nächsten Rd Muster A.1 (= 8 M) 11-12-13-15-16-17 x in der Breite stricken. MASCHENPROBE BEACHTEN! Wenn A.1 1 x in der Höhe gestrickt wurde, sind 264-288-312-360-384-408 M auf der Nadel. 3-5-9-5-7-11 Rd glatt re mit Mittelgrau stricken. BITTE BEACHTEN: In Gr. S, L, XL, XXXL die Rd vor den letzten 24 M (= 1 Rapport) beenden, hier ist nun der neue Rd-Beginn! Auf diese Weise wird das Muster nach der Aufteilung der M für Ärmel und Rumpfeil richtig platziert. Die nächste Rd wie folgt: Die ersten 37-40-46-52-58-64 M stricken (= halbes Rückenteil), die nächsten 58-64-64-76-76-76 M stilllegen (= Ärmel), 10 neue M unter dem Arm anschlagen, 1 Markierer in der Mitte dieser 10 M anbringen (= Seitenmarkierer), die nächsten 74-80-92-104-116-128 M stricken (= Vorderteil), die nächsten 58-64-64-76-76-76 M stilllegen (= Ärmel), 10 neue M unter dem Arm anschlagen, 1 Markierer in der Mitte dieser 10 M anbringen (= Seitenmarkierer), die restlichen 37-40-46-52-58-64 M stricken (= halbes Rückenteil). RUMPFTEIL: Nun sind 168-180-204-228-252-276 M für das Rumpfteil auf der Nadel. Im Muster A.2 (= 12 M) über alle M der Rd stricken. Wenn A.2 1 x in der Höhe gestrickt wurde, wird die Arbeit glatt re mit Mittelgrau weitergestrickt. In der nächsten Rd für die Seitenschrägung beidseitig jedes Markierers an den Seiten des Pullovers je 1 M abnehmen – ABNAHMETIPP lesen! Diese Abnahmen alle 2 cm noch weitere 2 x wdh (= 156-168-192-216-240-264 M). Bei einer Gesamtlänge von 12-13-14-15-16-17 cm ab den neuen M unter den Armen beidseitig jedes Markierers je 1 M zunehmen – ZUNAHMETIPP lesen! Diese Zunahmen alle 2 cm noch weitere 2 x wdh (= 168-180-204-228-252-276 M). Bei einer Gesamtlänge von 56-58-60-62-64-66 cm zu Rundnadel Nr. 3 wechseln und 20-24-24-28-28-32 M gleichmäßig verteilt zunehmen (= 188-204-228-256-280-308 M). Nun das Bündchen im Rippenmuster wie folgt stricken: * 2 M re, 2 M li *, von *-* wdh. Wenn das Bündchen eine Länge von 4 cm hat, die M abketten, wie sie erscheinen (d.h. re M re und li M li abketten). ÄRMEL: Die stillgelegten 58-64-64-76-76-76 M des einen Ärmels auf Nadelspiel Nr. 4 legen. 1 R glatt re stricken und am Ende der R 10 neue M unter dem Arm anschlagen (= 68-74-74-86-86-86 M). In der Mitte dieser neuen M 1 Markierer anbringen (= untere Ärmelmitte). Nun in Rd im Muster A.2 weiterstricken, dabei BITTE BEACHTEN: das Muster so abzählen, dass die 2 mittleren M im Diagramm (siehe Pfeil) die beiden mittleren M oben auf dem Ärmel sind! Nachdem A.2 1 x in der Höhe gestrickt wurde, im Muster A.3 stricken, dabei BITTE BEACHTEN: das Muster so abzählen, dass die mittlere M des Diagramms (siehe Pfeil) eine der 2 mittleren M oben auf dem Ärmel ist! GLEICHZEITIG in der 1. Rd von A.3 mit den Abnahmen an der unteren Ärmelmitte beginnen - ABNAHMETIPP lesen. Diese Abnahmen alle 3-2½-2½-2½-2½-2½ cm noch weitere 9-12-12-12-12-12 x wdh (= 48-48-48-60-60-60 M). Nachdem A.3 1 x in der Höhe gestrickt wurde, mit Mittelgrau weiterstricken. Bei einer Länge des Ärmels von 38 cm im Muster A.4 stricken. BITTE BEACHTEN: Das Muster so abzählen, dass die mittlere M im Diagramm (siehe Pfeil) eine der 2 mittleren M oben auf dem Ärmel ist! Wenn A.4 1 x in der Höhe gestrickt wurde, zu Nadelspiel Nr. 3 wechseln und 1 Rd re stricken, dabei gleichzeitig 4-8-8-0-4-4 M gleichmäßig verteilt zunehmen (= 52-56-56-60-64-64 M). Dann das Bündchen im Rippenmuster (= 2 M re, 2 M li im Wechsel) in Mittelgrau stricken, bis es 3 cm misst. Die M abketten, wie sie erscheinen. FERTIGSTELLEN: Die Öffnungen unter den Armen schließen. |
||||||||||
Erklärungen zum Diagramm |
||||||||||
|
||||||||||
 |
||||||||||
 |
||||||||||
 |
||||||||||
Haben Sie diese Anleitung nachgearbeitet?Dann taggen Sie Ihre Fotos mit #dropspattern #silverstagsweater oder schicken Sie sie an die #dropsfan Galerie Brauchen Sie Hilfe bei dieser Anleitung?Sie finden 25 Videotutorials, einen Kommentar/Fragen-Bereich und vieles mehr, wenn sie die Anleitung bei garnstudio.com aufrufen. © 1982-2026 DROPS Design A/S. Wir besitzen alle Rechte. Dieses Dokument, einschließlich aller Untersektionen, hat Urheberrechte. Mehr dazu, was Sie mit unseren Anleitungen machen können, finden Sie ganz unten auf der Seite zu jeder Anleitung. |
||||||||||


Mit über 40 Jahren Tätigkeit im Entwerfen von Strick- und Häkelmustern bietet Ihnen DROPS Design eine der umfangreichsten Sammlungen von kostenlosen Anleitungen im Internet - in 17 Sprachen übersetzt. Zum jetzigen Zeitpunkt haben wir insgesamt 324 Handarbeitshefte und 12290 Anleitungen auf Deutsch. 12202
Unser Ziel ist es, Ihnen die besten Angebote zum Stricken und Häkeln, Inspirationen und Ratschläge sowie qualitativ hochstehende Garne zu unglaublichen Preisen zu bieten! Möchten Sie unsere Anleitungen nicht nur für den persönlichen Gebrauch nutzen? Unsere Copyright Bedingungen finden Sie bei allen unseren Anleitungen ganz unten auf der jeweiligen Seite. Viel Spaß beim Handarbeiten!
Kommentieren Sie die Anleitung DROPS 157-23
Wir würden gerne Ihre Meinung zu diesem Modell erfahren!
Wenn Sie eine Frage stellen möchten, prüfen Sie bitte, dass Sie die richtige Kategorie im unten stehenden Formular gewählt haben - so bekommen Sie schneller eine Antwort. Die obligatorischen Felder sind mit einem * gekennzeichnet.