
Beliebte Kategorien
Suchen Sie nach einem Garn?


Kommentare / Fragen (254)
![]() Princey hat geschrieben:
Princey hat geschrieben:
I am having trouble with the diagram for knit pattern Butterfly Dream Shawl. How much of it should be M.1. Do I start at the bottom and go up? The diagram is confusing. Are there written instructions for the whole pattern? Any help you can give me I would appreciate, big time!!! Thanks, Princey
29.05.2014 - 21:18Julia hat geschrieben:
Ein schönes tuch und einfach zu stricke. ich habe mir die rapporte sowie die mitte der rapporte mit maschenmarkierern bestückt, so muss man nicht soviel überlegen....
28.04.2014 - 14:19
![]() Martha hat geschrieben:
Martha hat geschrieben:
Thank you for your patience with me. Your young lady Amber, in the San Luis Obispo store, also took the time to help me with the same explanation. For some reason, it was not getting through to me. I will now happily continue on making your beautiful shawl. With much gratitude, Martha Adkins in sunny California.
27.03.2014 - 15:42
![]() Martha hat geschrieben:
Martha hat geschrieben:
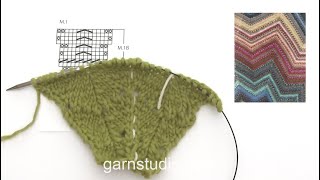
Thank you for the video. I had no problem following the pattern to this point in the video I have 129 stitches on the needles. It is the next set (starting at the "M.1B section) that I don't understand. How do I knit a 12 stitch pattern into a 16 stitch pattern and come out with equal sections. I get 10 repeats of 12 stitches with 9 left at the end of the row. Is there a video for continuing to the second set of M.1B? Martha
26.03.2014 - 13:58DROPS Design hat geantwortet:
Dear Martha, the video below shows how to work M.1B. For each time you work row 6 and row 10 with 2 times "K2 into 1 st" after each other you will get an additional K stitch on each side of inc in the middle of the repeat. Happy knitting!
26.03.2014 - 15:13
![]() Maria Säflund hat geschrieben:
Maria Säflund hat geschrieben:
Förstår inte fortsättningen efter att jag fått de 129 maskorna att stämma. Hur går jag vidare härifrån?
27.02.2014 - 16:52
![]() Maria Säflund hat geschrieben:
Maria Säflund hat geschrieben:
Förstår inte fortsättningen efter att jag fått de 129 maskorna att stämma. Hur går jag vidare härifrån?
27.02.2014 - 16:35
![]() Rina hat geschrieben:
Rina hat geschrieben:
Grazie per l'aiuto e' stato utilissimo ma spieghiamo che il diagramma cambia
14.02.2014 - 20:24DROPS Design hat geantwortet:
Buongiorno Rina, siamo contente che sia riuscita a risolvere il suo problema, in ogni caso nelle istruzioni è indicato che il n° di m nel diagramma M.1b cambia a ogni giro. Buon lavoro!
15.02.2014 - 11:44
![]() Rina hat geschrieben:
Rina hat geschrieben:
Potreste aiutarmi a proseguire non coincidono i punti nel 2 ferro di m1b
13.02.2014 - 21:22DROPS Design hat geantwortet:
Buongiorno Rina. Dopo ogni M.1b aumentano il n° di m per ogni “spicchio” dello scialle, ma gli spicchi restano sempre 8. Prenda come riferimento le 2 m centrali di ogni ripetizione. Ogni volta che lavora M.1b dovrà lavorare 2 m a maglia rasata in più prima delle 2 m centrali e 2 m a maglia rasata in più dopo le 2 m centrali. Ingrandire la fotografia del modello potrebbe aiutarla. Ci riscriva se non è chiaro.Buon lavoro!
14.02.2014 - 12:49
![]() Rina Leggio hat geschrieben:
Rina Leggio hat geschrieben:
Sono arrivata alla fine del diagramma cioe'129 m poi ho fatto il 2 ferro di m1b al ferro successivo mi mancano 4 m c'e'qualche spiegazione che non funziona perche 129 diviso 12 non si puo' fare aiutatemi se no non riesco ad andare avanti grazie
13.02.2014 - 20:20DROPS Design hat geantwortet:
Buongiorno Rina. Dopo ogni M.1b aumentano il n° di m per ogni “spicchio” dello scialle, ma gli spicchi restano sempre 8. Prenda come riferimento le 2 m centrali di ogni ripetizione. Ogni volta che lavora M.1b dovrà lavorare 2 m a maglia rasata in più prima delle 2 m centrali e 2 m a maglia rasata in più dopo le 2 m centrali. Ingrandire la fotografia del modello potrebbe aiutarla. Ci riscriva se non è chiaro.Buon lavoro!
14.02.2014 - 12:50
![]() Elin hat geschrieben:
Elin hat geschrieben:
Jeg synes det er træls at der ikke er lud på jeres videoer
07.02.2014 - 18:14
|
||||||||||||||||
Butterfly Dream#butterflydreamshawl |
||||||||||||||||
|
|
||||||||||||||||
DROPS Dreiecktuch in “Delight”
DROPS 133-1 |
||||||||||||||||
|
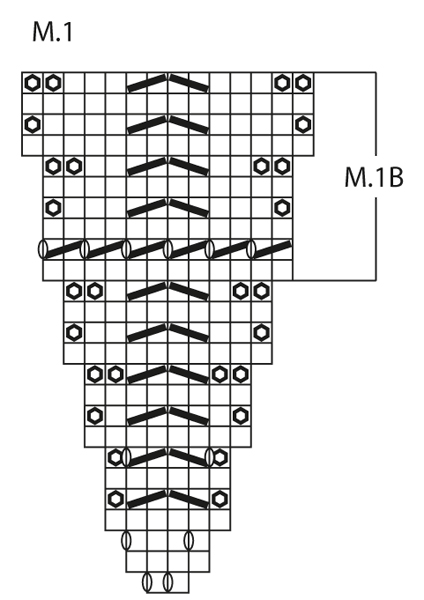
STREIFEN: 50 gr. hell blau mix, 50 gr. türkis/lila mix, 50 gr. lila/grün mix, 50 gr. beige/grau/rosa mix und 50 gr. beige/blau mix. MUSTER: Siehe Diagramm. Das Diagramm zeigt die Hin- und die Rückreihen von der Vorderseite. --------------------------------------------------------- TUCH: Die Arbeit wird auf einer Rundnadel hin und zurück gestrickt. Mit Delight auf Rundnadel Nr. 4, 17 M. anschlagen und auf der Rückseite 1 R. li. stricken. Weiter M1 mit den Streifen von der Vorderseite wie folgt stricken: 1. R. (Vorderseite): *1 re., 1 Umschlag, 1 re., 1 Umschlag, Markierung *, von *-* wiederholen und mit 1 M. glatt abschliessen (= 8 Markierungen zwischen den Rapporten). 2. R. und alle weiteren Runden von der Rückseite: alle M. und die Umschläge li. stricken. 3. R.: *1 re., 1 Umschlag, 3 re., 1 Umschlag*, von *-* wiederholen und mit 1 M. glatt abschliessen. 5. R.: * 2 re. in 1 M, 1 M. re. abheben, 1 re., die abgehobene über die gestrickte ziehen, 2 re. zusammen, 2 re. in 1 M.* von *-* wiederholen und mit 1 M. glatt abschliessen. 7. R.: *2 re. in 1 M, 1 Umschlag, 1 M. re. abheben, 1 re., die abgehobene über die gestrickte ziehen, 2 re. zusammen, 1 Umschalg, 2 re. in 1 M.* von *-* wiederholen und mit 1 M. glatt abschliessen. M1 1 Mal in der Höhe stricken. Weiter M1B wiederholen (beim wiederholen von M1B wird die Maschenzahl zwischen den Aufnahmen auf der Seite des Rapports und den Abnahmen in der Mitte des Rapportes erhöht). Bis zur gewünschten Länge weiterstricken. Mit einer 2. R. in M1B abschliessen (d.h. eine R. mit Lochmuster). 1 R. re. auf der Rückseite stricken. Danach re. auf der Vorderseite abk. Einen Faden durch die M. an der Anschlagskante ziehen und zusammenziehen. |
||||||||||||||||
Erklärungen zum Diagramm |
||||||||||||||||
|
||||||||||||||||
 |
||||||||||||||||
Haben Sie diese Anleitung nachgearbeitet?Dann taggen Sie Ihre Fotos mit #dropspattern #butterflydreamshawl oder schicken Sie sie an die #dropsfan Galerie Brauchen Sie Hilfe bei dieser Anleitung?Sie finden 6 Videotutorials, einen Kommentar/Fragen-Bereich und vieles mehr, wenn sie die Anleitung bei garnstudio.com aufrufen. © 1982-2026 DROPS Design A/S. Wir besitzen alle Rechte. Dieses Dokument, einschließlich aller Untersektionen, hat Urheberrechte. Mehr dazu, was Sie mit unseren Anleitungen machen können, finden Sie ganz unten auf der Seite zu jeder Anleitung. |
||||||||||||||||


Mit über 40 Jahren Tätigkeit im Entwerfen von Strick- und Häkelmustern bietet Ihnen DROPS Design eine der umfangreichsten Sammlungen von kostenlosen Anleitungen im Internet - in 17 Sprachen übersetzt. Zum jetzigen Zeitpunkt haben wir insgesamt 324 Handarbeitshefte und 12272 Anleitungen auf Deutsch. 12184
Unser Ziel ist es, Ihnen die besten Angebote zum Stricken und Häkeln, Inspirationen und Ratschläge sowie qualitativ hochstehende Garne zu unglaublichen Preisen zu bieten! Möchten Sie unsere Anleitungen nicht nur für den persönlichen Gebrauch nutzen? Unsere Copyright Bedingungen finden Sie bei allen unseren Anleitungen ganz unten auf der jeweiligen Seite. Viel Spaß beim Handarbeiten!
Kommentieren Sie die Anleitung DROPS 133-1
Wir würden gerne Ihre Meinung zu diesem Modell erfahren!
Wenn Sie eine Frage stellen möchten, prüfen Sie bitte, dass Sie die richtige Kategorie im unten stehenden Formular gewählt haben - so bekommen Sie schneller eine Antwort. Die obligatorischen Felder sind mit einem * gekennzeichnet.