
Catégories populaires
Vous cherchez un fil?


Commentaires / Questions (99)
![]() Yannick a écrit:
Yannick a écrit:
Bonjour (modèle petronella top - laine muskat) je ne comprends pas comment faire les augmentations du raglan en même temps que le motif A1 merci de m'expliquer - en effet je fais un jeté une maille endroit - une maille endroit et un jeté pour le motif A1 de la manche - comment puis-je alors faire une augmentation pour le raglan ?
24.08.2017 - 09:47DROPS Design a répondu:
Bonjour Yannick, vous n'allez pas augmenter pour le devant/le dos et les manches en même temps, par ex en taille S, on augmente 12x tous les 2 tours et 7x tous les 4 tours pour le devant/le dos mais 18x tous les 2 tours et 4 x tous les 4 tours pour les manches. Ainsi, les 12 premières augmentations seront sur chaque pièce (= manches + dos/devant), mais par la suite, vous augmenterez soit uniquement sur les manches (4 augm par tour), soit partout (8 augm par tour). Comment augmenter mailles pour le reglan tandis que l’on fait le schemat A.1 sur les manches, consulter la partie apres les fournitures entitulee REGLAN. Bon tricot!
24.08.2017 - 09:58Genevieve a écrit:
Hi. I've read some of the questions and answers and have figured out the pattern and increases. 😉
16.08.2017 - 04:06Genevieve a écrit:
And for chart A.2, for the 2nd row of k2together followed by 1 yarn over, for the increase round, I've started with marker thread, k1, yarn over followed by k2together, yarn over (8 times) and left with 1 stitch. Which means after the pattern yo, I yarn over again followed by k1 marker thread?
14.08.2017 - 07:24Genevieve a écrit:
I don't quite get the instruction for chart A.1 and A.2. I'm knitting for S size and I need to do the increase for sleeves 23 times. I worked chart A.1 1 time in height is 6 rows and chart A.2 in height is 8 rows. After that do I just knit all around till I reached the 23rd increases? Or I continue with A.2?
14.08.2017 - 00:46DROPS Design a répondu:
Hello Genevieve. You continue working A.2 during all the increases. Please remember that after the next to last increase on the sleeve (there are 4 rounds left), you must work the stitches on each sleeve in garter stitch. Happy knitting!
20.08.2017 - 18:08Genevieve a écrit:
I'm now at the beginning raglan increase and I'm stuck on the sleeves increase instruction. I've started with knit till 1 stitch before 1st marker thread, I've also made the yarn over, knit 1 and marker thread. After that I'll follow A.1 which is purl 10 for sleeves? If yes, how do I increase stitches on the sleeves now?
12.08.2017 - 06:39DROPS Design a répondu:
Hi Genevieve, You also need to increase after the marker - Knit 1, 1 yarn over. Do the same at all markers and you will have increases to raglan both on body and sleeves. On the next round knit all yarn overs so that you get holes. Happy knitting!
12.08.2017 - 07:57Genevieve a écrit:
Hi. I've just increased the stitches after the 4th round from the beginning. Do I knit 1 round followed by Raglan increase since the Raglan increase is from 2nd round onwards?
10.08.2017 - 17:44DROPS Design a répondu:
Hi Genevieve, Yes you knit 1 round between each round with increases to raglan on the body. On the sleeves you are increasing every 2nd round, but are working A.2 (while increasing alternate rounds). I hope this helps and happy knitting!
11.08.2017 - 07:10
![]() Bodil Jensen a écrit:
Bodil Jensen a écrit:
Ang. de 20 masker der skal tages ud i halsen. Er det korrekt at der skal tages ud på pind. 4 - dvs. en vrang pind, der efterfølges af ret (første raglan pind)? Hviken teknink tages der ud med? - Jeg har prøvet forskellige og udtagningerne blev desværre meget tydelige på næste pind. Mvh Bodil
29.07.2017 - 10:13DROPS Design a répondu:
Hej Bodil, ja du tager ud på 4.omgang som er vrang, her strikker du 2 vrang i samme maske, 1 i forreste maskeled og 1 i bagerste maskeled. God fornøjelse!
17.08.2017 - 15:48
![]() Virginia a écrit:
Virginia a écrit:
I think my question was not well put. What I see now for RAGLAN increases is that you do one height of A.1 (6 rows) increasing every 2nd row then move on to A.2 and increase every 2nd row until you have reached the number of 2nd row increases (27 times for L). THEN you do the 2nd paragraph - 4th row increases which are listed as Round 1-4 (2 times for L). When do you do the third paragraph "Increase as follows after the marker thread:" showing Rounds 1-4?
28.07.2017 - 18:15DROPS Design a répondu:
Dear Virginia, after you have inc every 2nd row, inc every 4th row: after the marking thread (= 3rd paragraph, ie at the beg of the sleeve) and before marking thread (= 2nd paragraph, ie at the end of the sleeve). Happy knitting!
31.07.2017 - 09:15Virginia a écrit:
I think my question was not well put. What I see now for RAGLAN increases is that you do one height of A.1 (6 rows) increasing every 2nd row then move on to A.2 and increase every 2nd row until you have reached the number of 2nd row increases (27 times for L). THEN you do the 2nd paragraph - 4th row increases which are listed as Round 1-4 (2 times for L). When do you do the third paragraph "Increase as follows after the marker thread:" showing Rounds 1-4
28.07.2017 - 16:55Virginia a écrit:
Thank you regarding A.3. Reading the pattern under RAGLAN in the first paragraph it says to "Increase every 2nd rounds as follows:" (27 times for L) and in the second paragraph it says "Increase every 4th round as follows:" (2 times for L). Then in the 3rd paragraph it says "Increase as follows, after the marker thread:" Is this 3rd paragraph referring to increases after you complete A.1 and A.2 once - 14 rows total? Yes?
28.07.2017 - 13:33DROPS Design a répondu:
Dear Virginia, under "RAGLAN" you are explained how to inc every 2nd round: first before the marking thread (at the end of each sleeve/front/back piece) then after the marking thread: at the beg of sleeve/front/back piece. Same when dec every 4th round: first how to inc before the marking thread, then how to inc after the marking thread. When A.1 has been worked 1 time in height, repeat A.2 in height until end of sleeve. Happy knitting!
28.07.2017 - 14:26
|
|||||||||||||
Petronella Top#petronellatop |
|||||||||||||
|
|
|||||||||||||
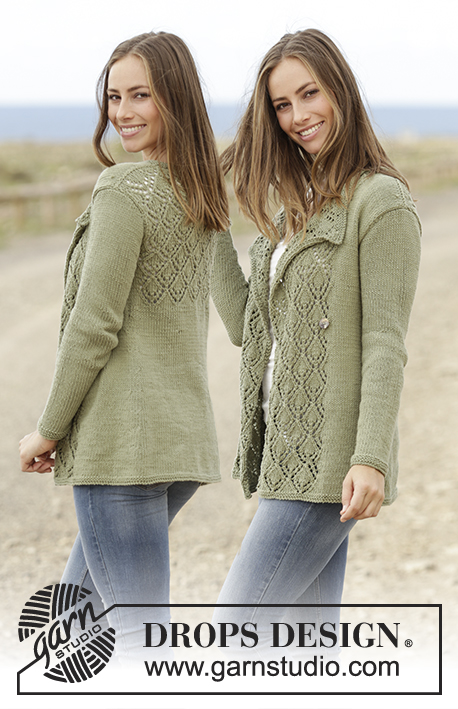
Top tricoté de haut en bas, avec raglan et point ajouré, en DROPS Muskat. Du S au XXXL.
DROPS 175-32 |
|||||||||||||
|
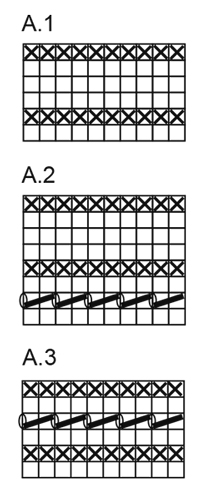
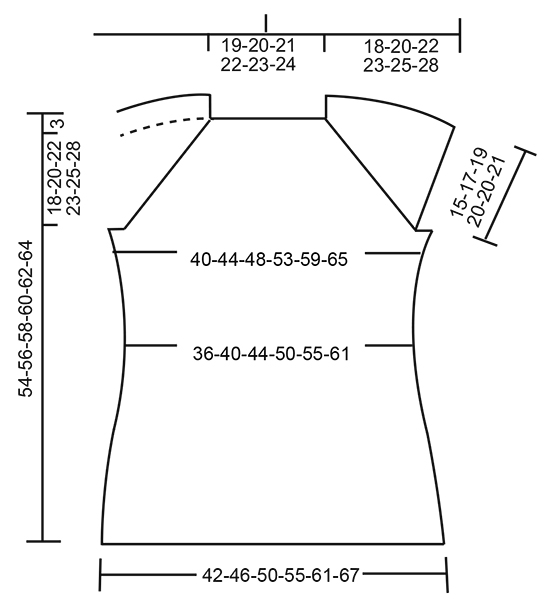
POINT MOUSSE (en rond): 1 côte mousse = 2 tours. Tricoter 1 tour endroit et 1 tour envers. POINT FANTAISIE: Voir les diagrammes A.1, A.2 et A.3. Les diagrammes montrent tous les rangs du motif, vus sur l'endroit. RAGLAN: Augmenter tous les 2 tours ainsi: Augmenter ainsi avant le fil marqueur: En commençant 1 maille avant le fil marqueur: Faire 1 jeté, 1 maille endroit, fil marqueur. Augmenter ainsi après le fil marqueur: Fil marqueur, 1 maille endroit, faire 1 jeté. Au tour suivant, tricoter les jetés à l'endroit, ils formeront des trous. Augmenter tous les 4 tours ainsi: Augmenter ainsi avant le fil marqueur: TOUR 1: En commençant 1 maille avant le fil marqueur: Faire 1 jeté, 1 maille endroit, fil marqueur. TOUR 2: Tricoter les jetés à l'endroit, ils formeront des trous. TOUR 3: En commençant 3 mailles avant le fil marqueur, tricoter: 2 mailles ensemble à l'endroit, faire 1 jeté, 1 maille endroit, fil marqueur. Pas d'augmentations, mais le motif ajouré continue comme avant. TOUR 4: Tricoter les jetés à l'endroit, ils formeront des trous. Augmenter ainsi après le fil marqueur: TOUR 1: Fil marqueur, 1 maille endroit, faire 1 jeté. TOUR 2: Tricoter les jetés à l'endroit, ils formeront des trous. TOUR 3: Fil marqueur, 1 maille endroit, faire 1 jeté, glisser 1 maille à l'endroit, 1 maille endroit, passer la maille glissée par-dessus la maille tricotée. Pas d'augmentations, mais le rang ajouré continue comme avant. TOUR 4: Tricoter les jetés à l'endroit, ils formeront des trous. DIMINUTIONS: En commençant 3 mailles avant le fil marqueur, tricoter: 2 mailles ensemble à l'endroit, 2 mailles endroit (le fil marqueur se trouve entre ces 2 mailles), glisser 1 maille à l'endroit, 1 maille endroit, passer la maille glissée par-dessus la maille tricotée = 2 mailles diminuées. AUGMENTATIONS: Tricoter jusqu'à ce qu'il reste 1 maille avant le fil marqueur. Faire 1 jeté, tricoter 2 mailles endroit (le fil marqueur se trouve entre ces 2 mailles) et faire 1 jeté. Au tour suivant, tricoter les jetés torse à l'endroit pour éviter les trous (les augmentations se tricotent en jersey). --------------------------------------------------------- TOP: Se tricote en rond, sur aiguille circulaire à partir du milieu dos, de haut en bas. EMPIÈCEMENT: Monter 80-84-88-92-96-100 mailles avec l'aiguille circulaire 4 en Muskat. Tricoter 2 CÔTES MOUSSE – voir ci-dessus, en augmentant au dernier tour des côtes mousse 20 mailles à intervalles réguliers = 100-104-108-112-116-120 mailles. Placer 4 fils marqueurs ainsi: le 1er fil marqueur après 19-20-21-22-23-24 mailles (= demi-dos), le 2ème fil marqueur après 12 mailles (= manche), le 3ème fil marqueur après 38-40-42-44-46-48 mailles (= devant), le 4ème fil marqueur après 12 mailles (= manche), il reste 19-20-21-22-23-24 mailles après le dernier fil marqueur (= demi-dos). Commencer à augmenter pour le RAGLAN comme expliqué ci-dessus et tricoter les mailles du dos et du devant en jersey et celles des manches en A.1. LIRE ATTENTIVEMENT LA SUITE AVANT DE CONTINUER! Les augmentations se font à un rythme différent sur le devant et le dos et sur les manches ainsi: DEVANT/DOS: Augmenter 12-15-17-25-30-35 fois tous les 2 tours, et 7-7-7-4-3-2 fois tous les 4 tours. MANCHES: Augmenter 18-23-27-29-26-25 fois tous les 2 tours, et 4-3-2-2-5-7 fois tous les 4 tours. Quand A.1 a été tricoté 1 fois en hauteur, répéter A.2 en hauteur. Les augmentations des manches se tricotent en point fantaisie au fur et à mesure. Après l'avant-dernière augmentation des manches (il reste encore 4 tours), tricoter les mailles des manches au point mousse, continuer les mailles du devant/dos en jersey comme avant. BIEN CONSERVER LA MÊME TENSION QUE POUR L'ÉCHANTILLON! Quand toutes les augmentations du raglan sont faites, on a 264-296-320-352-372-396 mailles. Tricoter le tour suivant ainsi: 38-42-45-51-56-61 mailles (= demi-dos), rabattre les 56-64-70-74-74-76 mailles suivantes, tricoter les 76-84-90-102-112-122 mailles suivantes (= devant), rabattre les 56-64-70-74-74-76 mailles suivantes, tricoter les 38-42-45-51-56-61 mailles suivantes (= demi-dos). DOS & DEVANT: Continuer ainsi: tricoter le demi-dos, monter 8-8-10-10-12-14 mailles, tricoter le devant, monter 8-8-10-10-12-14 mailles, tricoter le demi-dos. On a maintenant 168-184-200-224-248-272 mailles. Placer un fil marqueur de chaque côté, au milieu des nouvelles mailles montées. MESURER DÉSORMAIS L'OUVRAGE À PARTIR D'ICI!. Continuer en jersey, mais tricoter 2 côtes mousse sur les 8-8-10-10-12-14 nouvelles mailles sur les côtés, et tricoter ensuite en jersey sur toutes les mailles. Quand l'ouvrage mesure 4 cm, diminuer 1 maille de chaque côté des fils marqueurs (= 4 mailles diminuées), diminuer 4 fois au total tous les 3 cm – VOIR DIMINUTIONS = 152-168-184-208-232-256 mailles. Quand l'ouvrage mesure 19-19-19-18-18-19 cm, augmenter 1 maille de chaque côté des fils marqueurs (= 4 augmentations), augmenter 6 fois au total tous les 2 cm – VOIR AUGMENTATIONS = 176-192-208-232-256-280 mailles. Quand l'ouvrage mesure 32-32-32-33-33-32 cm, tricoter A.3 sur toutes les mailles. Rabattre ensuite à l'endroit, l'ouvrage mesure environ 54-56-58-60-62-64 cm depuis l'épaule. |
|||||||||||||
Légende diagramme(s) |
|||||||||||||
|
|||||||||||||
 |
|||||||||||||
 |
|||||||||||||
Vous avez terminé ce modèle?Alors taguez vos photos avec #dropspattern #petronellatop ou bien présentez-les dans la galerie #dropsfan Vous avez besoin d'aide pour ce modèle ?Vous trouverez 23 tutoriels vidéo, une rubrique commentaires/questions et plus encore en vous rendant sur la page du modèle sur garnstudio.com © 1982-2026 DROPS Design A/S. Tous droits réservés. Ce document, y compris ces sous-sections, est protégé par les droits d'auteur (copyright). Apprenez-en davantage sur ce que vous pouvez faire avec nos modèles en bas de chacune des pages de notre site. |
|||||||||||||


Avec plus de 40 ans dans la conception de modèles tricot et crochet, DROPS Design offre l'une des plus vastes collections de modèles gratuits sur internet - traduits dans 17 langues. À ce jour, on compte 324 catalogues et 12290 modèles en français.
Nous nous efforçons de vous apporter le meilleur de ce que le tricot et le crochet peuvent vous offrir, inspiration et conseils mais également des fils de haute qualité à des prix incroyables! Vous souhaiteriez utiliser nos modèles autrement que pour un usage personnel? Vous pouvez lire ce que vous êtes autorisés à faire dans le Copyright en bas de page de chacun de nos modèles. Bon tricot!
Poster un commentaire sur le modèle DROPS 175-32
Nous aimerions connaître votre avis sur ce modèle !
Si vous souhaitez poser une question, merci de bien vouloir vérifier que vous avez choisi la bonne catégorie dans le formulaire ci-dessous afin d'accélérer la réponse. Les champs obligatoires sont indiqués par une *.