
Catégories populaires
Vous cherchez un fil?


Commentaires / Questions (28)
![]() R N a écrit:
R N a écrit:
Hei! Teen XL kokoa. Ohjeissa on virhe kun kainaloista lähdetään jatkamaan alaspäin. Kuviot eivät täsmää. Voitteko auttaa?
05.07.2024 - 10:56DROPS Design a répondu:
Hei, etu-/takakappaleessa neulotaan mallineuletta piirroksen A.4 mukaisesti ja mallineule jatkuu siitä, mihin se kaarrokkeessa jäi. Mikäli neuletiheys täsmää, kaarroke on valmis, kun olet neulonut ylös piirrokseen kokosi nuolella merkittyyn kerrokseen.
05.07.2024 - 17:08
![]() Mary a écrit:
Mary a écrit:
But that’s precisely the problem! If I start the third line A4 from the underarm (the first stitch of the new round is basically the third stitch from the underarm) I get the mismatch because the triangle will be stitched earlier: I can’t understand where I am going wrong
09.04.2023 - 14:12DROPS Design a répondu:
Dear Mary, you need to adjust the stitches before starting the triangle. In this case, you need to simply knit stitches (not just the amount indicated in the pattern) so that the triangle won't be mismatched. The pattern under the arm may get slightly mismatched initially but that isn't important, since it will later on match correctly. Happy knitting!
10.04.2023 - 13:34
![]() Mary a écrit:
Mary a écrit:
Yes, I can see that the pattern is the same. But if I follow the instructions from A4 third line, I should start the "triangle" after 3 stitches of the body, while according to the stitches I have after the line with the arrow, A1, I should start the triangle after 5 stitches but this means that it will be "anticipated" hence the mismatch. Does it mean that I have not divided the garment accordingly? Many thanks and Happy Easter!
09.04.2023 - 11:09DROPS Design a répondu:
Dear Mary, take into account that you should have adjusted the start of the round in the body; you adjust so that the beginning of the round is in the middle stitch cast on under the sleeve. This should help adjust the pattern so that the triangle in A.4 won't get mismatched with the pattern in the yoke in A.1. Happy knitting!
09.04.2023 - 13:30
![]() Mary a écrit:
Mary a écrit:
Thanks! But I am still confused: the instructions say that the yoke is finished when I have 168 stitches (S size). If I had not knit the last row (the one with the arrow), I would not have got 168 stitches. In any case, once I have knit the row with the arrow, if I then start A4 from the third line I still get a mismatch in the pattern and I do not know where I get it wrong. Well, I know that I do something wrong while shifting from the yoke to the body but I can't figure out what.
07.04.2023 - 10:25DROPS Design a répondu:
Dear Mary, after having worked the row with the arrow, you should have knitted round, where you separated the stitches for each part of the garment. Then, you should start the body with the third row of A.4. There shouldn't be a mismatch there. You can check that the third row of A.4 is exactly like the third row in A.1 after the row with the arrow, so they should be matching. Hope this helps!
08.04.2023 - 20:58
![]() Mary a écrit:
Mary a écrit:
Thanks! But I am still confused: the instructions say that the yoke is finished when I have 168 stitches (S size). If I had not knit the last row (the one with the arrow), I would not have got 168 stitches. In any case, once I have knit the row with the arrow, if I then start A4 from the third line I still get a mismatch in the pattern and I do not know where I get it wrong. Well, I know that I do something wrong while shifting from the yoke to the body but I can't figure out what.
07.04.2023 - 10:20DROPS Design a répondu:
Dear Mary, after having worked the row with the arrow, you should have knitted round, where you separated the stitches for each part of the garment. Then, you should start the body with the third row of A.4. There shouldn't be a mismatch there. You can check that the third row of A.4 is exactly like the third row in A.1 after the row with the arrow, so they should be matching. Hope this helps!
08.04.2023 - 20:59
![]() Mary a écrit:
Mary a écrit:
Sorry, I am still unclear: I have finished the yoke knitting the A1-A3-A5 line with the arrow. Then I divided the work and I went for a knitted round. Now which line should I knit first and from which diagram?
05.04.2023 - 09:04DROPS Design a répondu:
Dear Mary, the arrows in the chart mean that, if the gauge is correct, you should finish the raglan/yoke when you reach the arrow for your size (before working it). If you have worked this row, then you will need to start the new part by working the third row of the new chart (A.4). Happy knitting!
06.04.2023 - 23:29
![]() Mary a écrit:
Mary a écrit:
Hi! "Continue the pattern from yoke on body – making sure to continue with the correct row in the diagram after the yoke. " Does this mean that if I finish A1 (S size) with the line with the arrow, the next line for the body in A4 is in fact the thirs one of the diagram?
04.04.2023 - 08:59DROPS Design a répondu:
Hi Mary, Yes, if you finished the diagram before separating for the body and sleeves, you continue with the first row in the diagram. Happy Easter!
05.04.2023 - 07:01
![]() Mary a écrit:
Mary a écrit:
"Knit as far as the middle stitch cast on under the sleeve. The round now starts here." Does it mean that the round starts after the second or after the third stitch under the sleeve? Many thanks!
08.03.2023 - 16:03DROPS Design a répondu:
Dear Mary, yes correct: work the first 2 of the 5 stitches cast on under 1st sleeve, the rounds will now start here, before the middle of the new stitches. Happy knitting!
08.03.2023 - 16:08
![]() Mary a écrit:
Mary a écrit:
Following from your last answer: "...you will start the next round 1 stitch eariler. So, you need to not work the last stitch of the previous round". I interpret this as moving the stitch marker one stitch behind and working that stitch as the first one of the next round rather than the last one of the previous round. Is this correct? So it is basically just a matter of moving the stitch marker?
07.03.2023 - 12:16DROPS Design a répondu:
Dear Mary, you will now work the dividing round, this means you don't need the markers anymore, you start working the dividing round when the last stitch on previous round remain on left needle, slip the next 39 sts (starting with the last stitch previous round + the first 38 sts next round). Happy knitting!
07.03.2023 - 14:37
![]() Mary a écrit:
Mary a écrit:
Hi, I have just finished all the increases on the raglan and I have 168 stitches (S size). I'll go now go for a knitted round but what does it mean " adjust so the round now starts 1 stitch earlier"? Plus, the 39 stitches I habe to put aside, correspond to the stiches that are within the first and the second marker?
04.03.2023 - 10:25DROPS Design a répondu:
Dear Mary, after finishing the increases and reaching the indicated length (21cm from the marker), you will start the next round 1 stitch eariler. So, you need to not work the last stitch of the previous round. On the other hand, the first marker was inserted in the transition between the back and the sleeve and the second marker between the sleeve and the front. Since you have to put aside the stitches which correspond to the sleeve, these stitches are all in between the first and 2nd marker. Happy knitting!
05.03.2023 - 20:45
|
|||||||||||||||||||
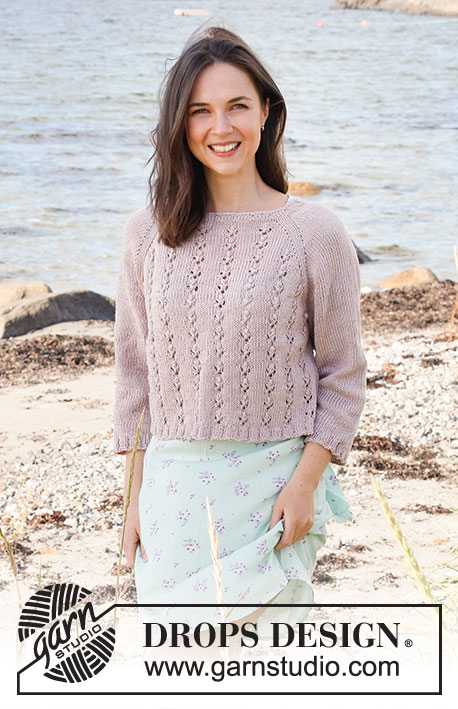
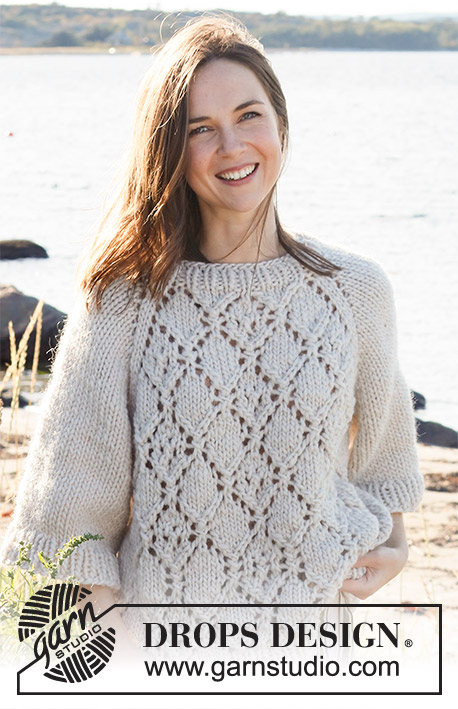
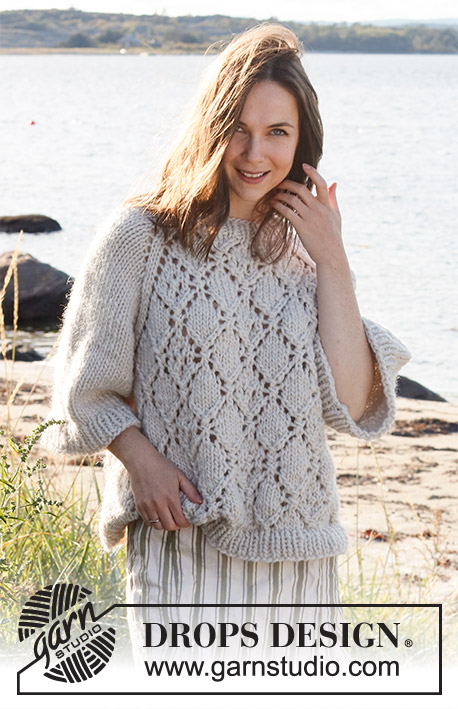
Diamonds in the Sky#diamondsintheskysweater |
|||||||||||||||||||
 |
 |
||||||||||||||||||
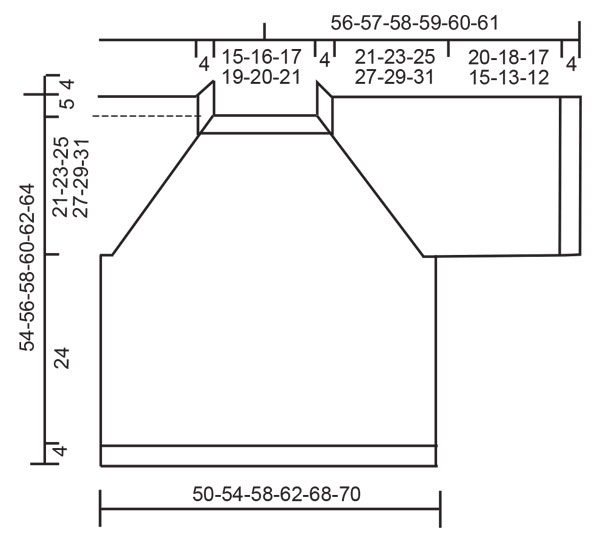
Pull tricoté de haut en bas avec emmanchures raglan, point ajouré et manches ¾ et larges, en DROPS Snow ou DROPS Wish. Du S au XXXL.
DROPS 221-29 |
|||||||||||||||||||
|
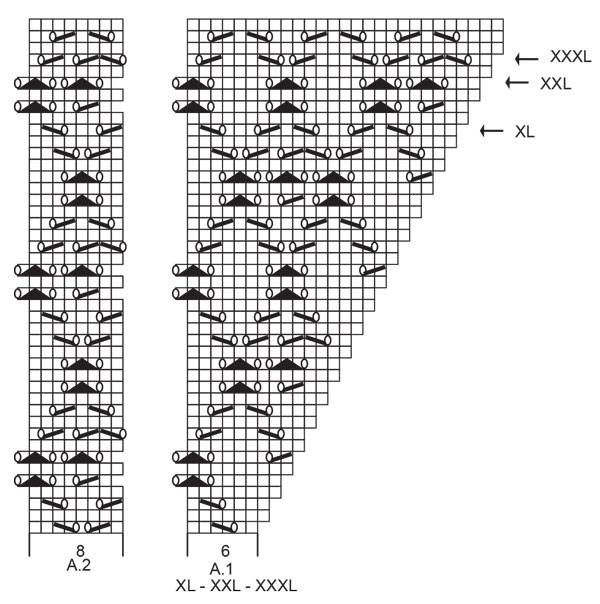
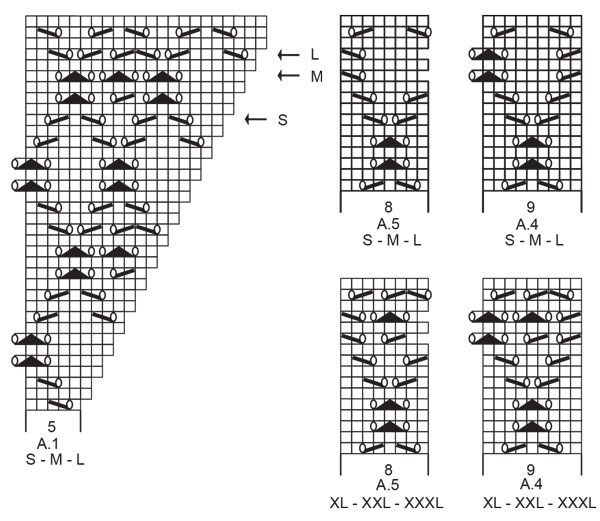
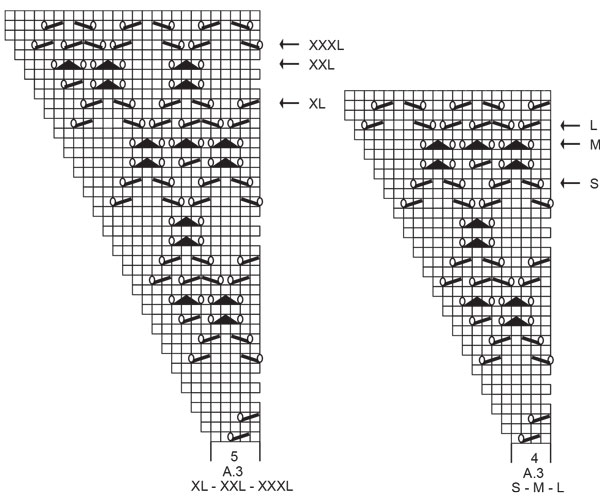
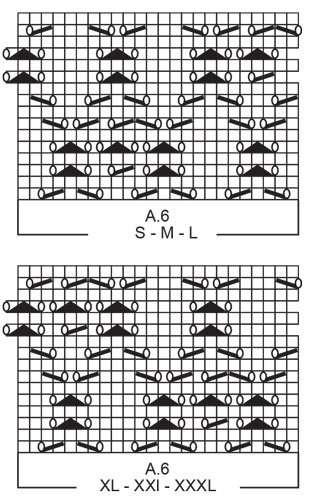
------------------------------------------------------- TECHNIQUES EMPLOYÉES: ------------------------------------------------------- POINT FANTAISIE: Voir les diagrammes A.1 à A.6 appropriés à la taille. AUGMENTATIONS (à intervalles réguliers): Pour calculer quand augmenter à intervalles réguliers, prendre le nombre total de mailles (par ex. 46 mailles) et le diviser par le nombre d’augmentations à faire (par ex. 10) = 4.6. Pour augmenter dans cet exemple, on va faire 1 jeté après alternativement chaque 4ème et 5ème maille. Au tour suivant, tricoter les jetés torse pour éviter les trous. RAGLAN: Augmenter pour le raglan en faisant 1 jeté de chaque côté de 2 mailles endroit (le marqueur est entre ces 2 mailles), à chacune des transitions entre le dos/le devant et les manches, ainsi (on augmente 8 mailles au total). Pour augmenter 1 maille, faire 1 jeté. Au tour suivant, tricoter les jetés à l’endroit; ils doivent former des trous. Tricoter ensuite les nouvelles mailles du devant et du dos en point fantaisie et celles des manches en jersey. ASTUCE POUR RABATTRE: Pour éviter que les mailles rabattues ne soient trop serrées, on peut utiliser une aiguille d’une taille au-dessus. Si elles sont toujours trop serrées, rabattre avec 1 jeté après environ chaque 4ème maille; rabattre les jetés comme des mailles normales. ------------------------------------------------------- L’OUVRAGE COMMENCE ICI: ------------------------------------------------------- PULL – PETIT APERÇU DE L’OUVRAGE: Le col et l’empiècement se tricotent de haut en bas, en rond sur aiguille circulaire. On divise l’empiècement et on continue le dos/le devant et les manches séparément en rond, sur aiguille circulaire, de haut en bas. COL: Monter 46-48-50-54-56-58 mailles avec la petite aiguille circulaire 8 en Snow ou Wish. Tricoter 1 tour endroit. Tricoter ensuite en côtes (1 maille endroit, 1 maille envers) en rond pendant 4 cm. Tricoter 1 tour endroit en augmentant 10-8-6-6-4-2 mailles à intervalles réguliers – voir AUGMENTATIONS = 56-56-56-60-60-60 mailles. Tricoter 1 tour endroit. Changer pour l’aiguille circulaire 9. Placer 1 marqueur à 20-20-20-21-21-21 mailles (= milieu devant environ), on mesure l’empiècement à partir de ce marqueur! EMPIÈCEMENT: Tricoter maintenant en plaçant 4 marqueurs ainsi: Placer 1 marqueur au début du tour (= transition entre le dos et la manche droite), 1 maille endroit, 1 jeté, 7 mailles endroit, 1 jeté, 1 maille endroit, placer 1 marqueur ici (transition entre la manche droite et le devant), 1 maille endroit, 1 jeté, A.1 au-dessus des 5-5-5-6-6-6 mailles suivantes, A.2 au-dessus des 8 mailles suivantes, A.3 au-dessus des 4-4-4-5-5-5 mailles suivantes, 1 jeté, 1 maille endroit, placer 1 marqueur ici (transition entre le devant et la manche gauche), 1 maille endroit, 1 jeté, 7 mailles endroit, 1 jeté, 1 maille endroit, placer 1 marqueur ici (transition entre la manche gauche et le dos), 1 maille endroit, 1 jeté, A.1 au-dessus des 5-5-5-6-6-6 mailles suivantes, A.2 au-dessus des 8 mailles suivantes, A.3 au-dessus des 4-4-4-5-5-5 mailles suivantes, 1 jeté, 1 maille endroit. BIEN CONSERVER LA MÊME TENSION QUE POUR L’ÉCHANTILLON! La première augmentation du RAGLAN – voir ci-dessus, est faite maintenant. Continuer ainsi et augmenter pour le raglan 14-16-17-18-20-21 fois au total tous les 2 tours = 168-184-192-204-220-228 mailles. Quand toutes les augmentations sont faites, l’ouvrage mesure environ 20-23-24-26-29-30 cm depuis le marqueur du col. Continuer sans augmenter jusqu’à ce que l’ouvrage mesure 21-23-25-27-29-31 cm depuis le marqueur (tricoter autant de mailles en point fantaisie jacquard qu’il y a de mailles côté raglan, bien veiller à ce qu’il y ait autant de jetés que de diminutions pour que le nombre de mailles reste le même – les autres mailles se tricotent en jersey). Au tour suivant (un tour en mailles endroit) – ajuster pour que le tour commence maintenant par 1 maille plus tôt, tricoter ainsi: Placer les 39-43-45-47-51-53 premières mailles en attente sur un fil pour la manche, monter 5-5-7-7-9-9 mailles (= côté, sous la manche), tricoter les 45-49-51-55-59-61 mailles suivantes comme avant (= devant), glisser les 39-43-45-47-51-53 mailles suivantes en attente sur un fil pour la manche, monter 5-5-7-7-9-9 mailles (= côté, sous la manche), tricoter les 45-49-51-55-59-61 dernières mailles comme avant (= dos). Terminer le dos/le devant et les manches séparément. MESURER DÉSORMAIS L’OUVRAGE À PARTIR D’ICI!. DOS & DEVANT: = 100-108-116-124-136-140 mailles. Tricoter à l’endroit jusqu’à la maille au milieu de celles montées sous la manche. Le tour commence maintenant ici. Continuer le point fantaisie de l'empiècement – bien veiller à continuer au rang suivant du diagramme après l'empiècement. Tricoter en point fantaisie et en jersey sur les côtés ainsi: *1-3-5-3-6-7 mailles endroit, A.4 au-dessus des 9 mailles suivantes (voir diagramme approprié à la taille), A.6 au-dessus des 24 mailles suivantes (voir diagramme approprié à la taille), tricoter les 8-8-8-16-16-16 premières mailles de A.6, A.5 au-dessus des 8 mailles suivantes (voir diagramme approprié à la taille), 0-2-4-2-5-6 mailles endroit*, répéter de *-* encore 1 fois. Quand l’ouvrage mesure 24 cm, tricoter 1 tour endroit en augmentant 10-10-12-12-14-14 mailles à intervalles réguliers = 110-118-128-136-150-154 mailles. Changer pour l’aiguille circulaire 8 et tricoter en côtes (1 maille endroit, 1 maille envers) pendant 4 cm. Rabattre les mailles comme elles se présentent. Le pull mesure environ 54-56-58-60-52-64 cm de hauteur totale depuis l’épaule. MANCHES: Reprendre les 39-43-45-47-51-53 mailles en attente sur un des côtés de l’ouvrage sur la petite aiguille circulaire 9 et relever 1 maille dans chacune des 5-5-7-7-9-9 mailles montées sous la manche = 44-48-52-54-60-62 mailles. Tricoter en rond, en jersey. Quand la manche mesure 20-18-17-15-13-12 cm, augmenter 4-4-4-4-6-6 mailles à intervalles réguliers = 48-52-56-58-70-68 mailles. Changer pour l’aiguille circulaire 8. Tricoter en côtes (1 maille endroit, 1 maille envers) pendant 4 cm. Rabattre les mailles comme elles se présentent. La manche mesure environ 24-22-21-19-17-16 cm depuis la séparation. Tricoter l’autre manche de la même façon. |
|||||||||||||||||||
Légende diagramme(s) |
|||||||||||||||||||
|
|||||||||||||||||||
 |
|||||||||||||||||||
 |
|||||||||||||||||||
 |
|||||||||||||||||||
 |
|||||||||||||||||||
 |
|||||||||||||||||||
Vous avez terminé ce modèle?Alors taguez vos photos avec #dropspattern #diamondsintheskysweater ou bien présentez-les dans la galerie #dropsfan Vous avez besoin d'aide pour ce modèle ?Vous trouverez 25 tutoriels vidéo, une rubrique commentaires/questions et plus encore en vous rendant sur la page du modèle sur garnstudio.com © 1982-2026 DROPS Design A/S. Tous droits réservés. Ce document, y compris ces sous-sections, est protégé par les droits d'auteur (copyright). Apprenez-en davantage sur ce que vous pouvez faire avec nos modèles en bas de chacune des pages de notre site. |
|||||||||||||||||||


Avec plus de 40 ans dans la conception de modèles tricot et crochet, DROPS Design offre l'une des plus vastes collections de modèles gratuits sur internet - traduits dans 17 langues. À ce jour, on compte 324 catalogues et 12291 modèles en français.
Nous nous efforçons de vous apporter le meilleur de ce que le tricot et le crochet peuvent vous offrir, inspiration et conseils mais également des fils de haute qualité à des prix incroyables! Vous souhaiteriez utiliser nos modèles autrement que pour un usage personnel? Vous pouvez lire ce que vous êtes autorisés à faire dans le Copyright en bas de page de chacun de nos modèles. Bon tricot!
Poster un commentaire sur le modèle DROPS 221-29
Nous aimerions connaître votre avis sur ce modèle !
Si vous souhaitez poser une question, merci de bien vouloir vérifier que vous avez choisi la bonne catégorie dans le formulaire ci-dessous afin d'accélérer la réponse. Les champs obligatoires sont indiqués par une *.