
Popular categories
Looking for a yarn?


|
|||||||||||||||||||
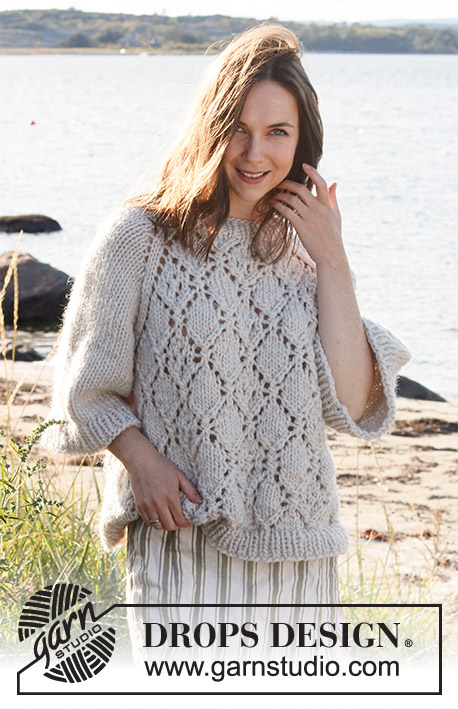
Diamonds in the Sky |
|||||||||||||||||||
 |
 |
||||||||||||||||||
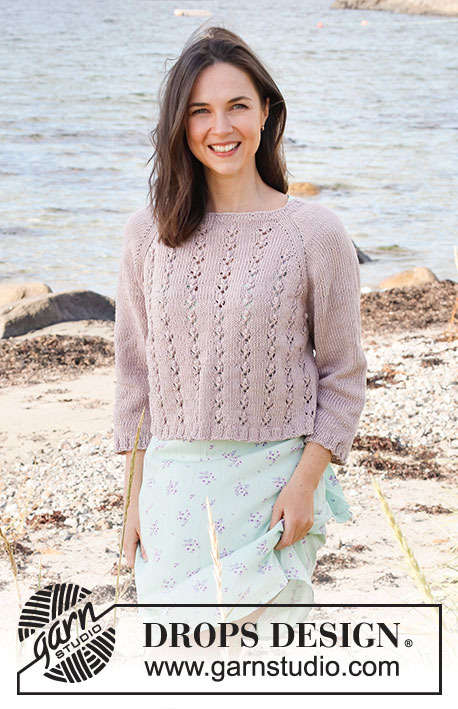
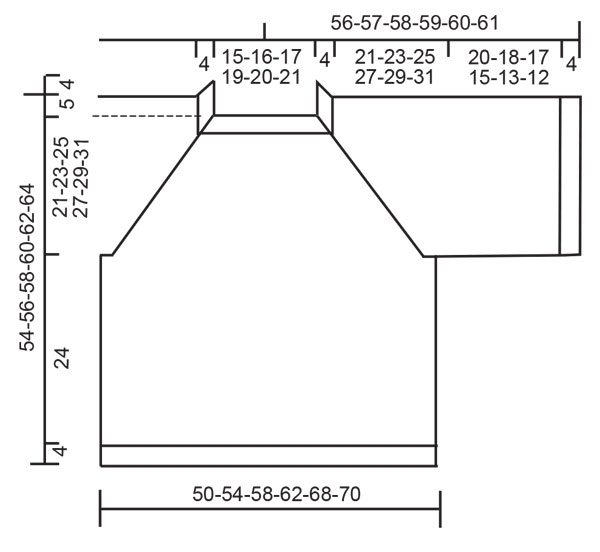
Knitted sweater in DROPS Snow or DROPS Wish. The piece is worked top down with raglan, lace pattern and ¾-length, wide sleeves. Sizes S - XXXL.
DROPS 221-29 |
|||||||||||||||||||
|
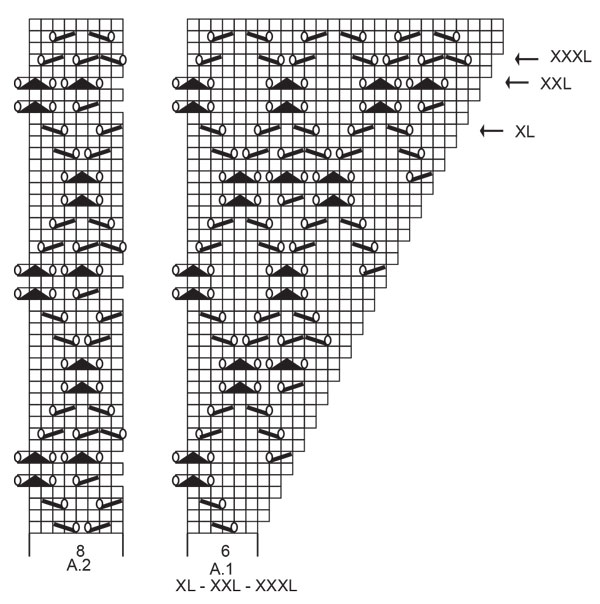
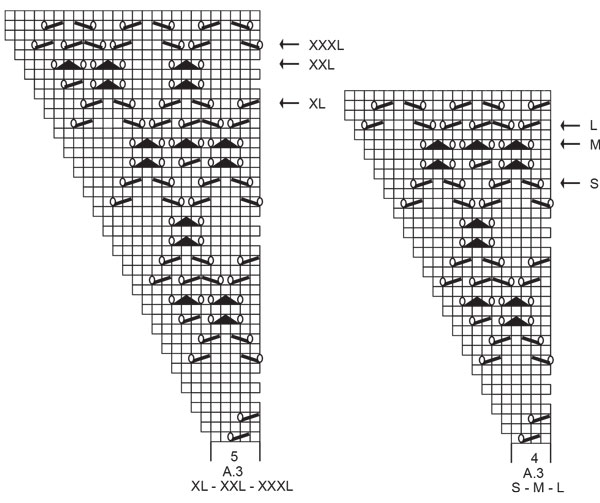
------------------------------------------------------- EXPLANATIONS FOR THE PATTERN: ------------------------------------------------------- PATTERN: See diagrams A.1 to A.6. Choose the diagrams for your size. INCREASE TIP (evenly spaced): To work out how to increase evenly, count the total number of stitches on the needle (e.g. 46 stitches) and divide by the number of increases to be made (e.g. 10) = 4.6. In this example, increase by making 1 yarn over after alternately each 4th and 5th stitch. On the next round work the yarn overs twisted to avoid holes. RAGLAN: Increase to raglan by making 1 yarn over on each side of 2 stitches (marker sits in the middle of these 2 stitches), in the transitions between body and sleeves, as follows (a total of 8 stitches increased). Increase 1 stitch by making 1 yarn over. On the next round knit the yarn overs; leaves holes. Then work the new stitches in pattern on the front and back pieces and in stockinette stitch on the sleeves. BINDING-OFF TIP: To avoid the bind-off edge being tight you can bind off with a larger size needle. If the edge is still tight, make 1 yarn over after approx. each 4th stitch at the same time as binding off; the yarn overs are bind off as normal stitches. ------------------------------------------------------- START THE PIECE HERE: ------------------------------------------------------- SWEATER – SHORT OVERVIEW OF THE PIECE: The neck and yoke are worked in the round with circular needle, top down. The yoke is divided and the body and sleeves are then continued separately in the round, with circular needle, top down. NECK: Cast on 46-48-50-54-56-58 stitches with short circular needle size 8 MM = US 11 and Snow or Wish. Knit 1 round. Then work rib (knit 1, purl 1) in the round for 4 cm = 1½". Knit 1 round where you increase 10-8-6-6-4-2 stitches evenly spaced – read INCREASE TIP = 56-56-56-60-60-60 stitches. Knit 1 round. Change to circular needle size 9 MM = US 13. Insert 1 marker after 20-20-20-21-21-21 stitches (= approx. mid-front), the yoke is measured from this marker! YOKE: Now work pattern and insert 4 markers as follows: Insert 1 marker at the beginning of the round (= transition between back piece and right sleeve), knit 1, 1 yarn over, knit 7, 1 yarn over, knit 1, insert 1 marker here (transition between right sleeve and front piece), knit 1, 1 yarn over, A.1 over the next 5-5-5-6-6-6 stitches, A.2 over the next 8 stitches, A.3 over the next 4-4-4-5-5-5 stitches, 1 yarn over, knit 1, insert 1 marker here ( transition between front piece and left sleeve), knit 1, 1 yarn over, knit 7, 1 yarn over, knit 1, insert 1 marker here (transition between left sleeve and back piece), knit 1, 1 yarn over, A.1 over the next 5-5-5-6-6-6 stitches, A.2 over the next 8 stitches, A.3 over the next 4-4-4-5-5-5 stitches, 1 yarn over, knit 1. REMEMBER THE KNITTING GAUGE! The first increase to RAGLAN – read description above, is now finished. Continue this pattern and increase to raglan every 2nd round a total of 14-16-17-18-20-21 times = 168-184-192-204-220-228 stitches. After the last increase, the piece measures approx. 20-23-24-26-29-30 cm = 8"-9"-9½"-10¼"-11⅜"-11¾" from the marker on the neck. Continue working without further increases until the piece measures 21-23-25-27-29-31 cm = 8¼"-9"-9¾"-10⅝"-11⅜"-12¼" from the marker, (work as many stitches in the pattern as there is room for towards the raglan, making sure the yarn overs and decreases equal each other so the number of stitches remains the same – the other stitches are worked in stockinette stitch). On the next round (a knitted round) – adjust so the round now starts 1 stitch earlier, work as follows: Place the first 39-43-45-47-51-53 stitches on a thread for the sleeve, cast on 5-5-7-7-9-9 new stitches on the needle (= in side under the sleeve), work the next 45-49-51-55-59-61 stitches as before (= front piece), place the next 39-43-45-47-51-53 stitches on a thread for the sleeve, cast on 5-5-7-7-9-9 new stitches on the needle (= in side under the sleeve), work the last 45-49-51-55-59-61 stitches as before (= back piece). Body and sleeves are finished separately. THE PIECE IS NOW MEASURED FROM HERE. BODY: = 100-108-116-124-136-140 stitches. Knit as far as the middle stitch cast on under the sleeve. The round now starts here. Continue the pattern from yoke on body – making sure to continue with the correct row in the diagram after the yoke. Work pattern and stockinette stitch in the sides as follows: * Knit 1-3-5-3-6-7 stitches, A.4 over the next 9 stitches (choose diagram for your size), work A.6 over the next 24 stitches (choose diagram for your size), work the first 8-8-8-16-16-16 stitches in A.6, work A.5 over the next 8 stitches (choose diagram for your size) knit 0-2-4-2-5-6 *, work from *-* 1 more time on the round. When the piece measures 24 cm = 9½", knit 1 round where you increase 10-10-12-12-14-14 stitches evenly spaced = 110-118-128-136-150-154 stitches. Change to circular needle size 8 MM = US 11 and work rib (knit 1, purl 1) for 4 cm = 1½". Bind off with knit over knit and purl over purl. The sweater measures approx. 54-56-58-60-52-64 cm = 21¼"-22"-22¾"-23⅝"-20½"-25¼" from the shoulder down. SLEEVES: Place the 39-43-45-47-51-53 stitches from the thread on the one side of the piece on short circular needle size 9 MM = US 13 and knit up 1 stitch in each of the 5-5-7-7-9-9 stitches cast on under the sleeve = 44-48-52-54-60-62 stitches. Work stockinette stitch in the round. When the sleeve measures 20-18-17-15-13-12 cm = 8"-7"-6¾"-6"-5⅛"-4¾", increase 4-4-4-4-6-6 stitches evenly spaced = 48-52-56-58-70-68 stitches. Change to circular needle size 8 MM = US 11. Work rib (knit 1, purl 1) for 4 cm = 1½". Bind off with knit over knit and purl over purl. The sleeve measures approx. 24-22-21-19-17-16 cm = 9½"-8¾"-8¼"-7½"-6¾"-6¼" from the division. Work the other sleeve in the same way. |
|||||||||||||||||||
Diagram explanations |
|||||||||||||||||||
|
|||||||||||||||||||
|
|||||||||||||||||||

|
|||||||||||||||||||
|
|||||||||||||||||||

|
|||||||||||||||||||
|
|||||||||||||||||||
|
Have you made this or any other of our designs? Tag your pictures in social media with #dropsdesign so we can see them! Do you need help with this pattern?You'll find tutorial videos, a Comments/Questions area and more by visiting the pattern on garnstudio.com. © 1982-2024 DROPS Design A/S. We reserve all rights. This document, including all its sub-sections, has copyrights. Read more about what you can do with our patterns at the bottom of each pattern on our site. |
|||||||||||||||||||


With over 40 years in knitting and crochet design, DROPS Design offers one of the most extensive collections of free patterns on the internet - translated to 17 languages. As of today we count 304 catalogs and 11422 patterns - 11417 of which are translated into English (US/in).
We work hard to bring you the best knitting and crochet have to offer, inspiration and advice as well as great quality yarns at incredible prices! Would you like to use our patterns for other than personal use? You can read what you are allowed to do in the Copyright text at the bottom of all our patterns. Happy crafting!
Comments / Questions (27)
But that’s precisely the problem! If I start the third line A4 from the underarm (the first stitch of the new round is basically the third stitch from the underarm) I get the mismatch because the triangle will be stitched earlier: I can’t understand where I am going wrong
09.04.2023 - 14:12DROPS Design answered:
Dear Mary, you need to adjust the stitches before starting the triangle. In this case, you need to simply knit stitches (not just the amount indicated in the pattern) so that the triangle won't be mismatched. The pattern under the arm may get slightly mismatched initially but that isn't important, since it will later on match correctly. Happy knitting!
10.04.2023 - 13:34Yes, I can see that the pattern is the same. But if I follow the instructions from A4 third line, I should start the "triangle" after 3 stitches of the body, while according to the stitches I have after the line with the arrow, A1, I should start the triangle after 5 stitches but this means that it will be "anticipated" hence the mismatch. Does it mean that I have not divided the garment accordingly? Many thanks and Happy Easter!
09.04.2023 - 11:09DROPS Design answered:
Dear Mary, take into account that you should have adjusted the start of the round in the body; you adjust so that the beginning of the round is in the middle stitch cast on under the sleeve. This should help adjust the pattern so that the triangle in A.4 won't get mismatched with the pattern in the yoke in A.1. Happy knitting!
09.04.2023 - 13:30Thanks! But I am still confused: the instructions say that the yoke is finished when I have 168 stitches (S size). If I had not knit the last row (the one with the arrow), I would not have got 168 stitches. In any case, once I have knit the row with the arrow, if I then start A4 from the third line I still get a mismatch in the pattern and I do not know where I get it wrong. Well, I know that I do something wrong while shifting from the yoke to the body but I can't figure out what.
07.04.2023 - 10:25DROPS Design answered:
Dear Mary, after having worked the row with the arrow, you should have knitted round, where you separated the stitches for each part of the garment. Then, you should start the body with the third row of A.4. There shouldn't be a mismatch there. You can check that the third row of A.4 is exactly like the third row in A.1 after the row with the arrow, so they should be matching. Hope this helps!
08.04.2023 - 20:58Thanks! But I am still confused: the instructions say that the yoke is finished when I have 168 stitches (S size). If I had not knit the last row (the one with the arrow), I would not have got 168 stitches. In any case, once I have knit the row with the arrow, if I then start A4 from the third line I still get a mismatch in the pattern and I do not know where I get it wrong. Well, I know that I do something wrong while shifting from the yoke to the body but I can't figure out what.
07.04.2023 - 10:20DROPS Design answered:
Dear Mary, after having worked the row with the arrow, you should have knitted round, where you separated the stitches for each part of the garment. Then, you should start the body with the third row of A.4. There shouldn't be a mismatch there. You can check that the third row of A.4 is exactly like the third row in A.1 after the row with the arrow, so they should be matching. Hope this helps!
08.04.2023 - 20:59Sorry, I am still unclear: I have finished the yoke knitting the A1-A3-A5 line with the arrow. Then I divided the work and I went for a knitted round. Now which line should I knit first and from which diagram?
05.04.2023 - 09:04DROPS Design answered:
Dear Mary, the arrows in the chart mean that, if the gauge is correct, you should finish the raglan/yoke when you reach the arrow for your size (before working it). If you have worked this row, then you will need to start the new part by working the third row of the new chart (A.4). Happy knitting!
06.04.2023 - 23:29Hi! "Continue the pattern from yoke on body – making sure to continue with the correct row in the diagram after the yoke. " Does this mean that if I finish A1 (S size) with the line with the arrow, the next line for the body in A4 is in fact the thirs one of the diagram?
04.04.2023 - 08:59DROPS Design answered:
Hi Mary, Yes, if you finished the diagram before separating for the body and sleeves, you continue with the first row in the diagram. Happy Easter!
05.04.2023 - 07:01"Knit as far as the middle stitch cast on under the sleeve. The round now starts here." Does it mean that the round starts after the second or after the third stitch under the sleeve? Many thanks!
08.03.2023 - 16:03DROPS Design answered:
Dear Mary, yes correct: work the first 2 of the 5 stitches cast on under 1st sleeve, the rounds will now start here, before the middle of the new stitches. Happy knitting!
08.03.2023 - 16:08Following from your last answer: "...you will start the next round 1 stitch eariler. So, you need to not work the last stitch of the previous round". I interpret this as moving the stitch marker one stitch behind and working that stitch as the first one of the next round rather than the last one of the previous round. Is this correct? So it is basically just a matter of moving the stitch marker?
07.03.2023 - 12:16DROPS Design answered:
Dear Mary, you will now work the dividing round, this means you don't need the markers anymore, you start working the dividing round when the last stitch on previous round remain on left needle, slip the next 39 sts (starting with the last stitch previous round + the first 38 sts next round). Happy knitting!
07.03.2023 - 14:37Hi, I have just finished all the increases on the raglan and I have 168 stitches (S size). I'll go now go for a knitted round but what does it mean " adjust so the round now starts 1 stitch earlier"? Plus, the 39 stitches I habe to put aside, correspond to the stiches that are within the first and the second marker?
04.03.2023 - 10:25DROPS Design answered:
Dear Mary, after finishing the increases and reaching the indicated length (21cm from the marker), you will start the next round 1 stitch eariler. So, you need to not work the last stitch of the previous round. On the other hand, the first marker was inserted in the transition between the back and the sleeve and the second marker between the sleeve and the front. Since you have to put aside the stitches which correspond to the sleeve, these stitches are all in between the first and 2nd marker. Happy knitting!
05.03.2023 - 20:45I am sorry, I have tried many times to work this without success. Can you please just tell me what I should do between the 1st and the 2nd marker in the second raglan? Maybe in this way, I can understand the logic. But if you do not specify the bit between these 2 markers, I am lost. Many thanks in advance!
11.02.2023 - 10:45DROPS Design answered:
Dear Mary, Work as follows: marker 1, k1 (=raglan line), 1YO, k7 (= sleeve), 1 YO, k1, 2nd marker, k1 (=raglan line), 1 YO, A.1, A.2, A.3 (for the front), 1 YO, k1, 3rd marker, k1 (= raglan line), e.t.c. Happy knitting!
13.02.2023 - 00:02