
Popular categories
Looking for a yarn?


Comments / Questions (101)
![]() Birgitta wrote:
Birgitta wrote:
Hej, jag har virkat om A1 - A4 flera gånger och hamnar inte på rätsidan vid övergång till A5- A7 I storlek M. Kommer det att ha någon betydelse fortsättningsvis? Ett annat problem i mönstret är efter A5-A8 inklusive sista varvet blir det bara 4 stolpvarv i storlek M eller ska man upprepa sista 2 varven utan ökningar? På bilden ser man att det är 6 stolpvarv.
29.06.2019 - 10:45
![]() Marianne wrote:
Marianne wrote:
Hallo, Ik ben bij de bobbel van A2 en A3 en ik snap niet goed wat je voor en na de 3 bobbels moet haken. Oftewel: horen de bogen met 3 lossen en 1 vaste bij dezelfde toer als de bobbels? Of horen die bij de volgende toer? Ik vind het lastig te lezen. Wat hoort bij welke regel en dus bij welke toer?
12.06.2019 - 19:42DROPS Design answered:
Dag Marianne,
Voor en na de bobbel zit het symbool van de open ovaal, (dus: haak 1 stk om l-lus maar wacht met de laatste doorhaling, haak 1 stk om dezelfde l-lus en haal dan draad door alle 3 lussen op haak)
13.06.2019 - 08:43
![]() Martha wrote:
Martha wrote:
Yoke section 4th par.: it say what to do on the 1st 2 rows; then it says “Now repeat A7...” & refers to another inc row. But the pattern at that point is the v-st row. Are there increases in that row (& the next one too) as well as in the dc rows? Thx.
28.03.2019 - 00:15DROPS Design answered:
Dear Martha, The 2nd row in A.7 = row where you have to increase, and it is a row with only dc = the row with the star in the diagram. After you have worked this row, there are enough stitches to repeat A.7 a total of 40-52 times (see size) in width. Happy crocheting!
01.04.2019 - 09:21
![]() Fatema wrote:
Fatema wrote:
So i've done 1st row of inc in A.5 diagram and i count sts exactly 271. Next row ask to do 43 times A.7. I've done the row and i count them and there is 45 times A.7. I can't figured it out where is the problem.
19.03.2019 - 12:52DROPS Design answered:
Dear Fatena, in size M you have 271 sts in total after A.5/A-A.7, and work the 271 sts as follows: A.5 (= 6 sts), A.6 (= 1 st), repeat A.7 a total of 43 times (not 45 times) (6 sts x 43), A.8 (= 6 sts) = 6 + 1 + 6x43 + 6 = 271 sts. Happy crocheting!
19.03.2019 - 16:00
![]() Fatema wrote:
Fatema wrote:
Thanks for reply. In diagram shows 4tr on each ch space, now in pattern says 42tr,( 10 ch space=40+ 2tr in any ch space=42) and 4tr inc 4tr( 8tr in one ch space)? And it says inc addition 3 on entire row so i can inc in any part(36,42,56,42,36)?
18.03.2019 - 10:49DROPS Design answered:
Dear Fatema, work the last row in A.1-A.4 as shown in diagram (= row with tr in tr and tr around ch-spaces), ie if you have to work 4 tr around a ch-space and at the same inc 4 tr, you will then work 8 tr around this ch-space (= increase 4 tr). The 3 extra inc will have to be worked in any ot the other parts that's right - make sure they are coming quite evenly. Happy crocheting!
18.03.2019 - 11:50
![]() Fatema wrote:
Fatema wrote:
Hi, i try to work out the increase section at last row of A.1-A-4 for M size. Could you please explain it to me dear.
17.03.2019 - 03:35DROPS Design answered:
Dear Fatema, work last row in A.1-A.4 size M increasing evenly 3 extra trebles (UK-EN) (not described below) as follows: Work 36tr, insert 1 marker, work 4 tr and inc 4 tr evenly (= right front piece), insert 1 marker, work 42 tr, insert 1 marker, work 4 tr and inc 4 tr evenly, insert 1 marker (= sleeve), work 56 tr, insert 1 marker, work 4 tr and inc 4 tr evenly, insert 1 marker (= back piece), work 42 tr, insert 1 marker, work 4 tr and inc 4 tr evenly, insert 1 marker (= sleeve), work 36 tr (= left front piece) = 247 tr on row. Happy crocheting!
18.03.2019 - 09:07
![]() Pearl Teller wrote:
Pearl Teller wrote:
What is the gauge?
12.03.2019 - 14:24DROPS Design answered:
Dear Mrs Teller, you will find gauge as well as sizes and materials required under the header - you need here 21 dc x 12 rows = 4'' x 4'' . Happy crocheting!
12.03.2019 - 14:44
![]() Silvia wrote:
Silvia wrote:
Al finalizar A1-A4 por primera vez, en la última vuelta se realizan los aumentos, para mi talla (s) son 36 (delantero der), 42 (manga), 56 (espalda), 42 (manga) y 36 ( delantero izquierdo). Sin embargo esa suma da 212 puntos y según el patrón debería tener 235 p.a en la fila... cómo debo resolver el problema?
23.09.2018 - 01:49DROPS Design answered:
Hola Silvia, parece que no estás teniendo en cuenta todos los puntos. Después de los 36 puntos del delantero derecho y antes de los 42 puntos de la manga, hay que trabajar 4 p.a y aumentar 2 puntos repartidos; entre la manga y la espalda y la espalda y la otra manga igual; y entre la manga y el delantero izquierdo son 4 p.a y 1 aumento en el caso de tu talla. En total son 235 puntos, eso está correcto.
29.09.2018 - 20:22Shimrit wrote:
Hi, in the body it says 'work pattern -1... and dec.. evenly in first row of dc'. What first row? In a.5- a.8 or at the first from the 6 dc rows thst after that? Thanks again.
28.01.2018 - 20:57DROPS Design answered:
Dear Shimrit, pattern-1= 6-8-10 dc-rows, then work A.5-A.8, then work 6-8-10 rows with dc. You will dec on first row with dc, ie on first row worked with dc (the first of the 6-8-10 dc-rows worked before A.5-A.8). Happy crocheting!
29.01.2018 - 10:01
![]() Shimrit wrote:
Shimrit wrote:
Hi, in the yoke, after finishing a.5- a.7, it says 'work 1row with dc and inc 18 dc evenly'. that means not according to the markers? Thanks!
27.01.2018 - 19:42DROPS Design answered:
Hi Shimrit, Yes that is right, when increasing evenly you are not using the markers but spreading the increases evenly on the row. Happy crocheting!
28.01.2018 - 06:58
|
||||||||||||||||||||||||||||||||||
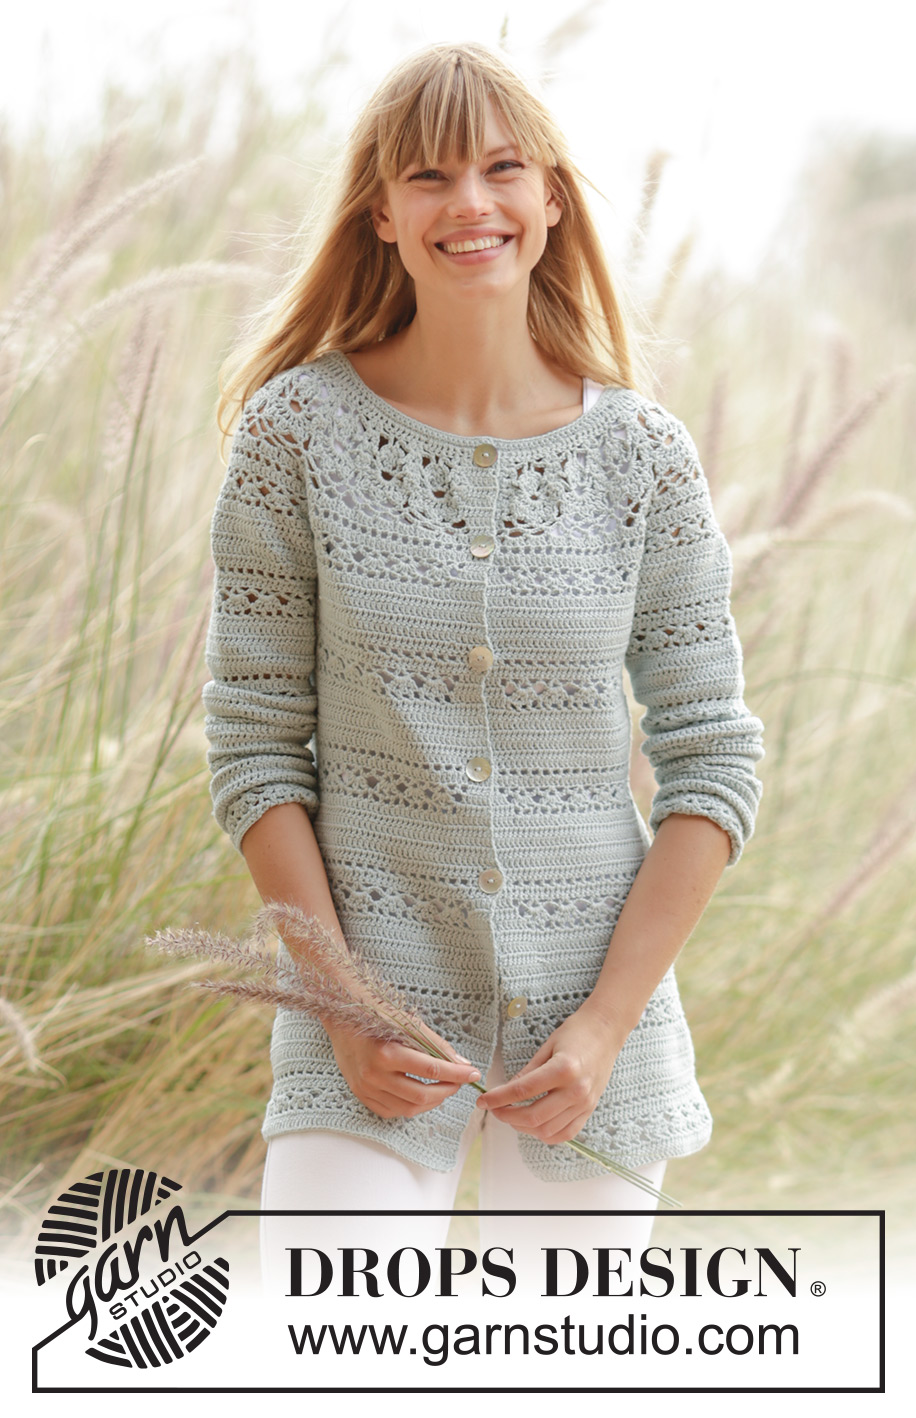
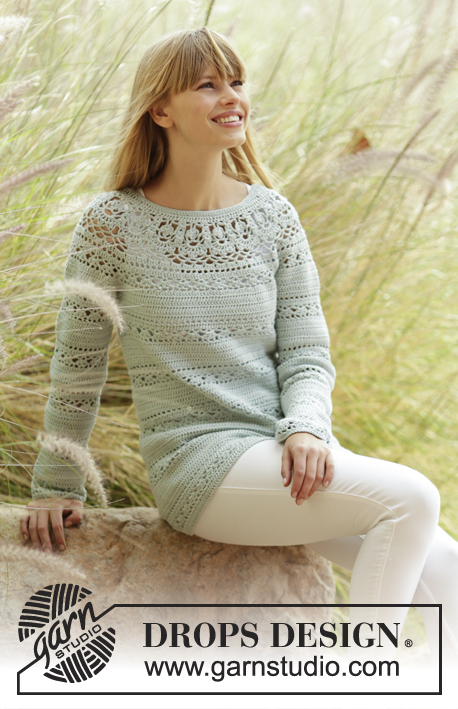
Sweet Mint Cardigan#sweetmintcardigan |
||||||||||||||||||||||||||||||||||
|
|
||||||||||||||||||||||||||||||||||
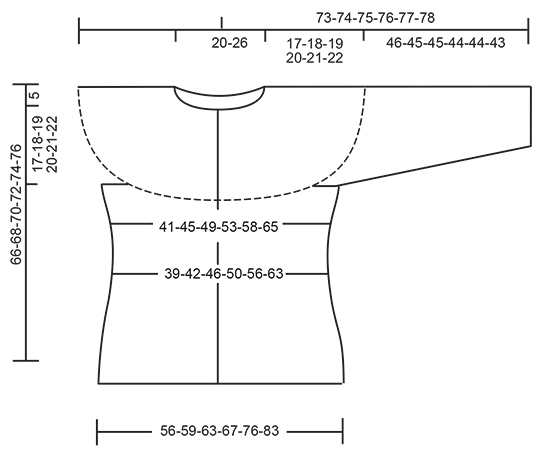
Crochet DROPS jacket with lace pattern and round yoke in ”Safran”. The piece is worked top down. Size: S - XXXL.
DROPS 169-32 |
||||||||||||||||||||||||||||||||||
|
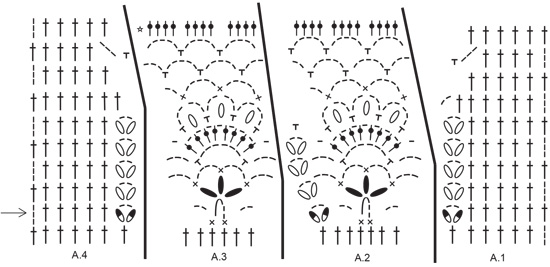
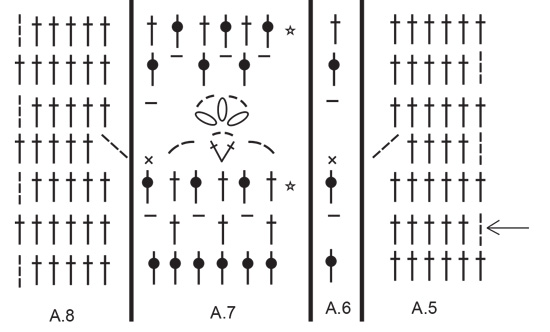
PATTERN: See diagrams A.1 to A.8. CROCHET INFO: On every tr row replace first tr with 3 ch. On every dc row replace first dc with 1 ch. Replace first tr at on every tr round with 3 ch, finish the round with 1 sl st in 3rd ch from beg of round. Replace first dc at on every dc round with 1 ch, finish the round with 1 sl st in first ch from beg of round. INCREASE TIP-1: Inc 1 tr by working 2 tr in same st. INCREASE TIP-2: Work until 2 tr/ch remain before marker, work 2 tr in/around next tr/ch (= 1 tr inc), work 1 tr in/around each of the next 2 tr/ch, markers is in the middle of these tr/ch, work 2 tr in/around next tr/ch (= 1 tr inc). Repeat inc at every marker. PATTERN-1 (applies to body): Work 1 tr in every tr until 6-8-10-10-10-10 rows have been worked, * work from RS: Work A.5 over the first 6 tr, A.6 over next tr, repeat A.7 until 6 tr remain, A.8 over the last 6 tr. When A.5 to A.8 have been worked 1 time vertically, work 6-8-10-10-10-10 rows with 1 tr in every tr *, repeat pattern from *-* until finished measurements. PATTERN-2 (applies to sleeve): * Work A.7 over all tr. When A.7 has been worked 1 time vertically, continue as follows: Work 6-8-10-10-10-10 rounds with 1 tr in every tr *, repeat from *-* until finished measurements. DECREASE TIP: Dec 1 tr by working the next 2 tr tog as follows: Work 1 tr but wait with last pull through (= 2 loops on hook), then work next tr but on last pull through, pull yarn through all 3 loops on hook. BUTTONHOLES: Make buttonholes on right band. 1 buttonhole = replace fourth tr from edge with 1 ch. On next row work band st as before (work 1 tr around ch). Work for buttonholes when piece measures: SIZE S: 2, 11, 20, 29, 38 and 47 cm. SIZE M: 2, 11, 20, 29, 38 and 47 cm. SIZE L: 2, 10, 18, 26, 34, 42 and 50 cm SIZE XL: 2, 10, 18, 26, 34, 42 and 50 cm SIZE XXL: 2, 11, 20, 29, 38, 47 and 55 cm SIZE XXXL: 2, 11, 20, 29, 38, 47 and 55 cm ---------------------------------------------------------- YOKE: Worked back and forth, top down. Work 163-163-172-172-180-180 ch on hook size 3.5 mm with Safran. Work next row as follows: Work 1 tr in 4th ch from hook (= 2 tr) - READ CROCHET INFO, 1 tr in each of the next 5-5-0-0-1-1 ch, * skip 1 ch, 1 tr in each of the next 6 ch *, repeat from *-* the entire row = 139-139-146-146-153-153 tr. Then work next row from WS as follows: Work A.4 over the first 7 tr (= right band), A.3 over the next 6 tr, repeat A.2 until 7 tr remain (= 17-17-18-18-19-19 times in width), finish with A.1 over the last 7 tr (= left band). Continue like this, i.e. work as follows from RS: A.1, A.2 17-17-18-18-19-19 times in total, A.3 and A.4. REMEMBER THE CROCHET TENSION! Remember BUTTONHOLES - see explanation above. On last row in A.1-A.4 (= from WS) insert 8 markers and inc as follows: NOTE: Continue as shown in diagrams A.1-A.4. Work and inc like as follows AT THE SAME TIME inc in addition 0-3-3-9-3-3 tr evenly on the entire row – READ INCREASE TIP-1: Work 36-36-38-38-40-40 tr, insert 1 marker in piece, work 4 tr and inc 2-4-4-4-4-4 tr evenly (= right front piece), insert 1 marker, work 42-42-44-44-46-46 tr, insert 1 marker, work 4 tr and inc 2-4-4-4-4-4 tr evenly, insert 1 marker (= sleeve), work 56-56-60-60-64-64 tr, insert 1 marker, work 4 tr and inc 2-4-4-4-4-4 tr evenly, insert 1 marker (= back piece), work 42-42-44-44-46-46 tr, insert 1 marker, work 4 tr and inc 1-4-4-4-4-4 tr evenly, insert 1 marker (= sleeve), work 36-36-38-38-40-40 tr (= left front piece) = 235-247-259-265-271-271 tr on row. Move the markers upwards when working. Piece measures approx. 9 cm. Work 0-0-0-0-2-2 row with 1 tr in every tr and inc 0-0-0-0-12-15 tr evenly on every row (= 0-0-0-0-24-30 tr in total) = 235-247-259-265-295-301 tr. Work A.5 to A.7 as follows (first row is from RS): Work A.5 over the first 6 tr (= left band), A.6 over next tr, repeat A.7 until 6 tr remain (= 37-39-41-42-47-48 times in width), finish with A.8 over the last 6 tr (= right band). On 2nd row (i.e. tr row) inc at every marker – READ INCREASE TIP-2 and inc 2-8-8-8-8-8 tr evenly on row (= 2 tr in at every marker and 2-8-8-8-8-8 tr inc evenly = 18-24-24-24-24-24 tr inc in total on row) = 253-271-283-289-319-325 tr. Now repeat A.7 40-43-45-46-51-52 times in width. Repeat inc (i.e. 2 tr inc at every marker and 2-8-8-8-8-8 tr inc evenly = 18-24-24-24-24-24 tr inc in total on row). On last row in A.5 to A.8 = 271-295-307-313-343-349 tr. * Work 1 row with 1 tr in every tr. Work 1 row with tr and inc 18-18-16-17-24-26 tr evenly *, repeat from *-* 1-1-2-3-2-3 times in total = 289-313-339-364-391-427 tr. Work 0-1-1-0-1-0 rows with 1 tr in every tr. Piece measures approx. 17-18-19-20-21-22 cm. On next row (= from RS), work as follows: Work 1 tr in each of the first 46-50-54-58-64-70 tr (= left front piece), work 8 ch, skip 60-64-69-73-75-79 tr from previous row (= sleeve), 1 tr in each of the next 77-85-93-102-113-129 tr (= back piece), 8 ch, skip 60-64-69-73-75-79 tr from previous round (= sleeve), 1 tr in each of the last 46-50-54-58-64-70 tr (= right front piece) = 185-201-217-234-257-285 tr/ch on row. Insert 1 marker in piece, NOW MEASURE PIECE FROM HERE. Work 1 row from WS with 1 tr in every tr/ch. Then work PATTERN-1 from RS - see explanation above and dec 4-2-0-5-4-2 tr evenly in first row of tr - READ DECREASE TIP = 181-199-217-229-253-283 tr. When piece measures 12 cm, adjust so that next row is a row with tr, dec 6-12-12-6-6-6 tr evenly = 175-187-205-223-247-277 tr. Continue with pattern as before. When piece measures 19-20-21-22-23-24 cm – adjust so that next row is a row with tr, inc 12 tr evenly. Repeat inc every 3 cm 5-5-5-5-6-6 more times = 247-259-277-295-331-361 tr. Work pattern as before until piece measures 44-45-46-47-48-49 cm from marker. Fasten off. SLEEVE: Sleeve is worked in the round, top down. Beg by working mid under sleeve as follows: Work 1 dc in 5th ch of the 8 ch work in armhole on body, 3 ch (= 1 tr), work 1 tr in each of the next 3 ch, work 1 tr in every tr over sleeve, work 1 tr in each of the remaining 4 ch under sleeve = 68-72-77-81-83-87 tr. Insert 1 marker thread mid under sleeve. Insert 1 marker in piece, NOW MEASURE PIECE FROM HERE. Leave marker in piece, move marker thread when working. SIZE S-M: Work 1 tr in every tr and dec 2-0 tr evenly = 66-72 tr. SIZE L-XL-XXL-XXXL: Work 1 tr in every tr and inc 1-3-1-3 tr evenly = 78-84-84-90 tr. ALL SIZES: READ ALL OF THE FOLLOWING SECTION BEFORE CONTINUING! WORK PATTERN AND DEC AT THE SAME TIME: PATTERN: Work 1 tr in every tr until 5-7-9-9-9-9 round with tr have been worked in total. Work PATTERN-2 - see explanation above. DECREASE: When piece measures 4 cm, adjust so that next round is 1 round with tr, dec 6 tr evenly, repeat dec every 15-10-8-8-8-6 cm 2-3-4-4-4-5 more times = 48-48-48-54-54-54 tr. Fasten off when sleeve measures 46-45-45-44-44-43 cm. Work the other sleeve the same way. NECK EDGE: Worked back and forth from mid front. Beg from RS. Work in ch where the tr were worked (i.e. do not work over the ch skipped = 139-139-146-146-153-153 tr). Work 1 dc in each of the first 22-22-24-24-26-26 tr, * 1 htr in each of the next 3 ch, 1 tr in each of the next 3 ch, 1 dtr in each of the next 19 ch, 1 tr in each of the next 3 ch, 1 htr in each of the next 3 ch *, 1 dc in each of the next 33-33-36-36-39-39 ch, repeat from *-* 1 time, 1 dc in each of the last 22-22-24-24-26-26 ch. Work next row as follows: Work 1 dc in each of the first 26-26-28-28-30-30 sts, ** 1 htr in each of the next 3 sts, 1 tr in each of the next 3 sts, * work the next 2 dtr tog *, repeat from *-* 5 more times, 1 tr in each of the next 3 sts, 1 htr in each of the next 3 sts **, 1 dc in each of the next 39-39-42-42-45-45 sts, repeat from **-** 1 more time, finish with 1 dc in each of the last 26-26-28-28-30-30 sts = 127-127-134-134-141-141 sts. Work 1 row with 1 dc in every st. Fasten off. ASSEMBLY: Sew the buttons on to the left front band. |
||||||||||||||||||||||||||||||||||
Diagram explanations |
||||||||||||||||||||||||||||||||||
|
||||||||||||||||||||||||||||||||||
 |
||||||||||||||||||||||||||||||||||
 |
||||||||||||||||||||||||||||||||||
 |
||||||||||||||||||||||||||||||||||
Have you finished this pattern?Tag your pictures with #dropspattern #sweetmintcardigan or submit them to the #dropsfan gallery. Do you need help with this pattern?You'll find 16 tutorial videos, a Comments/Questions area and more by visiting the pattern on garnstudio.com. © 1982-2026 DROPS Design A/S. We reserve all rights. This document, including all its sub-sections, has copyrights. Read more about what you can do with our patterns at the bottom of each pattern on our site. |
||||||||||||||||||||||||||||||||||


With over 40 years in knitting and crochet design, DROPS Design offers one of the most extensive collections of free patterns on the internet - translated to 17 languages. As of today we count 324 catalogues and 12291 patterns translated into English (UK/cm). 12291
We work hard to bring you the best knitting and crochet have to offer, inspiration and advice as well as great quality yarns at incredible prices! Would you like to use our patterns for other than personal use? You can read what you are allowed to do in the Copyright text at the bottom of all our patterns. Happy crafting!
Post a comment to pattern DROPS 169-32
We would love to hear what you have to say about this pattern!
If you want to leave a question, please make sure you select the correct category in the form below, to speed up the answering process. Required fields are marked *.