
Popular categories
Looking for a yarn?


Comments / Questions (38)
![]() Lucy wrote:
Lucy wrote:
Muchas gracias! Son hermosos sus tejidos, me encantan
05.02.2018 - 19:28
![]() Marie Præst wrote:
Marie Præst wrote:
Hej Jeg forsøger forgæves at komme i gang med denne fine nederdel, men jeg har svært ved at forstå hvordan kanterne i starten skal laves. Mine kanter bliver meget uens, altså som om der lægges til i den ene ende og må at der er et stykke ind til man skal starte i den anden side. Kan det passe? Så vil det jo ikke blive jævnt der hvor man skal sættes sammen til lukning. På forhånd tak for hjælpen. H Mvh Marie
30.08.2017 - 11:32DROPS Design answered:
Hej Marie, se videoen nederst i opskriften, hvordan man vender når man hækler stangmasker, så kanten bliver lige. God fornøjelse!
05.09.2017 - 16:12
![]() Annika Backis wrote:
Annika Backis wrote:
Hej! Tack för ett jättefint mönster !! Passar perfekt jag använder 2,5 virknål det blev mycket bra! Har du samma mönster till en tröja eller topp?
17.07.2017 - 18:04DROPS Design answered:
Hei Annika. Så hyggelig å høre at du ble fornøyd. Pr dags dato har vi ingen overdel med dette mønstret, men ditt ønske er formidlet videre til design avdeligen. Så kanskje ved en senere kolleksjon :)
09.08.2017 - 09:10
![]() Alena B. wrote:
Alena B. wrote:
Dobrý den, jak zde již psala Maria, vaše počty ok vůbec nesedí na požadované rozměry sukně. I při volbě menšího háčku a správně napjaté přízi bych se do obvodu sukně (velikosti S) kolem pasu vešla téměř 2x. Existuje alespoň nějaký návod, podle kterého bych mohla velikosti přepočítat? Děkuji za odpověď, Alena
04.06.2017 - 17:14DROPS Design answered:
Dobrý den, Aleno, máte-li stejně silnou, resp. tenkou přízi a přesto je vaše sukně tak velká, že nejde upravit ani pomocí légy (zapínání), bude nezbytné porovnat váš uháčkovaný díl s údaji uvedenými u zkušebního vzorku a také v nákresu, kde jsou uvedeny výsledné rozměry sukně. Jakmile zjistíte, kolik ok vám vychází na 10 cm šířky, budete si moci spočítat i celkový počet ok a podle toho upravit vzorek (ubrat potřebný počer sekvencí). Hodně zdaru! Hana
04.06.2017 - 21:18
![]() Jolanda wrote:
Jolanda wrote:
Ik heb AX nu 1 keer gehaakt en moet nu in de rondte verder haken, wat wordt daarme bedoeld? hoe moet ik het patroon nu lezen
23.05.2017 - 23:26DROPS Design answered:
Hallo Jolanda, Je begint a.h.w. weer opnieuw, onderaan het telpatroon (dus bij de pijl) en haakt nogmaals Ax. (maar dan zonder a.2, zoals in de beschrijving staat.)
24.05.2017 - 16:12
![]() Jolanda wrote:
Jolanda wrote:
Kan je een foto van de achterkant publiceren?
21.05.2017 - 13:09DROPS Design answered:
Hoi Jolanda, Helaas is er geen foto beschikbaar voor de achterkant. :( Hopelijk is de tekening duidelijk genoeg voor je.
22.05.2017 - 16:33
![]() Janine Catterall wrote:
Janine Catterall wrote:
Thank you so much for help. It's such a pretty skirt, I want to get it right!
18.07.2016 - 21:02
![]() Janine Catterall wrote:
Janine Catterall wrote:
Sorry! One more thing. I am reading the diagram from right to left for each row and referring to the photo. i don't know if I am right because the A.2 worked in the row before means I can't start the pattern immediately on the next row. All I'm doing is working the same stitches over A.2 before I start the pattern sequence. Does that make sense? Is that right? Many thanks.
18.07.2016 - 21:00DROPS Design answered:
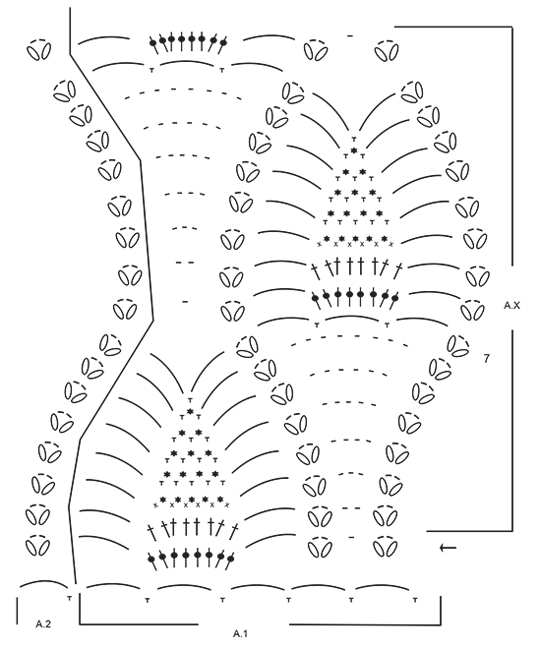
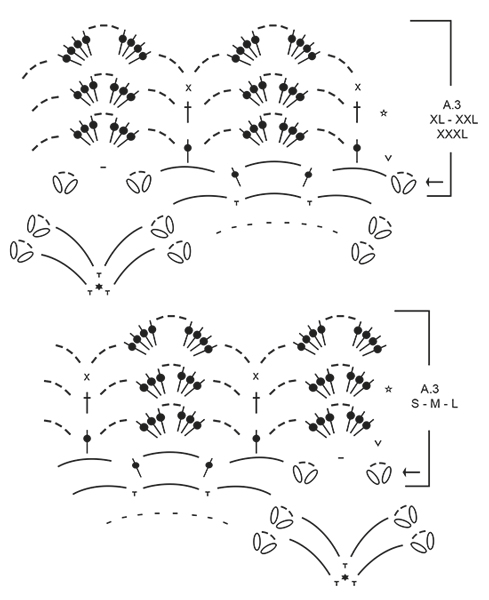
Dear Mrs Catterall, read diagram from right to left from RS, ie repeat A.1 in width and finish row with A.Z, but from WS when working first back and forth, read diagram from left to right, ie starting with A.2, then repeating A.1. When you will work in the round, from RS, repeat A.1, skip A.2 and join in the round with a sl st in first st at beg of round. Happy crocheting!
19.07.2016 - 09:52
![]() Janine Catterall wrote:
Janine Catterall wrote:
Sorry! One more thing. I am reading the diagram from right to left for each row and referring to the photo. i don't know if I am right because the A.2 worked in the row before means I can't start the pattern immediately on the next row. All I'm doing is working the same stitches over A.2 before I start the pattern sequence. Does that make sense? Is that right? Many thanks.
18.07.2016 - 13:08DROPS Design answered:
Dear Mrs Catterrall, read diagram from the bottom corner on the right side towards the left from RS (= starting with A.1) and from the left towards the right from WS (= starting with A.2), then when working in the round, only repeat A.1 (A.X) reading from the right towards the left. Happy crocheting!
18.07.2016 - 16:13
![]() Janine Catterall wrote:
Janine Catterall wrote:
Thank you for your quick response. So am I right to be working back on forth on first complete A.X only? Am I also correct that I restart doing A.2 at the end of each round after I have omitted it from the first round only? Thank you for your help, I am just having trouble visualising how it goes together.
18.07.2016 - 13:03DROPS Design answered:
Dear Mrs Caterall, that's correct to work first A.X back and forth, ie repeat A.1 in width and work A.2 at the end of row (from RS). When this A.X has been worked 1 time in height, then continue in the round repeating A.1 in width, but now skip A.2 (= when working in the round, beg of repeat is the same as A.2, so that you don't need A.2 anymore). Happy crocheting!
18.07.2016 - 16:11
|
|||||||||||||||||||||||||||||||||||||
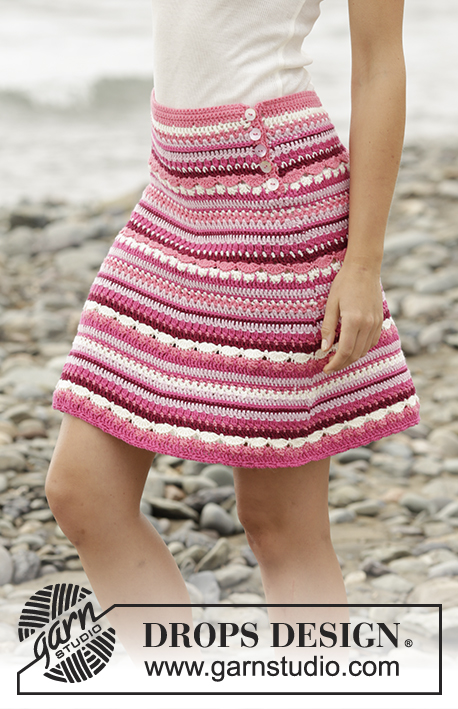
Piña Colada#pinacoladaskirt |
|||||||||||||||||||||||||||||||||||||
|
|
|||||||||||||||||||||||||||||||||||||
Crochet DROPS skirt with lace pattern and overlap, worked top down in ”Safran”. Size S-XXXL.
DROPS 169-21 |
|||||||||||||||||||||||||||||||||||||
|
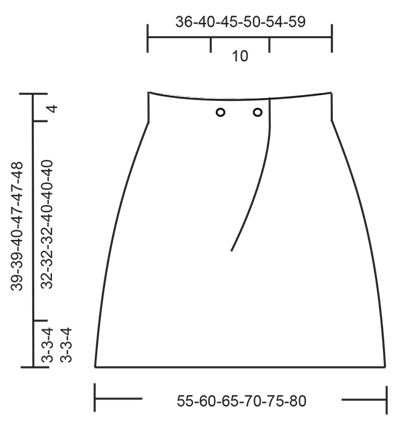
CROCHET INFO: Every row with tr beg with 3 ch. These 3 ch does not replace first tr. Finish row with 1 tr in 3rd ch from last row. On each round with tr replace first tr with 3 ch. Finish round with 1 sl st in 3rd ch from beg of round. When working pattern work sl sts to the first ch-space on beg of every round before working 3 ch at the start. PATTERN: See diagrams A.1 to A.3. See diagrams for correct size. INCREASE TIP: Inc 1 tr by working 2 tr in one tr. ---------------------------------------------------------- SKIRT: Worked back and forth until vent mid back is done. Then work in the round. Assemble skirt with an overlap mid back of approx. 10 cm. Work 233-250-280-308-331-360 ch (incl 3 ch to turn with) on hook size 3 mm with Safran - READ CROCHET INFO. ROW 1: Work 1 tr in 4th ch from hook (= 3 ch and 1 tr), work 1 tr in next ch, * skip 1 ch, work 1 tr in each of the next 6 ch *, repeat from *-* 31-33-38-42-45-49 more times, work 1 tr in each of the remaining 4-7-2-2-4-5 ch = 198-213-238-262-282-307 tr and 3 ch at beg of row. ROW 2: Work 1 tr in every tr. ROW 3: Work 1 tr in every tr and inc 12 tr evenly in all sizes – READ INCREASE TIP = 210-225-250-274-294-319 tr. ROW 4: Work 1 tr in every tr and inc 15-20-15-11-11-6 tr evenly = 225-245-265-285-305-325 tr. ROW 5: Work 1 ch (replaces 1 dc in first tr), * 4 ch, skip 3 tr, 1 dc in next tr *, repeat from *-* the entire row = 56-61-66-71-76-80 ch-space with 4 ch. Now work pattern, beg from arrow in diagram (= RS): Work A.1 (each repetition goes over 5 ch-spaces) 11-12-13-14-15-16 times on row, finish with A.2 around the last ch-space. REMEMBER THE CROCHET TENSION! When entire A.X has been worked vertically, piece measures approx. 20 cm in all sizes. Now continue in the round: Repeat A.X 1 more time vertically but on 1st round skip A.2, and then work only A.1 on round. NOTE: Remember that 1 ch extra is worked in every ch-space - see explanation in symbol explanation. Size S, M L: In size S, M and L finish on next to last round in A.X. The piece now measures approx. 36 cm in all sizes. Size XL, XXL and XXXL: Work all rounds in A.X, then work the first 7 round in A.X one more time. The piece now measures approx. 44 cm in all sizes. Now work an edge at the bottom of skirt. Work A.3 – see diagram for correct size 11-12-13-14-15-16 times on round. NOTE: Round marked with star in diagram is only worked in size L and XXXL. In size S, M, XL, XXL skip this round and continue on last round in diagram. Skirt measures approx. 39-39-40-47-47-48 cm. Fasten off. ASSEMBLY: Place right side of vent over left side so that there is an overlap of approx. 10 cm in all sizes. Or adjust as you wish. Sew the 2 buttons in the middle of the section with tr at the top of skirt. Fasten first button 1 cm from edge, fasten the other button approx. 8 cm from the first button. Button through a row with tr. Fasten off. Since the skirt is see-through it is nice to use a underskirt/jersey skirt in another colour to bring out the pattern. |
|||||||||||||||||||||||||||||||||||||
Diagram explanations |
|||||||||||||||||||||||||||||||||||||
|
|||||||||||||||||||||||||||||||||||||
 |
|||||||||||||||||||||||||||||||||||||
 |
|||||||||||||||||||||||||||||||||||||
 |
|||||||||||||||||||||||||||||||||||||
Have you finished this pattern?Tag your pictures with #dropspattern #pinacoladaskirt or submit them to the #dropsfan gallery. Do you need help with this pattern?You'll find 7 tutorial videos, a Comments/Questions area and more by visiting the pattern on garnstudio.com. © 1982-2026 DROPS Design A/S. We reserve all rights. This document, including all its sub-sections, has copyrights. Read more about what you can do with our patterns at the bottom of each pattern on our site. |
|||||||||||||||||||||||||||||||||||||


With over 40 years in knitting and crochet design, DROPS Design offers one of the most extensive collections of free patterns on the internet - translated to 17 languages. As of today we count 324 catalogues and 12267 patterns translated into English (UK/cm). 12267
We work hard to bring you the best knitting and crochet have to offer, inspiration and advice as well as great quality yarns at incredible prices! Would you like to use our patterns for other than personal use? You can read what you are allowed to do in the Copyright text at the bottom of all our patterns. Happy crafting!
Post a comment to pattern DROPS 169-21
We would love to hear what you have to say about this pattern!
If you want to leave a question, please make sure you select the correct category in the form below, to speed up the answering process. Required fields are marked *.