
Popular categories
Looking for a yarn?


Comments / Questions (38)
![]() Sanne Uhrenfeldt Andersen wrote:
Sanne Uhrenfeldt Andersen wrote:
Jeg er ikke god til at læse diagram :-( er der et sted hvor det stor skrevet for mig helt almindeligt ?
18.03.2025 - 12:53DROPS Design answered:
Hei Sanne. Kun det som er skrevet til oppskriften (diagram). Men er du usikker på hvordan les et diagram, ta en titt under: TIPS & HJÆLP - DROPS Lektioner - Læs en opskrift - Hvordan læses hæklediagrammer? mvh DROPS Design
24.03.2025 - 09:52
![]() Dorte wrote:
Dorte wrote:
Er hæklefastheden før eller efter vask? Det er ikke uvæsentligt i bomuldsgarn. Hvis taljemål ligger lige midt mellem to størrelser, hvilken størrelse vil I så anbefale at der skal hækles?
18.06.2024 - 06:05DROPS Design answered:
Hej Dorte, du måler arbejdet undervejs. DROPS Safran krymper ikke! Hvis det har trukket sig lidt sammen ved vask, trækker du det ud til de rigtige mål inden du lægger til tørre!
25.06.2024 - 12:02
![]() Dorte wrote:
Dorte wrote:
Hvordan skal jeg starte med at hækle rundt, når sidste omgang i første repetition af A.X slutter med A.2? Der står jo jeg skal springe A.2 over i anden repetition af A.X? Kan I forklare hvordan sidste omgang af A.X hækles inden der skl hækles rundt? Er der noget der skal hækles over hinanden og hækles sammen? Hvordan hækles første omgang når der hækles rundt?
17.06.2024 - 16:23DROPS Design answered:
Hej Dorte, ja i stedet for at afslutte rækken med A.2, springer du direkte til de første masker i A.1 når du fortsætter rundt :)
25.06.2024 - 12:00
![]() Manuela wrote:
Manuela wrote:
Ist es möglich ein Foto des Rockes von hinten zu bekommen? Ich häkle und stricke so gut wie nie etwas nach Anleitung, daher tue ich mir schwer diese Anleitung ohne Bild zu lesen. Ich brauche es um mir vorstellen zu können, worauf die Anleitung hinaus will
06.08.2023 - 09:11DROPS Design answered:
Liebe Manuela, das haben wir leider nicht, und den Rock haben wir leider nicht mehr, aber beim Ravelry können Sie einige Fotos von anderen Häklerinnen schauen, das kann Ihnen vielleicht helfen. Viel Spaß beim häkeln!
07.08.2023 - 10:22
![]() Bettina wrote:
Bettina wrote:
In die erste masche in das A2 und dann kettmaschen
07.06.2023 - 09:27DROPS Design answered:
Liebe Bettina, was meinen Sie damit? A.2 war früher am Ende den Reihen gehäkelt, wenn Sie in Runden häkeln, bei der 1. Runde häkeln Sie A.1 ( = AX) und am Ende der 1. Runde, anstatt A.2 wie zuvor häkeln Sie 1 Kett-Masche in das 1. Stäbchen am Anfang der Runde. Kann das Ihnen helfen oder misverstehe ich Ihre Frage?
07.06.2023 - 14:27
![]() Bettina wrote:
Bettina wrote:
Wie fange ich an mit den zusammenhäckel und wie muss ich enden das A2 nicht mehr gehäckelt wird Mit freundlichen Grüßen
07.06.2023 - 08:55DROPS Design answered:
Liebe Bettina, A.2 war am Ende A.x gehäkelt, und wird in der Runde nicht mehr gebraucht/gehäkelt, so am Anfang der nächste 1. Reihe A.X häkeln Sie A.1 wie zuvor aber am Ende der Runde häkeln Sie 1 Kettmasche in die 1. Masche der Runde (dann Kettmaschen bis der 1. Luftmaschenbogen - siehe HÄKELINFO. Viel Spaßb eim häkeln!
07.06.2023 - 09:12
![]() Bettina wrote:
Bettina wrote:
Hallo muss ich anfangen bei der A1 seite zum runden also das schon auslassen häckeln und wie ist das gemeind mit den kettmaschen im muster
07.06.2023 - 08:31DROPS Design answered:
Liebe Bettina, bei der 1. Reihe A.X enden Sie mit einer Kettmasche in die erste Masche der Reihe, und so häkeln Sie weiter in der Runde; bei der 8. Symbol hatten Sie bisher 4 Luftmaschen gehäkelt, nun häkeln Sie 5 Luftmaschen anstatt. Viel Spaß beim häkeln!
07.06.2023 - 09:04
![]() Bettina wrote:
Bettina wrote:
Ich muss es 14cm überlappen ist das sehr schlimm
06.06.2023 - 15:04DROPS Design answered:
Das sollte sicher passer - das können Sie schon mal sehen, nach einigen Runden. Viel Spaß beim häkeln!
06.06.2023 - 17:16
![]() Bettina wrote:
Bettina wrote:
Eine Frage habe ich noch muss ich wenn ich zusammen häckle in runden nur einfach weiter in runden häckeln oder was auslassen da ich ja 10 cm überlappen muss
06.06.2023 - 15:00DROPS Design answered:
Liebe Bettina, häkeln Sie nur einfach in der Runde weiter, die obere 10 cm lgen Sie dann ganz einfach über einander für die Taille. Viel Spaß beim häkeln!
06.06.2023 - 17:16
![]() Bettina wrote:
Bettina wrote:
Okay 👍 Und dann in Runden das muster AX nochmal ganz wiederholen bis ich mit A3 fertig mache?
06.06.2023 - 09:53DROPS Design answered:
Liebe Bettina, ja genau, beachten Sie aber, daß A.X soll mit der vorletzten Reihen enden, dann A.3 häkeln (aber nur nicht die Reihe mit dem Sternchen). Viel Spaß beim häkeln!
06.06.2023 - 14:04
|
|||||||||||||||||||||||||||||||||||||
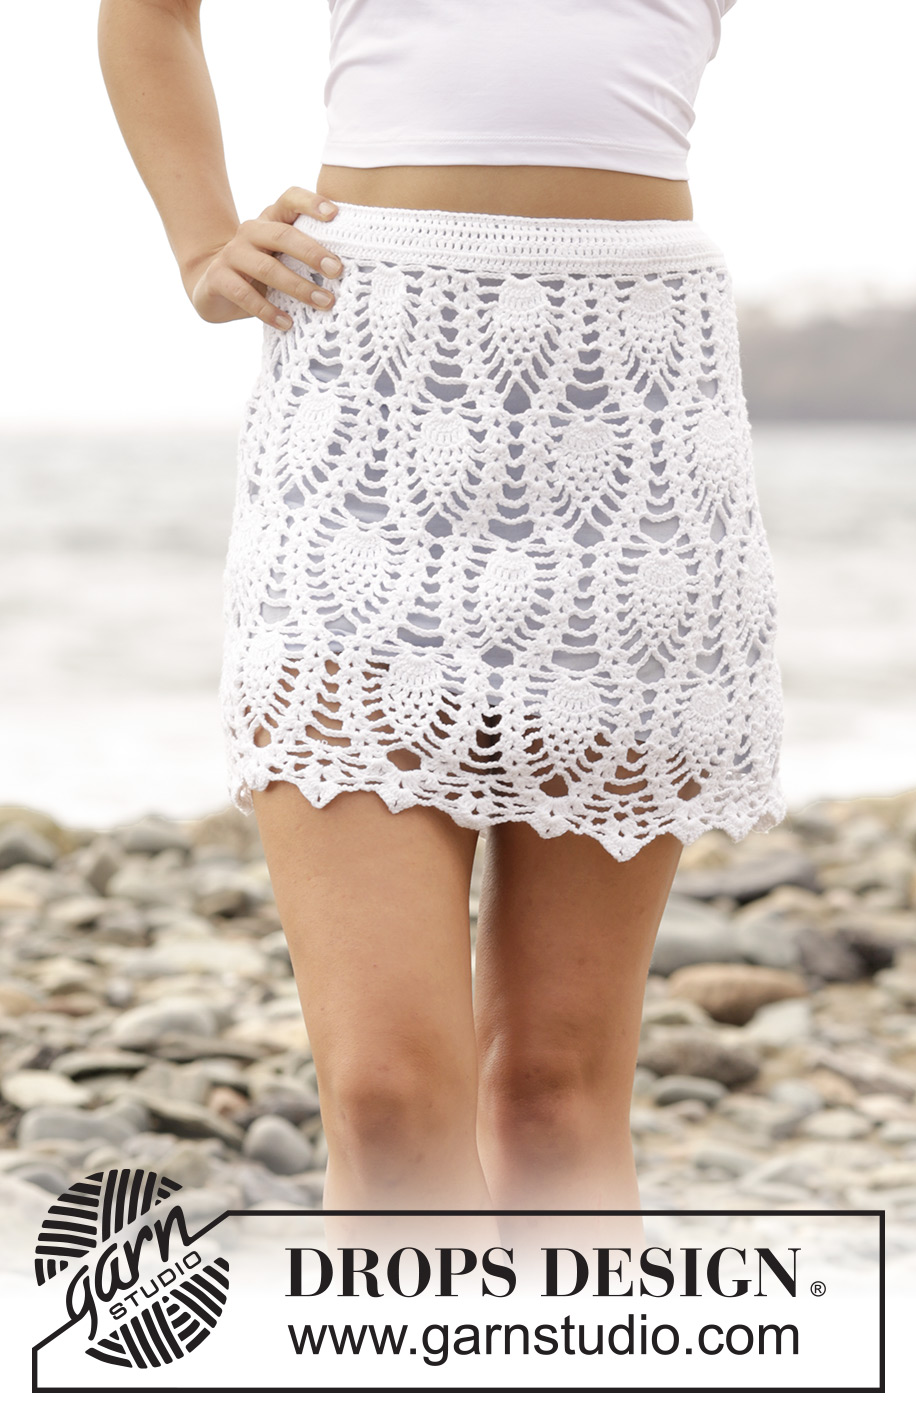
Piña Colada#pinacoladaskirt |
|||||||||||||||||||||||||||||||||||||
|
|
|||||||||||||||||||||||||||||||||||||
Crochet DROPS skirt with lace pattern and overlap, worked top down in ”Safran”. Size S-XXXL.
DROPS 169-21 |
|||||||||||||||||||||||||||||||||||||
|
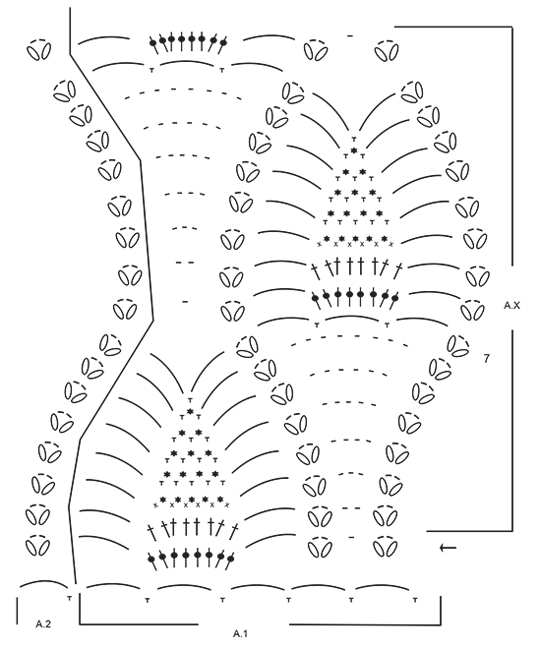
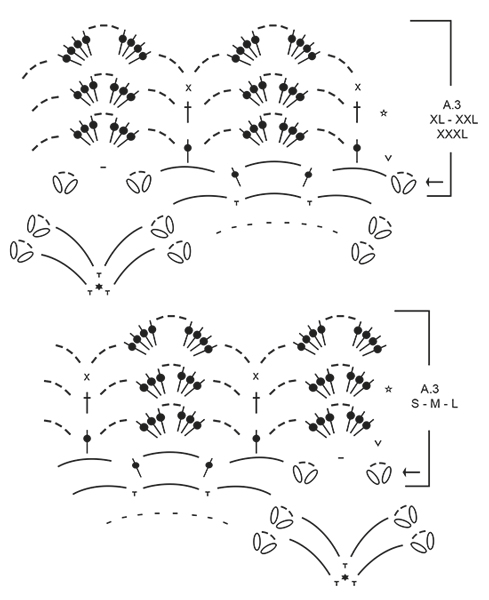
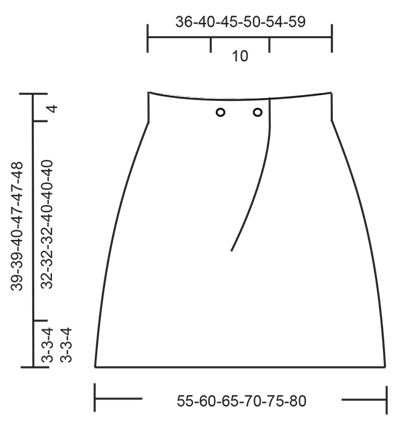
CROCHET INFO: Every row with tr beg with 3 ch. These 3 ch does not replace first tr. Finish row with 1 tr in 3rd ch from last row. On each round with tr replace first tr with 3 ch. Finish round with 1 sl st in 3rd ch from beg of round. When working pattern work sl sts to the first ch-space on beg of every round before working 3 ch at the start. PATTERN: See diagrams A.1 to A.3. See diagrams for correct size. INCREASE TIP: Inc 1 tr by working 2 tr in one tr. ---------------------------------------------------------- SKIRT: Worked back and forth until vent mid back is done. Then work in the round. Assemble skirt with an overlap mid back of approx. 10 cm. Work 233-250-280-308-331-360 ch (incl 3 ch to turn with) on hook size 3 mm with Safran - READ CROCHET INFO. ROW 1: Work 1 tr in 4th ch from hook (= 3 ch and 1 tr), work 1 tr in next ch, * skip 1 ch, work 1 tr in each of the next 6 ch *, repeat from *-* 31-33-38-42-45-49 more times, work 1 tr in each of the remaining 4-7-2-2-4-5 ch = 198-213-238-262-282-307 tr and 3 ch at beg of row. ROW 2: Work 1 tr in every tr. ROW 3: Work 1 tr in every tr and inc 12 tr evenly in all sizes – READ INCREASE TIP = 210-225-250-274-294-319 tr. ROW 4: Work 1 tr in every tr and inc 15-20-15-11-11-6 tr evenly = 225-245-265-285-305-325 tr. ROW 5: Work 1 ch (replaces 1 dc in first tr), * 4 ch, skip 3 tr, 1 dc in next tr *, repeat from *-* the entire row = 56-61-66-71-76-80 ch-space with 4 ch. Now work pattern, beg from arrow in diagram (= RS): Work A.1 (each repetition goes over 5 ch-spaces) 11-12-13-14-15-16 times on row, finish with A.2 around the last ch-space. REMEMBER THE CROCHET TENSION! When entire A.X has been worked vertically, piece measures approx. 20 cm in all sizes. Now continue in the round: Repeat A.X 1 more time vertically but on 1st round skip A.2, and then work only A.1 on round. NOTE: Remember that 1 ch extra is worked in every ch-space - see explanation in symbol explanation. Size S, M L: In size S, M and L finish on next to last round in A.X. The piece now measures approx. 36 cm in all sizes. Size XL, XXL and XXXL: Work all rounds in A.X, then work the first 7 round in A.X one more time. The piece now measures approx. 44 cm in all sizes. Now work an edge at the bottom of skirt. Work A.3 – see diagram for correct size 11-12-13-14-15-16 times on round. NOTE: Round marked with star in diagram is only worked in size L and XXXL. In size S, M, XL, XXL skip this round and continue on last round in diagram. Skirt measures approx. 39-39-40-47-47-48 cm. Fasten off. ASSEMBLY: Place right side of vent over left side so that there is an overlap of approx. 10 cm in all sizes. Or adjust as you wish. Sew the 2 buttons in the middle of the section with tr at the top of skirt. Fasten first button 1 cm from edge, fasten the other button approx. 8 cm from the first button. Button through a row with tr. Fasten off. Since the skirt is see-through it is nice to use a underskirt/jersey skirt in another colour to bring out the pattern. |
|||||||||||||||||||||||||||||||||||||
Diagram explanations |
|||||||||||||||||||||||||||||||||||||
|
|||||||||||||||||||||||||||||||||||||
|
|||||||||||||||||||||||||||||||||||||
|
|||||||||||||||||||||||||||||||||||||
|
|||||||||||||||||||||||||||||||||||||
Have you finished this pattern?Tag your pictures with #dropspattern #pinacoladaskirt or submit them to the #dropsfan gallery. Do you need help with this pattern?You'll find 7 tutorial videos, a Comments/Questions area and more by visiting the pattern on garnstudio.com. © 1982-2025 DROPS Design A/S. We reserve all rights. This document, including all its sub-sections, has copyrights. Read more about what you can do with our patterns at the bottom of each pattern on our site. |
|||||||||||||||||||||||||||||||||||||


With over 40 years in knitting and crochet design, DROPS Design offers one of the most extensive collections of free patterns on the internet - translated to 17 languages. As of today we count 314 catalogues and 11822 patterns translated into English (UK/cm).
We work hard to bring you the best knitting and crochet have to offer, inspiration and advice as well as great quality yarns at incredible prices! Would you like to use our patterns for other than personal use? You can read what you are allowed to do in the Copyright text at the bottom of all our patterns. Happy crafting!
Post a comment to pattern DROPS 169-21
We would love to hear what you have to say about this pattern!
If you want to leave a question, please make sure you select the correct category in the form below, to speed up the answering process. Required fields are marked *.