
Popular categories
Looking for a yarn?


Comments / Questions (85)
![]() Petra wrote:
Petra wrote:
Huomattaisiinkohan tämä nopeammin jos valitsen kategorian oikein...
17.02.2014 - 09:13DROPS Design answered:
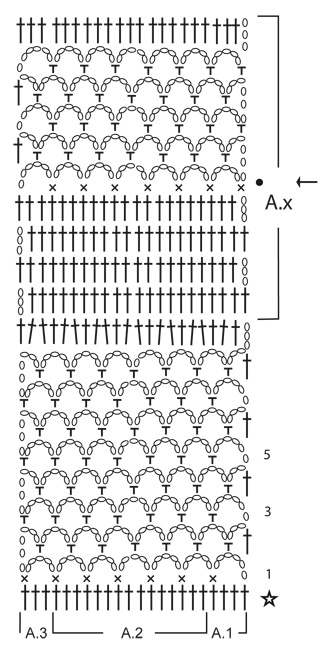
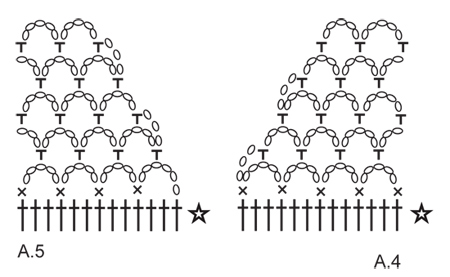
Hei! Kyllä, reikien tulee olla 23. Tarkista, että olet virkannut 8 krs kaaria kuten ohjeessa mainitaan. Jatka siten virkkaamista piirroksen A.x mukaan. Pylväitä tulee tällöin 70. Pylväiden määrä näkyy myös piirroksesta. Muista, että ensimmäinen p korvataan 3 ketjusilmukalla.
03.03.2014 - 15:54
![]() Petra wrote:
Petra wrote:
Hei! Minulla on vähän samanlaisia ongelmia kuin aikaisemmillakin. Eli olen tehnyt nyt ensimmäisen pitsiraitaosion. Kuuluuko niitä reikiä olla 23 koossa S? Jos jatkan ohjeen mukaan, pylväitä tulee 67 eikä 70 kuten ensimmäisessä pylväsosiossa. Olen purkanut ja aloittanut uudestaan varmaan 10 kertaa enkä vieläkään ymmärrä missä menee vikaan. Kiitos vastauksesta jo etukäteen!
16.02.2014 - 20:12
![]() DROPS Design wrote:
DROPS Design wrote:
Liebe Christine, es gilt das gleiche wie bei Andrea: Sie müssen darauf achten, dass Ihnen keine Maschen verloren gehen, achten Sie besonders genau auf die Ränder.
07.02.2014 - 13:29
![]() Christine wrote:
Christine wrote:
Auch ich habe das Problem, dass ich, wenn ich nach den Luftmaschenbögen wieder eine Reihe Stäbchen häkele, zu wenige Maschen in der Reihe habe. Es geht nur auf, wenn ich auch in die halben Bögen jeweils 3 Stäbchen häkele und zwischendrin in einem der ganzen Bögen eine vierte Masche mit einschummele. Keine Ahnung wo mein Fehler liegt.
05.02.2014 - 19:18
![]() Line wrote:
Line wrote:
Jeg har samme spørsmål eller problem som Andrea. Pga antall luftmaskebuer får jeg færre staver når jeg begynner på mønster ax? Er dette riktig?
02.02.2014 - 23:42DROPS Design answered:
Hej Line. Du skal have det samme antal staver efter luftmaskebuerne og du begynder med A.x (du kan telle staverne i begyndelsen af A.1-A.3 og ogsaa förste rad i A.x). Hold godt öje med du hekler precies som vist i diagrammet
04.02.2014 - 14:32
![]() Gina wrote:
Gina wrote:
Der Pulli ist toll. Würde ihn gern in dieser Farbe häkeln. Passt hierzu Drops Glitter und wenn ja, in welcher Farbe. Danke
30.01.2014 - 08:13
![]() Lise wrote:
Lise wrote:
Super sød og dejlig, glæder mig til at hækle den.
29.01.2014 - 10:03
![]() Andrea wrote:
Andrea wrote:
Wenn ich den ersten Lochmusterstreifen beendet habe (Größe S), habe ich 23 "Löcher", wenn ich dann nach Muster AX weiterhäkeln würde, habe ich nur noch 67 statt 70 feste Maschen, ist das so richtig???
25.01.2014 - 08:57DROPS Design answered:
Liebe Andrea, Sie haben nach dem Lochmusterstreifen genau so viele Stb wie vorher. Vergleichen Sie Ihr Arbeit genau mit dem Diagramm, es düfen keine Mschen "verloren gehen".
27.01.2014 - 10:08
![]() Rita wrote:
Rita wrote:
Zeer mooi patroon,nu nog wachten op de lente
20.01.2014 - 16:53Kal wrote:
Trés agréable
17.01.2014 - 20:52
|
||||||||||||||||||||||
Amber#ambersweater |
||||||||||||||||||||||
|
|
||||||||||||||||||||||
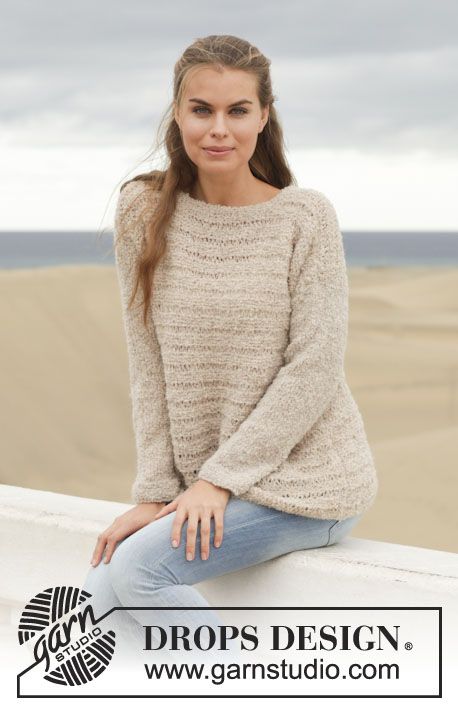
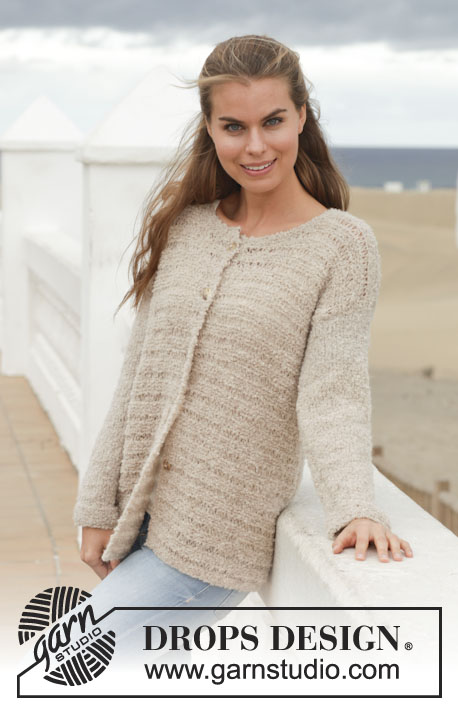
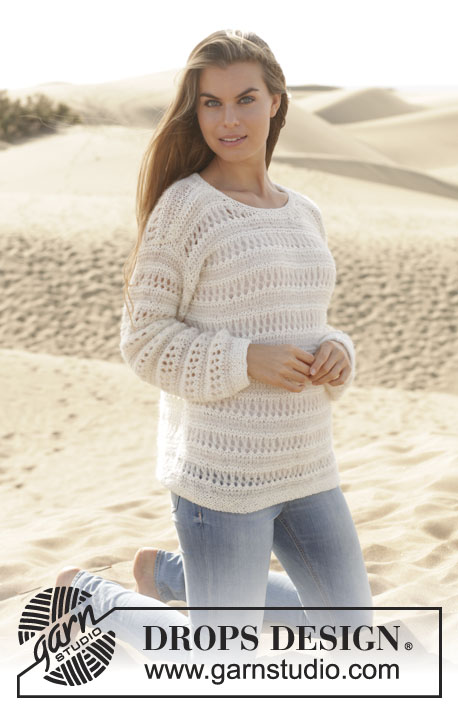
Crochet DROPS jumper with lace pattern and trebles in ”Cotton Light”. Size: S - XXXL.
DROPS 152-17 |
||||||||||||||||||||||
|
CROCHET INFO: At beg of a new row replace 1 tr with 3 ch. PATTERN: See diagrams A.1-A.5. CROCHET TIP: Beg and end at arrow in the middle of diagram A.x DECREASE TIP: Dec 1 tr by working 2 tr tog as follows: Work 1 tr but wait with last pull through (= 2 sts on hook), then work next tr but on last pull through, pull yarn through all 3 sts on hook. ---------------------------------------------------------- BACK PIECE: Worked back and forth. Work 83-90-100-107-121-132 loose ch on hook size 4.5 mm with Cotton Light. ROW 1: Work 1 tr in 4th ch from hook (= 2 tr), then work 1 tr in each of the next 2-2-5-5-5-2 ch, * skip 1 ch, work 1 tr in each of the next 6 ch *, repeat from *-* 10-11-12-13-15-17 more times = 70-76-85-91-103-112 tr. Then work 5-5-5-4-5-5 more rows with 1 tr in every tr (= 6-6-6-5-6-6 rows in total with tr) – READ CROCHET INFO. Continue with PATTERN as follows: Work A.1 over 4 tr, A.2 until 3 tr remain, A.3 over the remaining 3 tr from previous row. Continue with diagrams A.1 – A.3 back and forth for 8 rows, there are now 8 holes diagonally in height (= first stripe with lace pattern), and 1 row with tr's. REMEMBER THE CROCHET TENSION! Then continue with stripes in tr and lace pattern the same way but work according to diagram A.x, AT THE SAME TIME when piece measures 32-32-32-40-41-41 cm and when working a section with tr, insert a marker in each side for armholes. Continue with pattern as before. When piece measures 49-50-51-60-62-63 cm, beg neck dec and finish each shoulder separately as follows from RS: Work 1 row with tr over the first 21-24-27-30-36-39 tr, turn piece and dec 1 tr – READ DECREASE TIP. Work the rest of row. When piece measures 51-52-53-62-64-65 cm, back piece is finished. Fasten off. Work the other shoulder the same way but reversed. FRONT PIECE: Work as back piece. When piece measures 43-43-43-53-54-54 cm, beg neck dec and work each shoulder separately. Work left shoulder as follows from RS: Work ch-spaces as before (with 2 tr between every dc on first row with ch-spaces) over the first 27-30-33-36-42-45 tr, AT THE SAME TIME dec for neck by dec 1 ch-space in lace pattern according to pattern A.4. Continue like this back and forth until A.4 has been worked 1 time vertically. On next row work 4 tr in first ch-space, 3 tr in each of the next ch-spaces until 1 ch-space remains, and 4 tr in last ch-space on row = 20-23-26-29-35-38 tr remain for shoulder. Then continue with 1 tr in every tr. When piece measures 51-52-53-62-64-65 cm in total, front piece is finished. Fasten off. Work the other shoulder the same way but reversed and use diagram A.5 instead of A.4. Sew the shoulder seams. SLEEVE: The sleeves are worked from armhole and outwards. ROW 1: Beg at the bottom at one of the markers for armhole, and work ch-spaces over the armhole as follows: 1 dc, * 5 ch, 1 dc *, repeat from *-* until there are 20-21-23-23-25-26 ch-spaces (every ch-space is over 1½-2 cm). Continue back and forth with pattern A.x until 3 repetitions in total vertically have been worked - READ CROCHET TIP - AT THE SAME TIME dec in every section with tr as follows: 1st and 2nd time A.x is worked dec 1 tr in each side of piece on the 1st, 3rd and 5th row with tr in A.x = 6 tr dec in each side. 48-51-57-57-63-66 tr remain. 3rd time A.x is worked dec as follows: Dec 1 tr in each side of piece on the first 4-5-5-5-5-5 rows with tr = 40-41-47-47-53-56 tr remain. Continue with 4-3-2-2-1-0 rows with tr. Now sleeve measures approx. 36-35-34-34-33-32 cm. Fasten off. NECK EDGE: Work an edge around the neck as follows from mid on top of shoulder: 1 dc, * 3 ch, skip approx. 1 cm, 1 dc *, repeat from *-* around the entire neck and finish with 1 sl st in 1st dc on round. Fasten off. ASSEMBLY: Sew side seams and underarm seams in one in edge sts on rows. |
||||||||||||||||||||||
Diagram explanations |
||||||||||||||||||||||
|
||||||||||||||||||||||
 |
||||||||||||||||||||||
 |
||||||||||||||||||||||
 |
||||||||||||||||||||||
Have you finished this pattern?Tag your pictures with #dropspattern #ambersweater or submit them to the #dropsfan gallery. Do you need help with this pattern?You'll find 4 tutorial videos, a Comments/Questions area and more by visiting the pattern on garnstudio.com. © 1982-2026 DROPS Design A/S. We reserve all rights. This document, including all its sub-sections, has copyrights. Read more about what you can do with our patterns at the bottom of each pattern on our site. |
||||||||||||||||||||||


With over 40 years in knitting and crochet design, DROPS Design offers one of the most extensive collections of free patterns on the internet - translated to 17 languages. As of today we count 324 catalogues and 12267 patterns translated into English (UK/cm). 12267
We work hard to bring you the best knitting and crochet have to offer, inspiration and advice as well as great quality yarns at incredible prices! Would you like to use our patterns for other than personal use? You can read what you are allowed to do in the Copyright text at the bottom of all our patterns. Happy crafting!
Post a comment to pattern DROPS 152-17
We would love to hear what you have to say about this pattern!
If you want to leave a question, please make sure you select the correct category in the form below, to speed up the answering process. Required fields are marked *.