
Popular categories
Looking for a yarn?


Comments / Questions (61)
![]() Carine wrote:
Carine wrote:
Nu begrijp ik om de hoeveel naalden minderen maar is het nu voor of na de 1e en 2 e markeerder want uitleg verschilt per taal graag antwoord want raak zo niet verder
29.05.2015 - 07:27DROPS Design answered:
Hoi Carine. Je meerdert voor 1e markeerder en na 2e markeerder gezien aan goede kant - hetzelfde staat in het originele Noorse patroon en in het Engelse.
29.05.2015 - 12:54
![]() Carine wrote:
Carine wrote:
Sorry begrijp nog steeds niet... Dus minderen aan goede kant om de 4 nld?? Wat ook niet klopt is nederlandse beschrijving er staat minderen na markeerder en in andere talen voor markeerder.. Wat is ht eigenlijk???
28.05.2015 - 18:01DROPS Design answered:
Zie antwoord hierboven
29.05.2015 - 12:55
![]() Carine wrote:
Carine wrote:
Er staat voor de mouwen minder om de 4 nld 12 x 1 steek maar tss haakjes staat om de naald?? Is het om de 4 nld of om de 2 nld ??
28.05.2015 - 15:45DROPS Design answered:
Hoi Carine. Om de naald op de goede kant is elke 4e nld (verkeerde kant, goede kant (1e keer), verkeerde kant, goede kant (2e keer).
28.05.2015 - 15:54
![]() Carlne wrote:
Carlne wrote:
Kun je deze ook met gewone naalden breien ipv rondbreinaald?
27.05.2015 - 07:07DROPS Design answered:
Hoi Carine. Je kan het patroon aanpassen in voor- en achterpand en heen en weer breien.
27.05.2015 - 14:40
![]() Debbi Darling wrote:
Debbi Darling wrote:
So I am still waiting your answer from June.
07.11.2014 - 13:36DROPS Design answered:
Dear Mrs Darling, a correction has been made to this pattern so that you change to needle size 4 mm / US 6 to work A.2. See tab "correction" to print only the corrected part. Happy knitting!
07.11.2014 - 15:35
![]() Debbi Darling wrote:
Debbi Darling wrote:
The first part of the top is done using size us4 needle for chart a.1 - the pattern asks us to get gauge for A.2 on size us 6 needles (i got gauge with a us 5) -when we switch from chart a.1 to a.2, the instructions do not tell me to change my needle. what size needle do I use for chart a.2? thanks!
24.06.2014 - 17:48DROPS Design answered:
We'll come back as soon as possible to answer you - see below. Thank you for your patience.
24.06.2014 - 18:37
![]() Francisca wrote:
Francisca wrote:
Bonjour, je ne comprends pas, pour les manches, il faut diminuer du côté des marqueurs (côté manches) et du côté de la bordure ? (taille S)
18.06.2014 - 13:22DROPS Design answered:
Bonjour Francisca, en taille S, on a 128 m, on diminue: 12 x 1 m au début et à la fin du rang à 1 m des bords, soit 24 dim au total + 12 x 1 m (avant le 1er marqueur et après le 2ème marqueur)soit 24 dim au total Soit 128- 48= 80 -34 m pour l'encolure = 23 m pour chaque épaule/manche quand toutes les diminutions sont faites. Bon tricot!
18.06.2014 - 14:57
![]() Debbi Darling wrote:
Debbi Darling wrote:
The first part of the top is done using size us4 needle for chart a.1 - the pattern asks us to get gauge for A.2 on size us 6 needles (i got gauge with a us 5) -when we switch from chart a.1 to a.2, the instructions do not tell me to change my needle. what size needle do I use for chart a.2? thanks!
13.06.2014 - 21:08DROPS Design answered:
Dear Mrs Darling, your question has been forwarded to our design team, we'll back as soon as possible. Thank you.
24.06.2014 - 18:35
![]() Francisca wrote:
Francisca wrote:
Bonjour si j'ai bien compris, les coutures des manches se retrouvent sur le prolongement des épaules et sous les bras ? les explications sont un peu dures à suivre quand on arrive à cette partie merci de votre réponse
10.06.2014 - 13:34DROPS Design answered:
Bonjour Francisca, on monte les mailles des manches de chaque côté du dos et du devant, il faudra donc assembler les mailles montées entre elles à la fin (sous la manche). La couture d'épaules se continuera sur la manche. Vous pouvez demander de l'aide à votre magasin DROPS où sur le forum DROPS si nécessaire. Bon tricot!
10.06.2014 - 13:48
![]() Heléne Lundqvist wrote:
Heléne Lundqvist wrote:
Fortsätt minskn mot ärmkupan som förut. Efter sista minskn är det 23-24-Sticka 1 v rätt från avigsidan och sätt de yttersta 6-6-6-8-8-10 m på ärmkupan på 1 tråd. Fortsätt med rätst fram och tillbaka över de 17-18... Jag förstår verkligen inte hur jag ska göra. Finns det någon instruktionsvideo? Finns det någon bild på ryggen så man kan se hur det är tänkt att det ska vara. Tack på förhand! /Helene
04.06.2014 - 21:07DROPS Design answered:
Hej Heléne. Du har 23-24-24-27-28 eller 32 m paa pinden (afhaengigt af hvilken str du laver). Naar du har strikket 1 v rätt från avigsidan saetter du de ytterste 6-6-6-8-8 eller 10 m paa en traad eller maskeholder og nu har du 17-18-18-19-20-22 m paa pinden som du nu skal strikke riller over. Og derefter skal du strikke disse m sammen med de 6-6-6-8-8-10 m paa traaden som beskrevet. Hjaelper det?
11.06.2014 - 19:44
|
|||||||||||||||||||
Jodi#joditop |
|||||||||||||||||||
 |
 |
||||||||||||||||||
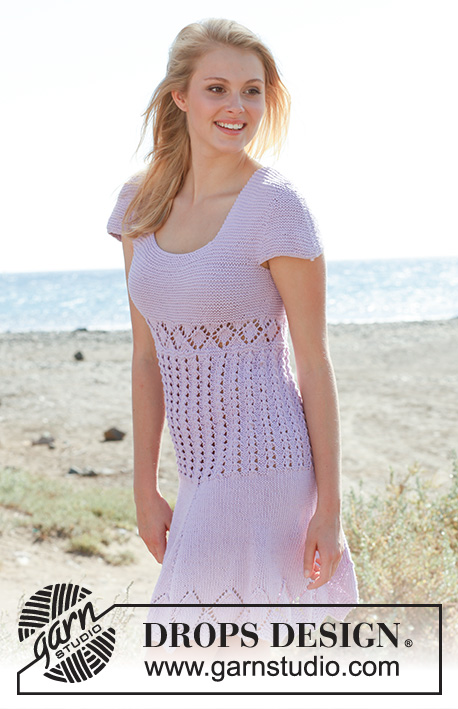
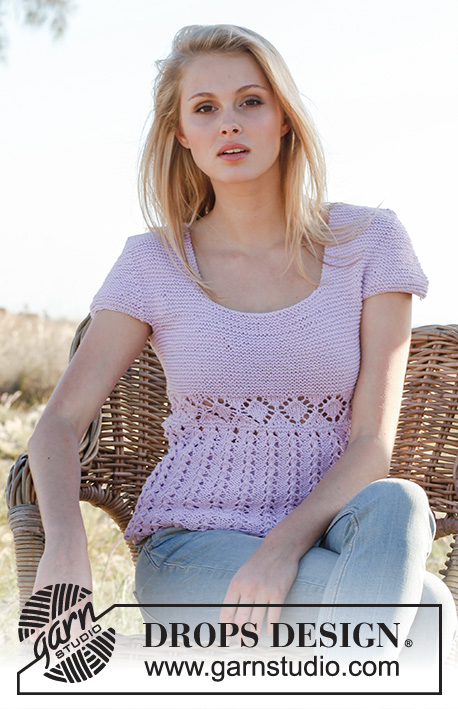
Knitted DROPS top in garter st with short sleeves and lace pattern in ”Cotton Light”. Size: S - XXXL.
DROPS 148-11 |
|||||||||||||||||||
|
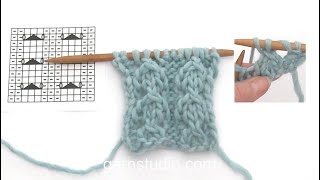
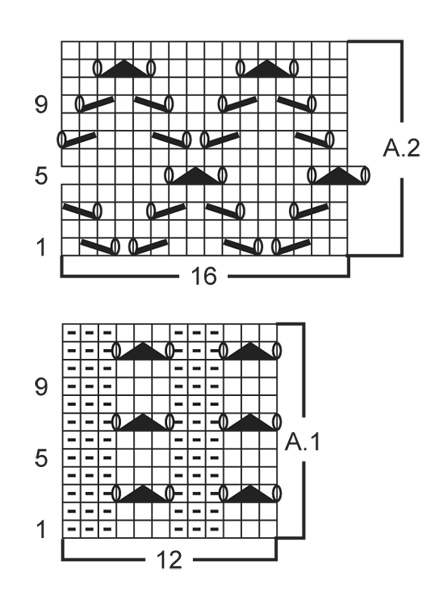
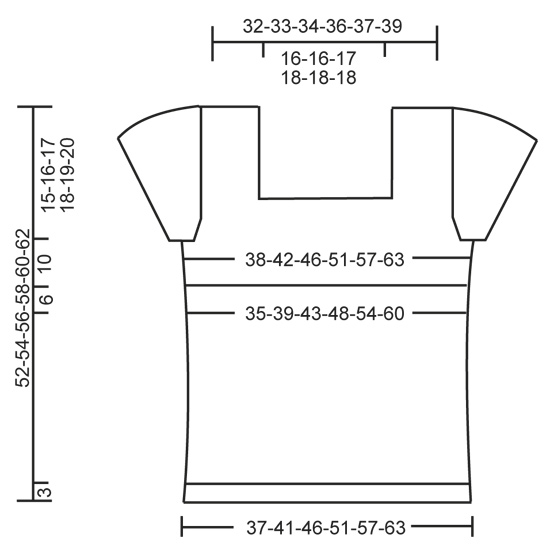
GARTER ST (in the round on circular needle): 1 ridge = * K 1 round and P 1 round *, repeat from *-*. GARTER ST (back and forth on needle): K all rows. 1 ridge = 2 rows K. PATTERN: See diagrams A.1 and A.2. INCREASE TIP: Inc 1 st by working 2 sts in the same st. DECREASE TIP (applies to dec at the sleeves): All dec are done from RS! Dec as follows before marker and before edge st: K 2 tog. Dec as follows after marker and after edge st: Slip 1 st as if to K, K 1, psso. ---------------------------------------------------------- TOP: Cast on 156-174-192-216-240-264 sts on circular needle size 3.5 mm with Cotton Light. K 1 round, then work rib = K 3/P 3. When rib measures 3 cm, work pattern according to diagram A.1. When piece measures approx. 21-22-23-24-25-26 cm (stop after 1 round with holes), K 1 round while AT THE SAME TIME dec 8-10-12-14-14-14 sts evenly = 148-164-180-202-226-250 sts. P 1 round, K 1 round and P 1 round. K 1 round while AT THE SAME TIME dec 28-36-36-42-42-42 sts evenly = 120-128-144-160-184-208 sts. Switch to circular needle size 4 mm and work pattern according to diagram A.2. When A.2 has been worked, K 1 round while AT THE SAME TIME inc 28-36-36-42-42-44 sts evenly = 148-164-180-202-226-252 sts. P 1 round. Insert 1 marker at beg of round and 1 marker after 74-82-90-101-113-126 sts (= sides) – NOW MEASURES PIECE FROM HERE! Then work in GARTER ST in the round on circular needle - see explanation above. When piece measures 3 cm, inc 1 st on each side of both markers – READ INCREASE TIP (= 4 sts inc). Repeat inc when piece measures 6 and 9 cm = 160-176-192-214-238-264 sts. When piece measures 10 cm - adjust so that next round is a P round, cast off 8-10-12-16-20-24 sts in each side for armholes (i.e. cast off 4-5-6-8-10-12 sts on each side of both markers) = 72-78-84-91-99-108 sts remain on front and back piece. BACK PIECE: = 72-78-84-91-99-108 sts. Beg with K from RS and cast off at beg of row in each side as follows: Cast off 2 sts 1-1-2-2-2-2 times in each side = 68-74-76-83-91-100 sts, cut the thread. Now work in sleeve caps on back piece as follows (1st row = RS): Cast on 30-30-32-34-36-38 sts on needle, insert 1 marker, work the 68-74-76-83-91-100 sts from back piece, insert 1 marker and cast on 30-30-32-34-36-38 sts on needle = 128-134-140-151-163-176 sts. Continue in garter st back and forth on circular needle size 4 mm. AT THE SAME TIME on next row from RS beg dec as follows - READ DECREASE TIP: Dec 1 st at beg and end of row inside 1 edge st: Dec every 4th row (i.e. every other row from RS) a total of 12-12-13-13-14-14 times. AT THE SAME TIME dec in each side in towards sleeves (i.e. before first marker and after 2nd marker seen from RS): Dec every 4th row (i.e. every other row from RS): 1 st 12-12-13-13-14-14 times in total. AT THE SAME TIME dec in each side in towards back piece (i.e. after first marker and before 2nd marker seen from RS): Dec every other row (i.e. every row from RS): 1 st 0-2-2-4-7-9 times in total. NECK DEC: AT THE SAME TIME when piece measures 48-50-52-54-56-58 cm, cast off the middle 34-34-36-37-37-38 sts from RS for neck and finish each shoulder separately. RIGHT SHOULDER: Continue dec towards sleeve cap as before. After last dec there are 23-24-24-27-28-32 sts on needle (i.e. 17-18-18-19-20-22 shoulder sts + 6-6-6-8-8-10 sts remain at the top on sleeve cap). K 1 row from WS and slip the outermost 6-6-6-8-8-10 sts on sleeve cap on 1 stitch holder. Continue in garter st back and forth over the 17-18-18-19-20-22 shoulder sts AT THE SAME TIME as sts from sleeve cap is worked tog with sts on needle as follows: K 1 row from RS until 1 st remains on left needle, slip last st over to right needle without working it, slip first and second st from stitch holder back on left needle, pass the slipped st from right needle back on left needle and K these 3 sts tog, turn, tighten thread and K 1 row from WS, * K 1 row from RS until 1 st remains on left needle, slip last st over to right needle without working it, slip next st from stitch holder back on left needle, pass the slipped st from right needle back on left needle and K these 2 sts tog, turn, tighten thread and K 1 row from WS *, repeat these 2 rows from *-* until all sts on stitch holder have been worked tog with last st on row, loosely cast off. Yoke measures approx. 25-26-27-28-29-30 cm from marker and the entire top measures approx. 52-54-56-58-60-62 cm. LEFT SHOULDER: Work as right shoulder but after last dec, slip the outermost 6-6-6-8-8-10 sts on sleeve cap on 1 stitch holder. Beg from WS and K 1 row until 1 st remains on left needle, slip last st over on right needle without working it, slip first and second st from stitch holder back on left needle, pass the slipped st from right needle back on left needle and K these 3 sts tog, turn, tighten thread and K 1 row from RS, then repeat the 2 rows from *-* as on right shoulder (but with start from WS) until all sts on stitch holder have been worked tog with last st on row, loosely cast off. FRONT PIECE: = 72-78-84-91-99-108 sts. Work as back piece and cast on for sleeve caps in each side as on back piece = 128-134-140-151-163-176 sts. Then dec on front piece and sleeve caps as on back piece but when piece measures 40-42-44-46-48-50 cm, cast off the middle 34-34-36-37-37-38 sts for neck and finish each shoulder separately. Continue dec and then work as right and left shoulder on back piece. Yoke measures approx. 25-26-27-28-29-30 cm from marker and the entire top measures approx. 52-54-56-58-60-62 cm. ASSEMBLY: Sew shoulder seams and down along sleeve caps - sew in front loop of outermost st to avoid chunky seams. |
|||||||||||||||||||
Diagram explanations |
|||||||||||||||||||
|
|||||||||||||||||||
 |
|||||||||||||||||||
 |
|||||||||||||||||||
Have you finished this pattern?Tag your pictures with #dropspattern #joditop or submit them to the #dropsfan gallery. Do you need help with this pattern?You'll find 19 tutorial videos, a Comments/Questions area and more by visiting the pattern on garnstudio.com. © 1982-2026 DROPS Design A/S. We reserve all rights. This document, including all its sub-sections, has copyrights. Read more about what you can do with our patterns at the bottom of each pattern on our site. |
|||||||||||||||||||


With over 40 years in knitting and crochet design, DROPS Design offers one of the most extensive collections of free patterns on the internet - translated to 17 languages. As of today we count 324 catalogues and 12267 patterns translated into English (UK/cm). 12267
We work hard to bring you the best knitting and crochet have to offer, inspiration and advice as well as great quality yarns at incredible prices! Would you like to use our patterns for other than personal use? You can read what you are allowed to do in the Copyright text at the bottom of all our patterns. Happy crafting!
Post a comment to pattern DROPS 148-11
We would love to hear what you have to say about this pattern!
If you want to leave a question, please make sure you select the correct category in the form below, to speed up the answering process. Required fields are marked *.