
Categorie popolari
State cercando un filato?


Commenti / Domande (80)
![]() Nina Davidson ha scritto:
Nina Davidson ha scritto:
Hi Please disregard yesterday’s comment/question ..... I can now see what is going on - very good!
15.07.2021 - 01:27
![]() Nina ha scritto:
Nina ha scritto:
I’m knitting the smallest size (204 stitches in the body). I’m struggling to understand where the pattern lies ..... you only do A.2 once (14 stitches). I assumed the 2 markers are placed at the sides i.e. 102 stitches each for front and back so how does doing A.2 once only fit into the pattern - front and back are different?? Please explain. I’m considering re jigging the sections to make front and back the same (leave out A.2).
14.07.2021 - 07:56
![]() Diana Seifert ha scritto:
Diana Seifert ha scritto:
Thank you very much!!!
01.06.2021 - 14:16
![]() Diana Seifert ha scritto:
Diana Seifert ha scritto:
How can I work A3, A4 and A6 ( together 20 stitches) over 28 stitches? Or how can I work A.3, A.4, A.5, A.4, A.3, A.6 over the last 14 ? Thank you sooo much.
31.05.2021 - 16:20DROPS Design ha risposto:
Dear Diana, it is always easier to answe if you specifya wich part you need help with (Sleeves? Front? ), and which size, the question relates to, I am just going to assume, that is the smalles size and the BODY at the beginning of the pattern. In there, you need the work A.3, THEN, A.4, and THEN repeat ,A.6 over 28 stitches (5 repeat + the first stitch). Then A.3, A.4, A.5, A.4, A.3,, and THEN repeat A.6 over the last 14 stitches (3 repeats + the first 2 stitches). Happy Knitting!
31.05.2021 - 16:40
![]() Diana Seifert ha scritto:
Diana Seifert ha scritto:
Hi, Thank you for your quick response. BODY: Then work pattern as follows - from beginning of round: A.2 over the first 14-17-23-29-35-41 stitches (finish with the first 2 stitches in A.2), A.3 (= 12 stitches), A.4 (= 8 stitches), A.5 (= 34 stitches), A.4, A.3, A.6 over the next 28-34-46-58-70-82 stitches (finish with first stitch in A.6), A.3, A.4, A.5, A.4, A.3, A.6 over the last 14-17-23-29-35-41 stitches (finish with the first 2 stitches in A.6).
31.05.2021 - 16:18
![]() Diana ha scritto:
Diana ha scritto:
Hi Thank you for this knitting pattern I have one question: I do the ice castle sweater, size s How can I knitter a3, a6, and a4 (23) ober 28 ? That makes no sense. Thank you.
30.05.2021 - 21:06DROPS Design ha risposto:
Dear Diana, please tell us, exactly which part of the pattern you need help with?
31.05.2021 - 02:40
![]() Glenys Gallagher ha scritto:
Glenys Gallagher ha scritto:
Can I ask when initially decreasing for the sleeve head I am decreasing 2 stitches each side for a total of 8 rows, and 1 stitch for a total of 2 rows leaving me with 80 stitches. Do I then continue to decrease 2 at each end of every row until 52cms ? The sleeve head doesn't look like it will fit in to the body wormhole, it looks far too short.
18.04.2021 - 18:41DROPS Design ha risposto:
Dear Glenys, when you are making the sleeve cap, you first sast off 3-3 stitches on both side of the marker (all together 6 stitches), then 2-2 stitches at the beginning of each row 8 times (that is 2 stitches cast of 4 times (= 8 stitches) on each side (all together 16 stitches), and then 1 stitch 0-0-1-2-3-4 times (depending on size), and cast off 2 stitches at the beginning of each row (thus you are casting off both side), until the piece us 52 cm long. Happy Knitting!
18.04.2021 - 22:31
![]() Glenys Gallagher ha scritto:
Glenys Gallagher ha scritto:
Is there a video that demonstrates casting off in the round. In splitting the front and the back I cast off 3 stitches at the beginning, 6sts in the middle but when I come to cast off the last 3 sts (to make the second total of 6) I have 1 stitch left on my needle ( in the middle of the 6). Thanks
25.03.2021 - 23:04DROPS Design ha risposto:
Hi Glenys, For this last stitch you cut the strand and pull it through the stitch. Then begin on the back piece. Happy knitting!
26.03.2021 - 07:48
![]() Marlena Otsuka ha scritto:
Marlena Otsuka ha scritto:
Hello, I have question reg. the Sleeve for size S After the 17 Increases (to 88 Stitches), what length should my piece be for Size S, 18" or 14 3/4"? Thank you, Marlena
19.03.2021 - 03:12DROPS Design ha risposto:
Dear Mrs Otsuka, the last increase on sleeve should be worked when piece measures approx. 17,36 inches (= approx. 44 cm). Happy knitting!
19.03.2021 - 07:40
![]() Glenys Gallagher ha scritto:
Glenys Gallagher ha scritto:
I am doing the large,size, after the first section the stitches go down to 240 but the repeats of pattern are on 259 stitches, is it offset all the way round by 19 stitches ? Thank you
15.03.2021 - 11:36DROPS Design ha risposto:
Dear Mrs Gallagher, work the 240 sts as follows: A.2 over the first 23 sts (repeat the 3 sts in diagram a total of 7 times and finish with the first 2 stitches), A.3 (= 12 sts), A.4 (= 8 sts), A.5 (= 34 sts ), A.4 (= 8 sts), A.3 (= 12 sts), A.6 over the next 46 (repeat the 3 sts a total of 15 times and finish with first st in A.6), A.3 (= 12 sts), A.4 (= 8 sts), A.5 (=34 sts), A.4 (= 8 sts), A.3 (= 12 sts), A.6 over the last 23 stitches (repeat the 3 sts in diagram a total of 7 times and finish with the first 2 stitches) = 23+12+8+34+8+12+46+12+8+34+8+12+23= 240 sts. Happy knitting!
15.03.2021 - 13:11
|
|||||||||||||||||||||||||
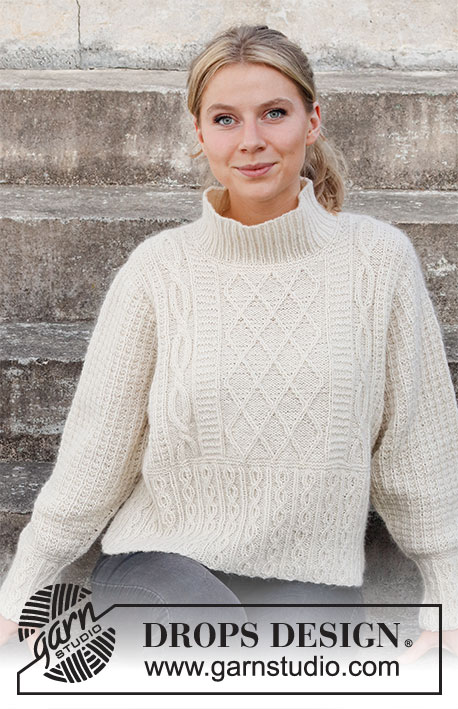
Ice Castles Sweater#icecastlessweater |
|||||||||||||||||||||||||
 |
 |
||||||||||||||||||||||||
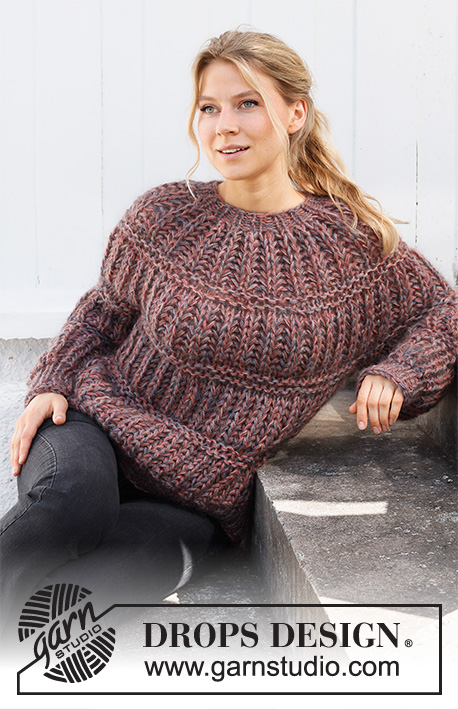
Maglione ai ferri in DROPS Puna o DROPS Soft. Lavorato con un motivo a punto fantasia e con trecce. Taglie: Dalla S alla XXXL.
DROPS 218-3 |
|||||||||||||||||||||||||
|
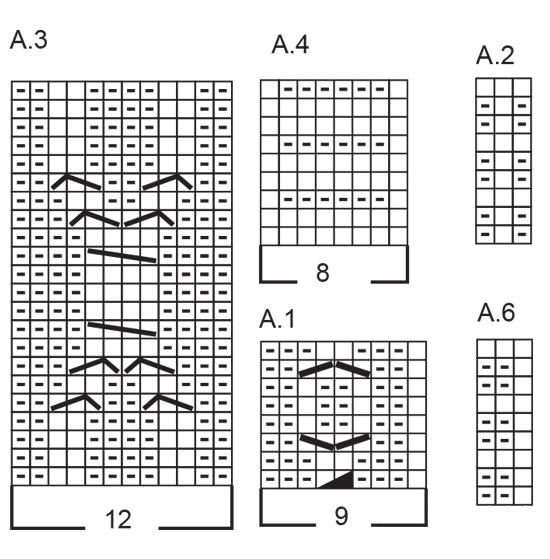
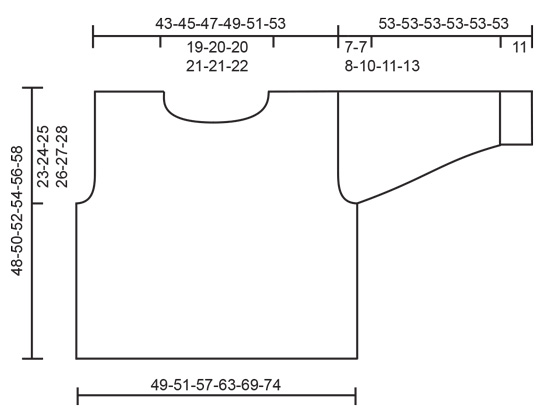
------------------------------------------------------- TECNICHE IMPIEGATE: ------------------------------------------------------- PUNTO LEGACCIO (in tondo): 1 costa a legaccio in altezza = 2 giri. Lavorare 1 giro a diritto e 1 giro a rovescio. MOTIVO: Vedere i diagrammi da A.1 a A.6. SUGGERIMENTO PER GLI AUMENTI/LE DIMINUZIONI (a intervalli regolari): Per calcolare ogni quante maglie aumentare/ diminuire a intervalli regolari, dividere il numero delle maglie (p.es: 225 maglie) per il numero di aumenti / diminuzioni da fare (p.es 9) = 25. Quindi, in questo esempio, per aumentare 1 maglia, fare 1 maglia gettata dopo ogni 25 maglie; al ferro successivo, lavorare le maglie gettate ritorte per evitare buchi. Per diminuire, in questo esempio, lavorare insieme ogni 24a e 25a maglia. SUGGERIMENTO PER GLI AUMENTI (al centro, sotto le maniche): Lavorare finché non rimane 1 maglia prima del segno, 1 maglia gettata, 2 maglie diritto (il segno si trova al centro di queste maglie), 1 maglia gettata. Al giro successivo, lavorare le maglie gettate ritorte per evitare buchi. Lavorare poi le nuove maglie seguendo il diagramma A.2. ------------------------------------------------------- IL LAVORO INIZIA QUI: ------------------------------------------------------- MAGLIONE - BREVI INDICAZIONI PER IL LAVORO: Si lavora in tondo con i ferri circolari fino agli scalfi; dividere poi il lavoro e lavorare il davanti e il dietro separatamente. Lavorare le maniche in tondo sui ferri circolari corti /ferri a doppia punta; diminuire per l’arrotondamento delle maniche e finire le maniche avanti e indietro. DAVANTI E DIETRO: Avviare 207-225-243-261-288-315 maglie sui ferri circolari n° 4 con il filato Puna. Lavorare 1 giro a diritto, Lavorare poi il diagramma A.1 su tutte le maglie (= 23-25-27-29-32-35 ripetizioni di 9 maglie sul giro). Proseguire con il diagramma A.1 su tutte le maglie finché il lavoro non misura circa 15-16-17-18-19-20 cm; aggiustare dopo una ripetizione intera del diagramma A.1 in verticale. Lavorare 2 coste a PUNTO LEGACCIO su tutte le maglie – vedere le spiegazioni sopra; durante l’ultimo giro delle coste, aggiustare il numero delle maglie a 204-216-240-264-288-312. Inserire 1 segno da ciascun lato: uno all’inizio del giro e uno dopo 102-108-120-132-144-156 maglie = lati. Proseguire come segue – a partire dall’inizio del giro: diagramma A.2 sulle prime 14-17-23-29-35-41 maglie (finire con le prime 2 maglie del diagramma A.2), diagramma A.3 (= 12 maglie), diagramma A.4 (= 8 maglie), diagramma A.5 (= 34 maglie), diagramma A.4, diagramma A.3, diagramma A.6 sulle 28-34-46-58-70-82 maglie successive (finire con la prima maglia del diagramma A.6), diagramma A.3, diagramma A.4, diagramma A.5, diagramma A.4, diagramma A.3, diagramma A.6 sulle ultime 14-17-23-29-35-41 maglie (finire con le prime 2 maglie del diagramma A.6). Proseguire in questo modo. RICORDARSI DI MANTENERE LA CORRETTA TENSIONE DEL LAVORO! Quando il lavoro misura 25-26-27-28-29-30 cm, lavorare il giro successivo come segue: Intrecciare le prime 3-3-3-4-4-4 maglie del giro, lavorare 96-102-114-124-136-148 maglie, intrecciare 6-6-6-8-8-8 maglie, lavorare 96-102-114-124-136-148 maglie, intrecciare le ultime 3-3-3-4-4-4 maglie. Lavorare ora ogni parte separatamente, avanti e indietro sui ferri. Mettere in attesa su un ferma maglie le prime 96-102-114-124-136-148 maglie e lavorare le ultime 96-102-114-124-136-148 maglie del dietro. DIETRO: = 96-102-114-124-136-148 maglie. Proseguire come prima, e intrecciare per lo scalfo da ciascun lato ogni 2 ferri, come segue: 2 maglie 1-1-2-3-4-5 volte e 1 maglia 1-2-4-5-6-8 volte = 90-94-98-102-108-112 maglie. Quando il lavoro misura 46-48-50-52-54-56 cm, intrecciare le 38-40-40-42-42-44 maglie centrali per lo scollo e finire ogni spalla separatamente. Al ferro successivo, intrecciare 1 maglia per lo scollo = 25-26-28-29-32-33 maglie. Proseguire finché il lavoro non misura 48-50-52-54-56-58 cm (= 23-24-25-26-27-28 cm dall’inizio dello scalfo); intrecciare le maglie. Lavorare l’altra spalla in modo uguale. DAVANTI: = 96-102-114-124-136-148 maglie. Proseguire e intrecciare per gli scalfi ai lati come indicato per il dietro = 90-94-98-102-108-112 maglie. Quando il lavoro misura 42-44-46-48-49-51 cm, mettere in attesa su un ferma maglie le 30-32-32-34-34-36 maglie centrali per lo scollo, e finire le spalle separatamente. Intrecciare le maglie per lo scollo ad ogni ferro, come segue: Intrecciare 2 maglie 1 volta e 1 maglia 3 volte = per ogni spalla rimangono 25-26-28-29-32-33 maglie. Proseguire finché il lavoro non misura 48-50-52-54-56-58 cm (= 23-24-25-26-27-28 cm dall’inizio dello scalfo); intrecciare le maglie. Lavorare l’altra spalla in modo uguale. CONFEZIONE: Cucire le spalle. MANICHE: Lavorare le maniche in tondo sui ferri a doppia punta/ ferri circolari, dal basso verso l’alto. Dividere il lavoro per l’arrotondamento delle maniche e finire avanti e indietro sui ferri. Avviare 54-54-54-63-63-63 maglie sui ferri a doppia punta n° 4 con il filato Puna. Lavorare 1 giro a diritto. Lavorare poi il diagramma A.1 su tutte le maglie (= 6-6-6-7-7-7 ripetizioni di 9 maglie sul giro). Continuare il diagramma A.1 su tutte le maglie finché il lavoro non misura circa 11 cm; aggiustare dopo una intera ripetizione del diagramma A.1 in verticale. Lavorare 2 coste a PUNTO LEGACCIO su tutte le maglie – vedere le spiegazioni sopra; durante l’ultimo giro di queste coste, aggiustare il numero delle maglie a 54-56-58-60-64-66. Inserire un segno all’inizio del giro = centro, sotto la manica. Proseguire come segue: 1 maglia a maglia rasata, diagramma A.2 sulle 52-54-56-58-62-64 maglie successive, finire con 1 maglia a maglia rasata. Proseguire in questo modo e, ALLO STESSO TEMPO, quando il lavoro misura 12 cm, aumentare 1 maglia da ciascun lato del segno - VEDERE IL SUGGERIMENTO PER GLI AUMENTI. Aumentare ogni 2-1½-1½-1½-1-1 cm 17-18-20-21-23-24 volte in tutto = 88-92-98-102-110-114 maglie. Quando il lavoro misura 46-46-45-43-42-40 cm, intrecciare 3 maglie da ciascun lato del segno (= 6 maglie intrecciare al centro, sotto la manica), Proseguire la manica avanti e indietro. Intrecciare per l’arrotondamento della manica all’inizio di ogni ferro da ciascun lato, come segue: 2 maglie 4-4-4-5-5-6 volte, 1 maglia 0-0-1-2-3-4 volte. Poi intrecciare 2 maglie da ciascun lato finché il lavoro non misura 52 cm per tutte le taglie; intrecciare 3 maglie da ciascun lato, poi intrecciare le rimanenti maglie. La manica misura 53 cm per tutte le taglie. Lavorare la seconda manica in modo uguale. COLLO: Iniziare sul diritto del lavoro con il filato Puna e con i ferri circolari corti n° 4 - riprendere circa da 96 a 106 maglie (comprese le maglie messe in attesa sul ferma maglie; il numero delle maglie deve essere divisibile per 2). Lavorare 1 giro a rovescio, 1 giro a diritto, 1 giro a rovescio, 1 giro a diritto. Lavorare a coste (1 maglia diritto /1 maglia rovescio) in tondo per 10 cm. Intrecciare le maglie, lavorando a diritto le maglie a diritto e a rovescio le maglie a rovescio. CONFEZIONE: Montare le maniche. |
|||||||||||||||||||||||||
Spiegazioni del diagramma |
|||||||||||||||||||||||||
|
|||||||||||||||||||||||||
 |
|||||||||||||||||||||||||
 |
|||||||||||||||||||||||||
 |
|||||||||||||||||||||||||
Avete terminato questo modello?Allora taggate le vostre foto con #dropspattern #icecastlessweater o inviatele alla #dropsfan gallery. Avete bisogno di aiuto con questo modello?Troverete 25 video tutorial, una sezione per i commenti/domande e molto altro guardando il modello su www.garnstudio.com © 1982-2026 DROPS Design A/S. Ci riserviamo tutti i diritti. Questo documento, compreso tutte le sue sotto-sezioni, è protetto dalle leggi sul copyright. Potete leggere quello che potete fare con i nostri modelli alla fine di ogni modello sul nostro sito. |
|||||||||||||||||||||||||


Con oltre 40 anni di esperienza nel design di modelli di maglia e uncinetto, DROPS Design offre la più estesa collezione di modelli gratuiti su internet - tradotti in 17 lingue. Ad oggi vi possiamo fornire 324 cataloghi e 12290 modelli - 9561 dei quali sono tradotti in Italiano.
Ci stiamo impegnando molto per darvi il meglio che vi possiamo offrire in termini di maglia e uncinetto, ispirazioni e consigli così come filati di grande qualità ad un prezzo incredibile! Volete utilizzare i nostri modelli per qualcosa d'altro oltre al vostro uso personale? Potete leggere tutto ciò che è consentito nel testo sul Copyright in basso su tutte le pagine dei nostri modelli. Buon lavoro!
Lasciare un commento sul modello DROPS 218-3
Noi saremmo felici di ricevere i tuoi commenti e opinioni su questo modello!
Se vuoi fare una domanda, fai per favore attenzione a selezionare la categoria corretta nella casella qui sotto per velocizzare il processo di risposta. I campi richiesti sono indicati da *.