
Categorie popolari
State cercando un filato?


Commenti / Domande (50)
![]() Anne Huygh ha scritto:
Anne Huygh ha scritto:
Ik ben aan het einde gekomen tot voor de hals. Indien ik het goed begrijp, zet ik enkel 12 steken (voor de maat die ik nu aan het breien ben) van de voorzijde op een hulpdraad en brei dan de overige steken verder tot ik alle minderingen heb gedaan. Hierdoor heb ik wel een stuk dat langer is achteraan dan vooraan + een opening van de afgekante steken. Daarna zet ik alles terug op naalden zonder top om de hals te breien. Klopt dit? Wat doen we met het verschil in hoogte en met het 'gat'?
14.04.2022 - 23:16DROPS Design ha risposto:
Dag Anne,
Nadat je de middelste steken midden voor op een hulpdraad hebt gezet, ga je verder en minder je ook aan beide zijden van deze steken. Er komt daardoor een ronding in de hals aan de voorkant en de achterkant van de hals is hoger. Dit is de bedoeling. Om de hals te breien neem je steken op rondom de halsopening inclusief de 12 steken midden voor. Daarna brei je de hals in de rondte.
20.04.2022 - 09:49
![]() Katrien Verellen ha scritto:
Katrien Verellen ha scritto:
Ik zette de mouwen en het lijf op dezelfde rondbreinaald en breide 1 naald zonder minderingen. Ik begon te minderen voor de raglan, elke 2de naald. Ik zou dat 16x moeten doen: dus 32 naalden verder stop je de minderingen? Dat betekent dat ik voor de 6de mindering al in de 2 averechtse steken zit. Klopt dat? Als ik er nog een 10 moet minderen verdwijnen de buitenste kabels volledig? Ik moet tot 60cm breien maar ben daar na 6 minderen nog lang niet. Blijf ik de kabels breien?Klopt mijn redenering?
22.02.2022 - 09:38DROPS Design ha risposto:
Dag Katrien,
Ja, dat klopt. De buitenste kabels verdwijnen volledig door de raglanminderingen. Je blijft kabels breien tot het niet meer mogelijk is omdat de kabelsteken geminderd zijn door de raglan.
22.02.2022 - 19:14
![]() Linda Van Rooij ha scritto:
Linda Van Rooij ha scritto:
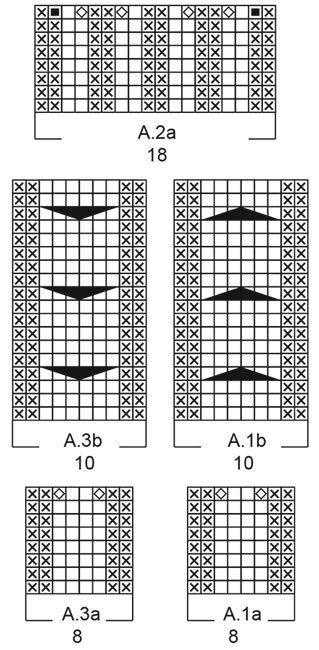
Hallo, ik raak al bij het begin in de war. Bij ALLE MATEN staat in de 2e regel: op de laatste naald meerdert u steken zodat er 74 steken op het voorpand... etc. Ga verder... A.1b over A.1a, A.2b over A.2a etc. Maar zoals ik het lees lijkt het of de steken worden gemeerderd op 1 plek op de laatste naald. Maar als ik het patroon bekijk lijkt het me dat de steken op verschillende plekken gemeerderd moeten worden zodat de patronen in elkaar overlopen. Klopt dat?
16.02.2022 - 22:47DROPS Design ha risposto:
Dag Linda,
Je meerdert op de laatste naald in de steek met het ruitje in het telpatroon door 2 steken in 1 steek te haken. Aan het eind van A.1a en A.3a heb je dan 10 steken, zodat deze aansluiten op A.1b en A.3b. Aan het eind van A.2a heb je 24 steken door het meerderen, zodat deze aansluit op A.2b. (Bij telpatroon A.3a zie ik trouwens dat er 10 steken onder staat, dat moet 8 steken zijn).
17.02.2022 - 09:53
![]() Susan Oneill ha scritto:
Susan Oneill ha scritto:
I have knit most of this sweater and now that I'm on the yoke, i'm at a complete loss. I don't have the technical know how to join facebook. Can I find a tutorial somewhere? I don't understand where to decrease 4 stitches in A.2b, I don't know what is meant by "continued back and forth" and I can't understand how to "decrease for neck ...bind off 2 stitches 1 time and 1 stitch 1 time". The most confusing instructions I've ever encountered.
08.02.2022 - 03:19DROPS Design ha risposto:
Dear Mrs Oneill, depending on the row in A.2b you have to work, decrease these 4 sts evenly in the set of 2 or 3 cables by K2 sts tog a total of 4 times accross A.2. Then slip the middle sts for neck on a thread. And now you will work back and forth starting on the neckline (after the stsvon a thread) towards the other side of neckline (before the sts on the thread) from RS (and from WS in the other direction). At the beginning of each the next 2 rows you will cast off 2 sts then at the beginning of the next 2 rows cast off 1 st (= 3 sts cast off on each side), but at the same time, remember to continue to decrease for raglan as before. Happy knitting!
08.02.2022 - 09:34
![]() Marjon ha scritto:
Marjon ha scritto:
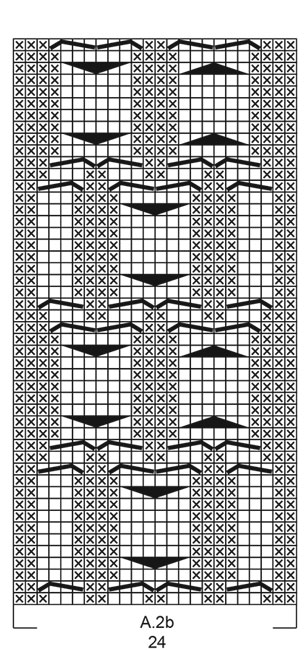
Bij de tekeningetjes van de kabels, staan bij de 2 onderste dat de 1 over 10 steken gaat en de andere over 8, maar de tekeningetjes gaan allebij over 8 steken. Volgens de tekeningen zijn ze hetzelfde, maar welke is goed? Het gaat over A.3a en A.1a.
17.12.2021 - 10:39DROPS Design ha risposto:
Dag Marjon,
Ze zijn beide goed en ze gaan beide over 8 steken en niet over 10 steken. Bij A.3a onder het telpatroontje hoort dus 8 steken te staan. Ik zal het doorgeven aan de ontwerpafdeling om te controleren en een correctie door te voeren.
19.12.2021 - 20:15
![]() Heather ha scritto:
Heather ha scritto:
Hi there! A question with the start, working on the medium, it says to k1 and then k2p2. At the halfway point (52 stitches) I added another k1 to make it even. Other than the charts I am doing the k2p2 rib. But when I get to the end of the row I have 5 knit stitches (the 3 knit stitches at the start, and 2 knit stitches at the end of the row from the rib). Am I missing something? The only way I can think to make it work is to do the cabling on the back too. Thanks so much!! :)
16.12.2021 - 08:13DROPS Design ha risposto:
Dear Heather, we will send your question to the Design department so that they can check the pattern.
10.01.2022 - 20:30
![]() Liz ha scritto:
Liz ha scritto:
Hi, I’m finding the Yoke section of this pattern very confusing. When decreasing 4 stitches on A2b, which 4 stitches should be decreased? And what does “bind off 2 stitches one time and 1 stitch one time” mean? Do you alternate on different rows, so bind off 2 stitches on one row and 1 stitch the next? Or what does it mean? Thank you Liz
11.10.2021 - 11:20DROPS Design ha risposto:
Dear Liz, what is important is that you decrease 4 sts over the stitches worked in A.2b to keep the correct width, but the stitches that have to be decreased are not that important, you can knit togheter the knit sts 2 and 2 or the purl/knit sts togeter, just remember the width is the important thing here, these stitches will be worked in rib for neck edge afterwards. Happy knitting!
11.10.2021 - 11:30
![]() Marika Van Ruth ha scritto:
Marika Van Ruth ha scritto:
Brei ik de voor- EN achterkant met kabel-telpatronen? ik zie alleen foto's vd voorzijde vd trui? op zich Niet verkeerd, ..
01.10.2021 - 20:30DROPS Design ha risposto:
Dag Mariska,
Nee de kabels worden alleen over het voorpand gebreid, op het achterpand brei je tricotsteek.
02.10.2021 - 10:19
![]() Maria Jonsson ha scritto:
Maria Jonsson ha scritto:
Hej! Stickat diagram A1a-A2a-A3a. Bytte till sticka 8. I instruktionen står det att jag ska sticka 7 rm och därefter sticka A1b över A1a - A2b över A2a och A3b över A3a. Om jag stickar 7 rm så kommer mönstret inte stämma. Har jag missat sticka 7 rm före det att börjat med första diagrammet, hittar inget i isnturiktionen. Vad missar jag?
16.05.2021 - 14:17DROPS Design ha risposto:
Hei Maria. Tar utgangspunkt i at du strikker den minste str. Fra starten av har du 7 masker (du starter med en vrangmaske, deretter vrangbord over 6 masker) før du strikker diagrammene A.1a, A2.a og A.3a. På siste omgang av diagrammene skal du øke 10 masker på forstykket. Se siste rad i diagrammene A.1a, A2.a og A.3a hvor det skal økes (2 steder i A.1a + A.3a og 4 steder i A.2a). Da skal mønstret stemme, lykke til. mvh DROPS design
19.05.2021 - 09:03
![]() Gulden Kiyici ha scritto:
Gulden Kiyici ha scritto:
Hallo, ich möchte das mittlere Muster (A2b) nicht stricken. Würde sich die Maschen Anzahl des Rumpfteils aendern? Danke für die Antwort..
15.02.2021 - 18:46DROPS Design ha risposto:
Liebe Frau Kiyici, leider können wir nicht jede Anleitung nach jeder individuelln Anfrage umrechnen - vielleicht können Sie hier die Zunahmen von A.2a nicht stricken (so wird die Maschenanzahl unterschiedlich als in die Anleitung sein), dh diejenigen, die vor A.2b gestrickt sind. Am besten wenden Sie sich an Ihrem DROPS Laden, dort bekommen Sie Hilfen, auch telefonisch oder per E-Mail. Viel Spaß beim stricken!
16.02.2021 - 09:15
|
|||||||||||||||||||||||||
Trails Head#trailsheadsweater |
|||||||||||||||||||||||||
 |
 |
||||||||||||||||||||||||
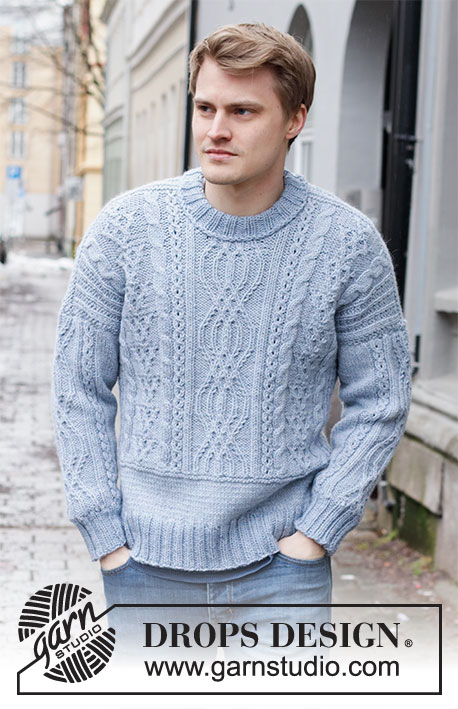
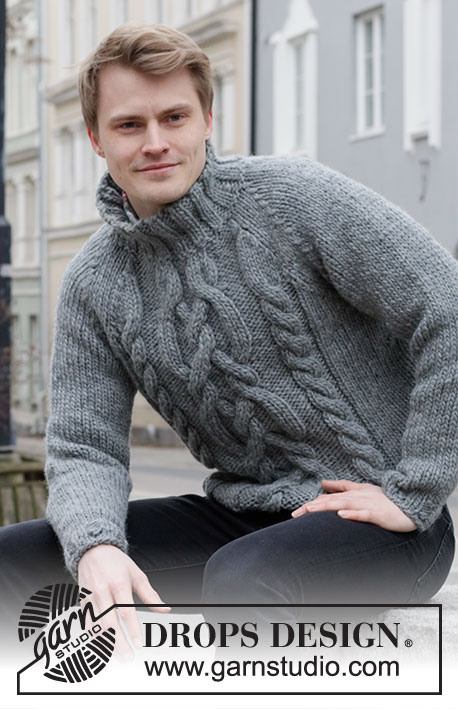
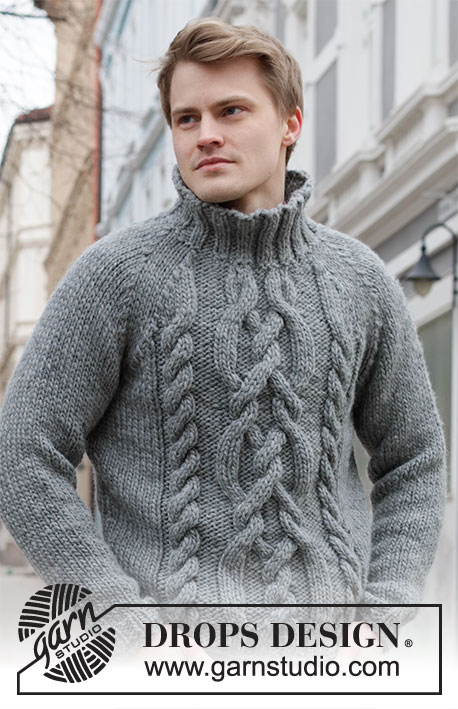
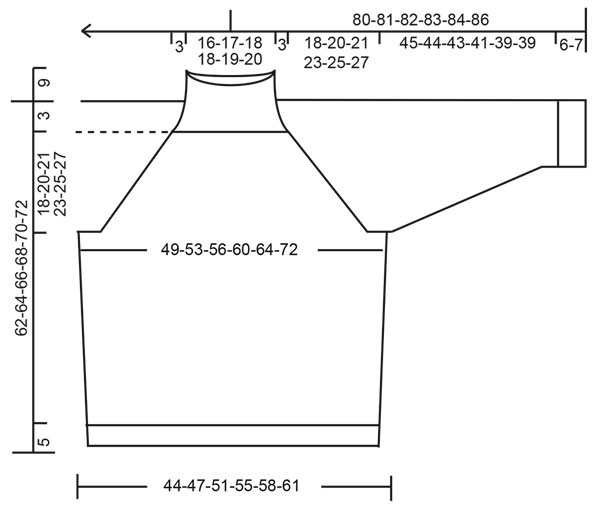
Maglione ai ferri per uomo con raglan, trecce e collo alto in DROPS Snow. Taglie: Dalla S alla XXXL.
DROPS 219-4 |
|||||||||||||||||||||||||
|
------------------------------------------------------- TECNICHE IMPIEGATE: ------------------------------------------------------- MOTIVO: Vedere i diagrammi da A.1 a A.3. I diagrammi mostrano tutti i ferri del motivo, visti sul diritto del lavoro. SUGGERIMENTO PER LE DIMINUZIONI (per il raglan): Diminuire in ogni passaggio tra il davanti/dietro e le maniche, ogni 2 giri – iniziare 4 maglie prima del segno e lavorare come segue: Passare 1 maglia a diritto senza lavorarla, 1 maglia diritto, accavallare la maglia passata sulla maglia lavorata, 4 maglie diritto (il segno si trova al centro di queste 4 maglie) e lavorare 2 maglie insieme a diritto. Dopo aver messo in attesa su un ferma maglie le maglie dello scollo, proseguire avanti e indietro – diminuire ora per il raglan ad ogni ferro sul diritto del lavoro. SUGGERIMENTO PER GLI AUMENTI (ai lati del davanti / dietro e al centro, sotto le maniche): Lavorare finché non rimane 1 maglia prima del segno, fare 1 maglia gettata, 2 maglie diritto (il segno si trova al centro di queste 2 maglie), 1 maglia gettata = 2 maglie aumentate. Sul giro successivo, lavorare le maglie gettate ritorte per evitare buchi. ------------------------------------------------------- MAGLIONE – BREVI INDICAZIONI PER IL LAVORO: Lavorare il davanti e il dietro in tondo con i ferri circolari fino agli scalfi. Lavorare le maniche in tondo con i ferri a doppia punta (passare ai ferri circolari corti quando necessario). Portare poi le maglie delle maniche sugli stessi ferri circolari del davanti / dietro e proseguire lo sprone in tondo. Lavorare il collo in tondo con i ferri a doppia punta o con i ferri circolari corti. DAVANTI E DIETRO: Avviare 96-104-112-120-128-148 maglie con i ferri circolari n° 7 ed il filato Snow. Inserire 1 segno all’inizio del giro e 1 segno dopo 48-52-56-60-64-74 maglie. Lavorare 1 giro a maglia rasata. Lavorare ora a coste in tondo, iniziando come segue, a seconda della taglia: TAGLIE S, L e XXL: Iniziare con 1 maglia rovescio, lavorare a coste (2 maglie diritto, 2 maglie rovescio) le 6-10-14 maglie successive e proseguire come indicato al paragrafo: Per tutte le taglie. TAGLIE M, XL: Iniziare con 1 maglia diritto, lavorare a coste (2 maglie rovescio, 2 maglie diritto) le 8-12 maglie successive e proseguire come indicato al paragrafo: Per tutte le taglie. TAGLIE XXXL: Iniziare con 2 maglie rovescio, lavorare a coste (2 maglie diritto, 2 maglie rovescio) le 18 maglie successive e proseguire come indicato al paragrafo: Per tutte le taglie. Per tutte le taglie: Continuare in tondo come segue: lavorare il diagramma A.1a sulle 8 maglie successive, diagramma A.2a sulle 18 maglie successive, diagramma A.3a sulle 8 maglie successive, lavorare poi a coste (2 maglie diritto, 2 maglie rovescio) fino alla fine del giro. Sull’ultima riga dei diagrammi, aumentare a intervalli regolari in modo che ci siano 58-62-66-70-74-84 maglie per il davanti e sempre 48-52-56-60-64-74 maglie per il dietro. Il lavoro ora misura circa 5 cm. Passare ai ferri circolari n° 8 e lavorare a maglia rasata le prime 7-9-11-13-15-20 maglie, diagramma A.1b sul diagramma A.1a, diagramma A.2b sul diagramma A.2a, diagramma A.3b sul diagramma A.3a e lavorare a maglia rasata fino alla fine del giro. Proseguire in questo modo. RICORDARSI DI MANTENERE LA CORRETTA TENSIONE DEL LAVORO! Quando il lavoro misura 12-12-12-12-12-12 cm, aumentare 1 maglia da ciascun lato di ogni segno – vedere il SUGGERIMENTO PER GLI AUMENTI sopra. Ripetere questi aumenti ogni 6-10-10-10-10-10 cm in tutto 3 volte = 118-126-134-142-150-170 maglie. Proseguire finché il lavoro non misura 41-41-42-42-42-42 cm. Sul giro successivo, intrecciare 6 maglie da ciascun lato per gli scalfi (= intrecciare 3 maglie da ciascun lato di ogni segno) = 58-62-66-70-74-84 maglie per il davanti e 48-52-56-60-64-74 maglie per il dietro. Lasciare il lavoro in sospeso e lavorare le maniche. MANICHE: Avviare 24-24-24-32-32-36 maglie con i ferri a doppia punta n° 7 ed il filato Snow. Lavorare 2 giri a maglia rasata. Proseguire a coste (2 maglie diritto, 2 maglie rovescio) finché il lavoro non misura 6-6-6-7-7-7 cm. Passare ai ferri a doppia punta n° 8. Inserire un segno all’inizio del giro e proseguire a maglia rasata. Quando il lavoro misura 8-10-10-9-9-9 cm, aumentare 1 maglia da ciascun lato del segno – vedere il SUGGERIMENTO PER GLI AUMENTI sopra. Ripetere questi aumenti ogni 5½-4-3½-5-4½-4 cm in tutto 8-10-11-8-9-9 volte = 40-44-46-48-50-54 maglie. Proseguire finché il lavoro non misura 51-50-49-48-46-46 cm. Sul giro successivo, intrecciare 6 maglie al centro sotto la manica (intrecciare 3 maglie da ciascun lato del segno) = 34-38-40-42-44-48 maglie. Lasciare il lavoro in sospeso e lavorare l’altra manica in modo uguale. SPRONE: Riportare le maglie delle maniche sugli stessi ferri circolari del davanti / dietro – dove sono state intrecciate le maglie per gli scalfi = 174-190-202-214-226-254 maglie. Inserire un segno in ogni passaggio tra le maniche e il davanti / dietro = 4 segni. Lavorare 2-1-1-0-0-0 giri prima di iniziare a diminuire per il raglan. LEGGERE TUTTE LE INDICAZIONI SUCCESSIVE PRIMA DI PROSEGUIRE ! Diminuire per il raglan da ciascun lato di ognuna delle 4 maglie con il segno - vedere il SUGGERIMENTO PER LE DIMINUZIONI sopra – ogni 2 giri, 13-15-16-17-18-21 volte. ALLO STESSO TEMPO, quando il lavoro misura 56-58-60-62-64-66 cm diminuire 4-4-4-4-4-4 maglie nelle trecce del diagramma A.2b. Mettere ora in attesa su un ferma maglie le 8-8-10-12-14-16 maglie centrali per lo scollo. Proseguire avanti e indietro, continuando a diminuire per il raglan come prima, ad ogni ferro sul diritto del lavoro. Inoltre, diminuire per lo scollo all’inizio di ogni ferro, come segue: Intrecciare 2 maglie 1 volta e 1 maglia 1 volta. Terminate tutte le diminuzioni per il raglan e per lo scollo, ci sono 52-52-54-56-58-60 maglie. COLLO: Con i ferri a doppia punta n° 7, riprendere le maglie intorno allo scollo e riportare sui ferri di lavoro le maglie messe in attesa sul ferma maglie, ponendo attenzione che ci siano in tutto circa da 14 a 22 maglie per lo scollo sul davanti. In tutto, ci devono essere da 60 a 76 maglie (il numero delle maglie deve essere divisibile per 4). Lavorare 1 giro a rovescio, proseguire a coste (2 maglie diritto, 2 maglie rovescio) per 9 cm. Intrecciare le maglie senza stringere troppo il filo, lavorando a diritto le maglie a diritto e a rovescio le maglie a rovescio. CONFEZIONE: Cucire le aperture sotto le maniche. |
|||||||||||||||||||||||||
Spiegazioni del diagramma |
|||||||||||||||||||||||||
|
|||||||||||||||||||||||||
 |
|||||||||||||||||||||||||
 |
|||||||||||||||||||||||||
 |
|||||||||||||||||||||||||
Avete terminato questo modello?Allora taggate le vostre foto con #dropspattern #trailsheadsweater o inviatele alla #dropsfan gallery. Avete bisogno di aiuto con questo modello?Troverete 31 video tutorial, una sezione per i commenti/domande e molto altro guardando il modello su www.garnstudio.com © 1982-2026 DROPS Design A/S. Ci riserviamo tutti i diritti. Questo documento, compreso tutte le sue sotto-sezioni, è protetto dalle leggi sul copyright. Potete leggere quello che potete fare con i nostri modelli alla fine di ogni modello sul nostro sito. |
|||||||||||||||||||||||||


Con oltre 40 anni di esperienza nel design di modelli di maglia e uncinetto, DROPS Design offre la più estesa collezione di modelli gratuiti su internet - tradotti in 17 lingue. Ad oggi vi possiamo fornire 324 cataloghi e 12290 modelli - 9561 dei quali sono tradotti in Italiano.
Ci stiamo impegnando molto per darvi il meglio che vi possiamo offrire in termini di maglia e uncinetto, ispirazioni e consigli così come filati di grande qualità ad un prezzo incredibile! Volete utilizzare i nostri modelli per qualcosa d'altro oltre al vostro uso personale? Potete leggere tutto ciò che è consentito nel testo sul Copyright in basso su tutte le pagine dei nostri modelli. Buon lavoro!
Lasciare un commento sul modello DROPS 219-4
Noi saremmo felici di ricevere i tuoi commenti e opinioni su questo modello!
Se vuoi fare una domanda, fai per favore attenzione a selezionare la categoria corretta nella casella qui sotto per velocizzare il processo di risposta. I campi richiesti sono indicati da *.