
Categorie popolari
State cercando un filato?


Commenti / Domande (29)
![]() Louise Godet ha scritto:
Louise Godet ha scritto:
Merci pour votre réponse. J'espère que, maintenant, je vais pouvoir réaliser ce modèle qui me plait. Cordialement.
01.09.2023 - 09:14
![]() Louise GODET ha scritto:
Louise GODET ha scritto:
Bonjour, Ce gilet me tente beaucoup mais je souhaite le faire avec des manches longues. Pensez-vous que je puisse faire une réhausse (dos) et quand ? Pendant les premières côtes ? Merci pour votre avis et conseil de réalisation. Cordialement.
31.08.2023 - 16:31DROPS Design ha risposto:
Bonjour Mme Godet, effectivement, je pense qu'il serait plus simple de la réaliser en côtes, avant de commencer les diagrammes. Bon tricot!
01.09.2023 - 08:35
![]() Margaret Tigchelaar ha scritto:
Margaret Tigchelaar ha scritto:
Thank you!- Again!
28.02.2023 - 17:04
![]() Margaret Tigchelaar ha scritto:
Margaret Tigchelaar ha scritto:
I am working on row 35 of the diagrams, when the last stitch is not to be used and I go to the next symbol. Do I just slide that unused stitch over to the needle on the right then? Thank you, I so enjoy making this pattern!
28.02.2023 - 02:37DROPS Design ha risposto:
Dear Mrs Tigchelaar, on this row, work A.1 until 1 stitch remain, then YO (this is now the last stitch A.1), slip the last stitch A.1 + the first stitch A.2 as if to K tog, K1 and psso = this is the new first stitch A.2, continue diagram that way, ie the last stitch A.2 will be worked together with the first 2 sts next A.2/A.3. Happy knitting!
28.02.2023 - 10:54
![]() Margaret Tigchelaar ha scritto:
Margaret Tigchelaar ha scritto:
Thank you so much!!
14.02.2023 - 19:35
![]() Margaret Tigchelaar ha scritto:
Margaret Tigchelaar ha scritto:
I want you to know, though, that I love the forum. I have checked all questions to see if anyone else had the same problem, but no. So it must be me. I hope you will not tire of me, I am 85 and have knitted since I was 3 yrs. old and yet.... I started with 111 stitches (M). Would I love to visit Drops!, but there is no store in my area. Maybe when I visit the Netherlands in May! Hope to wear this sweater then, though.
14.02.2023 - 16:59
![]() Margaret Tigchelaar ha scritto:
Margaret Tigchelaar ha scritto:
Hello, I have tried row 1 of the diagram 4 times and still get stuck. I end up with 14 st. at the end of row 1 all right, but only need 5 to do diagram 3, which only becomes 7 because of the yos. What do I do with those last 2 stitches before the band? According to my figures all 3 diagrams are equal that first row. The yarn overs add the stitches for the following rows but I still have those two extras in row one. Ending up with 14, use 5 for diagram 3 and then the band. Help and thank you!
14.02.2023 - 16:54DROPS Design ha risposto:
Dear Mrs Tigchelaar, first row A.1 in all sizes is worked over 6 stitches and you increase 2 stitches, this means there are 8 sts in A.1 after the first row has been worked, then repeat the 6 stitches in A.2 (you increase 2 sts in each A.2, there are 8 sts in each A.2) then end with the 7 sts in A.3 (increasing 2 sts as shown in diagram). Just skip the spaces in the diagrams, ie each diagram starts and end with Knit 1, the spaces are there because you will increase stitches later but on first row there are still no stitches. Hope it can help. Happy knitting!
14.02.2023 - 18:05
![]() Margaret Tigchelaar ha scritto:
Margaret Tigchelaar ha scritto:
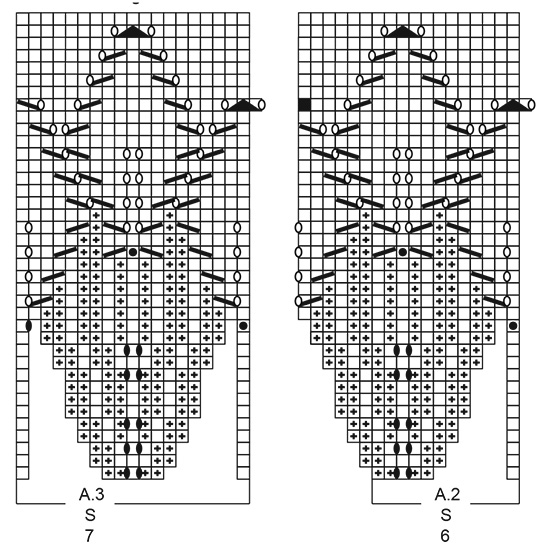
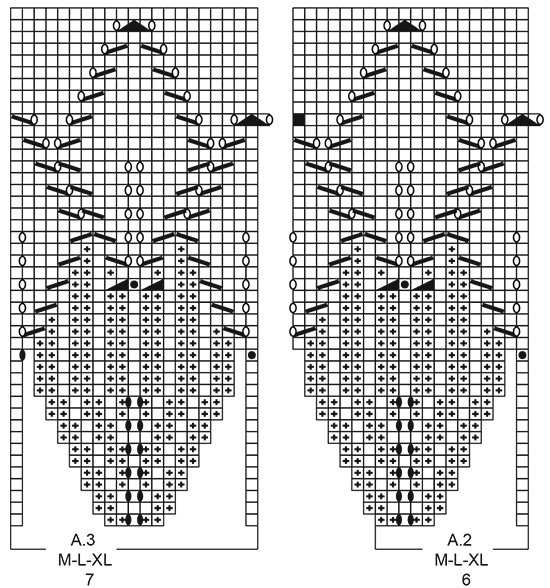
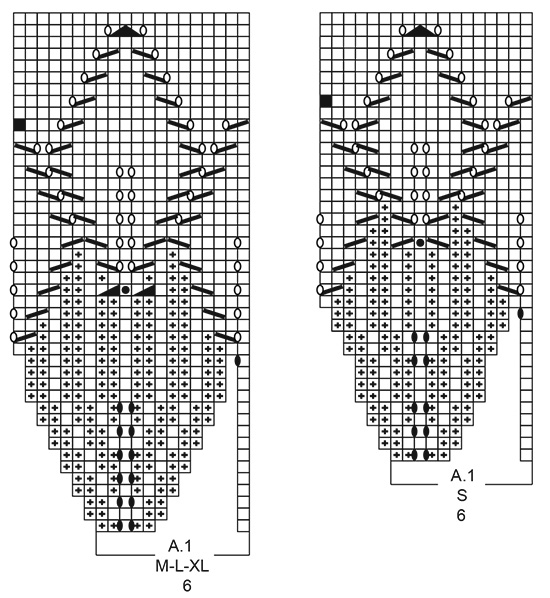
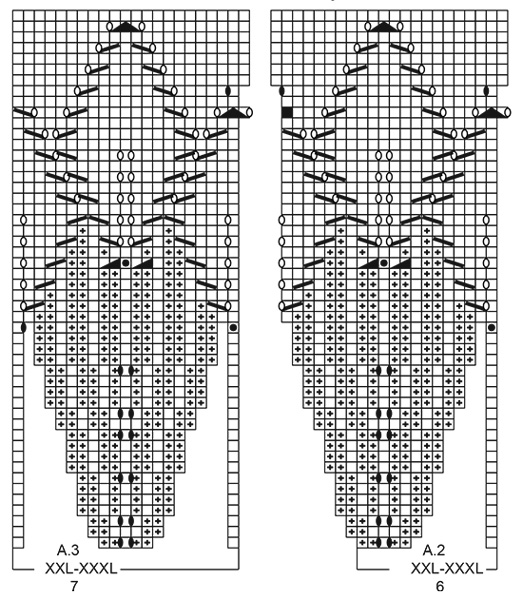
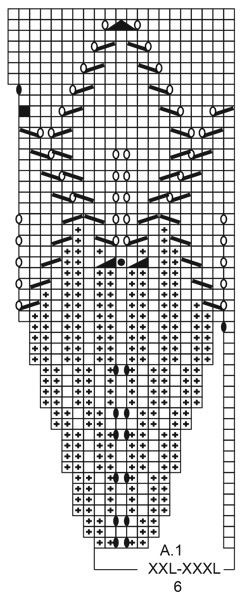
Hello, I want you to know how I love Drops! I received yarn from my daughter for a sweater for myself and I am knitting 213-21. I was confused as well as Amal about the number of times to repeat the diagrams, but you answered my question and now I hope to continue. One other question, though, what do the numbers 6 under Diagram 1 and 2 mean and number 7 under diagram 3? Thank you!
09.02.2023 - 23:44DROPS Design ha risposto:
Hi Margaret, The 7 and 6 refer to the number of stitches in the first rows of diagrams A.3 and A.2. Happy knitting!
10.02.2023 - 08:33
![]() Bettie Scheepers ha scritto:
Bettie Scheepers ha scritto:
Heb patroon 213-21 uitgeprint maar helaas staat het telpatroon er niet bij.hoop dat jullie het kunnen oplossen
28.03.2022 - 17:58
![]() Ola ha scritto:
Ola ha scritto:
Witam, co to znaczy "nie zapomnieć o dziurce na guzik"? To w którym rzędzie wstawić pierwsza dziurkę na guzik?
12.03.2022 - 22:17DROPS Design ha risposto:
Witaj Olu, górna dziurka na guzik znajduje się już na wykończeniu dekoltu, wykonujesz ją, gdy wys. wykończenia dekoltu wynosi ok. 1½-2 cm. Pozdrawiamy!
14.03.2022 - 08:17
|
|||||||||||||||||||||||||||||||
Lavender Charm#lavendercharmcardi |
|||||||||||||||||||||||||||||||
 |
 |
||||||||||||||||||||||||||||||
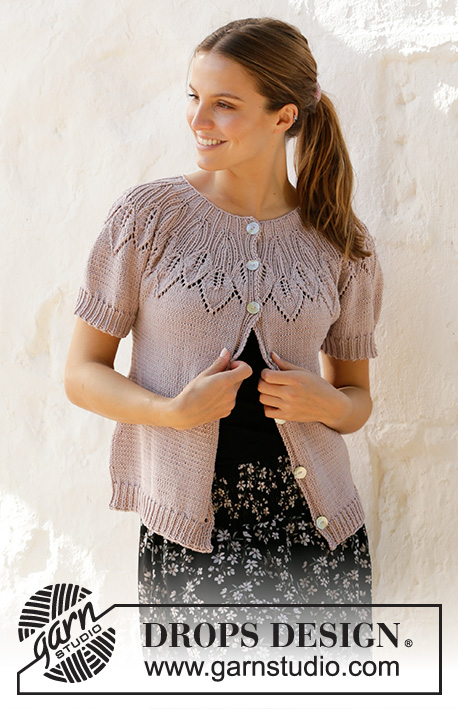
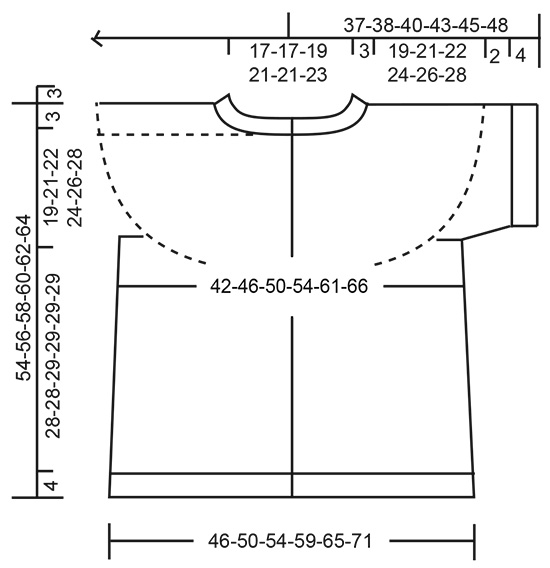
Cardigan lavorato ai ferri con sprone rotondo in DROPS Muskat. Lavorato dall’alto in basso a maniche corte, motivo a foglie e motivo traforato. Taglie: S - XXXL.
DROPS 213-21 |
|||||||||||||||||||||||||||||||
|
------------------------------------------------------- TECNICHE IMPIEGATE: ------------------------------------------------------- COSTA/MAGLIA LEGACCIO (avanti e indietro): Lavorare tutti i ferri a diritto. 1 costa in altezza = 2 ferri diritto. MOTIVO: Vedere i diagrammi A.1 - A.3. Scegliere il diagramma per la vostra taglia. I diagrammi mostrano tutti i ferri del motivo visti dal diritto del lavoro. SUGGERIMENTO PER GLI AUMENTI (per i lati del corpo): Lavorare tutti gli aumenti dal dirtto del lavoro! Lavorare fino a quando rimangono 2 maglie prima del segnapunti, 1 gettato, 4 maglie diritto (il segnapunti è al centro di queste 4 maglie), 1 gettato. Sul ferro successivo lavorare il gettato a rovescio ritorto per evitare buchi. Poi lavorare le nuove maglie a maglia rasata. SUGGERIMENTO PER LA CHIUSURA: Per evitare che il bordo di chiusura sia tirato potete intrecciare con un ferro di una misura più grande. Se il bordo risulta ancora tirato, fare 1 gettato dopo circa 4 maglie durante la chiusura e intrecciare i gettati come maglie normali. ASOLE: Lavorare le asole sul bordo destro (con il capo indossato). Lavorare dal diritto del lavoro quando mancano 6 maglie come segue: fare 1 gettato, lavorare 2 maglie insieme a diritto e lavorare le ultime 4 maglie come prima. Sul ferro successivo lavorare i gettati a rovescio per creare buchi. Lavorare la 1° asola quando le coste sul collo misurano circa 1½-2 cm. Poi lavorare le altre 6-6-6-6-7-7 asole a circa 7½-7½-8-8½-7½-7½ cm tra ognuna. ------------------------------------------------------- INIZIO DEL LAVORO: ------------------------------------------------------- CARDIGAN – BREVE RIASSUNTO DEL LAVORO: Lavorare il collo e lo sprone in piano con i ferri circolari, dal centro davanti e dall’alto in basso. Dividere lo sprone per il corpo e i bordi delle maniche e continuare il corpo in piano con i ferri circolari. Lavorare i bordi delle maniche in tondo con i ferri a doppia punta, dall’alto in basso. COLLO: Avviare 111-111-117-129-129-135 maglie (comprese 7 maglie per il bordo a ogni lato verso il centro davanti) con i ferri circolari n° 3 mm e Muskat. Lavorare 1 ferro rovescio (= rovescio del lavoro). Lavorare il ferro successivo come segue dal diritto del lavoro: Lavorare 1 maglia a MAGLIA LEGACCIO – leggere la descrizione sopra, 1 maglia diritto, * 2 maglie rovescio, 1 maglia diritto *, lavorare *-* fino a quando rimangono 4 maglie, 2 maglie rovescio, 1 maglia diritto e 1 maglia a maglia legaccio. Lavorare le ASOLE – leggere la descrizione sopra. Quando il lavoro misura 3 cm, passare ai ferri circolari n° 4 mm. Inserire1 segnapunti dopo il bordo all’inizio del ferro; lo sprone verrà misurato da questo segnapunti! SPRONE: Lavorare come segue dal diritto del lavoro: 1 maglia a maglia legaccio, 1 maglia diritto, 2 maglie rovescio, 1 maglia diritto, 2 maglie rovescio (= bordo), A.1 (= 6 maglie), A.2 (= 6 maglie) fino a quando rimangono 14 maglie sul ferro (= 14-14-15-17-17-18 volte in larghezza), A.3 (= 7 maglie) e poi 2 maglie rovescio, 1 maglia diritto, 2 maglie rovescio, 1 maglia diritto e 1 maglia a maglia legaccio (bordo). FARE ATTENZIONE ALLA TENSIONE DEL LAVORO! Alla fine di A.1 - A.3 ci sono 303-335-355-395-431-453 maglie sul ferro. Il lavoro misura circa 14-16-16-16-18-18 cm dal segnapunti. Lavorare i bordi come prima e a maglia rasata sulle altre maglie. Quando il lavoro misura 19-21-22-24-26-28 cm dal segnapunti, dividerlo per il corpo e i bordi delle maniche come segue: Lavorare le 7 maglie del bordo come prima e a maglia rasata sulle 41-45-49-53-60-64 maglie successive (= davanti), mettere le 63-69-72-84-89-90 maglie successive in sospeso per il bordo della manica e avviare 6-6-6-6-8-10 nuove maglie sotto la manica, lavorare a maglia rasata sulle 81-93-99-107-119-131 maglie successive (= dietro), mettere le 63-69-72-84-89-90 maglie successive in sospeso per il bordo della manica e avviare 6-6-6-6-8-10 nuove maglie sotto la manica, lavorare 41-45-49-53-60-64 maglie a maglia rasata e le 7 maglie per il bordo come prima (= davanti). CORPO: = 189-209-223-239-269-293 maglie. Inserire 1 segnapunti all’interno di 51-55-59-63-71-76 maglie da ogni lato (= lati del corpo). Ci sono 87-99-105-113-127-141 maglie tra i segnapunti sul dietro. Lasciare che i segnapunti seguano il lavoro; verranno usati durante gli aumenti laterali. Continuare a maglia rasata e con le 7 maglie per il bordo a ogni lato come prima. Quando il lavoro misura 4 cm dalla divisione aumentare 1 maglia a ogni lato di entrambi i segnapunti – leggere il SUGGERIMENTO PER GLI AUMENTI (= 4 aumenti). Aumentare in questo modo ogni 4 cm per un totale di 5-4-4-5-5-5 volte = 209-225-239-259-289-313 maglie. Quando il lavoro misura 28-28-29-29-29-29 cm dalla divisione, aumentare 13-12-13-14-14-14 maglie in modo uniforme = 222-237-252-273-303-327 maglie. Passare ai ferri circolari n° 3 mm e continuare come segue dal diritto del lavoro: Lavorare 1 maglia a maglia legaccio, coste (= 1 maglia diritto / 2 maglie rovescio) fino a quando rimangono 2 maglie e finire con 1 maglia diritto e 1 maglia a maglia legaccio. Intrecciare a diritto dal diritto del lavoro quando le coste misurano 4 cm – leggere il SUGGERIMENTO PER LA CHIUSURA. Il lavoro misura 32-32-33-33-33-33 cm dalla divisione. BORDO DELLA MANICA: Riportare le 63-69-72-84-89-90 maglie in sospeso a un lato del lavoro sui ferri a doppia punta n° 4 mm e riprendere 1 maglia in ognuna delle 6-6-6-6-8-10 maglie avviate sotto la manica = 69-75-78-90-97-100 maglie. Lavorare a maglia rasata in tondo per 2 cm. Passare ai ferri a doppia punta n° 3 mm e lavorare a coste (= 1 maglia diritto / 2 maglie rovescio) e ALLO STESSO TEMPO diminuire sul 1° giro 0-0-0-0-1-1 maglie = 69-75-78-90-96-99 maglie. Intrecciare quando le coste misurano 4 cm, con diritto su diritto e rovescio su rovescio. Lavorare l’altro bordo della manica nello stesso modo. CONFEZIONE: Attaccare i bottoni sul bordo sinistro. |
|||||||||||||||||||||||||||||||
Spiegazioni del diagramma |
|||||||||||||||||||||||||||||||
|
|||||||||||||||||||||||||||||||
 |
|||||||||||||||||||||||||||||||
 |
|||||||||||||||||||||||||||||||
 |
|||||||||||||||||||||||||||||||
 |
|||||||||||||||||||||||||||||||
 |
|||||||||||||||||||||||||||||||
 |
|||||||||||||||||||||||||||||||
Avete terminato questo modello?Allora taggate le vostre foto con #dropspattern #lavendercharmcardi o inviatele alla #dropsfan gallery. Avete bisogno di aiuto con questo modello?Troverete 30 video tutorial, una sezione per i commenti/domande e molto altro guardando il modello su www.garnstudio.com © 1982-2026 DROPS Design A/S. Ci riserviamo tutti i diritti. Questo documento, compreso tutte le sue sotto-sezioni, è protetto dalle leggi sul copyright. Potete leggere quello che potete fare con i nostri modelli alla fine di ogni modello sul nostro sito. |
|||||||||||||||||||||||||||||||


Con oltre 40 anni di esperienza nel design di modelli di maglia e uncinetto, DROPS Design offre la più estesa collezione di modelli gratuiti su internet - tradotti in 17 lingue. Ad oggi vi possiamo fornire 324 cataloghi e 12290 modelli - 9561 dei quali sono tradotti in Italiano.
Ci stiamo impegnando molto per darvi il meglio che vi possiamo offrire in termini di maglia e uncinetto, ispirazioni e consigli così come filati di grande qualità ad un prezzo incredibile! Volete utilizzare i nostri modelli per qualcosa d'altro oltre al vostro uso personale? Potete leggere tutto ciò che è consentito nel testo sul Copyright in basso su tutte le pagine dei nostri modelli. Buon lavoro!
Lasciare un commento sul modello DROPS 213-21
Noi saremmo felici di ricevere i tuoi commenti e opinioni su questo modello!
Se vuoi fare una domanda, fai per favore attenzione a selezionare la categoria corretta nella casella qui sotto per velocizzare il processo di risposta. I campi richiesti sono indicati da *.