
Categorie popolari
State cercando un filato?


Commenti / Domande (90)
![]() Ellen Zandijk ha scritto:
Ellen Zandijk ha scritto:
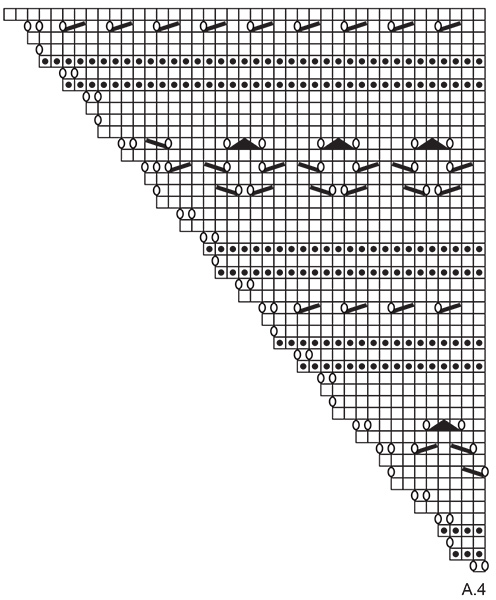
Goedemiddag, Ik heb A1, A2, A3 en A4 1x gebreid. Ik heb 183 steken. Aan beide kanten van de middelste steek heb ik 90 steken + 2 kantsteken. Ik begrijp niet hoe ik verder moet. Ik hoor graag van u.
14.02.2026 - 13:50DROPS Design ha risposto:
Dag Ellen,
Je breit verder op dezelfde manier, alleen brei je nu 10 herhalingen van A.3 in de breedte (in plaats van 1 herhaling in de breedte).
15.02.2026 - 14:16
![]() Janet Mikkelsen ha scritto:
Janet Mikkelsen ha scritto:
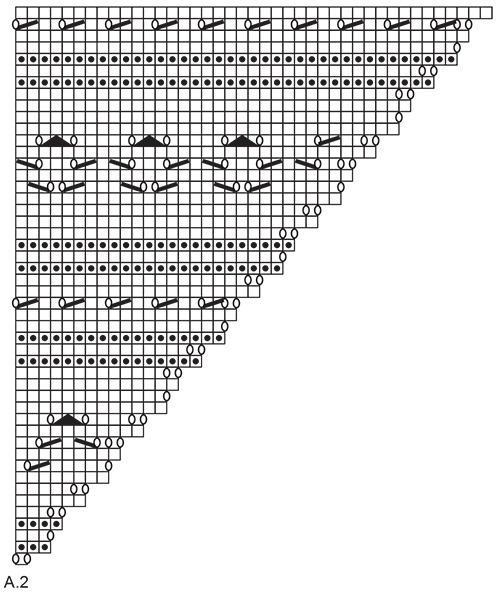
Jeg vil mene at jeg er en habil strikker men jeg har ikke held med at læse denne opskrift. Jeg fatter den bare ikke. Jeg er nået til række 5 i mønstret og mit maske antal passer med diagrammerne men ikke med teksten i opskriften. Der er ikke masker nok til at gentage A2-A4 samt en midtermaske og 2 kantmasker. Jeg har læst alle kommentar på denne opskrift og kan forstå at der er mange ligesom mig der ikke forstår hvad man skal gøre.
11.01.2026 - 14:39
![]() Pia Lindgreen ha scritto:
Pia Lindgreen ha scritto:
Hvis rigtig forstået så strikkes nedefra mønsteret og opad. Ender med masker: 1+41+8+40+1+41+8+40+1 masker så er jeg i toppen af mønsteret. Men hvordan får jeg videre de 8m. A3 ind som repetetion?mangler mønster forklaring hvornår og hvormange og hvor i mønsteret de skal ind Kan du hjælpe? Hilsen pia
20.12.2025 - 15:36DROPS Design ha risposto:
Hei Pia. Når du har strikket diagrammene A.2, A.3 og A.4 1 gang i høyden har du 183 masker (1+41+8+41+1+41+8+41+1 =183). Så starter du på 1. rad i diagrammene igjen, men over A.2 (41 masker) og A.4 (41 masker) strikkes A.3 5 ganger, altså se på diagram A.2. Du strikkes nå A.2 (starten på diagrammet, som består kun av 1 maske) i øverste maske i høyre side på siste pinne, de resterende maskene (40 masker på siste rad av diagram A.2) strikkes nå A.3 (8 masker x 5 = 40). Det samme gjelder også for A.4. Man strikker da A.3 5 ganger over A.2 og 5 ganger over A.4 på hver side av midtmasken = 10 repetisjoner av A.3. mvh DROPS Design
05.01.2026 - 11:42
![]() Lucie Cliche ha scritto:
Lucie Cliche ha scritto:
Bonjour a vous je ne comprends vraiment pas comment lire le diagramme A1. Existe t'il une description écrite de la marche à suivre? Est-ce que le diagramme représente tous les rangs à tricoter? Merci
01.12.2025 - 15:59DROPS Design ha risposto:
Bonjour Mme Cliche, les diagrammes se lisent de bas en haut: de droite à gauche sur l'endroit et de gauche à droite sur l'envers. Ainsi, au 1er rang de A.1, on va tricoter: (1 jeté, 2 m end, 1 jeté), au 2ème rang: (4 m endroit) et ainsi de suite. Retrouvez plus d'infos sur les diagrammes ici. Bon tricot!
01.12.2025 - 16:30
![]() Emmy ha scritto:
Emmy ha scritto:
Bonjour, j'ai bientot termine l'ouvrage par contre j'ai utilise une pelote "type drop Snow - 100% laine" avec des aiguilles de 5. Je voudrais savoir si à la fin de l'ouvrage je devrais passer par le processus du blocage pour fixer mon ouvrage - Merci
29.11.2025 - 21:09DROPS Design ha risposto:
Bonjour Emmy, consultez la bande/l'étiquette de votre laine pour en savoir plus sur l'entretien, et vous pouvez, si vous le souhaitez, bloquer votre ouvrage, et comment le bloquer; mais pensez à bien respecter les consignes d'entretien. N'hésitez pas à demander conseil auprès du magasin où vous avez acheté votre laine, ils pourront vous aider, même par mail ou téléphone. Bon tricot!
01.12.2025 - 08:49
![]() Veronica ha scritto:
Veronica ha scritto:
Ciao ma il modello in foto sono due lavori uniti? Oppure è il risultato di un unico lavoro? Grazie
16.11.2025 - 14:01DROPS Design ha risposto:
Buongiorno Veronica, la foto mostra il lavoro finito. Buon lavoro!
16.11.2025 - 15:30
![]() Emmy ha scritto:
Emmy ha scritto:
Si j'ai bien compris: après que j'ai terminé A.2 et A4, je reprend depuis le diagramme depuis le début, en prenant compte les augmentations, jusqu'à qu'à une hauteur de 72 cm.
02.11.2025 - 23:39DROPS Design ha risposto:
Bonjour Emmy, tout à fait. Bon tricot!
03.11.2025 - 08:31
![]() Emmy ha scritto:
Emmy ha scritto:
Je n'ai pas compris, cette partie: Répéter le point fantaisie en hauteur, c'est-à-dire qu'à chaque fois que l'on tricote les diagrammes, on a suffisamment de mailles pour tricoter 10 motifs de plus de A.3 de chaque côté de la maille centrale. J'ai tricoté tous les rangs de A.2 à A4 (1 fois) et là je bloque.
24.10.2025 - 11:15DROPS Design ha risposto:
Bonjour Emmy, lorsque vous avez terminé A.2 et A.4 en hauteur, vous avez augmenté 40 mailles de chaque côté, au rang suivant sur l'endroit, vous tricotez ainsi: A.2 = 1 m (la 1ère maille du A.2 précédent) puis 4 fois les 10 mailles de A.3, tricotez A.3 comme avant jusqu'aux mailles de A.4, tricotez 4 x A.3 et terminez par la maille de A.4 (avec les augmentations), vous avez maintenant suffisamment de mailles pour tricoter 20 fois A.3 en plus par rapport au 1er motif en hauteur, entre A.2 et A.4. Bon tricot!
29.10.2025 - 14:47
![]() Anne ha scritto:
Anne ha scritto:
Liian hankala ohje, ei tästä ota selvää.
12.10.2025 - 09:42
![]() Anne ha scritto:
Anne ha scritto:
Voitteko selittää mitä tämä tarkoittaa: o du tager 8 masker ud i hver A.1. Så du får 1+(2+8)+1+(2+8)+1 = 23 masker ja MITÄ tämä tarkoittaa: Neulo 1 reunasilmukka ainaoikeaa, A.2 (= 1 silmukka), A.3 (= 8 silmukkaa), A.4 (= 1 silmukka), 1 silmukka sileää neuletta??? eli A2 = 1 silmukka?
11.10.2025 - 09:31DROPS Design ha risposto:
Hei, tässä selitetään miten kerroksen silmukat neulotaan, eli neulo: 1 reunasilmukka ainaoikeaa, neulo sitten mallineuletta piirroksen A.2 mukaisesti (= 1 silmukka ensimmäisellä kerroksella, lisäksi piirroksen mukaan tehdään 2 langankiertoa), neulo mallineuletta piirroksen A.3 mukaisesti, neulo mallineuletta piirroksen A.4 mukaisesti, jne.
13.10.2025 - 17:21
|
|||||||||||||||||||
Austrian Spring#austrianspringshawl |
|||||||||||||||||||
 |
 |
||||||||||||||||||
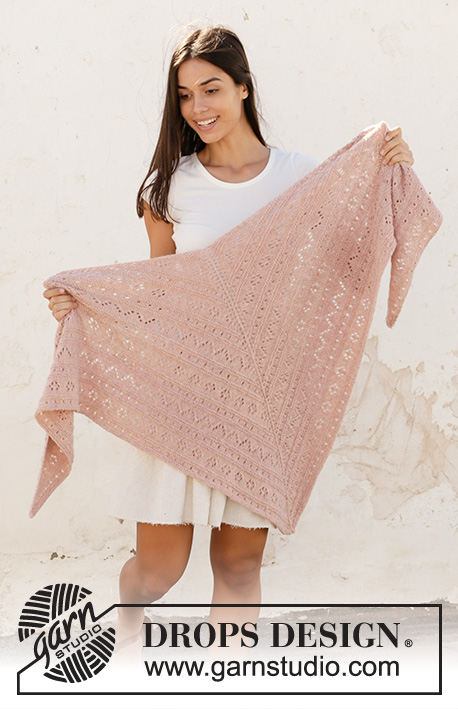
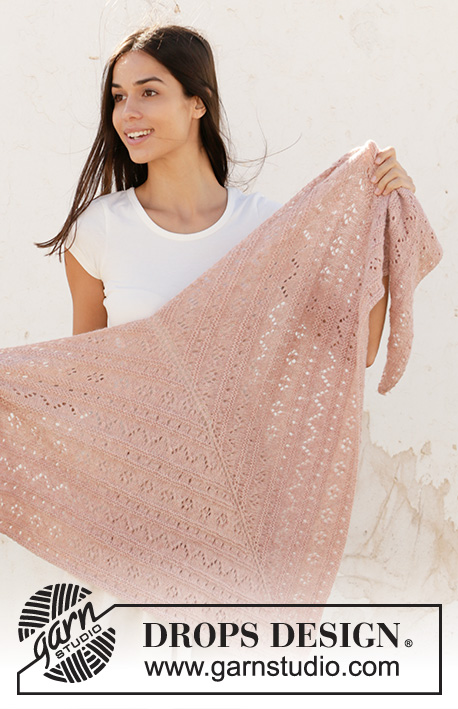
Scialle ai ferri in DROPS Sky. Lavorato dall’alto verso il basso con un motivo traforato e a punto legaccio
DROPS 212-42 |
|||||||||||||||||||
|
---------------------------------------------------------- TECNICHE IMPIEGATE: ---------------------------------------------------------- PUNTO LEGACCIO (avanti e indietro sui ferri): Lavorare tutti i ferri a diritto. 1 costa a legaccio in altezza = lavorare 2 ferri a diritto. MOTIVO: Vedere i diagrammi da A.1 a A.4. I diagrammi mostrano tutti i ferri del motivo, visti sul diritto del lavoro. SUGGERIMENTO PER CHIUDERE LE MAGLIE – per un bordo elastico: Intrecciare le maglie a diritto sul diritto del lavoro, come segue: lavorare 2 maglie diritto, * puntare il ferro di sinistra, da sinistra verso destra, nelle 2 maglie sul ferro destro e lavorarle insieme a diritto, lavorare 1 maglia diritto *, ripetere da *-* finché non rimane 1 maglia sul ferro destro. Tagliare il filo e passarlo attraverso l’ultima maglia. Quando si chiudono le maglie in questo modo, il bordo di chiusura risulta più elastico. ---------------------------------------------------------- IL LAVORO INIZIA QUI: ---------------------------------------------------------- SCIALLE - BREVI INDICAZIONI PER IL LAVORO: Si lavora dall’alto verso il basso, avanti e indietro. SCIALLE: Avviare 7 maglie sui ferri circolari n° 4 con il filato Sky. Lavorare 1 ferro a diritto sul rovescio del lavoro. Lavorare poi come segue: 1 maglia vivagno a PUNTO LEGACCIO - vedere le spiegazioni sopra, diagramma A.1 (= 2 maglie), 1 maglia centrale a maglia rasata, diagramma A.1 sulle 2 maglie successive e finire con 1 maglia vivagno a punto legaccio. Dopo aver lavorato il diagramma A.1 1 volta in verticale, ci sono 23 maglie. Proseguire come segue, sul diritto del lavoro: Lavorare 1 maglia vivagno a punto legaccio, diagramma A.2 (= 1 maglia), diagramma A.3 (= 8 maglie), diagramma A.4 (= 1 maglia), 1 maglia a maglia rasata, diagramma A.2 (= 1 maglia), diagramma A.3 (= 8 maglie), diagramma A.4 (= 1 maglia) e finire con 1 maglia vivagno a punto legaccio. RICORDARSI DI MANTENERE LA CORRETTA TENSIONE DEL LAVORO! Lavorare le maglie vivagno a punto legaccio e lavorare la maglia centrale a maglia rasata fino alla fine del lavoro. Dopo aver lavorato i diagrammi A.2 - A.4 1 volta in verticale, ci sono 183 maglie. Ripetere il motivo in verticale, quindi ogni volta che vengono completati i diagrammi in verticale, ci sono sufficienti maglie per lavorare 10 ripetizioni in più del diagramma A.3 da ciascun lato della maglia centrale. Quando lo scialle misura 72 cm, misurati lungo la maglia centrale (aggiustare per finire dopo 1 ripetizione intera del motivo traforato), lavorare a punto legaccio su tutte le maglie - continuare ad aumentare prima / dopo la maglia vivagno da ciascun lato del lavoro e da ciascun lato della maglia centrale come prima. Intrecciare le maglie lavorando a diritto sul diritto del lavoro quando lo scialle misura 74 cm, misurati lungo la maglia centrale - vedere il SUGGERIMENTO PER CHIUDERE LE MAGLIE! |
|||||||||||||||||||
Spiegazioni del diagramma |
|||||||||||||||||||
|
|||||||||||||||||||
 |
|||||||||||||||||||
 |
|||||||||||||||||||
 |
|||||||||||||||||||
Avete terminato questo modello?Allora taggate le vostre foto con #dropspattern #austrianspringshawl o inviatele alla #dropsfan gallery. Avete bisogno di aiuto con questo modello?Troverete 16 video tutorial, una sezione per i commenti/domande e molto altro guardando il modello su www.garnstudio.com © 1982-2026 DROPS Design A/S. Ci riserviamo tutti i diritti. Questo documento, compreso tutte le sue sotto-sezioni, è protetto dalle leggi sul copyright. Potete leggere quello che potete fare con i nostri modelli alla fine di ogni modello sul nostro sito. |
|||||||||||||||||||


Con oltre 40 anni di esperienza nel design di modelli di maglia e uncinetto, DROPS Design offre la più estesa collezione di modelli gratuiti su internet - tradotti in 17 lingue. Ad oggi vi possiamo fornire 324 cataloghi e 12290 modelli - 9561 dei quali sono tradotti in Italiano.
Ci stiamo impegnando molto per darvi il meglio che vi possiamo offrire in termini di maglia e uncinetto, ispirazioni e consigli così come filati di grande qualità ad un prezzo incredibile! Volete utilizzare i nostri modelli per qualcosa d'altro oltre al vostro uso personale? Potete leggere tutto ciò che è consentito nel testo sul Copyright in basso su tutte le pagine dei nostri modelli. Buon lavoro!
Lasciare un commento sul modello DROPS 212-42
Noi saremmo felici di ricevere i tuoi commenti e opinioni su questo modello!
Se vuoi fare una domanda, fai per favore attenzione a selezionare la categoria corretta nella casella qui sotto per velocizzare il processo di risposta. I campi richiesti sono indicati da *.