
Categorie popolari
State cercando un filato?


Commenti / Domande (13)
![]() Alessandra ha scritto:
Alessandra ha scritto:
Buongiorno, mi servirebbe aiuto per la 4º riga del collo. Devo procedere in questo modo: Rovescio, yarn over, passo una maglia, rovescio, rovescio? In questo caso come lavoro lo yarn over della riga precedente? Nella didascalia dice di lavorarlo ritorto… Non devo fare un dritto, giusto? Perché in quel caso non potrei poi fare i due rovesci dello schema. Spero di essermi spiegata. Grazie!☺️
26.01.2025 - 22:15DROPS Design ha risposto:
Buonasera Alessandra, deve lavorarlo a ritorto come indicato. Buon lavoro!
13.02.2025 - 23:21
![]() Simone ha scritto:
Simone ha scritto:
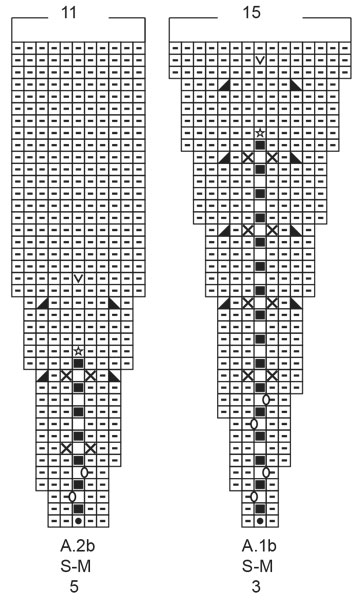
Hello, knitting another of your wonderful patterns.. September story but already I am stuck, Could you please explain the start of the yoke - Work A.1b over A.1a and A.2b over A.2a I don't understand how to proceed ? Work A/1b then A.1a then A.2b then A.2a or something else ? Many thanks again for your guidance
26.03.2023 - 21:54DROPS Design ha risposto:
Hi Simone, The stitches you have worked in A.1a will now be worked according to diagram A.1b and the same applies to the stitches in A.2a, now worked according to diagram A.2b (no longer work A.1a or A.2a). Happy knitting!
27.03.2023 - 06:54
![]() Megan ha scritto:
Megan ha scritto:
Third row of A.1b and A.2b: after knitting yarn over and slip stitch together, making one yarn over, am I supposed to purl three times before knitting the next yarn over and slip stitch together? But there are only two stitches from the previous row for me to purl? Thank you,
01.10.2022 - 19:47DROPS Design ha risposto:
Dear Megan, A.1b and A.2b are worked next to each other and repeated the whole row. Between the yarn over in A.1b and the yarn over in A.2b there are 3 purl stitches (1 from A.1b and 2 from A.2b). Happy knitting!
03.10.2022 - 00:57
![]() Megan ha scritto:
Megan ha scritto:
Thank you for your answering. If I yarn over once, slip a stitch to the right needle, I will have one more stitch for this row than what is shown in the diagram. Should I purl the next two stitches together then?
28.09.2022 - 16:37DROPS Design ha risposto:
Dear Mega, the yarn over worked over the slipped stitch doesn't count as 1 stitch, both yarn overs + slipped stitch will count as 1 stitch in English rib; on the next round, you will knit the yarn over + the slipped stitch together as 1 stitch in English rib. This video shows how to work a pattern with such stitches, it might help you. Happy knitting!
29.09.2022 - 08:17
![]() Megan ha scritto:
Megan ha scritto:
This is a follow up question to my previous question about “make 1 yarn over and slip the stitch onto the right needle as if to purl (= English rib stitch)” in second row of A.1b and A.2b. In the answer to this question, “slip 1 stitch onto the right needle as if to purl, purl 1 and repeat,” what does “slip one stitch” mean? Does it mean a yarn over?
27.09.2022 - 16:24DROPS Design ha risposto:
Hi Megan, Slipping a stitch means transferring it from the left needle to the right without working it. Slipping as if to purl means you insert the right needle from right to left when transferring it. Happy knitting!
28.09.2022 - 07:10
![]() Megan ha scritto:
Megan ha scritto:
“make 1 yarn over and slip the stitch onto the right needle as if to purl (= English rib stitch)” in second row of A.1b and A.2b, do you slip the stitch on the left needle onto the right needle and purl the next two stitches together? Thank you.
27.09.2022 - 06:54DROPS Design ha risposto:
Hi Megan, In A.1b row 2 you purl 1, slip 1 stitch onto the right needle as if to purl, purl 1 and repeat. In A.2b you purl 2, slip 1 stitch onto the right needle as if to purl, purl 2 and repeat. Happy knitting!
27.09.2022 - 07:25
![]() Megan ha scritto:
Megan ha scritto:
If I use long tail cast on method, which creates both a cast-on and the first row, do I still need to knit one round? "Insert 1 marker at the beginning of the round mid back" What does "mid back" mean? Does it mean this marker will be in the middle of the back? Thank you.
22.09.2022 - 05:43DROPS Design ha risposto:
Dear Megan, this knit row is worked before starting ribbing edge, just decide if you want it or rather start with rib. And correct, the rounds start /the marker is on the middle of back piece. Happy knitting!
22.09.2022 - 09:59
![]() Mary Culbertson ha scritto:
Mary Culbertson ha scritto:
I am stuck on how to proceed with yoke. Have been studying videos and charts and am confused. This is my first sweater other than simple baby sweaters. I love the look but haven't worked with charts.
02.01.2022 - 03:01DROPS Design ha risposto:
Dear Mary, can you please tell us, exactly what confuses you? So we might be able to help you better. Thank you. Happy Stitching!
03.01.2022 - 02:05
![]() Kim Stellinga ha scritto:
Kim Stellinga ha scritto:
Ik heb de trui gebreid (s) in drops Alaska. Hij is mooi, maar wanneer de pas 20 cm meet ga je over in tricotsteek. Dit maakt dat de overgang ribbel/tricot halverwege de borst valt. Dit vind ik niet zo mooi omdat die rand best dik is. Het zou mooier zijn als je na 25 cm de overgang maakt. Dan valt hij onder de borst. Bij jullie model is zo te zien de overgang ook niet na 20 cm gebreid, want bij haar valt het ook onder de borst. Dit zou naar mijn idee moeten worden aangepast in het patroon.
13.10.2021 - 23:49
![]() Christel Poeter ha scritto:
Christel Poeter ha scritto:
Die Anleitung will ich in Groesse M stricken Halsausschnitt 1 Reihe re. stricken u.dann 1a u.2a über alle Maschen strichen das verstehe ich nicht 1a sind 3 Ma. u.2a 5Ma. nur rechte u. linke Ma.?Danke für die Hilfe
08.05.2020 - 22:36DROPS Design ha risposto:
Liebe Frau Poeter, so sollen Sie stricken: *die 3 Maschen von A.1a, die 5 Maschen von A.2a*, diese 8 Maschen wiederholen Sie bis zur Ende der Runde, insgesamt 10 Mal = über alle 80 Maschen. Hier lesen Sie mehr über Diagramme. Viel Spaß beim stricken!
11.05.2020 - 08:37
|
|||||||||||||||||||||||||||||||
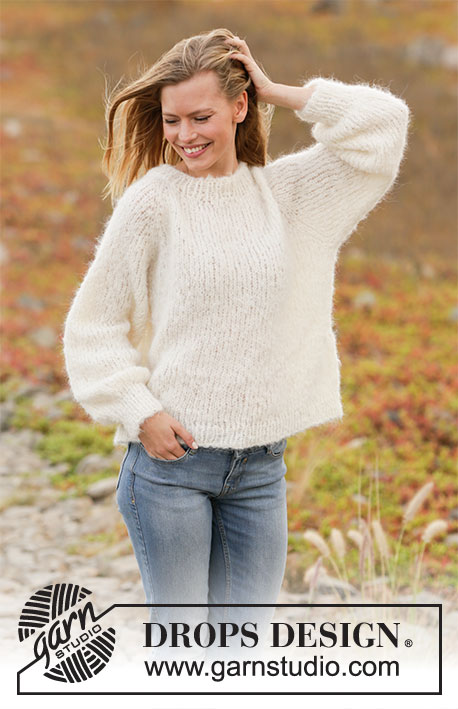
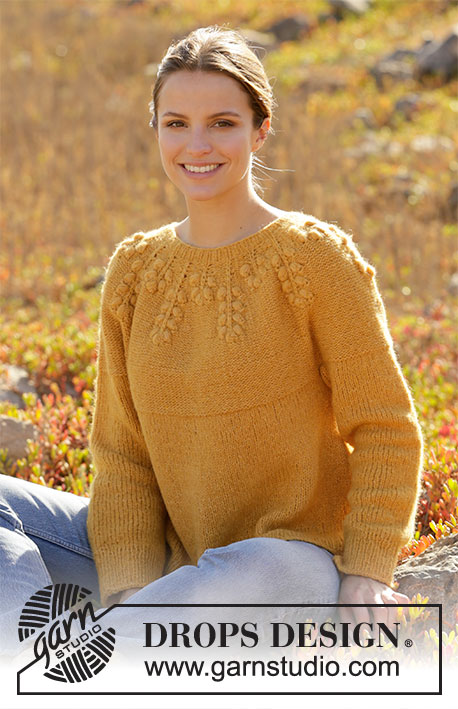
September Story Sweater#septemberstorysweater |
|||||||||||||||||||||||||||||||
 |
 |
||||||||||||||||||||||||||||||
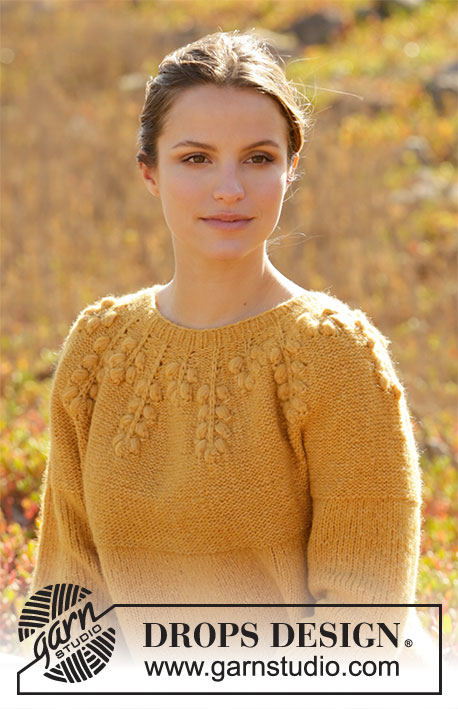
Maglione lavorato ai ferri con sprone rotondo in DROPS Air. Lavorato dall'alto in basso con noccioline. Taglie: S - XXXL.
DROPS 213-25 |
|||||||||||||||||||||||||||||||
|
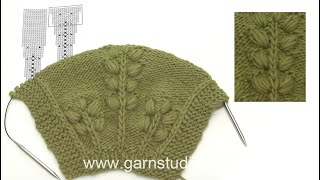
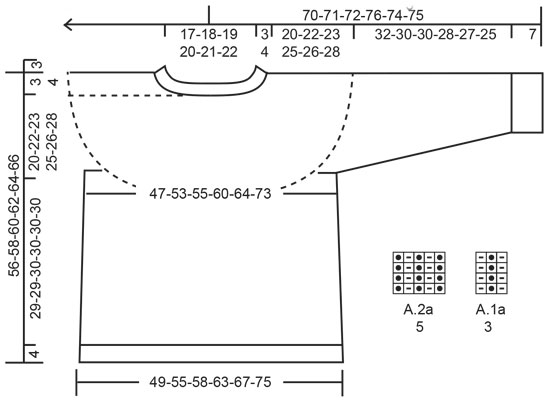
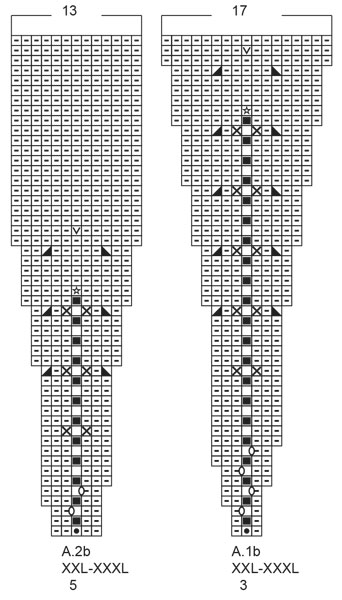
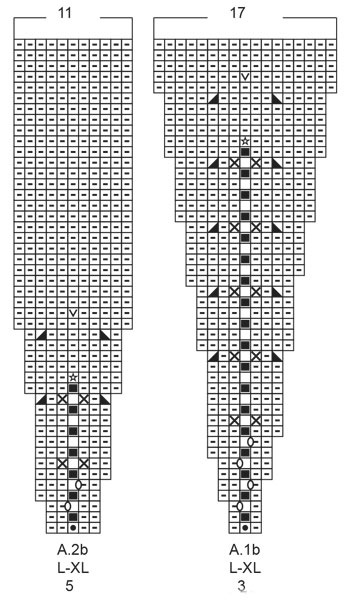
------------------------------------------------------- TECNICHE IMPIEGATE: ------------------------------------------------------- MOTIVO: Vedere i diagrammi A.1 e A.2. Scegliere il diagramma per la vostra taglia. SUGGERIMENTO PER GLI AUMENTI (applicato ai lati del corpo): Lavorare fino a quando rimangono 2 maglie prima del segnapunti, 1 gettato, 4 maglie diritto (il segnapunti è al centro di queste 4 maglie), 1 gettato (= 2 aumenti). Sul giro successivo lavorare il gettato a ritorto per evitare buchi. Poi lavorare le nuove maglie a diritto. SUGGERIMENTO PER LE DIMINUZIONI (applicato alle maniche): Diminuire 1 maglia a ogni lato del segnapunti come segue: Lavorare fino a quando rimangono 3 maglie prima del segnapunti, 2 maglie insieme a diritto, 2 maglie diritto (il segnapunti è al centro di queste maglie), passare 1 maglia a diritto senza lavorarla, 1 maglia diritto, accavallare la maglia passata sopra quella appena lavorata (= 2 diminuzioni). SUGGERIMENTO PER LA CHIUSURA: Per evitare che il bordo di chiusura sia tirato potete intrecciare con un ferro di una misura più grande. Se il bordo risulta ancora tirato, fare 1 gettato dopo circa 4 maglie durante la chiusura e intrecciare i gettati come maglie normali. ------------------------------------------------------- INIZIO DEL LAVORO: ------------------------------------------------------- MAGLIONE – BREVE RIASSUNTO DEL LAVORO: Lavorato avanti e indietro con i ferri circolari, dall'alto in basso dal centro dietro. Lavorare le maniche in tondo con i ferri a doppia punta, dall'alto in basso. COLLO: Avviare 72-80-80-88-88-96 maglie con i ferri circolari n° 4,5 mm e Air. Lavorare 1 giro diritto. Poi lavorare * A.1a (= 3 maglia), A.2a (= 5 maglie) *, lavorare *-* su tutte le maglie (= 9-10-10-11-11-12 volte in larghezza). Quando il lavoro misura 3-3-3-3-4-4 cm, passare ai ferri circolari n° 5,5 mm. Inserire 1 segnapunti all'inizio del giro al centro dietro; misurare lo sprone da qui! SPRONE: Lavorare A.1b su A.1a e A.2b su A.2a. FARE ATTENZIONE ALLA TENSIONE DEL LAVORO! Alla fine di A.1b e A.2b ci sono 234-260-280-308-330-360 maglie sul ferro. Lavorare a rovescio fino a quando il lavoro misura 20-22-23-25-26-28 cm dal segnapunti. Ora dividere lo sprone per il corpo e le maniche come segue: Lavorare 34-39-41-45-48-55 maglie diritto, mettere le 48-52-58-64-68-70 maglie successive in sospeso per la manica, avviare 6 nuove maglie sul ferro (= a lato sotto la manica), 69-78-82-90-97-110 maglie diritto (= davanti), mettere le 48-52-58-64-68-70 maglie successive in sospeso per la manica, avviare 6 nuove maglie sul ferro (= a lato sotto la manica) e lavorare a diritto le 35-39-41-45-49-55 maglie rimaste. Finire il corpo e le maniche in modo separato. ORA MISURARE IL LAVORO DA QUI! CORPO: = 150-168-176-192-206-232 maglie. Inserire 1 segnapunti al centro delle 6 maglie avviate sotto ogni manica. Ci sono 75-84-88-96-103-116 maglie sul dietro e davanti. Lasciare che i segnapunti seguano il lavoro; verranno usati durante gli aumenti laterali. Lavorare in tondo a diritto. Quando il lavoro misura 6 cm dalla divisione, aumentare 1 maglia a ogni lato di entrambi i segnapunti – leggere il SUGGERIMENTO PER GLI AUMENTI (= 4 aumenti). Ripetere questo aumento quando il lavoro misura 16 cm = 158-176-184-200-214-240 maglie. Quando il lavoro misura 29-29-30-30-30-30 cm dalla divisione, passare ai ferri circolari n° 4,5 mm e lavorare a coste (= 1 maglia diritto, 1 maglia rovescio). Intrecciare a diritto quando le coste misurano 4 cm– leggere il SUGGERIMENTO PER LA CHIUSURA. MANICA: Riportare le 48-52-58-64-68-70 maglie in sospeso a un lato del lavoro sui ferri circolari corti n° 5,5 mm e riprendere 1 maglia in ognuna delle 6 maglie avviate sotto la manica = 54-58-64-70-74-76 maglie. Inserire un segnapunti al centro delle 6 maglie sotto le maniche. Lasciare che il segnapunti segua il lavoro; verrà usato durante le diminuzioni sotto la manica. Iniziare all'altezza del segnapunti e lavorare a diritto in tondo. Quando la manica misura 3 cm dalla divisione, diminuire 2 maglie al centro sotto la manica – leggere il SUGGERIMENTO PER LE DIMINUZIONI. Diminuire in questo modo ogni 6-3-2½-2-1½-1½ cm per un totale di 5-7-9-11-12-12 volte = 44-44-46-48-50-52 maglie. Continuare a lavorare fino a quando la manica misura 32-30-30-28-27-25 cm dalla divisione (mancano circa 7 cm alla fine del lavoro; potete provare il maglione e lavorare fino alla lunghezza desiderata). Passare ai ferri a doppia punta n° 4,5 mm e lavorare a coste (= 1 maglia diritto, 1 maglia rovescio). Intrecciare quando le coste misurano 7 cm. La manica misura circa 39-37-37-35-34-32 cm dalla divisione. Lavorare l'altra manica nello stesso modo. |
|||||||||||||||||||||||||||||||
Spiegazioni del diagramma |
|||||||||||||||||||||||||||||||
|
|||||||||||||||||||||||||||||||
 |
|||||||||||||||||||||||||||||||
 |
|||||||||||||||||||||||||||||||
 |
|||||||||||||||||||||||||||||||
 |
|||||||||||||||||||||||||||||||
Avete terminato questo modello?Allora taggate le vostre foto con #dropspattern #septemberstorysweater o inviatele alla #dropsfan gallery. Avete bisogno di aiuto con questo modello?Troverete 26 video tutorial, una sezione per i commenti/domande e molto altro guardando il modello su www.garnstudio.com © 1982-2026 DROPS Design A/S. Ci riserviamo tutti i diritti. Questo documento, compreso tutte le sue sotto-sezioni, è protetto dalle leggi sul copyright. Potete leggere quello che potete fare con i nostri modelli alla fine di ogni modello sul nostro sito. |
|||||||||||||||||||||||||||||||


Con oltre 40 anni di esperienza nel design di modelli di maglia e uncinetto, DROPS Design offre la più estesa collezione di modelli gratuiti su internet - tradotti in 17 lingue. Ad oggi vi possiamo fornire 324 cataloghi e 12290 modelli - 9561 dei quali sono tradotti in Italiano.
Ci stiamo impegnando molto per darvi il meglio che vi possiamo offrire in termini di maglia e uncinetto, ispirazioni e consigli così come filati di grande qualità ad un prezzo incredibile! Volete utilizzare i nostri modelli per qualcosa d'altro oltre al vostro uso personale? Potete leggere tutto ciò che è consentito nel testo sul Copyright in basso su tutte le pagine dei nostri modelli. Buon lavoro!
Lasciare un commento sul modello DROPS 213-25
Noi saremmo felici di ricevere i tuoi commenti e opinioni su questo modello!
Se vuoi fare una domanda, fai per favore attenzione a selezionare la categoria corretta nella casella qui sotto per velocizzare il processo di risposta. I campi richiesti sono indicati da *.