
Categorie popolari
State cercando un filato?


Commenti / Domande (24)
![]() Kati ha scritto:
Kati ha scritto:
Kaikki hyvin
31.03.2026 - 07:50
![]() Rina ha scritto:
Rina ha scritto:
Erg leuk en makkelijk te breien met het patroon en de uitleg. Heb muts en sjaal in de roze kleur van Snow gemaakt en ben er blij mee!
14.12.2025 - 22:38
![]() Hanna ha scritto:
Hanna ha scritto:
Hungarian translation says decrease instead of increase several times in the description.
06.10.2025 - 18:50
![]() Evie ha scritto:
Evie ha scritto:
Simpele vorm van de Engelse patentsteek: haal de steek af zonder te breien en hou de draad achter het werk. Op de naald terug de steek wél breien.
02.10.2025 - 07:16
![]() Elena ha scritto:
Elena ha scritto:
Guten Tag, ich sehe aus dem Bild andere Muster bei der Schal. Sie schreiben:43 Anschlagen, Rück Reihe alle Maschen links stricken. Auf dem Foto - sieht es so aus, als ob man beim Rück Reihe (2-er Reihe, Schal) man strickt 3 Rand Maschen schon als Krausrippe. Wenn ich so wie sie beschreiben - 2-er Reihe (rück reihe) - alle Maschen links stricke- ich sehe den Unterschied. Es ist Evtl eine Fehler bei der Beschreibung? Danke!
20.12.2024 - 21:40DROPS Design ha risposto:
Liebe Elena, die erste Reihe beim Schal wird links gestrickt = das ist eine Rückreihe; dann wird die nächste Reihe eine Hinreihe sein und wird mit Bündchen und 3 Maschen krausrechts beidseitig gestrickt. Viel Spaß beim Stricken!
02.01.2025 - 09:25
![]() Jo ha scritto:
Jo ha scritto:
Scarf: "knit 1 in stitch below next stitch - this stitch is now called an English rib stitch" - what does ut supposed to mean? Is this really the English rib stich? It sounds nothing like that and the pattern does not work with the real English rib.
28.09.2024 - 21:49DROPS Design ha risposto:
Dear Jo, in this video we show how to knit 1 stitch in previous row, this will be like a fisherman's rib maybe rather than English rib. Happy knitting!
30.09.2024 - 10:23
![]() Gabriela Ambühl ha scritto:
Gabriela Ambühl ha scritto:
Guten Tag Die Strickschrift kann nicht stimmen, habe Erfahrung im Stricken und das Zopfmuster sieht nicht aus wie auf dem Foto Freundliche Grüsse
13.12.2023 - 11:10DROPS Design ha risposto:
Liebe Frau Ambühl, Diagramme stimmen so, und werden von unten nach oben gelesen, rechts nach links bei den Hin-Reihen und links nach rechts bei den Rückreihen. Hier lesen Sie mehr. Viel Spaß beim stricken!
15.02.2024 - 08:51
![]() Debora ha scritto:
Debora ha scritto:
Hallo! Wenn ich alles richtig gemacht habe müsste ich beim Schal in der 1. Reihe die 12. Masche ja als Patentmasche stricken und gleichzeitig aber auch verschränkt stricken. Wie mache ich das? Vielen Dank schon im Voraus!
20.11.2022 - 20:42DROPS Design ha risposto:
Liebe Debora, meinen Sie diese Masche ist die Zunahmen der vorrigen Rückreihe? Dann stricken Sie am besten die Zunahmen entweder davor oder danach und die Patentmasche wie erklärt. Viel Spaß beim stricken!
21.11.2022 - 10:20
![]() Berlin ha scritto:
Berlin ha scritto:
Hello Has anyone finished the scarf with success in this pattern? I am sorry but the diagram it has been given doesn’t look the same when I knit. Something could be missing? Is it possible to write directions more clear rather than using the diagram for the cable part? Looks like 9 rows knit then do the cable part, another 9 rows knit, then do the cable but it doesn’t look right. Anyone who worked on the scarf please?
20.01.2022 - 13:56DROPS Design ha risposto:
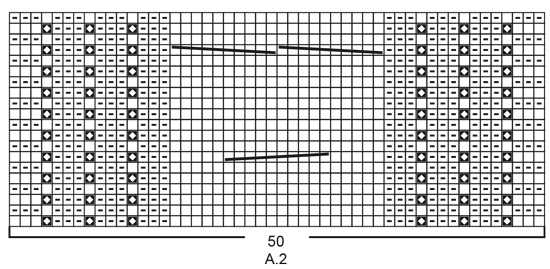
Dear Berlin, sure it was - you will find some projects in Ravelry for example; the first cable over 10 sts in A.2 will be worked on 7 (over the 10 middle stitches) then you will work 2 cables over each of the next 10 sts. Could this lesson help you with diagrams?
20.01.2022 - 17:20
![]() Berlin ha scritto:
Berlin ha scritto:
I need help with autumn twist hat. Haven’t found a video on how to make knit from right, purl from front and purl from right knit from wrong side. I am knitting in circle so this doesn’t make any sense for me. Please help
08.12.2021 - 14:31DROPS Design ha risposto:
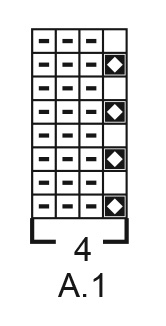
Dear Mrs Berlin, when working the hat, you will always work from RS, correct, this means you will knit the white squares and purl the squares with a small - so that the first st in A.1 is worked alternately K1 below/K1 and the last 3 sts in A.1 will always be purled on every round. Diagram text is also written for the diagram to the scarf that is worked in rows (with a wrong side). Happy knitting!
08.12.2021 - 15:37
|
||||||||||||||||
Autumn Twist#autumntwistset |
||||||||||||||||
|
|
||||||||||||||||
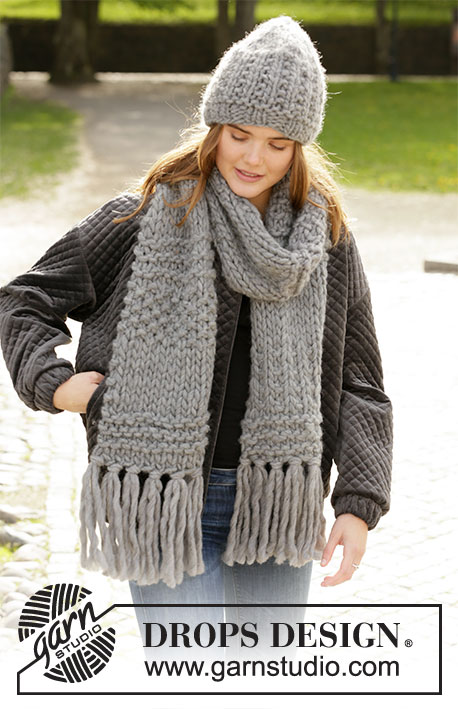
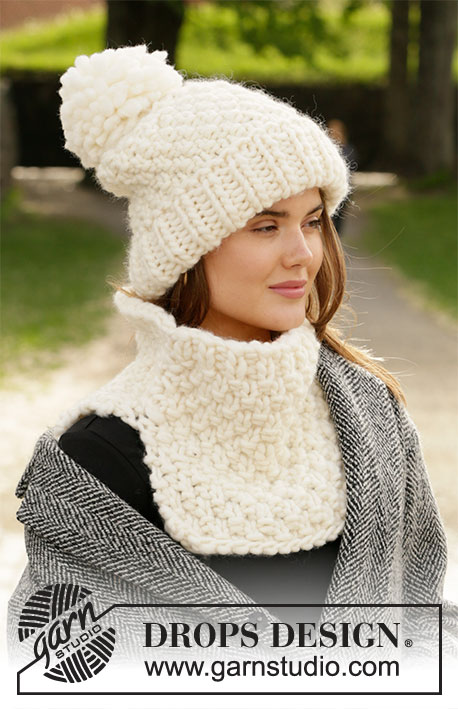
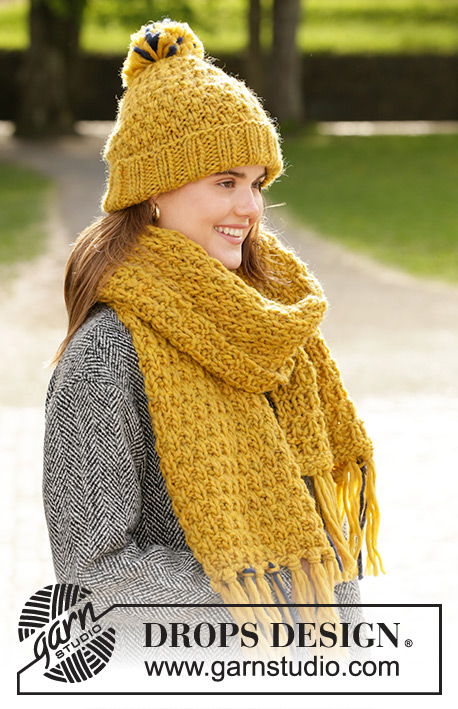
Cappello e sciarpa lavorati ai ferri in DROPS Snow o DROPS Wish con motivo a punto fantasia e trecce.
DROPS 204-10 |
||||||||||||||||
|
---------------------------------------------------------- TECNICHE IMPIEGATE: ---------------------------------------------------------- COSTA/MAGLIA LEGACCIO (avanti e indietro): Lavorare tutti i ferri a diritto. 1 costa in altezza = 2 ferri diritto. MOTIVO: Cappello: Vedere il diagramma A.1. Sciarpa: Vedere il diagramma A.2. SUGGERIMENTO PER GLI AUMENT/DIMINUZIONI (distribuiti in modo uniforme): Per stabilire ogni quanto diminuire/aumentare in modo uniforme, prendere il n° totale di maglie sul ferro (ad esempio 43 maglie), meno le maglie del bordo (ad esempio 6 maglie) e dividere il numero di maglie rimasto per il n° di aumenti/diminuzioni da fare (ad esempio 7) = 5,3. In questo esempio aumentare facendo 1 gettato circa dopo ogni 5° maglia. Non aumentare sulle maglie del bordo. Sul ferro successivo lavorare i gettati a ritorto per evitare buchi. Durante le diminuzioni lavorare insieme a diritto ogni 4° e 5° maglia insieme. ---------------------------------------------------------- INIZIO DEL LAVORO: ---------------------------------------------------------- CAPPELLO – BREVE RIASSUNTO DEL LAVORO: Lavorato in tondo con i ferri circolari, dal basso verso l’alto. Passare ai ferri a doppia punta quando necessario. CAPPELLO: Avviare 56-60 maglie con i ferri circolari corti n° 8 mm con Snow. Lavorare a coste in tondo = 1 maglia diritto/1 maglia rovescio per 6 cm. Poi lavorare A.1 in tondo (= 14-15 ripetizioni di 4 maglie). FARE ATTENZIONE ALLA TENSIONE DEL LAVORO! Quando il lavoro misura 24-25 cm dal bordo di avvio, iniziare a diminuire e aumentare come descritto sotto. ALLO STESSO TEMPO lavorare a coste inglesi su ogni giro. Sul 1° giro di diminuzioni, diminuire le sezioni con 3 maglie rovescio a 2 maglie rovescio lavorando 2 maglie insieme a rovescio in ogni sezione a rovescio = 42-45 maglie. Lavorare 1 giro con diritto su diritto e rovescio su rovescio. Sul giro successivo diminuire tutte le maglie con 2 maglie rovescio a 1 maglia rovescio = 28-30 maglie. Lavorare 2 giri con diritto su diritto e rovescio su rovescio. Poi lavorare 2 giri in cui lavorare tutte le maglie insieme 2 a 2 a diritto su entrambi i giri = 7-8 maglie rimaste. Tagliare il filo. Farlo passare attraverso le maglie rimaste, tirare bene e affrancare. Il lavoro misura circa 29-30 cm dall’alto in basso. Piegare i 6 cm inferiori del cappello. ---------------------------------------------------------- SCIARPA – BREVE RIASSUNTO DEL LAVORO: Lavorare avanti e indietro. SCIARPA: Avviare 43 maglie con i ferri n° 10 mm con Snow. Lavorare 1 ferro rovescio (= rovescio del lavoro). Lavorare il ferro successivo come segue dal diritto del lavoro: lavorare 3 maglie di vivagno a MAGLIA LEGACCIO – leggere la spiegazione sopra - * 1 maglia diritto, 1 maglia rovescio *, lavorare *-* fino a quando rimangono 4 maglie, 1 maglia diritto e finire con 3 maglie di vivagno a maglia legaccio. Continuare a coste per lavorare 3 ferri in totale a coste. Lavorare 1 ferro rovescio dal rovescio del lavoro (lavorare le maglie del bordo a maglia legaccio) – ALLO STESSO TEMPO aumentare 7 maglie in modo uniforme – leggere il SUGGERIMENTO PER GLI AUMENTI/DIMINUZIONI = 50 maglie. Poi lavorare A.2 avanti e indietro su tutte e 50 le maglie. FARE ATTENZIONE ALLA TENSIONE DEL LAVORO! Lavorare fino a quando la sciarpa misura circa 167 cm ma finire dopo circa 3 o 5 ferri dopo una treccia (lavorare l’ultimo ferro dal rovescio del lavoro). Lavorare 1 ferro diritto dal diritto del lavoro in cui diminuire 7 maglie in modo uniforme = 43 maglie. Lavorare il ferro successivo come segue dal rovescio del lavoro: lavorare 3 maglie di vivagno a maglia legaccio, * 1 maglia rovescio, 1 maglia diritto *, ripetere *-* fino a quando rimangono 4 maglie sul ferro, lavorare 1 maglia rovescio e finire con 3 maglie di vivagno a maglia legaccio. Continuare a coste in questo modo fino a quando sono stati lavorati 3 ferri a coste. Intrecciare senza stringere a diritto dal diritto del lavoro. La sciarpa misura circa 170 cm. |
||||||||||||||||
Spiegazioni del diagramma |
||||||||||||||||
|
||||||||||||||||
 |
||||||||||||||||
 |
||||||||||||||||
Avete terminato questo modello?Allora taggate le vostre foto con #dropspattern #autumntwistset o inviatele alla #dropsfan gallery. Avete bisogno di aiuto con questo modello?Troverete 22 video tutorial, una sezione per i commenti/domande e molto altro guardando il modello su www.garnstudio.com © 1982-2026 DROPS Design A/S. Ci riserviamo tutti i diritti. Questo documento, compreso tutte le sue sotto-sezioni, è protetto dalle leggi sul copyright. Potete leggere quello che potete fare con i nostri modelli alla fine di ogni modello sul nostro sito. |
||||||||||||||||


Con oltre 40 anni di esperienza nel design di modelli di maglia e uncinetto, DROPS Design offre la più estesa collezione di modelli gratuiti su internet - tradotti in 17 lingue. Ad oggi vi possiamo fornire 324 cataloghi e 12290 modelli - 9561 dei quali sono tradotti in Italiano.
Ci stiamo impegnando molto per darvi il meglio che vi possiamo offrire in termini di maglia e uncinetto, ispirazioni e consigli così come filati di grande qualità ad un prezzo incredibile! Volete utilizzare i nostri modelli per qualcosa d'altro oltre al vostro uso personale? Potete leggere tutto ciò che è consentito nel testo sul Copyright in basso su tutte le pagine dei nostri modelli. Buon lavoro!
Lasciare un commento sul modello DROPS 204-10
Noi saremmo felici di ricevere i tuoi commenti e opinioni su questo modello!
Se vuoi fare una domanda, fai per favore attenzione a selezionare la categoria corretta nella casella qui sotto per velocizzare il processo di risposta. I campi richiesti sono indicati da *.