
Categorie popolari
State cercando un filato?


Commenti / Domande (17)
![]() María ha scritto:
María ha scritto:
Buenas! Una novata por aquí que quiere aprender y hacerle una bufanda a su madre por Navidad, pero no entiendo nada del esquema 😂🤦🏼♀️ ¿Habría alguna posibilidad de que me explicarais un poco mejor todo? ¿O algún vídeo con el paso a paso de esta bufanda? O cualquier recomendación es más que aceptada! Gracias de antemano!
18.12.2025 - 08:48DROPS Design ha risposto:
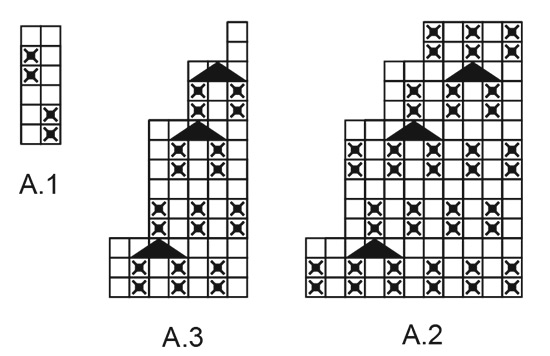
Hola María, para la bufanda solo necesitas usar el diagrama A.1. Este diagrama representa un patrón de 2 puntos. En la primera fila trabajas 1 revés/ 1 derecho. En la segunda fila derecho sobre derecho y revés sobre revés. Después trabajas 1 fila de derecho, 1 fila de (1 revés/ 1 derecho) y una fila de derecho sobre derecho y revés sobre revés. Terminar con una fila de revés por el lado revés. Repetir estas 6 filas el número de veces necesario. Para entender mejor nuestros diagramas puedes leer esta lección.
28.12.2025 - 19:41
![]() Annemarie ha scritto:
Annemarie ha scritto:
Hallo, ist es beabsichtigt, dass beim Anfang der Mützenspitze (die ersten zwei Runden von “A1, *A2,A3*x3”) das Muster der Mütze unterbrochen wird? Bei mir sind an der Stelle zwei rechte Maschen über zwei rechten Maschen, anstatt über linken Maschen, wie es vorher war. Das passiert ja, weil die zweite Masche von A1 eine linke ist, die erste Masche von A1 aber auch. Oder habe ich die Anleitung falsch verstanden?
30.10.2025 - 10:49DROPS Design ha risposto:
Liebe Annemarie, eigentlich sollte das nicht passieren. Ich nehme an, Sie stricken Gr. M/L - denn nur dann stricken Sie noch 1 x A.1. In der kleineren Größe stricken Sie nur A.2 und A.3 im Wechsel. In Gr. M/L beginnen Sie mit A.1 (= 2 M = 1 M li, 1 M re), dann 3 x 18 M (= A.2 (11 Maschen) + A.3 (7 Maschen)), das geht mustergemäß in der Runde auf. Auch die Abnahmen passen ins Muster. Schauen Sie noch mal genau nach, ob Sie die richtige Maschenzahl haben oder ob Sie an irgendeiner Stelle das Muster nicht ganz richtig weitergestrickt haben. Gutes Gelingen!
30.10.2025 - 23:22
![]() Annette ha scritto:
Annette ha scritto:
Re previous question & answer. Do I only work the first 11/7 stitches from each chart? Or do I alternate 11 from A2 and 7 from A3 until I complete the entire chart? The first 11 stitches from A2 have no decreases. The first 7 from A3 has 1 decrease of 2 stitches (k3 tog). Each decrease in the charts is 2 stitches (k3tog) so I can only decrease in even numbers. I can't get 5 & 1 decreased x 3. Do I complete each chart 3 times to get the 36 stitch decrease? Appears I need more specific guidance
03.03.2023 - 16:52DROPS Design ha risposto:
Dear Anette, round 1 of A.2 has 11 stitches and round 1 of A.3 has 7 stitches. On the first round work: the first 2 stitches of A.1, A.2, A.3, A.2, A.3, A.2, A.3. On the next round, you will work round 2 of the charts in the same order: 2 stitches of A.1, A.2, A.3, A.2, A.3, A.2 and A.3. In row 3 of A.2 and A.3 you will decrease 2 stitches for each A.2 and each A.3 on the round. Since there are 3 A.2 and 3 A.3, you are decreasing 12 stitches on the round. You have 3 rounds with decreases in both charts so, after finishing charts A.2 and A.3, you should have decreased 36 stitches. Happy knitting!
05.03.2023 - 21:23
![]() Annette ha scritto:
Annette ha scritto:
Confused on hat decreases. Do I work 11 stitches from A2 then 7 from A3, then move to next 11 stitches from A2 & next 7 from A3, etc. "for a total of 3 times in width" (I don't understand this statement). If I work a total of 33 from A2 & 21 from A3 I don't end up with the 20 stitches that I should and I never complete either chart. Please help
03.03.2023 - 15:51DROPS Design ha risposto:
Dear Annette, you will now decrease for top of hat as shown in both diagrams, this means you will work *A.2 (= 11 sts), A.3 (= 7 sts)* (= a total of 18 sts) and repeat these 18 stitches to the end of the round (3 times = 3 x 18 = 54 sts). Decrease just as shown in diagrams A.2 and A.3 so that there should be 5 sts in A.2 and 1 st in A.3 when diagrams are done (= (5+1)x3 = 18 sts in total). Happy knitting!
03.03.2023 - 16:21
![]() Géraldine GOBERT ha scritto:
Géraldine GOBERT ha scritto:
Bonjour, je tricote une écharpe devant modèle, dans la laine est drops snow 100% laine la même que le modèle. Le problème est que la laine peluche partout, auriez-vous une astuce pour éviter cela? Merci passez de bonnes fêtes
20.12.2022 - 16:44DROPS Design ha risposto:
Bonjour Mme Gobert, il est naturel que la laine peluche, car ce sont des fibres naturelles, au bout d'un moment ce processus diminue (quand les fibres plus lâchement filées sont parties), mais ceci varie aussi en fonction également des frottements. Bon tricot!
21.12.2022 - 08:27
![]() Vicki Grierson ha scritto:
Vicki Grierson ha scritto:
Hello, I love this pattern but unfortunately I don't love the Snow yarn. It feels much cheaper and rougher than your other yarns I have knitted up. However I shall persevere and finish the two accessories. M.y question is that the band says do not use fabric conditioner. Is there a reason why not as I have thought of using some to soften the scarf and hat? The other yarn I am using, Wish, is absolutely beautiful and so soft. I wish Snow was like Wish! Many thanks, Vicki
16.03.2022 - 21:07DROPS Design ha risposto:
Dear Vicki, you shouldn't use fabric softener at all on any wool yarns. For wool it is recommended to use detergent that is meant for wool. So no fabric softener at all on wool yarns (both Snow, Wish, merino yarns etc). Happy knitting! Fabric softener destroys the wool fibres and ruins the shape stability
17.03.2022 - 11:15
![]() Novella ha scritto:
Novella ha scritto:
La sciarpa preferisco lavorarla coi ferri lineari. In questo caso il diagramma A1 si lavora a ferri di andata e ritorno (1 riga dx-sx e 2 riga sx-dx) oppure essendo fatto ai ferri circolari si deve leggere ogni riga sempre da dx a sx? Non mi è molto chiaro. Grazie.
09.12.2020 - 16:40DROPS Design ha risposto:
Buonasera Novella, la sciarpa si lavora in piano anche sui ferri circolari, per cui il diagramma si legge da destra a sinistra per i ferri di andata e da sinistra a destra per i ferri di ritorno. Buon lavoro!
09.12.2020 - 17:56
![]() Nanna ha scritto:
Nanna ha scritto:
Hej. Jeg er ved at strikke huen. Og jeg kan ikke få mønsteret til at passe efter den første indtagning. Hvordan kan det være at diagrammet siger at der skal strikkes vrang oven på indtagningerne. Men også siger at man skal strikke ret oven på de indtagede masker som ikke er der mere? (Det ligner jeg har 3 ret masker på linje på pinden efter indtagningen, og næste række rib passer derfor ikke?)
20.02.2020 - 21:57DROPS Design ha risposto:
Hej Nanna, Jo da du altid tager 2 masker ind på en gang, så kan du også altid fortsætte med 1 vrang over 1 ret og omvendt. God fornøjelse!
21.02.2020 - 08:35
![]() Déborah Bellanger ha scritto:
Déborah Bellanger ha scritto:
Bonjour je viens de tricoter ce bonnet,(204-2) et de l offrir a ma maman, elle me demande si ce point (A1) a un nom.merci
27.11.2019 - 04:02DROPS Design ha risposto:
Bonjour Mme Bellanger, c'est une variation du point de blé, vous trouverez ici , comment lire un diagramme. Bon tricot!
27.11.2019 - 08:23
![]() Ghislaine DesGagné ha scritto:
Ghislaine DesGagné ha scritto:
Le 1er rg doit se tricoter à l'envers, ce qui m'amène au rg 2 qui devra lui aussi être à l'envers? J'imagine que je commence le diagramme A1 au 3ième rg? Les rgs envers doivent se faire comment? Merci
27.11.2019 - 03:18DROPS Design ha risposto:
Bonjour Mme DesGagné, pour l'écharpe, on commence par 1 rang en mailles envers = ce rang sera le 1er rang sur l'envers. On va donc commencer le diagramme A.1 par le 1er rang et ce sera un rang sur l'endroit. Répétez ensuite les 6 rangs de A.1 en hauteur. Vous trouverez ici comment lire des diagrammes. Bon tricot!
27.11.2019 - 08:10
|
||||||||||
Hello Autumn#helloautumnset |
||||||||||
 |
 |
|||||||||
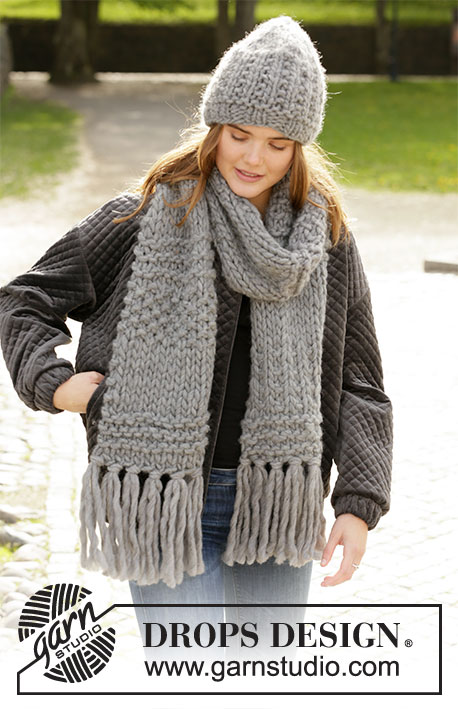
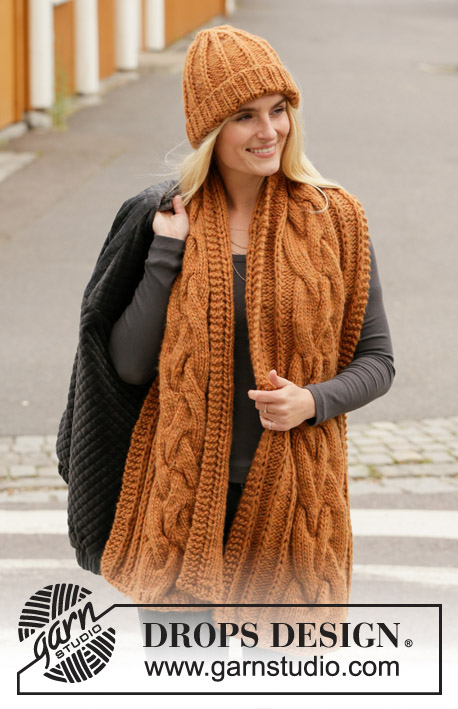
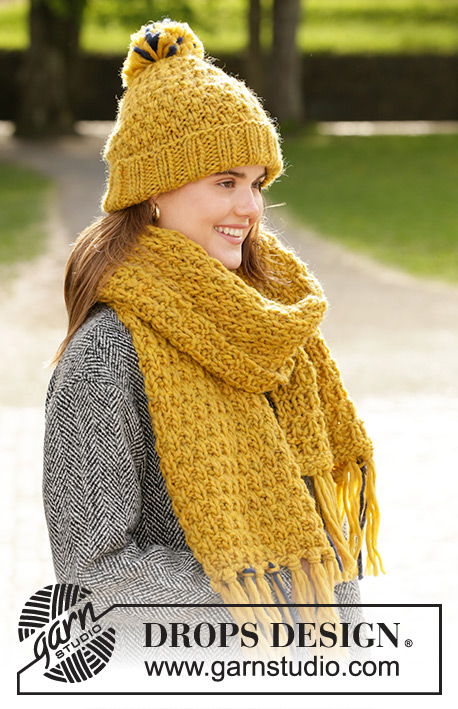
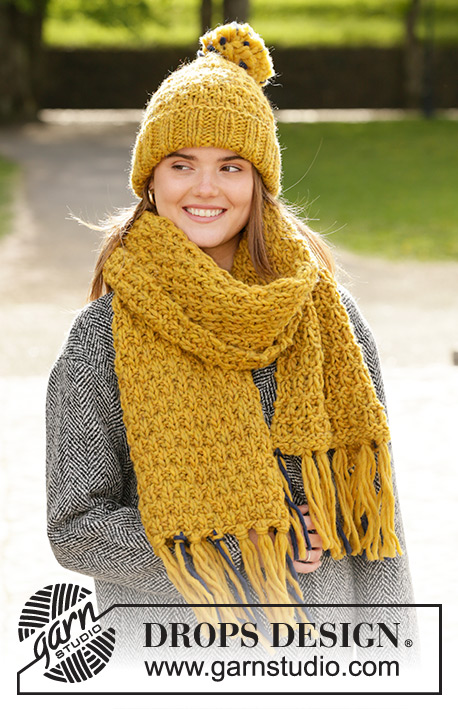
Cappello ai ferri con motivo a punto fantasia e pompon, e sciarpa ai ferri con motivo a punto fantasia e frange in DROPS Snow.
DROPS 204-2 |
||||||||||
|
------------------------------------------------------- TECNICHE IMPIEGATE: ------------------------------------------------------- MOTIVO: Cappello: Vedere i diagrammi da A.1 a A.3. Sciarpa: Vedere il diagramma A.1. Il diagramma mostra tutti i ferri del motivo, visti sul diritto del lavoro. SUGGERIMENTO PER LE DIMINUZIONI (a intervalli regolari): Per calcolare ogni quante maglie diminuire, dividere il numero complessivo delle maglie (p.es: 64 maglie) per il numero di diminuzioni da fare (p.es 10) = 6,4. Quindi, in questo esempio, per diminuire lavorare insieme a diritto alternativamente ogni 5a e 6a maglia e ogni 6a e 7a maglia. ------------------------------------------------------- IL LAVORO INIZIA QUI: ------------------------------------------------------- CAPPELLO – BREVI INDICAZIONI PER IL LAVORO: Si lavora in tondo con i ferri circolari corti, dal basso verso l’alto. Passare ai ferri a doppia punta quando necessario. CAPPELLO: Avviare 64-68 maglie con i ferri circolari n° 7 ed il filato Snow. Lavorare 1 giro a rovescio. Proseguire a coste (= 2 maglie diritto / 2 maglie rovescio) per 11 cm. Passare ai ferri circolari n° 8; lavorare 1 giro a diritto e durante questo giro diminuire 10-12 maglie a intervalli regolari – vedere il SUGGERIMENTO PER LE DIMINUZIONI = 54-56 maglie. Lavorare il diagramma A.1 in tondo per 13-14 cm – aggiustare per finire dopo l’ultimo giro del diagramma. RICORDARSI DI MANTENERE LA CORRETTA TENSIONE DEL LAVORO. Iniziare ora a diminuire: Lavorare 0-2 maglie del diagramma A.1 come prima, * diagramma A.2 (= 11 maglie), diagramma A.3 (= 7 maglie) *, ripetere da *-* in tutto 3 volte in larghezza. Quando i diagrammi sono stati completati, rimangono 18-20 maglie sul giro. Lavorare 1 giro a diritto e durante questo giro, lavorare tutte le maglie insieme a 2 a 2 a diritto = 9-10 maglie. Tagliare il filo, passarlo attraverso le rimanenti maglie, stringere e fermare il filo. Il cappello misura circa 32-33 cm (ca.25-26 cm con 7 cm di risvolto). POMPON: Preparare un pompon grande e morbido di circa 12 cm di diametro con 6 capi del colore curry e 1 capo del colore blu marina. Cucire il pompon in cima al cappello. ------------------------------------------------------- SCIARPA – BREVI INDICAZIONI PER IL LAVORO: Si lavora avanti e indietro con i ferri circolari. SCIARPA: Avviare 32 maglie con i ferri circolari n° 9 ed il filato Snow. Lavorare 1 ferro a rovescio. Lavorare poi il diagramma A.1, avanti e indietro. RICORDARSI DI MANTENERE LA CORRETTA TENSIONE DEL LAVORO! Quando il lavoro misura 164 cm, intrecciare le maglie – assicurarsi che il bordo di chiusura delle maglie non sia troppo stretto. FRANGE: Preparare 11 frange per ogni estremità della sciarpa. La sciarpa nella fotografia ha 7 frange del colore curry e 4 frange con 1 capo di ogni colore. Perché le frange cadano correttamente, inumidirle, scrollarle dall’acqua e farle asciugare. 1 FRANGIA: Tagliare 2 capi del filato Snow lunghi 36 cm l’uno. Piegarli in due, passare l’anello ottenuto attraverso la maglia sul bordo di chiusura delle maglie, sul diritto del lavoro. Passare le estremità dei fili nell’anello e stringere leggermente. Preparare altre 10 frange uguali e fissarle a intervalli regolari lungo il bordo di chiusura delle maglie. Ripetere lungo il bordo di avvio delle maglie. |
||||||||||
Spiegazioni del diagramma |
||||||||||
|
||||||||||
 |
||||||||||
Avete terminato questo modello?Allora taggate le vostre foto con #dropspattern #helloautumnset o inviatele alla #dropsfan gallery. Avete bisogno di aiuto con questo modello?Troverete 16 video tutorial, una sezione per i commenti/domande e molto altro guardando il modello su www.garnstudio.com © 1982-2026 DROPS Design A/S. Ci riserviamo tutti i diritti. Questo documento, compreso tutte le sue sotto-sezioni, è protetto dalle leggi sul copyright. Potete leggere quello che potete fare con i nostri modelli alla fine di ogni modello sul nostro sito. |
||||||||||


Con oltre 40 anni di esperienza nel design di modelli di maglia e uncinetto, DROPS Design offre la più estesa collezione di modelli gratuiti su internet - tradotti in 17 lingue. Ad oggi vi possiamo fornire 324 cataloghi e 12290 modelli - 9561 dei quali sono tradotti in Italiano.
Ci stiamo impegnando molto per darvi il meglio che vi possiamo offrire in termini di maglia e uncinetto, ispirazioni e consigli così come filati di grande qualità ad un prezzo incredibile! Volete utilizzare i nostri modelli per qualcosa d'altro oltre al vostro uso personale? Potete leggere tutto ciò che è consentito nel testo sul Copyright in basso su tutte le pagine dei nostri modelli. Buon lavoro!
Lasciare un commento sul modello DROPS 204-2
Noi saremmo felici di ricevere i tuoi commenti e opinioni su questo modello!
Se vuoi fare una domanda, fai per favore attenzione a selezionare la categoria corretta nella casella qui sotto per velocizzare il processo di risposta. I campi richiesti sono indicati da *.