
Categorie popolari
State cercando un filato?


Commenti / Domande (37)
![]() Patti Urso ha scritto:
Patti Urso ha scritto:
What I am understanding from the instructions is that after finishing all the rows in A2B I work on A2A for six rounds- on the 5th round I will increases to equal 240- or 264 or 288 , depending on the size, and then complete the 6th round working on all the stitches including those that I increased in the 5th row. After that I measure the yoke and it should be 12.5 inches. After that I then will place the marker per your directions to separate the body and the sleeves. Is this correct?
18.12.2019 - 17:05DROPS Design ha risposto:
Dear Mrs Urso, yes it seems correct. After you have placed the markers, you just work next piece separately, first body and then sleeeves. Happy crocheting!
19.12.2019 - 07:41
![]() Consuelo ha scritto:
Consuelo ha scritto:
Buongiorno, sarebbe fattibile questo modello in cotone? Se si, quale suggerite?
10.12.2019 - 17:37DROPS Design ha risposto:
Buongiorno Consuelo. Può usare il Paris (gruppo filato C come Big Merino) oppure il Safran, usato doppio. Per ogni ulteriore consiglio sulla scelta del filato e sulle quantità da ordinare, può rivolgersi al suo rivenditore Drops di fiducia. Buon lavoro!
16.12.2019 - 11:22
![]() Patti Urso ha scritto:
Patti Urso ha scritto:
There is another Mermaid Shell that I printed of this pattern that has double crochet for some symbols in the diagram where the other says treble crochet I am nearly completing the yoke with the double crochets and now I just discovered that it seems that the instructions had an error. Please confirm if the pattern I am following is not correct. Thank you.
29.11.2019 - 10:00DROPS Design ha risposto:
- see answer below - remember crochet terminology is different in US and in Uk English. Happy crocheting!
29.11.2019 - 10:33
![]() Patti Urso ha scritto:
Patti Urso ha scritto:
This pattern was also found with treble crochet in the diagram which one is correct?
29.11.2019 - 09:47DROPS Design ha risposto:
Dear Mrs Urso, make sure you are following the required English terminology, editing language if necessary by clicking on the scroll down menu under the foto. Happy crocheting!
29.11.2019 - 10:32
![]() Patti Urso ha scritto:
Patti Urso ha scritto:
Regarding your explanation “ after you have increased to 192-210-228 stitches, you have now enough stitches to repeat A.2B (= 6 stitches) a total of 32-35-38 times in width (= 32-35-38 repeats of A.2B in the round). “ does this mean that I repeat the entire A.2B from the beginning? Or just continue on the next row indicated in the chart?
26.11.2019 - 17:48DROPS Design ha risposto:
Dear Mrs Urso, just continue A.2B as before, ie work next row in diagram and continue diagram to the end (until it has been worked 1 time in height), but now you will repeat the diagram more times in width. Happy crocheting!
27.11.2019 - 07:44
![]() Patti Urso ha scritto:
Patti Urso ha scritto:
What does this statement mean? Then repeat A.2B 32-35-38 times in width.
26.11.2019 - 09:38DROPS Design ha risposto:
Dear Mrs Urso, after you have increased to 192-210-228 stitches, you have now enough stitches to repeat A.2B (= 6 stitches) a total of 32-35-38 times in width (= 32-35-38 repeats of A.2B in the round). Happy crocheting!
26.11.2019 - 09:46
![]() Patti Urso ha scritto:
Patti Urso ha scritto:
Please explain further what “Then repeat A.2B 32-35-38 times in width.”
26.11.2019 - 09:24
![]() Huet Nicole ha scritto:
Huet Nicole ha scritto:
Je reviens vers vous car je ne comprends pas A2A au total en largeur. A2A représente 10 motifs. Si c’est en largeur dois je crocheter le 1er et juste après le second car moi j’ai raisonné avant de vous écrire crocheter un tour de 1 er motif et enchaîner un tour du 2ème motif etc . De plus quand vous écrivez 16 fois et ensuite 24 fois vous rajoutez 8 tours? Je suis perdue!!!!
16.08.2019 - 18:23DROPS Design ha risposto:
Bonjour Mme Huet, je ne suis pas sûre de bien comprendre les 10 motifs dont vous parlez. A.2A se crochète sur 6 mailles et 10 rangs. Vous crochetez d'abord le 1er rang de A.2A sur toutes les mailles, puis le 2ème rang et ainsi de suite. c'est ainsi qu'on lit des diagrammes crochet. Bon crochet!
19.08.2019 - 08:49
![]() Huet ha scritto:
Huet ha scritto:
Merci de votre réponse je n’avais absolument rien compris!!!! Je recommence tout!!!
16.08.2019 - 11:13
![]() Huet Nicole ha scritto:
Huet Nicole ha scritto:
Bonjour quand vous écrivez 16 fois au total en largeur cela veut dire 16 tours?, ou 24 fois je n’arrive pas à comprendre merci de vos éclaircissements
15.08.2019 - 18:03DROPS Design ha risposto:
Bonjour Mme Huet, quand on indique "répéter de *à* 15 fois au total, on doit crocheter la partie entre les * un total de 15, on aura donc 15 "motifs" + les mailles indiquées au début du tour avant la partie entre les * + celles indiquées à la fin du tour après la partie entre les *. Au début par ex, on doit avoir 96 brides + les 3 ml du début du tour et on pourra donc répéter 16 fois A.2 (= 16 x 6 m = 96 m). Bon crochet!
16.08.2019 - 08:56
|
||||||||||||||||||||||||||||||||||
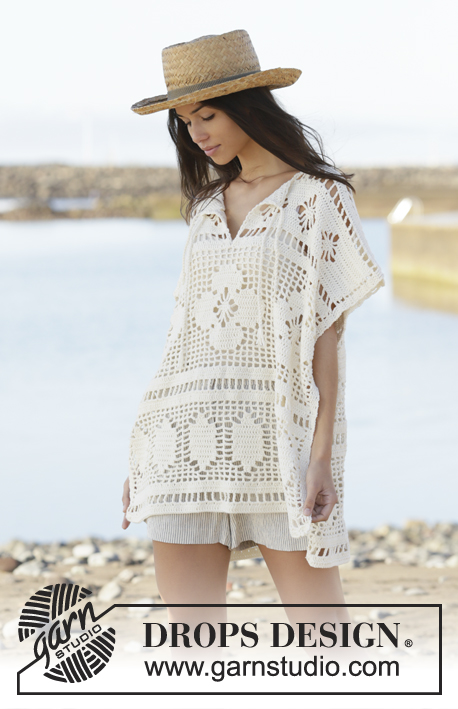
Mermaid Shell#mermaidshellponcho |
||||||||||||||||||||||||||||||||||
 |
 |
|||||||||||||||||||||||||||||||||
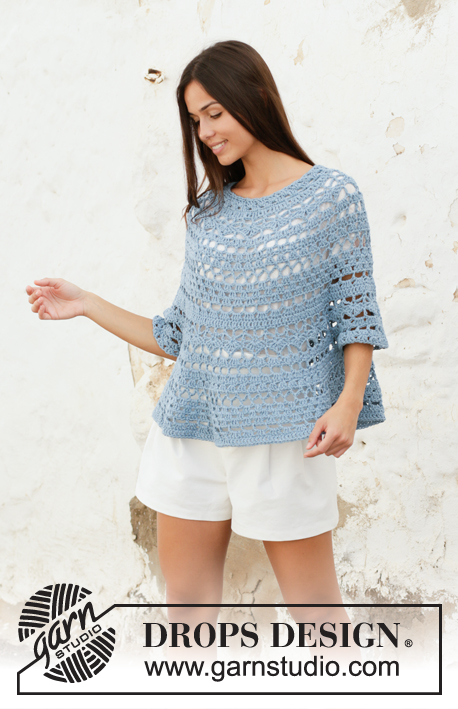
Maglione a poncho lavorato all’uncinetto in DROPS Big Merino. Lavorato dall’alto in basso con motivo traforato. Taglie: S - XXXL
DROPS 199-35 |
||||||||||||||||||||||||||||||||||
|
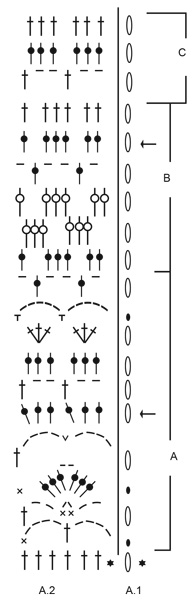
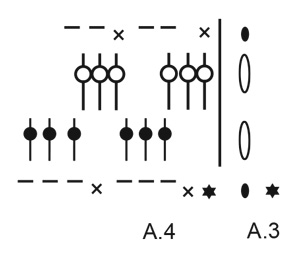
---------------------------------------------------------- PRIMA DI INIZIARE: ---------------------------------------------------------- MOTIVO: Vedere i diagrammi A.1 - A.4. INFORMAZIONI PER IL LAVORO: Il diagramma A.1 mostra come iniziano e finiscono i giri, ed è lavorato in aggiunta ad A.2. Il diagramma A.3 mostra come iniziano e finiscono i giri, ed è lavorato in aggiunta ad A.4. SUGGERIMENTO PER GLI AUMENTI (distribuiti in modo uniforme): Per stabilire ogni quanto aumentare in modo uniforme, prendere il n° totale di maglie sul ferro (ad esempio 96 maglie) e dividerlo per il n° di aumenti da fare (ad esempio 48) = 2. In questo esempio, aumentare lavorando 2 maglie alte nella stessa maglia a maglie alte alterne. ---------------------------------------------------------- INIZIO DEL LAVORO: ---------------------------------------------------------- MAGLIONE A PONCHO – BREVE RIASSUNTO DEL LAVORO: Lavorare in tondo dall’alto in basso. Lavorare le maniche in tondo, dall’alto in basso. Lavorare il bordo del collo in tondo alla fine. SPRONE: Avviare 112-119-126 catenelle con l’uncinetto n° 5 mm con Big Merino e unire ad anello con 1 maglia bassissima nella 1° catenella. Lavorare 3 catenelle, 1 maglia alta in ognuna delle prime 6 catenelle, * saltare 1 catenella, lavorare 1 maglia alta in ognuna delle 6 catenelle successive *, lavorare *-* 15-16-17 volte in totale, finire con 1 maglia bassissima nella 3° catenella all’inizio del giro = 96-102-108 maglie alte + 3 catenelle. Poi lavorare come segue: Leggere le INFORMAZIONI PER IL LAVORO, lavorare A.2A 16-17-18 volte in totale sul giro – sul giro indicato con una freccia aumentare 48-54-60 maglie alte in modo uniforme – leggere il SUGGERIMENTO PER GLI AUMENTI = 144-156-168 maglie alte. FARE ATTENZIONE ALLA TENSIONE DEL LAVORO! Poi ripetere A.2A 24-26-28 volte in larghezza. Alla fine di A.2A, lavorare A.2B su A.2A – sul giro indicato con la freccia aumentare 48-54-60 maglie alte in modo uniforme = 192-210-228 maglie alte. Poi ripetere A.2B 32-35-38 volte in larghezza. Alla fine di A.2B, lavorare i primi 6 giri con A.2A su A.2B – sul giro indicato con la freccia aumentare 48-54-60 maglie alte in modo uniforme = 240-264-288 maglie alte. Poi ripetere A.2A 40-44-48 volte in larghezza. Continuare fino al 6° giro di A.2A (= giro dopo il giro con la freccia) = 80-88-96 archi di catenelle. Il lavoro misura circa 32 cm per tutte le taglie. Inserire 4 segnapunti nel lavoro come segue (senza lavorare le maglie): Inserire il 1° segnapunti dopo i primi 13-15-16 archi di catenelle (= metà dietro), inserire il 2° segnapunti dopo i 14-14-16 archi successivi (= manica), inserire il 3° segnapunti dopo i 26-30-32 archi successivi (= davanti), e inserire il 4° segnapunti dopo i successivi 14-14-16 archi di catenelle (= manica), 13-15-16 archi di catenelle rimasti sul giro dopo l’ultimo segnapunti (= metà dietro). Ora dividere il corpo e le maniche all’altezza dei segnapunti, e finire ogni parte in modo separato. ORA MISURARE IL LAVORO DA QUI! CORPO: = 52-60-64 archi di catenelle. Continuare fino a quando A.2A è stato lavorato su queste maglie e ALLO STESSO TEMPO sul 1° giro aumentare 24 maglie alte in modo uniforme (poi ripetere A.2A 30-34-36 volte in larghezza) = 180-204-216 maglie alte. Alla fine di A.2A, lavorare A.2B su A.2A – sul giro indicato con una freccia aumentare 36-42-48 maglie alte in modo uniforme = 216-246-264 maglie alte (poi ripetere A.2B 36-41-44 volte in larghezza). Alla fine di A.2B, lavorare A.2C su A.2B 0-1-2 volte in totale in verticale. Tagliare e affrancare il filo. Il corpo misura circa 14-18-22 cm dalla divisione. MANICA: = 14-14-16 archi di catenelle. Iniziare al centro sotto la manica e poi lavorare come segue: Ricordarsi delle INFORMAZIONI PER IL LAVORO, continuare con il 7° giro di A.2A su queste maglie (= 7-7-8 volte in larghezza), e lavorare fino all’8° giro. Poi ripetere i giri 6 - 8 altre 0-0-1 volte. Tagliare e affrancare il filo. La manica misura circa 3-3-7 cm dalla divisione. Lavorare l’altra manica nello stesso modo. BORDO DEL COLLO: Lavorare attorno al collo come segue - NOTA: Lavorare nelle catenelle in cui sono state lavorate le maglie alte ma non lavorare nelle catenelle che sono state saltate: iniziare al centro dietro, affrancare il filo al lavoro con 1 maglia bassissima in una maglia alta, lavorare 1 catenella, 1 maglia bassa nella maglia alta successiva, 3 catenelle, saltare 3-1-3 maglie alte, 1 maglia bassa nella maglia alta successiva, * 3 catenelle, saltare 3 maglie alte, 1 maglia bassa nella maglia alta successiva *, lavorare *-* 22-24-25 volte in totale, lavorare 3 catenelle, saltare 3 maglie alte e finire con 1 maglia bassissima nella 1° catenella all’inizio del giro = 24-26-27 archi di catenelle. Poi lavorare A.4 in tondo – ricordarsi delle INFORMAZIONI PER IL LAVORO. Alla fine di A.4, chiudere e affrancare. |
||||||||||||||||||||||||||||||||||
Spiegazioni del diagramma |
||||||||||||||||||||||||||||||||||
|
||||||||||||||||||||||||||||||||||
 |
||||||||||||||||||||||||||||||||||
 |
||||||||||||||||||||||||||||||||||
 |
||||||||||||||||||||||||||||||||||
Avete terminato questo modello?Allora taggate le vostre foto con #dropspattern #mermaidshellponcho o inviatele alla #dropsfan gallery. Avete bisogno di aiuto con questo modello?Troverete 11 video tutorial, una sezione per i commenti/domande e molto altro guardando il modello su www.garnstudio.com © 1982-2026 DROPS Design A/S. Ci riserviamo tutti i diritti. Questo documento, compreso tutte le sue sotto-sezioni, è protetto dalle leggi sul copyright. Potete leggere quello che potete fare con i nostri modelli alla fine di ogni modello sul nostro sito. |
||||||||||||||||||||||||||||||||||


Con oltre 40 anni di esperienza nel design di modelli di maglia e uncinetto, DROPS Design offre la più estesa collezione di modelli gratuiti su internet - tradotti in 17 lingue. Ad oggi vi possiamo fornire 325 cataloghi e 12298 modelli - 9569 dei quali sono tradotti in Italiano.
Ci stiamo impegnando molto per darvi il meglio che vi possiamo offrire in termini di maglia e uncinetto, ispirazioni e consigli così come filati di grande qualità ad un prezzo incredibile! Volete utilizzare i nostri modelli per qualcosa d'altro oltre al vostro uso personale? Potete leggere tutto ciò che è consentito nel testo sul Copyright in basso su tutte le pagine dei nostri modelli. Buon lavoro!
Lasciare un commento sul modello DROPS 199-35
Noi saremmo felici di ricevere i tuoi commenti e opinioni su questo modello!
Se vuoi fare una domanda, fai per favore attenzione a selezionare la categoria corretta nella casella qui sotto per velocizzare il processo di risposta. I campi richiesti sono indicati da *.