
Categorie popolari
State cercando un filato?


Commenti / Domande (49)
![]() MARCHAND ha scritto:
MARCHAND ha scritto:
Bonjour : je ne comprends pas les explications apès avoir plié mon ouvrage en deux envers sur envers : comment relever les mailles sur la ligne de montage ?MERCI
18.01.2024 - 20:29DROPS Design ha risposto:
Bonjour Mme Marchand, vous travaillez maintenant sur l'endroit du boléro et relevez les mailles tout autour en suivant par exemple cette vidéo. Bon tricot!
19.01.2024 - 09:15
![]() Valeria Di Stasio ha scritto:
Valeria Di Stasio ha scritto:
Non riesco a capire come fare il bordo. Le 5 maglie a legaccio vanno saltate?? 122 sono il totale delle maglie comprese le maniche...
15.12.2023 - 13:16DROPS Design ha risposto:
Buongiorno Valeria, il bordo va lavorato su tutte le maglie come indicato. Buon lavoro!
30.12.2023 - 11:37
![]() Louise ha scritto:
Louise ha scritto:
Hej Jeg bøvler med aflukningen, den bliver for stram. Er det en hjælp at lave italiensk aflukning?
10.09.2023 - 11:42DROPS Design ha risposto:
Hej Louise, du kan prøve, eller så lukker du af med dobbelt tråd. Vi har mange videoer som viser hvordan man kan lukke af :)
14.09.2023 - 15:44
![]() Mieke Baras ha scritto:
Mieke Baras ha scritto:
Ik brei de 2de maat en vraag me af wat jullie bedoelen met ‘ga verder met tricot OF brei textuurpatroon enz. ‘, als het werk 42cm is en 5x gebreid is in de hoogte. Ik vermoed dat, als het werk 48cm meet, je motief van 18 n niet volledig gebreid zal zijn en je dus alles in tricotsteek breit waarna 1 ribbel moet gebreid worden. Klopt dat? Vanwaar dan de OF? Mooi werk!
12.08.2023 - 11:53DROPS Design ha risposto:
Dag Mieke,
In de foto zie je dat onderaan op het achterpand een stukje gebreid is in tricotsteek. Dit is wat er bedoeld wordt na het breien van A.1, 5 keer in de hoogte. Je kunt er ook voor kiezen om A.1 door te breien en halverwege het patroon te stoppen. Maar net wat je het mooist vindt.
14.08.2023 - 14:08
![]() Tanya ha scritto:
Tanya ha scritto:
Though I usually wear size S/M I decided to go with size L. The gauge was the same as in pattern. It turned out beautiful with just one big disappointment - it sits tight, not as pictured. Most likely the model is size XS and shows wearing size XXL. I think it should've been mentioned. Need to redo.
01.06.2023 - 00:23
![]() Lilian Gustafsson ha scritto:
Lilian Gustafsson ha scritto:
Förstår inte riktigt hur man gör när man lägger aviga mot aviga och lägger upp 146 m. Var kommer ärmhålet?
12.02.2023 - 20:02DROPS Design ha risposto:
Hei Lillian I str. L, når arbeidet måler 51 cm strikkes det 2 rader med rettstrikk. Start så med kanten der det strikkes over de 146 maskene du nettopp har strikket over, samtidig som det økes med 34 masker jevnt fordelt = 180 masker. Legg arbeidet dobbelt, vrangen mot vrangen, slik at det blir en stor "tube", snu arbeidet slik at du kan plukke opp 146 masker langs oppleggskanten + at det samtidig økes 34 masker jevnt fordelt = 180 masker. Du har nå 360 masker på rundpinnnen og skal nå strikke vrangborden rundt. Ermhullene blir de 2 "hullene" i hver side "tuben". mvh DROPS Design
13.02.2023 - 13:44
![]() Birgit Nygaard ha scritto:
Birgit Nygaard ha scritto:
Kan jeg få opskriften i str xs/s? Vh Birgit
09.02.2023 - 13:17DROPS Design ha risposto:
Hej Birgit, Den findes ikke mindre end S/M :)
09.02.2023 - 15:25
![]() Stefania Rossi ha scritto:
Stefania Rossi ha scritto:
HO INIZIATO QUESTO PRIMO MODELLO DROPS 201-27 E ANCHE CON L'AIUTO DEL TUTORIAL SU YOUTUBE STO PROCEDENDO MOLTO, BENE BASTA UN PO' DI INTUITO NELLE SPIEGAZIONI ED E' TUTTO OK - GRAZIE MILLE !!!
03.01.2023 - 11:36
![]() Nina Lang ha scritto:
Nina Lang ha scritto:
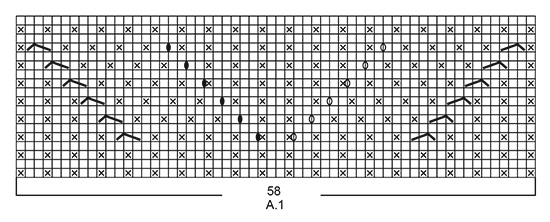
Chart A.1 indicates that wrong side rows are purled across all stitches. However, the photo CLEARLY looks like the 1-2 rib is continued, providing the definition in the waves. Can you please confirm: is the ribbing broken by WS rows?
28.03.2022 - 23:37DROPS Design ha risposto:
Dear Mrs Lang, diagram is correct, from RS you work: (P1 (= cross), K2 (white squares) and from WS you purl all stitches. That way you will have a pattern like ribbing K2, 1 stitch in garter stitch (purled from RS and purled from WS). Happy knitting!
29.03.2022 - 09:12
![]() Ange ha scritto:
Ange ha scritto:
I have just completed this shrug using the alpaca and kid silk as per the pattern. Very happy with finished article. My question relates to blocking. With the blend of alpaca and kid silk what method of blocking do you recommend. wet, spray or steam? Thanks
05.09.2021 - 08:11DROPS Design ha risposto:
Dear Ange, we recommend to use a cloth, to avoid direct contact of the iron and the cloth; to block from wrong side, and to use steam. Also, you should be extra careful while ironing the pattern itself. Sometimes, it's better to not block the garment at all.
05.09.2021 - 17:39
|
||||||||||||||||||||||
Sweet Angel#sweetangeljacket |
||||||||||||||||||||||
 |
 |
|||||||||||||||||||||
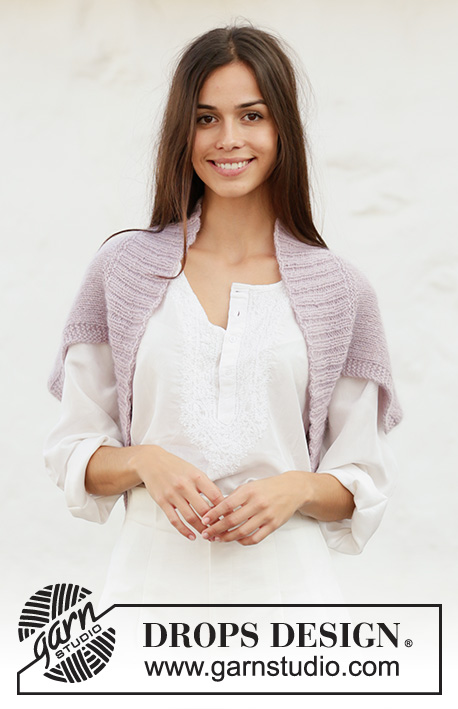
Coprispalle lavorato ai ferri con spostamenti in DROPS Alpaca e DROPS Kid-Silk. Taglie: S - XXXL.
DROPS 201-27 |
||||||||||||||||||||||
|
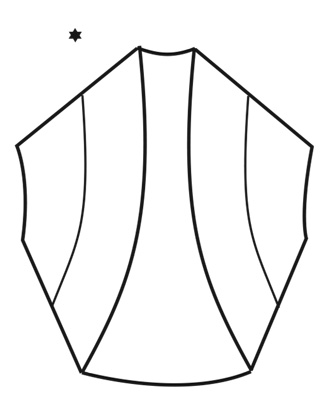
------------------------------------------------------- PRIMA DI INIZIARE: ------------------------------------------------------- COSTA/MAGLIA LEGACCIO (lavorata in tondo): 1 costa = 2 giri. Lavorare 1 giro diritto e 1 giro rovescio. COSTA/MAGLIA LEGACCIO (avanti e indietro): Lavorare tutti i ferri a diritto. 1 costa in altezza = 2 ferri diritto. MOTIVO: Vedere il diagramma A.1. Il diagramma mostra tutti i ferri del motivo visti dal diritto del lavoro. SUGGERIMENTO PER GLI AUMENTI (distribuiti in modo uniforme): Per stabilire ogni quanto aumentare in modo uniforme, prendere il n° totale di maglie sul ferro (ad esempio 122 maglie) e dividerlo per il n° di aumenti da fare (ad esempio 24) = 5,1. In questo esempio, aumentare facendo 1 gettato dopo ogni 5° maglia. Sul giro successivo lavorare i gettati a ritorto per evitare buchi ------------------------------------------------------- INIZIO DEL LAVORO: ------------------------------------------------------- COPRISPALLE – BREVE RIASSUNTO DEL LAVORO: Lavorato avanti e indietro con i ferri circolari. Lavorare un bordo di rifinitura in tondo alla fine del lavoro, con i ferri circolari. COPRISPALLE: Avviare 122-132-146-160 maglie con i ferri circolari n° 5 mm e 1 capo di Alpaca + 1 capo di Kid-Silk (= 2 capi). Lavorare 1 COSTA – leggere la descrizione sopra, avanti e indietro su tutte le maglie sul ferro, poi lavorare 1 ferro rovescio. Ora lavorare il motivo come segue: 5 maglie a maglia legaccio, 27-32-39-46 maglie a maglia rasata, A.1 (= 58 maglie), 27-32-39-46 maglie a maglia rasata e 5 maglie a maglia legaccio. FARE ATTENZIONE ALLA TENSIONE DEL LAVORO! Continuare avanti e indietro in questo modo fino a quando A.1 è stato lavorato 5-5-6-6 volte in totale in altezza. Il lavoro misura circa 42-42-50-50 cm. Continuare a maglia rasata (come mostrato nella foto) o lavorare il punto fantasia come prima sulle 58 maglie centrali sul ferro, 5 maglie a maglia legaccio a ogni lato e maglia rasata sulle maglie rimaste sul ferro. Quando il lavoro misura 43-48-51-53 cm lavorare 1 costa su tutte le maglie. BORDO: Ora lavorare un bordo attorno al lavoro con 1 capo di Alpaca e 1 capo di Kid-Silk (= 2 capi) e i ferri circolari n° 4 mm dal diritto del lavoro come segue: lavorare a diritto le 122-132-146-160 maglie sul ferro e allo stesso tempo aumentare 24-30-34-36 maglie in modo uniforme – leggere il SUGGERIMENTO PER GLI AUMENTI (= 146-162-180-196 maglie), piegare il lavoro e metterlo rovescio contro rovescio, riprendere 146-162-180-196 maglie lungo il bordo di avvio = 292-324-360-392 maglie attorno all’apertura sul coprispalle. Lavorare 2 COSTE – leggere la descrizione sopra, in tondo su tutte le maglie. Poi lavorare a coste (2 maglie diritto, 2 maglie rovescio) fino a quando le coste misurano 10 cm. Intrecciare con diritto su diritto e rovescio su rovescio, ma per evitare che il bordo di chiusura risulti tirato, lavorare 1 gettato dopo ogni 4° maglia; intrecciare i gettati come maglie normali. |
||||||||||||||||||||||
Spiegazioni del diagramma |
||||||||||||||||||||||
|
||||||||||||||||||||||
 |
||||||||||||||||||||||
 |
||||||||||||||||||||||
 |
||||||||||||||||||||||
Avete terminato questo modello?Allora taggate le vostre foto con #dropspattern #sweetangeljacket o inviatele alla #dropsfan gallery. Avete bisogno di aiuto con questo modello?Troverete 21 video tutorial, una sezione per i commenti/domande e molto altro guardando il modello su www.garnstudio.com © 1982-2026 DROPS Design A/S. Ci riserviamo tutti i diritti. Questo documento, compreso tutte le sue sotto-sezioni, è protetto dalle leggi sul copyright. Potete leggere quello che potete fare con i nostri modelli alla fine di ogni modello sul nostro sito. |
||||||||||||||||||||||


Con oltre 40 anni di esperienza nel design di modelli di maglia e uncinetto, DROPS Design offre la più estesa collezione di modelli gratuiti su internet - tradotti in 17 lingue. Ad oggi vi possiamo fornire 324 cataloghi e 12290 modelli - 9561 dei quali sono tradotti in Italiano.
Ci stiamo impegnando molto per darvi il meglio che vi possiamo offrire in termini di maglia e uncinetto, ispirazioni e consigli così come filati di grande qualità ad un prezzo incredibile! Volete utilizzare i nostri modelli per qualcosa d'altro oltre al vostro uso personale? Potete leggere tutto ciò che è consentito nel testo sul Copyright in basso su tutte le pagine dei nostri modelli. Buon lavoro!
Lasciare un commento sul modello DROPS 201-27
Noi saremmo felici di ricevere i tuoi commenti e opinioni su questo modello!
Se vuoi fare una domanda, fai per favore attenzione a selezionare la categoria corretta nella casella qui sotto per velocizzare il processo di risposta. I campi richiesti sono indicati da *.