
Categorie popolari
State cercando un filato?


Commenti / Domande (44)
![]() Margarita ha scritto:
Margarita ha scritto:
Moin, ich verstehe die Maschenprobe nicht richtig. Bedeutet 24 Maschen in der Breite auch, dass nur die rechten Maschen gezählt werden? Also i. Wirklichkeit 48 Maschen auf der Nadel sind und 10 cm ergeben?
23.07.2025 - 18:01DROPS Design ha risposto:
Liebe Margarita, die Maschenprobe soll 24 Maschen auf der Nadel 10 cm messen und 48 Reihen in der Höhe = 24 sichtbare rechte Maschen 10 cm messen. Viel Spaß beim Stricken!
24.07.2025 - 16:31
![]() Catharina ha scritto:
Catharina ha scritto:
Jeg strikkede nederdelen i uld i efteråret og har først lige færdigmontet den. Superflot og så lækker at have på. Vil nu strikke den i flere nuancer. 🤗
13.01.2025 - 20:13
![]() Ghita Forelius ha scritto:
Ghita Forelius ha scritto:
Förstår ej ur stickas varv A1
03.12.2024 - 15:33DROPS Design ha risposto:
Hej, du börjar nederst till höger i diagrammet och stickar första varvet så här: *2 aviga maskor tillsammans, 1 omslag, lyft 1 maska som om den skulle stickas avig*, upprepa *-* (= de tre rutorna i diagrammet) hela varvet runt. Fortsätt sedan med följande varv i diagrammet (läs diagrammet från höger till vänster).
03.12.2024 - 18:18
![]() Cecilie ha scritto:
Cecilie ha scritto:
Der er en video om hvordan man folder kanten og syr den, men hvad gør man, når den foldede kant skal sys på noget, der er meget mere elastisk? Lige efter kanten tager man jo ud og begynder at strikke rib - hvordan undgår man at miste elasticiteten, når der kommer sting på tværs af ribbene?
14.09.2022 - 12:29DROPS Design ha risposto:
Hej Cecilie, ja du har helt ret, da er det vigtigt at du syr løst, så kanten ikke mister elasticiteten :)
15.09.2022 - 15:46
![]() Elvira Eger ha scritto:
Elvira Eger ha scritto:
Guten Tag, ich bin gerade dabei, den Rock zu stricken und hätte da eine Frage zu dem Muster Diagramm. Es gibt das Muster A. 1 mit der ersten Reihe mit Abnahme und dann noch das Muster A. 1a, das bis zum Ende gestrickt werden soll. Ich sehe aber keinen Unterschied zwischen A. 1 und A.. 1a. Bitte melden Sie sich bald, damit ich weiter machen kann. Vielen Dank für die Bemühungen Elvira Eger
17.02.2022 - 13:16DROPS Design ha risposto:
Liebe Frau Eger, bei der 1. Reihe in A.1a stricken Sie *2 Maschen links zusammen, 1 Umschlag, 1 Maschen wie zum Linksstricken abheben*, und diese 3 Maschen von *bis* wiederholen (Umschläge werden nicht als Maschen gezählt), so haben Sie abgenommen. Dann stricken Sie die 2. und 3. Reihe in A.1 und stricken Sie so weiter, dh die 2 Reihen in A.1a sind die gleichen als die 2. und die 3. Reihe in A.1. Kann das Ihnen helfen?
17.02.2022 - 13:42
![]() Carol MacDonald ha scritto:
Carol MacDonald ha scritto:
Hi I have pattern Drops 196-37. Can you please tell me what the measurements are for the sizes
16.10.2021 - 07:37DROPS Design ha risposto:
Dear Carol, you can find all the relevant measurements of the finished piece on the shcematic drawing just below the pattern description. Happy Stitching!
17.10.2021 - 00:23
![]() Lara ha scritto:
Lara ha scritto:
Does anyone else find A1 not working for them? It works when I do rows, and does not when I try in rounds. Shouldn't it be "purl in one round, then knit in the next?" I watched a few videos of false English rib, it usually starts with "knit one " - not purl. Could this be an issue?
02.01.2021 - 05:50
![]() Lara ha scritto:
Lara ha scritto:
Dear Drops Design, Kristen seems to be right, the pattern appears to give the wrong side as "right side" when switching to false English rib. I looked up a video explaining false English rib, it appears that A1 diagram is somehow wrong, I am still trying to figure out what exactly the problem is. Maybe it has something to do with translation from Norwegian? Was anyone able to get it right using this pattern? Thank you.
01.01.2021 - 05:36
![]() Emma ha scritto:
Emma ha scritto:
Jeg har svært ved at forstå overgangen fra de 8 cm rib til det nye mønster. Bliver forvirret over strikkediagrammet og den vejledende video for falsk patent. Prøver de at forklare den samme ting?
18.11.2020 - 23:30DROPS Design ha risposto:
Hej Emma, første pind i diagrammet er anderledes end i videoen da du strikker 2 masker vrang sammen, men herefter strikkes de to omgange skiftevis som i videoen. God fornøjelse!
23.11.2020 - 16:00
![]() Lisia ha scritto:
Lisia ha scritto:
Dit was de eerste keer dat ik in aanraking kwam met valse patentsteek en patentsteken überhaupt, na veel gepuzzel en googlen ontdekte ik een fout in het telpatroon. De averechtste steken in de tour van de dichte bolletjes (de toer met de extra omslagen) moeten rechtste steken zijn!
14.11.2020 - 16:42
|
||||||||||||||||
See You In Dublin#seeyouindublinskirt |
||||||||||||||||
 |
 |
|||||||||||||||
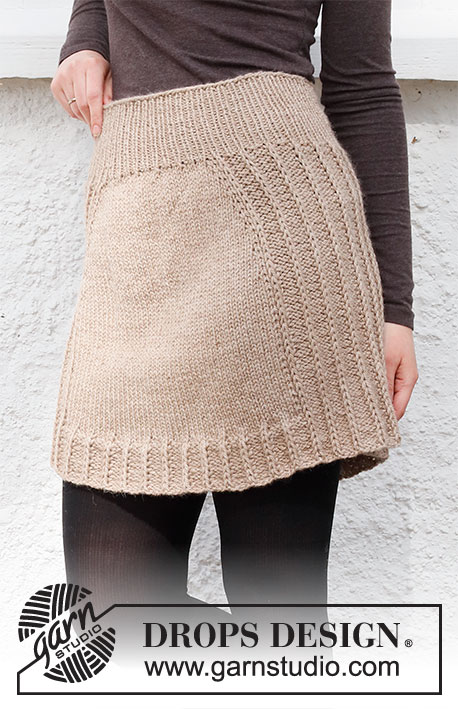
Gonna ai ferri in DROPS Nord, lavorata dall’alto verso il basso, in false coste inglesi. Taglie: Dalla S alla XXXL.
DROPS 196-37 |
||||||||||||||||
|
---------------------------------------------------------- TECNICHE IMPIEGATE: ---------------------------------------------------------- CAMPIONI: La gonna si allargherà quando indossata; ci sono quindi due campioni: Campione 1: quando si lavora la gonna e la si misura in piano. La gonna deve avere questa tensione quando la si lavora. Campione 2: tensione misurata in vita quando la gonna è indossata. La tensione in altezza viene indicata seguendo le maglie diritto, che vengono lavorate su 1 ferro in meno delle maglie rovescio, perché le maglie diritto vengono passate sul ferro destro ogni 2 giri. In altre parole: 24 ferri in altezza contate nelle maglie diritto misurano 10 cm e corrispondono a 48 ferri misurati nelle maglie rovescio per 10 cm di altezza. Le misure nello schema sono indicate in cm, quando la gonna viene indossata. SUGGERIMENTO PER GLI AUMENTI-1: Per calcolare ogni quante maglie aumentare, dividere il numero complessivo delle maglie sul ferro (p.es: 172 maglie) per il numero di aumenti da fare (p.es 26) = 6,6. Quindi, in questo esempio, per aumentare fare 1 maglia gettata alternativamente dopo ogni 6 e 7 maglie circa. Al giro successivo, lavorare le maglie gettate ritorte per evitare che si formino dei buchi. SUGGERIMENTO PER GLI AUMENTI-2: Tutti gli aumenti vengono fatti su un giro dove la maglia gettata e la maglia diritto sono lavorate insieme a diritto. Lavorare 5 volte la maglia diritto e la maglia gettata come segue: lavorare insieme a diritto la maglia gettata e la maglia diritto, ma lasciarle sul ferro sinistro, * fare 1 maglia gettata sul ferro destro e lavorare insieme a diritto la maglia diritto e la maglia gettata *, ripetere da *-* 2 volte in tutto = 5 maglie (= 4 maglie aumentate). MOTIVO: Vedere il diagramma A.1. ---------------------------------------------------------- IL LAVORO INIZIA QUI: ---------------------------------------------------------- GONNA - BREVI INDICAZIONI PER IL LAVORO: Si lavora in tondo sui ferri circolari, dall’alto verso il basso. Lavorare prima un bordo per farvi passare l’elastico. Proseguire a coste e a false coste inglesi. L’elasticità della gonna sarà diversa una volta indossata - vedere il CAMPIONE. BORDO: Avviare 172-188-202-228-250-292 maglie sui ferri circolari n° 2,5 con il filato Nord. Lavorare 1 giro a rovescio. Lavorare poi 4 giri a maglia rasata. Lavorare 1 giro a rovescio e durante questo giro aumentare 26-28-32-36-38-44 maglie a intervalli regolari (= punto in cui verrà piegato il bordo) - vedere il SUGGERIMENTO PER GLI AUMENTI-1 = 198-216-234-264-288-336 maglie. Inserire 1 segno nel lavoro. DA ADESSO IN AVANTI, MISURARE IL LAVORO DA QUESTO PUNTO ! GONNA: Lavorare a coste (2 maglie rovescio/1 maglia diritto) per 8 cm. Passare ai ferri circolari n° 3 e lavorare il diagramma A.1 su tutte le maglie (= 66-72-78-88-96-112 volte in tondo). Dopo aver lavorato il primo giro del diagramma A.1, ci sono 132-144-156-176-192-224 maglie. Le maglie gettate non sono contate nel numero delle maglie. Dopo aver lavorato il diagramma A.1 1 volta in verticale, ripetere il diagramma A.1a fino alla fine del lavoro. RICORDARSI DI MANTENERE LA CORRETTA TENSIONE DEL LAVORO! Quando il lavoro misura 10 cm dal segno, inserire 1 segno in ogni 11a-12a-13a-11a-12a-14a maglia diritto (= 6-6-6-8-8-8 segni). Poi aumentare 4 maglie in ogni maglia con il segno – vedere il SUGGERIMENTO PER GLI AUMENTI-2 (= 24-24-24-32-32-32 maglie aumentate). Proseguire in tondo seguendo il motivo e lavorare le maglie aumentate seguendo il motivo. Aumentare in questo modo ogni 4-4-4-4½-4½-4½ cm finché il lavoro non misura 48-50-52-54-56-58 cm dal segno. Ci sono circa 348-384-396-464-512-544 maglie. Assicurarsi che l’ultimo giro sia un giro con maglie gettate. Intrecciare ora lavorando a diritto le maglie a diritto e a rovescio le maglie a rovescio, ma intrecciare le maglie gettate come fossero maglie diritto per evitare che il ferro di chiusura delle maglie sia troppo stretto. CONFEZIONE: Piegare il bordo sul rovescio del lavoro e cucirlo con piccoli punti regolari. Lasciare una piccola apertura per far passare l’elastico. |
||||||||||||||||
Spiegazioni del diagramma |
||||||||||||||||
|
||||||||||||||||
 |
||||||||||||||||
Avete terminato questo modello?Allora taggate le vostre foto con #dropspattern #seeyouindublinskirt o inviatele alla #dropsfan gallery. Avete bisogno di aiuto con questo modello?Troverete 18 video tutorial, una sezione per i commenti/domande e molto altro guardando il modello su www.garnstudio.com © 1982-2026 DROPS Design A/S. Ci riserviamo tutti i diritti. Questo documento, compreso tutte le sue sotto-sezioni, è protetto dalle leggi sul copyright. Potete leggere quello che potete fare con i nostri modelli alla fine di ogni modello sul nostro sito. |
||||||||||||||||


Con oltre 40 anni di esperienza nel design di modelli di maglia e uncinetto, DROPS Design offre la più estesa collezione di modelli gratuiti su internet - tradotti in 17 lingue. Ad oggi vi possiamo fornire 324 cataloghi e 12290 modelli - 9561 dei quali sono tradotti in Italiano.
Ci stiamo impegnando molto per darvi il meglio che vi possiamo offrire in termini di maglia e uncinetto, ispirazioni e consigli così come filati di grande qualità ad un prezzo incredibile! Volete utilizzare i nostri modelli per qualcosa d'altro oltre al vostro uso personale? Potete leggere tutto ciò che è consentito nel testo sul Copyright in basso su tutte le pagine dei nostri modelli. Buon lavoro!
Lasciare un commento sul modello DROPS 196-37
Noi saremmo felici di ricevere i tuoi commenti e opinioni su questo modello!
Se vuoi fare una domanda, fai per favore attenzione a selezionare la categoria corretta nella casella qui sotto per velocizzare il processo di risposta. I campi richiesti sono indicati da *.