
Categorie popolari
State cercando un filato?


Commenti / Domande (16)
![]() Sylvie ha scritto:
Sylvie ha scritto:
C'est joli mais les explications sont incompréhensibles....pourquoi faire simple quand on peut faire compliqué!!
06.10.2025 - 22:33DROPS Design ha risposto:
Bonjour Sylvie, navrée de lire que vous avez des problèmes de compréhension pour réaliser ce modèle, n'hésitez pas à nous indiquer quelle partie vous ne comprenez pas pour que nous puissions tenter de vous aider au mieux; Merci pour votre compréhension. Bon tricot!
07.10.2025 - 08:28
![]() Kate ha scritto:
Kate ha scritto:
I changed the hood to avoid stitching - cast on 46 stitches loosely. Knit along the row, then pick up 46 stitches from the base of the row you've just done and knit back along. I used the "magic loop method" for being able to turn the sharp corner. I continued knitting using this method, back and forth, remembering to knit 6 stitches at the beginning and ends of the purled rows, and hood worked well.
21.11.2024 - 15:52
![]() Ann ha scritto:
Ann ha scritto:
Good evening. I'm afraid, but I don't think that 92 stiches will fit on an head S and on once per XXXL too. However I'd like to knit it, the description looks very unclear. A picture showing the measurement is missing furthermore (see a comment from US 2 years ago). What's an female head in S oder XXXL for Drops :-) and how can knitters adjust their project well
04.11.2024 - 21:49DROPS Design ha risposto:
Dear Ann, 92 sts is the total width of the piece of the beginning. At the beginning of the pattern you will have a flat piece which is worked back and forth. Then, after 28cm you join it in the round and the lower part of the cowl is worked in the round, with increases depending on the size. The head is a standard size; according to the gauge, the hood should measure approx. 54 cm when flat (17 sts = 10 cm, so 92 = 54 cm), which is then folded double and the cast-on edge is sewn together. So the hood's side is 27cm width and 28 cm length, before the shoulders. If this doesn't fit you you can calculate the pattern for your desired measurements. Happy knitting!
10.11.2024 - 18:08
![]() Ayra ha scritto:
Ayra ha scritto:
Hello Plz explain ( cut the yarn insert the marker thread in the mid back) Do I have to cut the yarn before I start the next row from right side and do I have to knit the stitches before the marker also. because in the pattern it says start the round from mid back. Thanks
01.02.2022 - 19:57DROPS Design ha risposto:
Dear Ayra, the hood part is now done and you will cast on new stitches for the front piece, so you have to cut the yarn, then add a marker on mid back, slip the stitches to the marker without working them and join the yarn to start now from here = mid back. Work now in the round as explained, casting on new sts for front piece on first round. Happy knitting!
02.02.2022 - 08:39
![]() Kathleen Smith ha scritto:
Kathleen Smith ha scritto:
Thank you for this pattern. It would be so helpful if a diagram with measurements was included.
14.01.2022 - 23:55
![]() Anita Louisa Andre ha scritto:
Anita Louisa Andre ha scritto:
Hello, Please explain better how to do the 6 ridges in front, I added 16 stitches, did 6 ridges, My side augm. are slanted.Do not look straight like on foto, Did 6 ridges & only got 108 sts. Want to do XL. Made numerous of your patterns, This front is not clearly explained. Also how to do the Twist. did not knit in round to do the 6 ridges, PLease explain middle augment sides front better way. Thank You
05.02.2021 - 00:35DROPS Design ha risposto:
Dear Mrs Andre, you start with 92 sts - after 28 cm, cut the yarn and start now from mid back (= in the middle of previous rows and work now in the round casting on the new sts for mid front and increasing on each side of the new stitches), cast on 16 sts for mid front and increase 1 stitch on each side of the middle 30 sts (= YO, K1, 6+16+6 sts in garter st, K1, YO) a total of 6 times on every other round = 92 + 16 + 6x2= 120 sts. Hope this helps. Happy knitting!
05.02.2021 - 08:49
![]() Barbara ha scritto:
Barbara ha scritto:
Buongiorno, sono arriva a questo punto ma non riesco a capire come devo procede una volta tagliato il filo: “Tagliare il filo. Inserire un segno al centro, sul dietro. Per evitare di iniziare il giro al centro delle coste a legaccio sul davanti, iniziare ora il giro da qui.” Vi ringrazio saluti
01.07.2020 - 17:10DROPS Design ha risposto:
Buongiorno Barbara. Il lavoro inizia dal cappuccio; si lavora prima avanti e indietro, poi in tondo. Prima di unire in tondo, mette un segno al centro sul dietro, taglia il filo, passa la prima metà delle maglie senza lavorarle e inizia a lavorare in tondo, a partire dal segno. Lavora finché non rimangono 7 maglie (6 m a legaccio + 1 maglia), 1 maglia gettata, lavorare le 7 m successive, avviare 16 m (parte centrale del davanti, lavorata a legaccio), lavora le 7 m successive (sono le prime maglie passate senza averle lavorate), 1 maglia gettata e prosegue fino al segno. Buon lavoro!
01.07.2020 - 17:48
![]() Jantine ha scritto:
Jantine ha scritto:
Wordt bij de afwerking van de capuchon de capuchon aan de binnenkant gemaasd zodat aan de buitenkant de naad komt? Groeten, Jantine
24.05.2020 - 11:51DROPS Design ha risposto:
Dag Jantine,
Nee, het is de bedoeling dat de naad aan de binnenkant komt.
05.06.2020 - 11:57
![]() Carol Lee ha scritto:
Carol Lee ha scritto:
I’ve just completed the increase directions to have 120 stitches on my needles. I’m making the XL version. The next instructions are confusing to When piece measures 3-4-2 cm / 1 1/8"-1 ½"-¾" from last ridge worked mid “ it seems that there are more cm/inches for the smaller version. I would think for the XL you would use the next to largest measurement I.e. 3 or 1 1/8? Thank you in advance for your reply.
08.02.2020 - 02:43DROPS Design ha risposto:
Dear Mrs Lee, in 2nd size you work until the garter stitch section measures 4 cm = 1.57 inches (in first size this section measures 3 cm = 1.18 inches) - you can convert into cm here. Happy knitting!
10.02.2020 - 07:48
![]() Terka ha scritto:
Terka ha scritto:
Good evening. I have one question. Will you translate this hooded cowl 192-3 to Czech language? Thank you for your answer.
06.01.2020 - 20:40DROPS Design ha risposto:
Milá Terko, ano - návod bude k dipozici co nevidět :-) Sledujte, prosím naše stránky a seznam nejnověji přidaných překladů, zde Hezký večer! Hana
06.01.2020 - 21:12
|
|
Loxley#loxleyhood |
|
 |
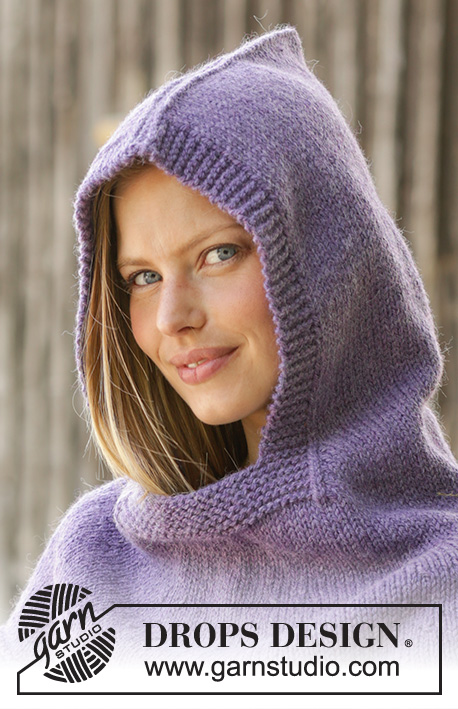 |
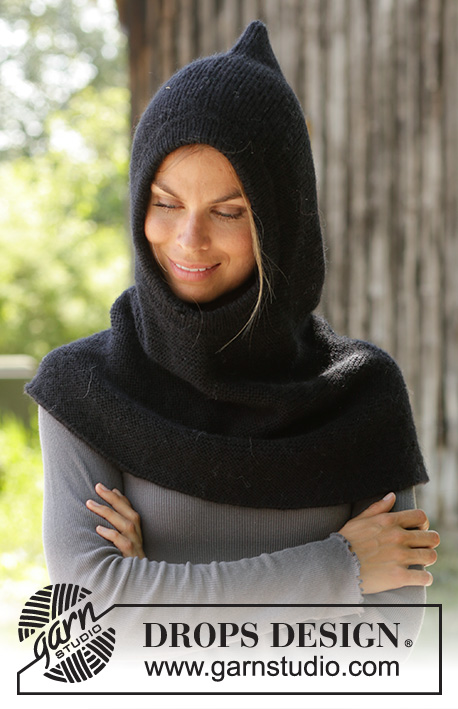
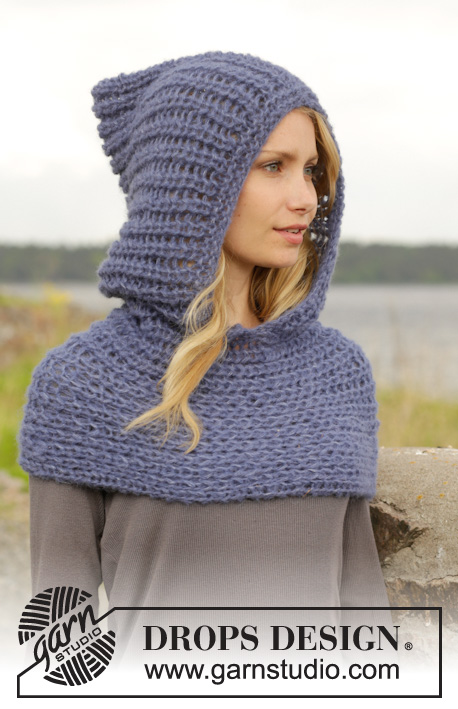
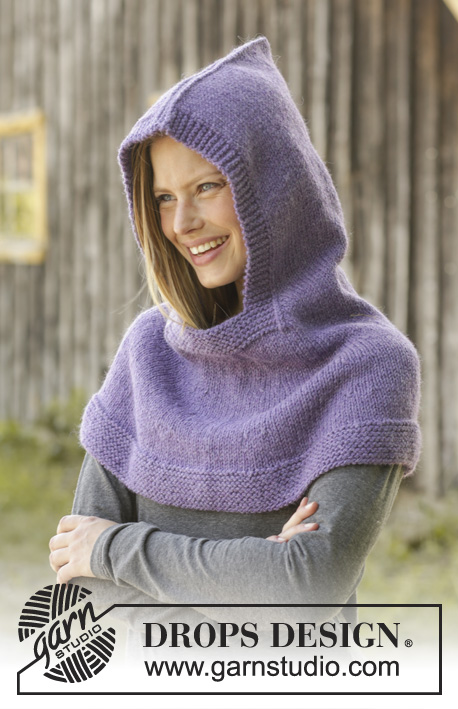
Scalda collo con cappuccio / Passamontagna in DROPS Nepal. Lavorato dall’alto verso il basso a punto legaccio. Taglie: Dalla S alla XXXL
DROPS 192-3 |
|
|
---------------------------------------------------------- TECNICHE IMPIEGATE: ---------------------------------------------------------- PUNTO LEGACCIO (in tondo): 1 costa a legaccio = 2 giri. Lavorare 1 giro a diritto e 1 giro a rovescio. PUNTO LEGACCIO (avanti e indietro sui ferri): 1 costa a legaccio = lavorare 2 ferri a diritto. SUGGERIMENTO PER GLI AUMENTI-1: Fare 1 maglia gettata da ciascun lato delle 30 maglie centrali del davanti (= 28 maglie a punto legaccio + 1 maglia diritto da ciascun lato di queste maglie). Al giro successivo, lavorare le maglie gettate a diritto ritorto per evitare che si formino dei buchi. Lavorare poi le nuove maglie a maglia rasata. SUGGERIMENTO PER GLI AUMENTI-2: Aumentare 1 maglia da ciascun lato di ogni segno (= 16 maglie aumentate sul giro), come segue: Lavorare finché non rimane 1 maglia prima del primo segno, 1 maglia gettata, lavorare 2 maglie diritto (il segno si trova al centro di queste 2 maglie), 1 maglia gettata. Ripetere in corrispondenza di ogni segno. Al giro successivo, lavorare le maglie gettate a diritto ritorto per evitare che si formino dei buchi. ---------------------------------------------------------- IL LAVORO INIZIA QUI: ---------------------------------------------------------- SCALDA COLLO CON CAPPUCCIO - BREVI INDICAZIONI PER IL LAVORO: Si lavora dall’alto verso il basso sui ferri circolari. Lavorare prima avanti e indietro; avviare poi le maglie al centro sul davanti del collo e proseguire in tondo. SCALDA COLLO CON CAPPUCCIO: Avviare 92 maglie sui ferri circolari n° 5 con il filato Nepal per tutte le taglie. Lavorare 1 COSTA A LEGACCIO avanti e indietro – vedere le spiegazioni sopra. Lavorare ora a maglia rasata con 6 maglie a punto legaccio da ciascun lato finché il lavoro non misura 28 cm; assicurarsi che il ferro successivo sia sul diritto del lavoro. RICORDARSI DI MANTENERE LA CORRETTA TENSIONE DEL LAVORO! Tagliare il filo. Inserire un segno al centro, sul dietro. Per evitare di iniziare il giro al centro delle coste a legaccio sul davanti, iniziare ora il giro da qui. Lavorare come segue: lavorare a diritto finché non rimane 1 maglia prima delle prime 6 maglie a punto legaccio, fare 1 maglia gettata, 1 maglia diritto, lavorare 6 maglie a punto legaccio, avviare 16 nuove maglie sui ferri (= centro sul davanti), lavorare le 6 maglie a punto legaccio lungo l’altro lato del lavoro, 1 maglia diritto, fare 1 maglia gettata, lavorare a diritto le restanti maglie del giro. Sono state aumentate 2 maglie - vedere il SUGGERIMENTO PER GLI AUMENTI-1. Proseguire in questo modo in tondo e lavorare a punto legaccio le nuove maglie avviate al centro sul davanti (= 28 maglie a punto legaccio al centro sul davanti), ALLO STESSO TEMPO, continuare ad aumentare da ciascun lato delle maglie a legaccio ogni 2 giri altre 5 volte (= 6 maglie aumentate in tutto da ciascun lato delle maglie a punto legaccio) = 120 maglie. Dopo aver lavorato 6 coste a legaccio sulle maglie centrali del davanti e quando gli aumenti sono terminati, proseguire in tondo a maglia rasata. Quando il lavoro misura 3-4-2 cm dall’ultima costa a legaccio al centro sul davanti, inserire 8 segni nel lavoro come segue: Inserire un segno all’inizio del giro (= centro, sul dietro), poi inserire 7 segni a distanza di 15 maglie l’uno dall’altro. Nel corso del primo giro, iniziare ad aumentare - vedere il SUGGERIMENTO PER GLI AUMENTI-2. Aumentare in questo modo circa ogni 5-4-4 cm 4-5-6 volte in tutto = 184-200-216 maglie. Dopo l’ultimo aumento, il lavoro misura circa 51-53-55 cm. Lavorare a punto legaccio per 5 cm. Intrecciare le maglie. Se il bordo di chiusura delle maglie è troppo stretto, fare 1 maglia gettata dopo circa ogni 5 maglie. Intrecciare le maglie gettate come fossero maglie normali. Lo scalda collo con cappuccio misura circa 56-58-60 cm dall’alto verso il basso. CONFEZIONE: Cucire tra loro le maglie avviate del cappuccio - Assicurarsi che la cucitura non sia troppo stretta. |
|
Avete terminato questo modello?Allora taggate le vostre foto con #dropspattern #loxleyhood o inviatele alla #dropsfan gallery. Avete bisogno di aiuto con questo modello?Troverete 20 video tutorial, una sezione per i commenti/domande e molto altro guardando il modello su www.garnstudio.com © 1982-2026 DROPS Design A/S. Ci riserviamo tutti i diritti. Questo documento, compreso tutte le sue sotto-sezioni, è protetto dalle leggi sul copyright. Potete leggere quello che potete fare con i nostri modelli alla fine di ogni modello sul nostro sito. |
|


Con oltre 40 anni di esperienza nel design di modelli di maglia e uncinetto, DROPS Design offre la più estesa collezione di modelli gratuiti su internet - tradotti in 17 lingue. Ad oggi vi possiamo fornire 324 cataloghi e 12290 modelli - 9561 dei quali sono tradotti in Italiano.
Ci stiamo impegnando molto per darvi il meglio che vi possiamo offrire in termini di maglia e uncinetto, ispirazioni e consigli così come filati di grande qualità ad un prezzo incredibile! Volete utilizzare i nostri modelli per qualcosa d'altro oltre al vostro uso personale? Potete leggere tutto ciò che è consentito nel testo sul Copyright in basso su tutte le pagine dei nostri modelli. Buon lavoro!
Lasciare un commento sul modello DROPS 192-3
Noi saremmo felici di ricevere i tuoi commenti e opinioni su questo modello!
Se vuoi fare una domanda, fai per favore attenzione a selezionare la categoria corretta nella casella qui sotto per velocizzare il processo di risposta. I campi richiesti sono indicati da *.