
Categorie popolari
State cercando un filato?


Commenti / Domande (44)
![]() Pat Ellis ha scritto:
Pat Ellis ha scritto:
I have bound off and am working on the left side (it is beautiful!) but I have a question. I'm binding off at the beginning of each row - as indicated - but when I get to the increase rows like #37 and 41 and 45 , do I still do those increases???? Seems counter productive but , if I don't do them, what would the pattern look like in those parts? Thanks!!!
19.07.2019 - 14:03DROPS Design ha risposto:
Dear Mrs Ellis, you have to continue increasing as before to get the pattern continuing, and at the same time you cast off at the beginning of every row (= both from RS and from WS) so that you get a straight front piece - see measurement chart. Happy knitting!
05.08.2019 - 16:18
![]() Friederike ha scritto:
Friederike ha scritto:
Bei dem letzten Absatz des Kreises steht:"... die nächsten 168 Maschen stricken, diese stilllegen, die letzten 56 Maschen stricken." Müssen die letzten 56 Maschen nicht auch angekettet werden, genau so wie die erste 56 Maschen angekettet werden?
14.07.2019 - 17:41DROPS Design ha risposto:
Liebe Friederike, ja genau, diese letzten 56 Maschen sollen abgekettet werden, die deutsche Anleitung wird korrigiert, danke für den Hinweis. Viel Spaß beim stricken!
15.07.2019 - 10:46
![]() Pat Ellis ha scritto:
Pat Ellis ha scritto:
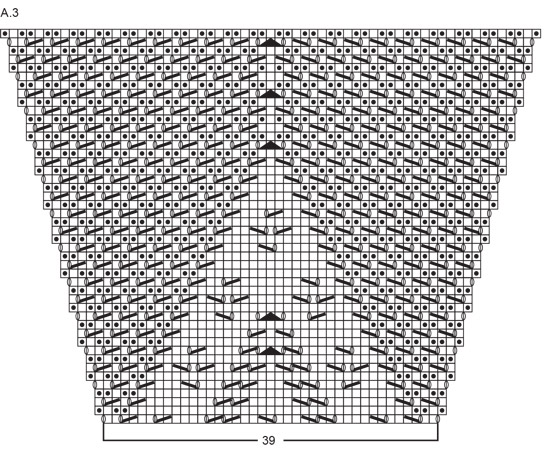
I have finished A3 and about to repeat the last 12 rows. I am not sure I understand “ you continue working rows of holes and garter stitch”. Please help me understand. Thank you
03.07.2019 - 02:44DROPS Design ha risposto:
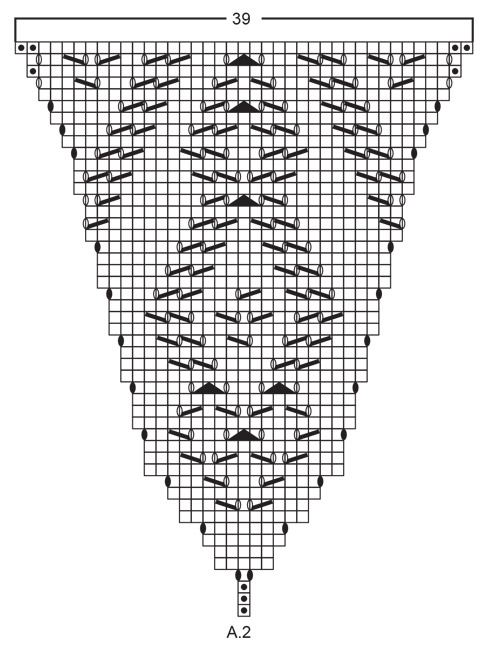
Dear Mrs Ellis, start each A.3 as before, work to the middle of repeat and work the middle of the repeat as before (see matching row in diagram), then work to the end of repeat and finish repeat as before. this mean you continue the increases at the begin and end of each repeat (with a YO), and there will be more sts stitches inbetween, these stitches will be worked as before in these last 12 rows. Happy knitting!
03.07.2019 - 07:56
![]() Pat Ellis ha scritto:
Pat Ellis ha scritto:
I have been moving along well with the pattern but am now to "Now all the stitches in A.1, apart from the middle 5 have been worked in to A.2" Where do I get a "middle 5". I have been knitting for over 60 years and am having serious issues with this pattern... I do appreciate the prompt responses and help. Thank you
20.05.2019 - 22:57DROPS Design ha risposto:
Dear Mrs Ellis, the middle 5 stitches in A.1 will be worked in A.1 on next round, but after this round with a star in A.1, Cut the strand and begin the next round 5 stitches to the left, so that the first stitch in A.2 is the beginning of the round. Continue with A.1 and A.2 as before. Happy knitting!
21.05.2019 - 09:53
![]() Linda Rød ha scritto:
Linda Rød ha scritto:
Hei. Skal det fortsettes med mønster (med økninger) på forstykket som det står? Blir det da fellt ca 100 masker på 15cm? Syntes og det er vanskelig å måle arbeidet underveis..
20.05.2019 - 09:45DROPS Design ha risposto:
Hei Linda. Ja, du fortsetter med økninger i A.3, samtidig som det felles 2 masker på hver pinne. Dvs, det felles ca 50 masker i hver side. God fornøyelse
31.05.2019 - 12:01
![]() Pat Ellis ha scritto:
Pat Ellis ha scritto:
Never mind - I figured out you're to start at the bottom of the graph! I was trying to make it work starting at the top. Numbers would have helped me. Sorry!
13.05.2019 - 12:51
![]() Pat Ellis ha scritto:
Pat Ellis ha scritto:
I need help getting started - sorry! It says CO 8 stitches and follow A.1 but that pattern shows 5 stitches? Also, by the time you YO twice and have decreased 2 stitches you're not increasing any. What am I missing? Thanks for any help you can offer.
11.05.2019 - 23:34DROPS Design ha risposto:
Hello Pat. You read diagrams from bottom to top and from right to left. So you cast on 8 sts, you then: make *1 yo, p1 *, and repeat *-* 8 times. At the end of first round you will have 16 sts. Here is explained how to read a knitting diagram. Happy knitting!
12.05.2019 - 11:02
![]() Pat Ellis ha scritto:
Pat Ellis ha scritto:
Is the gauge that is stated on the pattern one that most folks get with the size four needles? I only get twenty-four stitches to equal two and a half inches. I'd have to go up many needle sizes to acheive that gauge. What am I doing wrong?
06.05.2019 - 21:19DROPS Design ha risposto:
Dear Mrs Ellis, the gauge to this pattern is the usual one for DROPS BabyAlpaca Silk = 24 sts x 32 rows in stockinette stitch = 4"x4" - you can first work your swatch then block it to check your tension, and then adjust the needle size if required. Happy knitting!
07.05.2019 - 08:53
![]() Petra ha scritto:
Petra ha scritto:
Na 4 regels gaat patroon a2 opeens van 1 steek naar 5 steken, terwijl er maar 2 omhalen genoemd staan (dus lijkt van 1 naar 3 steken te gaan), maar tegelijkertijd worden in a1 opeens 2 steken minder weergegeven, terwijl het aantal steken daar volgens het telpatroon hetzelfde blijft. Zijn die 2 missende steken bij a1 dan steken in a2 geworden? Ik heb dit stuk al eens gebreid door alle steken van a2 na die van a1 te breien maar toen liep de v-vorm scheef dus ik ben bang dat ik hier een fout maak?
05.05.2019 - 18:30DROPS Design ha risposto:
Dag Petra,
Op toer 4 in A.2 worden er in totaal 4 omslagen gemaakt, aan beide kanten van de steek 2 omslagen (dichte ovaal symbool). In A.1 zitten ook meerderingen in de vorm van omslagen (open ovalen) en als er meerderingen zijn, zie je in de naald erna extra steken (zoals in naald 2 en 4 van A.1). Later in het telpatroon van A.1 worden de meerderingen gecompenseerd door minderingen (schuine streepjes over 2 steken).
05.05.2019 - 19:23
![]() Francoise ha scritto:
Francoise ha scritto:
J'ai réfléchi et c'est au rg 29 que j'ai un probleme lorsque l'on tricote le début du rg 29 A.1 je n'obtiens pas le jeté en décalé par rapport au jeté précédent.
15.04.2019 - 18:51DROPS Design ha risposto:
Bonjour Françoise, regardez la réponse précédente, dès le 5ème rang de A.2, vous allez incorporer les mailles de A.1 dans A.2 (si vous préférez, A.1 va commencer et se terminer par la diminution, la maille endroit avant le jeté et celle après le jeté de A.1 vont appartenir désormais à A.2). Bon tricot!
23.04.2019 - 10:08
|
|||||||||||||||||||||||||
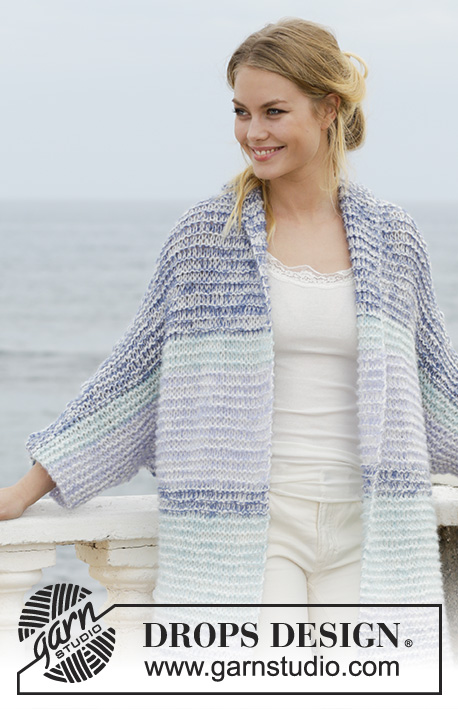
Seaside Dreamer#seasidedreamerjacket |
|||||||||||||||||||||||||
 |
 |
||||||||||||||||||||||||
Cardigan circolare lavorato ai ferri con motivo traforato. Taglie: S - XXXL. Lavorato in DROPS BabyAlpaca Silk.
DROPS 191-6 |
|||||||||||||||||||||||||
|
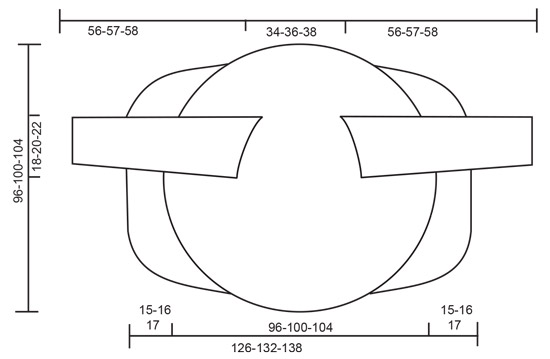
INFORMAZIONI PER IL LAVORO: MOTIVO: Vedere i diagrammi A.1-A.4. I diagrammi mostrano tutti i ferri del motivo visti dal diritto del lavoro. COSTE/MAGLIA LEGACCIO (lavorata in tondo): 1 costa = 2 giri. Lavorare 1 giro diritto e 1 giro rovescio. SUGGERIMENTO PER GLI AUMENTI: Iniziare 1 maglia prima del segnapunti. Fare 1 gettato, 2 maglie diritto (il segnapunti è al centro di queste 2 maglie), 1 gettato. Sul giro successivo lavorare i gettati a diritto per evitare buchi. ---------------------------------------------------------- CARDIGAN A CERCHIO: Il cardigan è lavorato in tondo dal centro del motivo (dietro), poi avanti e indietro a ogni lato. Le maniche sono lavorate in modo separato e attaccate alla fine. Avviare 8 maglie con BabyAlpaca Silk e dividerle su 4 ferri a doppia punta n° 3 mm. Lavorare seguendo A.1 (= 8 ripetizioni di A.1 sul giro). Inserire un segnapunti all’inizio del giro. Lavorare fino al giro prima della freccia in A.1 compreso = 128 maglie sul ferro. Dal giro con la freccia, lavorare A.2 dopo ogni A.1 come segue: lavorare * A.1 sulle prime/successive 15 maglie come prima, lavorare A.2 sulla maglia successiva *, lavorare *-* per un totale di 8 volte. Continuare il motivo in questo modo. Queste maglie in A.1 sono lavorate in A.2 contemporaneamente agli aumenti a ogni lato di A.2 (gli aumenti vengono indicati nel diagramma). Lavorare fino al giro prima della stella in A.1 compreso. Ora tutte le maglie di A.1, tranne le 5 maglie centrali, sono state lavorate A.2. Tagliare il filo e iniziare il giro successivo 5 maglie verso sinistra, in modo che la 1° maglia di A.2 sia l’inizio del giro. Continuare con A.1 e A.2; alla fine di A.1 ripetere A.1a fino alla fine del lavoro. Passare ai ferri circolari quando ci sono abbastanza maglie. Continuare fino a quando il lavoro misura 34-36-38 cm di diametro totale, aggiustarlo in modo che il giro successivo sia un giro di aumenti. Ora lavorare gli scalfi come segue (ci sono circa 256-272-288 maglie sui ferri): aumentare come prima, quindi durante gli intrecci per gli scalfi aumentare su queste maglie, cioè fare dei gettati che devono essere intrecciati.Sul giro successivo avviare le maglie per lo scalfo, avviare lo stesso numero di maglie che sono state intrecciate per lo scalfo (compresi gli aumenti), cioè contare le maglie che sono state intrecciate. Lavorare il motivo come prima sulle prime 37-39-42 maglie, intrecciare le 44-48-52 maglie successive per lo scalfo (il n° di maglie è senza aumenti, questi aumenti sono in aggiunta alle maglie), lavorare il motivo come prima fino a quando rimangono 81-87-94 maglie, intrecciare le 44-48-52 maglie successive per lo scalfo (il n° di maglie è senza aumenti, questi aumenti sono in aggiunta alle maglie), lavorare il motivo sulle ultime 37-39-42 maglie. Sul giro successivo avviare lo stesso numero di maglie che sono state intrecciate per lo scalfo (cioè 44-48-52 maglie + gli aumenti in aggiunta a queste maglie) sulle maglie intrecciate. Continuare con il motivo come prima. Alla fine di A.2 (ora ci sono 352 maglie sui ferri), continuare con A.3 su A.2 (A.1a continua come prima). Alla fine di A.3, ripetere i 12 giri superiori di A.3; aumentare come prima ogni 4 giri e continuare a lavorare i ferri traforati e a maglia legaccio. Continuare con A.3 e A.1a fino a quando il lavoro misura 96-100-104 cm, ci sono circa 672-696-720 maglie sul ferro. Ora dividere il lavoro per i davanti come segue: Intrecciare le prime 54-56-58 maglie, lavorare le 162-168-174 maglie successive (= davanti sinistro), intrecciare le maglie fino a quando rimangono 216-224-232 maglie, lavorare le 162-168-174 maglie successive (= davanti destro), mettere queste maglie in sospeso e intrecciare le ultime 54-56-58 maglie. Tagliare e affrancare il filo. DAVANTI SINISTRO: Continuare con il motivo avanti e indietro sulle 162-168-174 maglie; aggiustarlo sul ferro 1 in modo che le maglie a rovescio delle coste ora siano lavorate a diritto dal rovescio del lavoro. ALLO STESSO TEMPO intrecciare le prime 2 maglie all’inizio di ogni ferro (= 2 maglie intrecciate su ogni ferro). Continuare a lavorare il motivo e a intrecciare in questo modo fino a quando il lavoro misura 63-66-69 cm in totale dal centro del cerchio (il davanti misura circa 15-16-17 cm. Intrecciare le maglie rimaste. DAVANTI DESTRO: Lavorare come per il davanti sinistro. MANICA: La manica è lavorata in tondo con i ferri a doppia punta/ferri circolari corti. Avviare 48-56-64 maglie con i ferri a doppia punta n° 3 mm e BabyAlpaca Silk. Lavorare 3 COSTE – leggere la descrizione sopra, poi lavorare A.4 su tutte le maglie (= 6-7-8 ripetizioni in larghezza). Alla fine di A.4 continuare a maglia rasata su tutte le maglie. Inserire 1 segnapunti all’inizio del giro (= centro sotto la manica). Quando il lavoro misura 5 cm aumentare 1 maglia a ogni lato del segnapunti – leggere il SUGGERIMENTO PER GLI AUMENTI. Aumentare ogni 6 giri per un totale di 18-19-20 volte = 84-94-104 maglie. Quando il lavoro misura 43-43-42 cm intrecciare 4 maglie a ogni lato del segnapunti e continuare a lavorare avanti e indietro sui ferri circolari = 76-86-96 maglie. Intrecciare per l’arrotondamento della manica all’inizio di ogni ferro a ogni lato come segue: 2 maglie 7-7-8 volte, 1 maglia 5-7-9 volte e 2 maglie a ogni lato fino a quando il lavoro misura 56-57-58 cm. Intrecciare le maglie rimaste e lavorare l’altra manica nello stesso modo. CONFEZIONE: Unire le 8 maglie all’inizio del lavoro. Attaccare le maniche. |
|||||||||||||||||||||||||
Spiegazioni del diagramma |
|||||||||||||||||||||||||
|
|||||||||||||||||||||||||
 |
|||||||||||||||||||||||||
 |
|||||||||||||||||||||||||
 |
|||||||||||||||||||||||||
 |
|||||||||||||||||||||||||
Avete terminato questo modello?Allora taggate le vostre foto con #dropspattern #seasidedreamerjacket o inviatele alla #dropsfan gallery. Avete bisogno di aiuto con questo modello?Troverete 26 video tutorial, una sezione per i commenti/domande e molto altro guardando il modello su www.garnstudio.com © 1982-2026 DROPS Design A/S. Ci riserviamo tutti i diritti. Questo documento, compreso tutte le sue sotto-sezioni, è protetto dalle leggi sul copyright. Potete leggere quello che potete fare con i nostri modelli alla fine di ogni modello sul nostro sito. |
|||||||||||||||||||||||||


Con oltre 40 anni di esperienza nel design di modelli di maglia e uncinetto, DROPS Design offre la più estesa collezione di modelli gratuiti su internet - tradotti in 17 lingue. Ad oggi vi possiamo fornire 324 cataloghi e 12290 modelli - 9561 dei quali sono tradotti in Italiano.
Ci stiamo impegnando molto per darvi il meglio che vi possiamo offrire in termini di maglia e uncinetto, ispirazioni e consigli così come filati di grande qualità ad un prezzo incredibile! Volete utilizzare i nostri modelli per qualcosa d'altro oltre al vostro uso personale? Potete leggere tutto ciò che è consentito nel testo sul Copyright in basso su tutte le pagine dei nostri modelli. Buon lavoro!
Lasciare un commento sul modello DROPS 191-6
Noi saremmo felici di ricevere i tuoi commenti e opinioni su questo modello!
Se vuoi fare una domanda, fai per favore attenzione a selezionare la categoria corretta nella casella qui sotto per velocizzare il processo di risposta. I campi richiesti sono indicati da *.