
Categorie popolari
State cercando un filato?


Commenti / Domande (126)
![]() Nathalie ha scritto:
Nathalie ha scritto:
Bonjour, Ma fille étant petite, je souhaiterais pouvoir diminuer la hauteur total de la robe de 10 cm environ, comment faire pour ne pas perdre le motif ou les bonnes proportions d'augmentation? Merci pour votre aide
21.03.2026 - 15:23DROPS Design ha risposto:
Bonjour Nathalie, vous pouvez vous inspirer des explications et du schéma pour calculer les modifications à faire en fonction des mesures finales souhaitées. Bon crochet!
23.03.2026 - 08:20
![]() Karin 45 ha scritto:
Karin 45 ha scritto:
Das ist eine super Anleitung,auch für Anfänger sehr geeignet!!
20.03.2026 - 04:11
![]() Marga ha scritto:
Marga ha scritto:
Hola. No entiendo cuando tengo que hacer A2 y como se hace. No entiendo los puntos que tengo que hacer u si tengo que unirlo con A1
17.03.2026 - 16:29DROPS Design ha risposto:
Hola Marga, A.2 representa el inicio y final de las vueltas. A.2 = trabajar 1 punto enano en el último punto de cadeneta del inicio de la fila anterior. Después trabajas el número de cadenetas que se corresponde en esa fila (1, 2, 3 o 4). A.2 solo se trabaja en un extremo, el resto se trabaja según el diagrama A.1 o A.3.
18.04.2026 - 18:48
![]() Pareto Dominique ha scritto:
Pareto Dominique ha scritto:
Robe après les fentes quand vous dites de crocheter en allez et retour la grille A1 etA2 dois je faire les 6 premières mailles de A1 puis la grille A2 tout le long du rang ou faire 1 rang Grille A1 et ensuite 1 rang de A2?? Merci pour votre reponse
24.02.2026 - 17:27DROPS Design ha risposto:
Bonjour Mme Pareto, A.2 montre simplement comment commencer et terminer les rangs/tours, autrement dit, vous commencez le tour par A.2 puis vous répétez A.1 jusqu'à la fin du tour. Sur l'envers, continuez à lire A.1 de gauche à droite, sur l'endroit, lisez A.1 toujours de droite à gauche, comme avant. Bon crochet!
25.02.2026 - 07:14
![]() Pareto Dominique ha scritto:
Pareto Dominique ha scritto:
Je parlais de la grille A1 qui a été corrigée
22.02.2026 - 13:40DROPS Design ha risposto:
Cf. réponse ci-dessous :)
23.02.2026 - 08:49
![]() Pareto Dominique ha scritto:
Pareto Dominique ha scritto:
Bonjour je ne parviens pas à trouver la grille de correction pour le modèle belladone 187 /5 pourriez vous me l en voyer par mail svp merci d avance
22.02.2026 - 12:13DROPS Design ha risposto:
Bonjour Mme Pareto, si vous avez imprimé les explications après la date du correctif, les explications sont alors à jour; sinon, il est recommandé de les imprimer à nouveau. Bon crochet!
23.02.2026 - 08:31
![]() Yvonne ha scritto:
Yvonne ha scritto:
Is there a place where the pattern is written out? I cannot figure out the diagram at all.
09.02.2026 - 00:30
![]() Cattaneo ha scritto:
Cattaneo ha scritto:
Encore une précision s'il vous plaît, pour la taille S, les "35 CMS" sont la mesure de la taille qu'il faut multiplier par 2 pour avoir la circonférence du tour de taille ? Ma fille a une taille fine, je pensais peut être changer de crochet pour cette partie sur quelques rangs. Qu en pensez vous ? Je trouve ce modèle très joli, j'aimerais bien le réaliser pour elle 😀 Merci pour vos explications.
02.01.2026 - 10:07DROPS Design ha risposto:
Bonjour Mme Cattaneo, les 35 cm sont la mesure de la taille - cette mesure doit etre multipliee par 2 pour avoir la circonférence du tour de taille. Vous pouvez prendre un crochet plus fin pour la taille, bonne idee. Bon crochet!
02.01.2026 - 10:35
![]() Cattaneo ha scritto:
Cattaneo ha scritto:
Bonjour, pour confectionner cette robe pour ma fille qui a 20 ans, et qui est très jolie, je souhaiterais des précisions : la robe commence du bas vers le haut ? elle ne veut pas les fentes sur les côtés, pour du S je peux commencer par 2x90 mls et faire des A/R en rond sur 10 CMS (on a 78x2 mls au total circonférence) et après je continue en rond en A/R mais après ces 20 CMS, quel point fait on ? On continue le diag. A1 ?
02.01.2026 - 09:02DROPS Design ha risposto:
Bonjour Mme Cattaneo, la robe commence du bas. Vous allez crocheter 2x90 mls et faire des A/R en rond (on a 78x2 mls au total circonférence) et après vous continuez en rond en A/R selon le diag. A.1 jusqu’a 10 cm de hauteur. Continuer ainsi en allers et retours en suivant les diagrammes A.1 et A.2. Aux tours de brides ou de mailles serrées, on a maintenant 156 mailles (A.2 ne compte pas dans le nombre de mailles). Bon crochet !
02.01.2026 - 09:55
![]() Coreen ha scritto:
Coreen ha scritto:
I am to the point where I separate the front and back and decrease for arm hole shaping. I have been working the A.3 chart. It says to repeat decrease on every row but there isn’t a star on every row. Am I only supposed to be decreasing where the star is? Or am I supposed to decrease every row? Or am I not supposed to be following A.3 chart at this point? Thank you for your help.
03.08.2025 - 15:02DROPS Design ha risposto:
Dear Coreen, in the "DRESS after vent"section, you decrease on the rows marked with stars. However, in the later parts of the FRONT PIECE/ BACK PIECE the decreases are separate from the charts, so you don't need to work them on the marked rows, you work the decreases every row. Happy crochetting!
03.08.2025 - 20:00
|
|||||||||||||||||||||||||||||||||||||
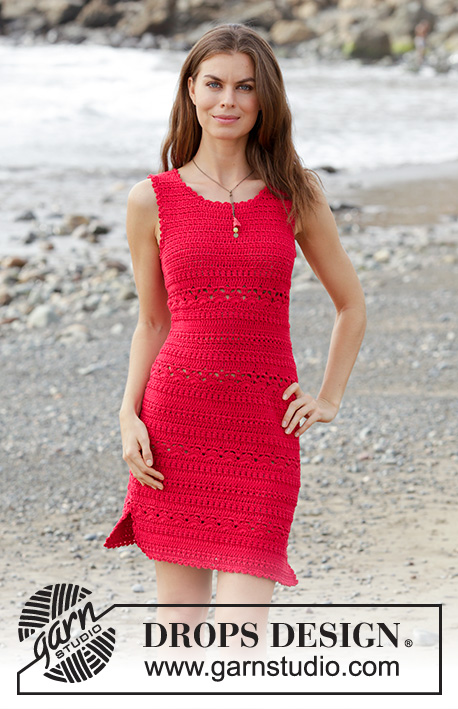
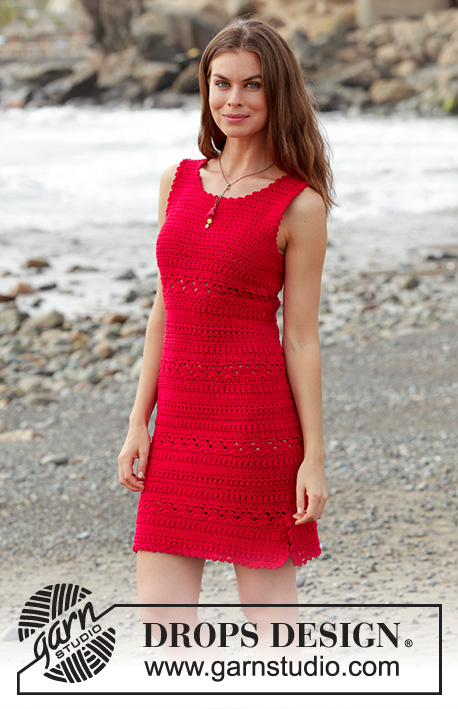
Belladonna#belladonnadress |
|||||||||||||||||||||||||||||||||||||
 |
 |
||||||||||||||||||||||||||||||||||||
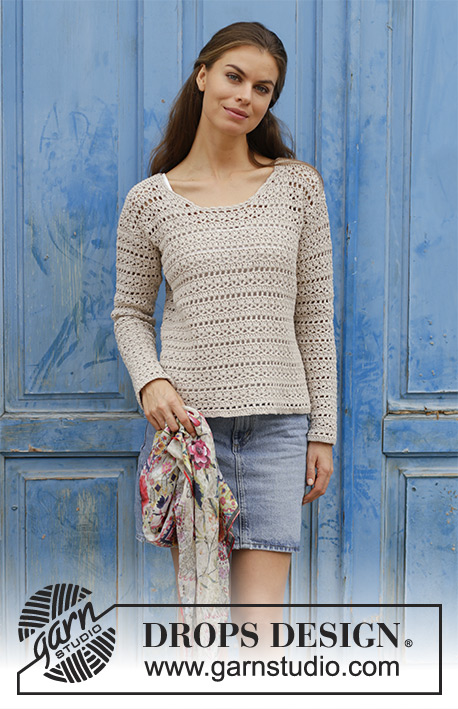
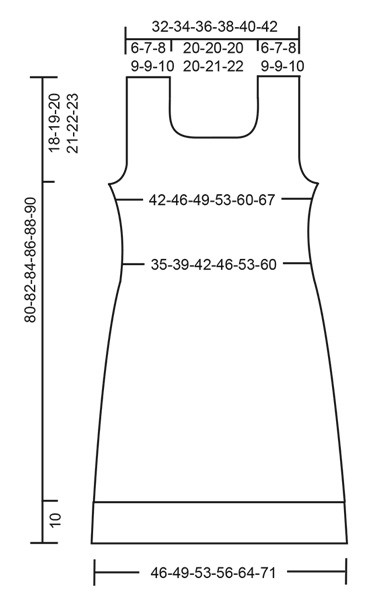
Vestito lavorato ai ferri con motivo a punto fantasia. Taglie: S – XXXL. Lavorato in DROPS Muskat.
DROPS 187-5 |
|||||||||||||||||||||||||||||||||||||
|
INFORMAZIONI GENERALI: MOTIVO: Vedere i diagrammi A.1, A.2 e A.3. A.2 mostra come inizia/finisce il giro quando si lavora in tondo. SUGGERIMENTO PER IL LAVORO – quando si lavora avanti e indietro: Lavorare 3 catenelle all’inizio delle righe che iniziano con 1 maglia alta (non sostituiscono la prima maglia alta). Lavorare 1 catenella all’inizio delle righe che iniziano con 1 maglia bassa (non sostituisce la prima maglia bassa). SUGGERIMENTO PER LE DIMINUZIONI: MAGLIE ALTA: Diminuire 1 maglia alta lavorando 2 maglie alte insieme come segue: Lavorare 1 maglia alta nella 1° maglia, ma aspettare con l’ultimo gettato e passaggio (= 2 occhielli sull’uncinetto), lavorare 1 maglia alta nella maglia successiva/attormo alla catenella, ma fare l’ultimo passaggio attraverso tutti e 3 gli occhielli sull’uncinetto (= 1 maglia alta diminuita). MAGLIE BASSE: Diminuire 1 maglia bassa lavorando 2 maglie basse insieme come segue: Lavorare 1 maglia bassa, ma aspettare con l’ultimo gettato e passaggio (= 2 occhielli sull’uncinetto), lavorare la maglia bassa successiva, ma fare l’ultimo passaggio attraverso tutti e 3 gli occhielli sull’uncinetto (= 1 maglia bassa diminuita). SUGGERIMENTO PER LE DIMINUZIONI (in modo uniforme): Per calcolare ogni quanto diminuire in modo uniforme, prendere il n° totale di maglie (ad esempio 156 maglie) e dividerlo per il n° di diminuzioni da fare (ad esempio 6) = 26. In questo esempio lavorare insieme ogni 25° e 26° maglia circa. -------------------------------------------------------- VESTITO: C’è uno spacco di 10 cm sulla parte inferiore del vestito, per prima cosa lavorarlo avanti e indietro fino alla fine dello spacco, poi lavorare in tondo ma girare su ogni giro e tornare indietro sul giro per lavorare il punto fantasia nello stesso modo. Quando il lavoro viene diviso all’altezza dello scalfo, lavorare ancora avanti e indietro. DAVANTI: Avviare 90-97-104-111-125-139 catenelle con Muskat con l’uncinetto n° 4 mm. Continuare con 1 maglia bassa nella 2° catenella dall’uncinetto, poi 1 maglia bassa in ognuna delle 4 catenelle successive, * saltare 1 catenella, 1 maglia bassa in ognuna delle 6 catenelle successive *, ripetere *-* per tutta la riga = 78-84-90-96-108-120 maglie basse (la catenella con cui girare viene anche contata come 1 maglia bassa). Girare e lavorare 1 maglia bassa in ogni maglia bassa. Ora lavorare seguendo il diagramma A.1 – leggere il SUGGERIMENTO PER IL LAVORO! FARE ATTENZIONE ALLA TENSIONE DEL LAVORO! Dopo 10 cm mettere il lavoro da parte e lavorare il dietro. DIETRO: Avviare 90-97-104-111-125-139 catenelle con Muskat con l’uncinetto n° 4 mm. Continuare con 1 maglia bassa nella 2° catenella dall’uncinetto, poi 1 maglia bassa in ognuna delle 4 catenelle successive, * saltare 1 catenella, 1 maglia bassa in ognuna delle 6 catenelle successive *, ripetere *-* per tutta la riga = 78-84-90-96-108-120 maglie basse (la catenella con cui girare viene anche contata come 1 maglia bassa). Girare e lavorare 1 maglia bassa in ogni maglia bassa. Ora lavorare seguendo il diagramma A.1. Continuare fino a quando il lavoro misura 10 cm – finire sulla stessa riga del davanti. VESTITO dopo lo spacco: Continuare il motivo in questo modo – prima lavorare le maglie del davanti, poi lavorare le maglie del dietro, poi chiudere il giro con 1 maglia bassissima nella 1°/3° maglia sul giro, lavorare la maglia in A.2, girare il lavoro e tornare indietro. Inserire 1 segnapunti nel punto di passaggio tra il davanti e il dietro = lati. Continuare in questo modo avanti e indietro con il motivo seguendo i diagrammi A.1 e A.2. Sui giri a maglia alte o maglie basse ora ci sono 156-168-180-192-216-240 maglie sul giro (A.2 non viene conteggiato nel n° di maglieù). Quando il lavoro misura circa 30-31-32-33-34-35 cm – aggiustarlo in modo che il giro successivo sia un giro a maglie alte o maglie basse (indicato con la stella nel diagramma), diminuire 6 maglie in modo uniforme – leggere il SUGGERIMENTO PER LE DIMINUZIONI e il SUGGERIMENTO PER LE DIMINUZIONI (in modo uniforme). Ripetere le diminuzioni 6 volte in totale sui 6 giri indicati a maglie alte o maglie basse = 120-132-144-156-180-204 maglie su un giro a maglie alte o maglie basse. Dopo l’ultima diminuzione lavorare il motivo come prima per circa 3 cm – aggiustarlo in modo che il giro successivo sia un giro indicato con la stella (ora il lavoro misura circa 48-49-50-51-52-53 cm). Ora aumentare 6 maglie in modo uniforme sul giro lavorando 2 maglie in 1 maglia. Ripetere gli aumenti 4 volte in totale in verticale sui giri indicati nel diagramma = 144-156-168-180-204-228 maglie su un giro a maglie alte o basse dopo l’ultimo aumento. Quando il lavoro misura circa 60-61-62-63-64-65 cm – aggiustarlo alla fine di un giro indicato con la stella, finire il vestito seguendo il diagramma A.3 (girare come prima con il diagramma A.2). Quando il lavoro misura 62-63-64-65-66-67 cm, dividerlo per il davanti e il dietro all’altezza degli scalfi. DAVANTI: Lavorare a maglie bassissime sulle prime 4-5-4-5-6-7 maglie, poi lavorare fino a quando rimangono 4-5-4-5-6-7 maglie prima del segnapunti all’altro lato, girare il lavoro. Sul ferro successivo lavorare insieme 2 a 2 le 4 maglie più esterne a ogni lato – leggere il SUGGERIMENTO PER LE DIMINUZIONI! Ripetere le diminuzioni su ogni ferro altre 0-0-1-1-2-3 volte. Sul ferro successivo lavorare insieme le 2 maglie più esterne, ripetere le diminuzioni su ogni ferro altre 2-2-2-3-4-5 volte. Alla fine di tutte le diminuzioni, rimangono 54-58-62-64-68-72 maglie sul ferro. Quando il lavoro misura 70-71-73-74-76-77 cm, finire ogni spalla in modo separato. SPALLA: Continuare a maglia alte sulle prime 17-19-21-22-23-24 maglie dal diritto del lavoro, girare e lavorare insieme 2 a 2 a diritto le prime 4 maglie per il collo, poi lavorare il resto del ferro. Girare e lavorare fino a quando rimangono 4 maglie prima del collo, lavorarle insieme 2 a 2, girare. Sul ferro successivo lavorare insieme le prime 2 maglie, poi lavorare il resto del ferro. Girare e lavorare fino a quando rimangono 2 maglie, lavorarle insieme. Girare, lavorare insieme le prime 2 maglie, poi lavorare il resto del ferro = 10-12-14-15-16-17 maglie rimaste sulla spalla. Continuare fino a quando il lavoro misura 80-82-84-86-88-90 cm, chiudere e affrancare. Lavorare l'altra spalla in modo uguale ma a specchio. Quindi iniziare sul diritto del lavoro e lavorare le diminuzioni per lo scollo alla fine delle righe sul rovescio del lavoro. DIETRO: Lavorare a maglie bassissime sulle prime 4-5-4-5-6-7 maglie, poi lavorare fino a quando rimangono 4-5-4-5-6-7 maglie prima del segnapunti a lato, girare il lavoro. Sul ferro successivo lavorare insieme 2 a 2 le prime 4 maglie più esterne a ogni lato – leggere il SUGGERIMENTO PER LE DIMINUZIONI! Ripetere le diminuzioni su ogni ferro altre 0-0-1-1-2-3 volte. Sul ferro successivo lavorare insieme le 2 maglie più esterne, ripetere le diminuzioni su ogni ferro altre 2-2-2-3-4-5 volte. Alla fine di tutte le diminuzioni, rimangono 54-58-62-64-68-72 maglie sul ferro. Continuare a lavorare fino a quando il lavoro misura circa 78-80-82-84-86-88 cm. Poi finire ogni spalla in modo separato come segue: lavorare 1 ferro sulle prime 12-14-16-17-18-19 maglie, girare, lavorare insieme le prime 2 maglie, lavorare il resto del ferro. Girare e lavorare fino a quando rimangono 2 maglie, lavorarle insieme. Girare, lavorare il resto del ferro, chiudere e affrancare. Ripetere sull’altra spalla. CONFEZIONE: Cucire i margini delle spalle bordo a bordo per evitare una cucitura spessa. BORDO DECORATIVO: Lavorare un bordo decorativo attorno al collo, a ogni scalfo e sulla parte inferiore del corpo – e anche su e giù da ogni spacco. Lavorare un bordo decorativo come segue: 1 maglia bassa, * 3 catenelle, 1 maglia alta nella 3° catenella dall’uncinetto, saltare circa 1 cm e fare 1 maglia bassa *. Ripetere *-* e finire con 1 maglia bassissima nella 1° maglia bassa dall’inizio del giro. |
|||||||||||||||||||||||||||||||||||||
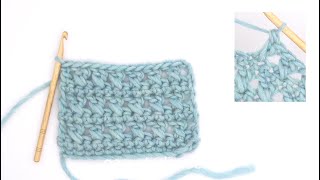
Spiegazioni del diagramma |
|||||||||||||||||||||||||||||||||||||
|
|||||||||||||||||||||||||||||||||||||
 |
|||||||||||||||||||||||||||||||||||||
 |
|||||||||||||||||||||||||||||||||||||
Avete terminato questo modello?Allora taggate le vostre foto con #dropspattern #belladonnadress o inviatele alla #dropsfan gallery. Avete bisogno di aiuto con questo modello?Troverete 13 video tutorial, una sezione per i commenti/domande e molto altro guardando il modello su www.garnstudio.com © 1982-2026 DROPS Design A/S. Ci riserviamo tutti i diritti. Questo documento, compreso tutte le sue sotto-sezioni, è protetto dalle leggi sul copyright. Potete leggere quello che potete fare con i nostri modelli alla fine di ogni modello sul nostro sito. |
|||||||||||||||||||||||||||||||||||||


Con oltre 40 anni di esperienza nel design di modelli di maglia e uncinetto, DROPS Design offre la più estesa collezione di modelli gratuiti su internet - tradotti in 17 lingue. Ad oggi vi possiamo fornire 324 cataloghi e 12290 modelli - 9561 dei quali sono tradotti in Italiano.
Ci stiamo impegnando molto per darvi il meglio che vi possiamo offrire in termini di maglia e uncinetto, ispirazioni e consigli così come filati di grande qualità ad un prezzo incredibile! Volete utilizzare i nostri modelli per qualcosa d'altro oltre al vostro uso personale? Potete leggere tutto ciò che è consentito nel testo sul Copyright in basso su tutte le pagine dei nostri modelli. Buon lavoro!
Lasciare un commento sul modello DROPS 187-5
Noi saremmo felici di ricevere i tuoi commenti e opinioni su questo modello!
Se vuoi fare una domanda, fai per favore attenzione a selezionare la categoria corretta nella casella qui sotto per velocizzare il processo di risposta. I campi richiesti sono indicati da *.