
Categorie popolari
State cercando un filato?


Commenti / Domande (26)
![]() Amanda ha scritto:
Amanda ha scritto:
Hej, i början av arbetet ska det sitta två stick markörer i början av arbetet, 3 maskor in. När man sen ska göra omslag ska man göra ett omslag på vardera sida om markörerna, eller vart ska de två ökningarna som beskrivs som att de ska sitta i mitten av arbetet göras?
28.02.2025 - 15:14DROPS Design ha risposto:
Hej Amanda, du ökar 2 maskor på varje sida om de mittersta 55 maskorna. Yttersta omslaget är alltid innanför 2 rätstickade maskor i varje sida - och de 2 andra omslagen är alltid på varje sida om de mittersta maskorna :)
06.03.2025 - 13:35
![]() Marie ha scritto:
Marie ha scritto:
Bonjour. Est-ce normal qu’il n’y ai qu’une seule augmentation à gauche dans le A2b la 3ème fois. Merci pour votre réponse
01.04.2024 - 23:36DROPS Design ha risposto:
Bonjour Marie, tout à fait, on n'augmente ici qu'une seule maille. Bon tricot!
02.04.2024 - 16:00
![]() Morel ha scritto:
Morel ha scritto:
Bonjour Je voudrais savoir si ce magnifique châle peut être transformé en cape ( fermé autour du cou ) Merci beaucoup et bravo pour votre travail 🥰
07.02.2024 - 08:22DROPS Design ha risposto:
Bonjour Mme Morel, probablement, il vous faudrait juste faire les ajustements nécessaires. Bon tricot!
08.02.2024 - 08:05
![]() Amanda Karlsson ha scritto:
Amanda Karlsson ha scritto:
If I am supposed to increase 2 every other row, and knit 62 rows. How does that become 62 increased stitches, wouldn't it be double the amount of rows?
04.03.2023 - 13:48DROPS Design ha risposto:
Dear Amanda, since you increase 2 stitches every other row you only increase on every 2 rows (for example, on even rows - work 1 row with no increases, work 1 row with increases, work 1 row with no increase, 1 row with increases...). So you increase 2 stitches on 31 rows = 62 stitches increased. Happy knitting!
05.03.2023 - 19:18
![]() Anna ha scritto:
Anna ha scritto:
Hei, eg har lagt opp til sjalet, men e usikker på hvordan man øker etter pinne 1 og 2. Skal man strikke 2 masker kast, så strikke 3 masker eller skal man øke 2 masker, kast, strikk 1 og så et kast
26.04.2022 - 20:57DROPS Design ha risposto:
Hei Anna, Du gjentar pinner 1 og 2. Så pinne 3: 2 masker rille, 1 kast, strikke riller fram til 1. merket, 1 kast, riller fram til 2. merke, 1 kast, riller til det gjenstår 2 masker og 2 masker rille. God fornøyelse!
27.04.2022 - 07:06
![]() Uschi ha scritto:
Uschi ha scritto:
Hallo, sind im Diagranm die Hin- und Rückreihen gezeigt, oder stricke ich die Rückreise wie sie auf der Nadel erscheint? Viele Grüße Uschi
25.02.2021 - 23:21DROPS Design ha risposto:
Liebe Uschi, die Hin- sowie die Rückreihen sind im Diagram gezeichnet, Rückreihen lesen Sie links nach rechts. Viel Spaß beim stricken!
26.02.2021 - 08:24
![]() Brenda ha scritto:
Brenda ha scritto:
The graph is wrong. I had to work the pattern to prove it to some one else. Never mind.
06.01.2021 - 19:01
![]() Brenda ha scritto:
Brenda ha scritto:
Ok to follow up. When you look at the pattern of adding and decreases the stitches it looks right but with actual knitting the increase is on the inside between the middle SKP and YO. Thus stitches get moved over one and then the YO misses a stitch. Gee this is hard to explain. When I added the extra row. The holes now flowed continuously across the shawl. Maybe you have to do a trial run to figure out what I mean. I repeated mine 3 times. We can zoom?
05.01.2021 - 17:29DROPS Design ha risposto:
Dear Brenda, the diagrams just should be worked as follows, ie the yarn overs should be worked as shown in the diagram - on which row do you have this kind of worry? To get any individual assistance please feel free to contact your yarn store - even per mail or telephone, showing them your work so that it might be easier for them to see what you did. Happy knitting!
06.01.2021 - 08:13
![]() Brenda ha scritto:
Brenda ha scritto:
Hi. I rewrote... You need an extra row so that the YO’s all follow in a row. When you did the extra stitches the yo is ok. The next row after adding the stitches you miss a stitch with the yarn over. Therefore you have to repeat the last row over once more . Ok look at it this way. What I did to get it....Forget the pattern. Just do the YO to follow that pattern to hold the line. The line after the yarn over and on the pattern you miss the continuing the YO holes. You m
05.01.2021 - 15:14
![]() Brenda ha scritto:
Brenda ha scritto:
I do have every pattern sectioned off with markers. When you add a stitch there’s a yarn over missing. I can send a picture. There’s a spot where there’s a stitch and no yarn over. The pattern has to be adjusted I think. Unless the yarn over flow shows a separation? Is that it? I know I commented on this before and I’m trying once more to get it to work. I can not
05.01.2021 - 13:39DROPS Design ha risposto:
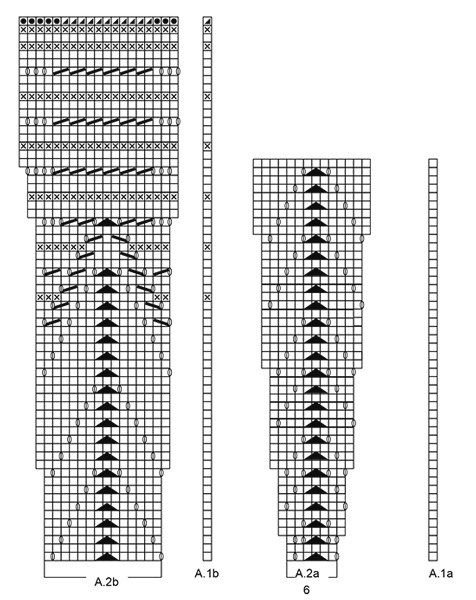
Dear Brenda, I'm sorry, I'm not following you - as examples showing the increases: you will increase 2 sts on row 3 in A.2a (= there are 4 yarn overs but only 2 sts are decreased); you will increase 2 sts on row 11 in A.2b working a total of 4 yarn overs but decreasing also only 2 sts. Hope this can help. Happy knitting!
05.01.2021 - 14:43
|
|||||||||||||||||||||||||
Majesty#majestyshawl |
|||||||||||||||||||||||||
 |
 |
||||||||||||||||||||||||
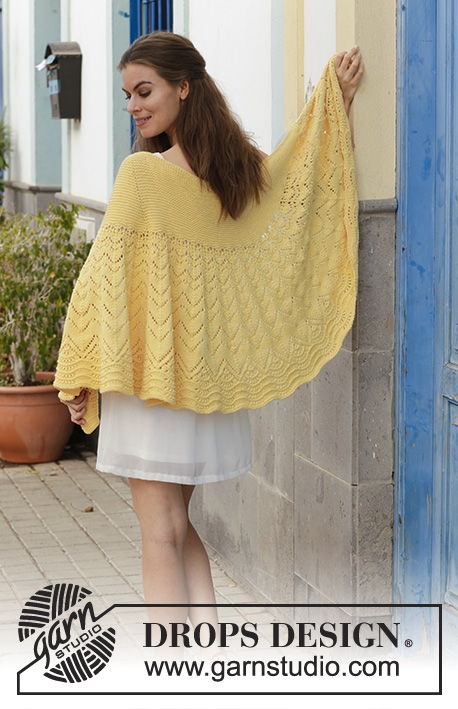
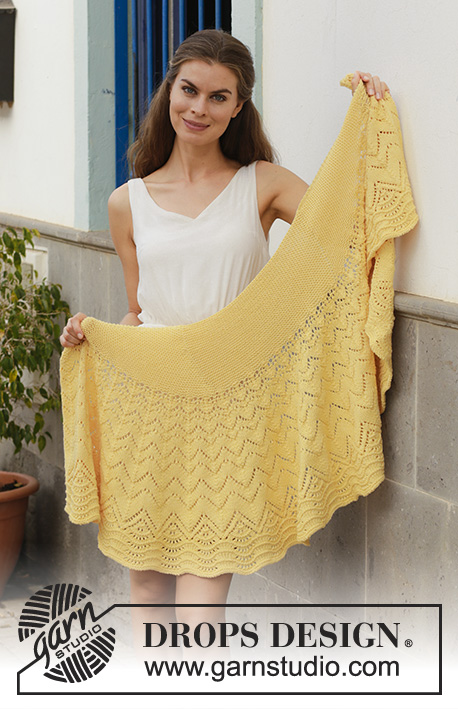
Scialle ai ferri con motivo traforato, motivo ondulato e a punto legaccio. Lo scialle è lavorato in DROPS Merino Extra Fine.
DROPS 187-23 |
|||||||||||||||||||||||||
|
INFORMAZIONI GENERALI: PUNTO LEGACCIO (avanti e indietro sui ferri): 1 costa a legaccio = lavorare 2 ferri a diritto. MOTIVO: Vedere i diagrammi A.1 e A.2. I diagrammi mostrano tutti i ferri del motivo, visti sul diritto del lavoro ---------------------------------------------------------- SCIALLE: Si lavora avanti e indietro sui ferri circolari. Avviare 61 maglie sui ferri circolari n° 4 con il filato Merino Extra Fine. Inserire 1 segno dopo le prime 3 maglie e 1 segno prima delle ultime 3 maglie (= 55 maglie tra segni). Lavorare come segue: FERRO 1 (= sul diritto del lavoro): Lavorare 2 maglie a PUNTO LEGACCIO – vedere le spiegazioni sopra, 1 maglia gettata (= 1 maglia aumentata), lavorare a punto legaccio fino al 1° segno, 1 maglia gettata prima del segno (= 1 maglia aumentata), lavorare 55 maglie a punto legaccio (il 2° segno si trova qui), 1 maglia gettata dopo il segno (= 1 maglia aumentata), lavorare a punto legaccio finché non rimangono 2 maglie, 1 maglia gettata (= 1 maglia aumentata), finire con 2 maglie a punto legaccio (=in tutto 4 maglie aumentate). FERRO 2 (= sul rovescio del lavoro): Lavorare tutte le maglie a punto legaccio, lavorare la prima maglia gettata e l’ultima maglia gettata non ritorte, si devono formare dei buchi; lavorare le 2 maglie gettate centrali ritorte, NON si devono formare dei buchi. Quindi ci sarà un buco tra 2 maglie a punto legaccio da ciascun lato del lavoro. Ripetere i ferri 1 e 2. RICORDARSI DI MANTENERE LA CORRETTA TENSIONE DEL LAVORO! Lavorare in tutto 31 coste a legaccio (= 62 ferri in tutto), quindi vengono aumentate 62 maglie da ciascun lato delle 55 maglie centrali = 185 maglie sul ferro. Il lavoro misura circa 15 cm, misurati lungo la direzione del lavoro. Lavorare il ferro successivo come segue, sul diritto del lavoro: Lavorare 2 maglie vivagno a punto legaccio, diagramma A.1a sulla maglia successiva, diagramma A.2a (= 6 maglie) finché non rimangono 2 maglie (= 30 volte in tutto in larghezza), finire con 2 maglie vivagno a punto legaccio. Proseguire con il motivo in questo modo. Dopo aver lavorato i diagrammi A.1a e A.2a una volta in verticale, lavorare il diagramma A.1b sul diagramma A.1a e il diagramma A.2b sul diagramma A.2a. Terminati gli aumenti nel diagramma A.2, sui ferri ci sono 575 maglie. Intrecciare come spiegato nel diagramma; intrecciare le maglie usando ferri di misura più grande per evitare che il bordo di chiusura delle maglie sia troppo stretto. |
|||||||||||||||||||||||||
Spiegazioni del diagramma |
|||||||||||||||||||||||||
|
|||||||||||||||||||||||||
 |
|||||||||||||||||||||||||
Avete terminato questo modello?Allora taggate le vostre foto con #dropspattern #majestyshawl o inviatele alla #dropsfan gallery. Avete bisogno di aiuto con questo modello?Troverete 19 video tutorial, una sezione per i commenti/domande e molto altro guardando il modello su www.garnstudio.com © 1982-2026 DROPS Design A/S. Ci riserviamo tutti i diritti. Questo documento, compreso tutte le sue sotto-sezioni, è protetto dalle leggi sul copyright. Potete leggere quello che potete fare con i nostri modelli alla fine di ogni modello sul nostro sito. |
|||||||||||||||||||||||||


Con oltre 40 anni di esperienza nel design di modelli di maglia e uncinetto, DROPS Design offre la più estesa collezione di modelli gratuiti su internet - tradotti in 17 lingue. Ad oggi vi possiamo fornire 324 cataloghi e 12290 modelli - 9561 dei quali sono tradotti in Italiano.
Ci stiamo impegnando molto per darvi il meglio che vi possiamo offrire in termini di maglia e uncinetto, ispirazioni e consigli così come filati di grande qualità ad un prezzo incredibile! Volete utilizzare i nostri modelli per qualcosa d'altro oltre al vostro uso personale? Potete leggere tutto ciò che è consentito nel testo sul Copyright in basso su tutte le pagine dei nostri modelli. Buon lavoro!
Lasciare un commento sul modello DROPS 187-23
Noi saremmo felici di ricevere i tuoi commenti e opinioni su questo modello!
Se vuoi fare una domanda, fai per favore attenzione a selezionare la categoria corretta nella casella qui sotto per velocizzare il processo di risposta. I campi richiesti sono indicati da *.