
Categorie popolari
State cercando un filato?


Commenti / Domande (27)
![]() Viola ha scritto:
Viola ha scritto:
Hallo, ich würde diese Jacke für ein neunjähriges Mädchen stricken. Es gibt nicht zufällig diese Anleitung für die Größe XXS oder XS? Viele Grüße
03.04.2018 - 21:17DROPS Design ha risposto:
Liebe Frau Viola, dieses Modell gibt es nur in Damen-Größe. Viel Spaß beim stricken!
04.04.2018 - 08:54
![]() Holly Hensel Kinsella ha scritto:
Holly Hensel Kinsella ha scritto:
When not working the A-1 pattern or the front band garter do you knit on your purls and purl on your knits on the opposite sides? After you set up the pattern it just says to continue the pattern upwards and I find this confusing? Exp. on the 25 knit stitches on either side do you purl these on the wrong side? And the 2 purls between the patterns do you knit these on the wrong sides? Thank you!
12.03.2018 - 21:30DROPS Design ha risposto:
Dear Mrs Kinsella, from WS you work in garter st the sts in garter st and K over K and P over P and diagram as shown on WS row in diagram. Happy knitting!
13.03.2018 - 09:30
![]() Barbara ha scritto:
Barbara ha scritto:
Guten Tag, ich wollte mir diese Anleitung ausdrucken, aber es hat leider NICHT funktioniert, nur die Seiten 1 - 3 sind ausdruckbar, das Lochmuster und die Skizze für die Maße kann ich nicht ausdrucken, können Sie mir bitte weiterhelfen? Grüße Barbara
24.02.2018 - 18:41DROPS Design ha risposto:
Liebe Barbara, die Settings Ihrer Drücker sollen Sie vielleicht mal prüfen, damit alle Seiten gedrückt werden. Viel Spaß beim stricken!
26.02.2018 - 08:09
![]() Fran Miller ha scritto:
Fran Miller ha scritto:
I am assembling the piece and working on the neck and so there is no decreasing at all. I want to know if I should knit the stitches off of the thread and then pick up stitches around the rest of the neck and then knit the final 15 stitches that are on the thread.
15.01.2018 - 17:28DROPS Design ha risposto:
Dear Mrs Miller, correct, you will knit the sts from thread back on needle and knit up sts around whole neckline, beg on one shoulder or on mid back. Happy knitting!
16.01.2018 - 09:03
![]() Fran Miller ha scritto:
Fran Miller ha scritto:
I still have a question about the stitches on the thread. Since they are at the beginning of each side, there are no stitches that have been worked previously. If I slip the first 15 on the right needle and then join a yarn to work the others of the neck on to the needle, the last 15 are on the thread. If I just slip them on, then my yarn would be in the middle of a row. If I knit them on, then the first 15 have not been knitted but the last 15 have! Please clarify as I am very confused.
15.01.2018 - 15:04DROPS Design ha risposto:
Dear Mrs Miller, for neck you will work first 15 sts from RS then slip them on a st holder (so that you don't have to cut the yarn), work to the end of row. Turn and work return row. At the beg from next row from RS beg to dec for neck. Happy knitting!
15.01.2018 - 15:54
![]() Fran Miller ha scritto:
Fran Miller ha scritto:
I am assembling my sweater and am on the neckline. How do I know up the stitches for the neckline, specifically the 15 stitches that are on the threads. Do I just slip them on the needle and then join yarn to get the other stitches on the needle or do I treat these stitches like bound off stitches and pull thread through them. I have tried finding a video but can't find any.
15.01.2018 - 02:02DROPS Design ha risposto:
Hi Fran, Slip the stitches on the thread onto the right needle when you have knitted up the other stitches as far as the front and then work them too. Then carry on knitting up stitches on the other side of the thread stitches. I hope this helps and happy knitting!
15.01.2018 - 06:18
![]() Sabina ha scritto:
Sabina ha scritto:
Hi.can you please explain in detail the sleeve cap and the 3 stitches cast off on each side-does that mean you cast off while on wrong side and right side? Thanks
17.12.2017 - 09:24DROPS Design ha risposto:
Hi Sabina, Yes, you cast off at the beginning of each row, so the one will be RS the other WS. Happy knitting!
18.12.2017 - 06:21
![]() Fran Miller ha scritto:
Fran Miller ha scritto:
I have another question about the front piece. On the right front piece, if you put the first 15 stitches on the thread, the yarn from your knitting is with it. So do you attach new yarn to do the stitches after that so you can begin the bind off? Likewise on the left side, do you work from the wrong side and take the 15 stitches off at the beginning or do you work from the right side and slip them to the thread at the end? Again what happens to that yarn if done in the beginning?
18.11.2017 - 23:52DROPS Design ha risposto:
Dear Mrs Miller, when slipping the first 15 sts from RS on right front piece, work them first to avoid cutting the yarn. On left front piece, leave the last 15 sts from RS unworked and turn. This way you won't have to cut yarn and join it on next row. Happy knitting!
20.11.2017 - 09:21
![]() Fran Miller ha scritto:
Fran Miller ha scritto:
I still have a question about the right front piece. After you put the 15 stitches on the thread, what happens to them. I don't see anything in the directions. Also when it says"bind off for the neck at the beginning of the row from the neck " does this mean after the stitches that are on the thread? I would think so in order to have the 18 stitches for the shoulder.
18.11.2017 - 01:13DROPS Design ha risposto:
Hi Fran, The 15 stitches on the thread are worked when you get to Neck, The new stitches that you bind off are, as you say, the ones next to the stitches on the thread so you shape the neck up to the shoulders. Happy knitting!
18.11.2017 - 07:07
![]() Fran Miller ha scritto:
Fran Miller ha scritto:
I am starting this sweater and want clarification on the ribbing. Is the purl row just done for the first row? So knit 5, (knit 2,purl 2) to last 7 stitches, knit last 7 stitches is done every row?
24.10.2017 - 22:19DROPS Design ha risposto:
Dear Mrs Miller, you will K every row the first 5 sts and the last 5 sts on row, all remaining sts between these will be worked K2/P2, ie from RS you will finish with K7 and from WS you will start with K5 (= front band), then work K over K and P over P for the rib, and finish with K5 (= front band). Happy knitting!
25.10.2017 - 08:44
|
||||||||||||||||
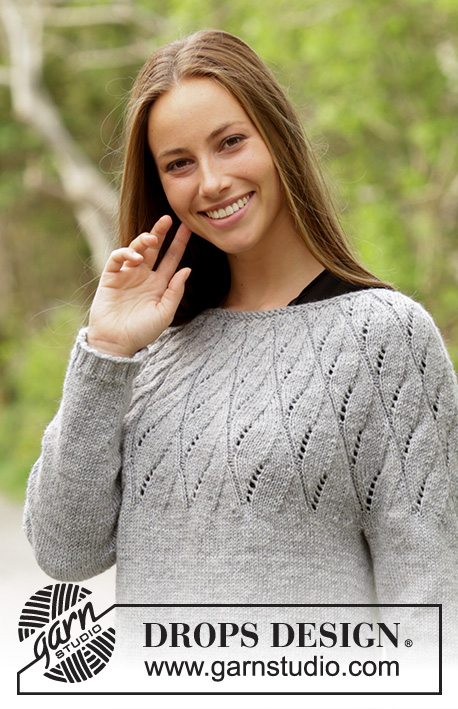
Lotus Jacket#lotusjacket |
||||||||||||||||
 |
 |
|||||||||||||||
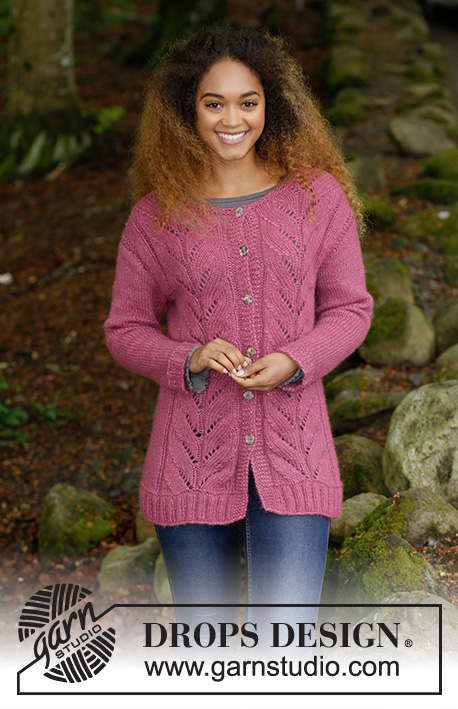
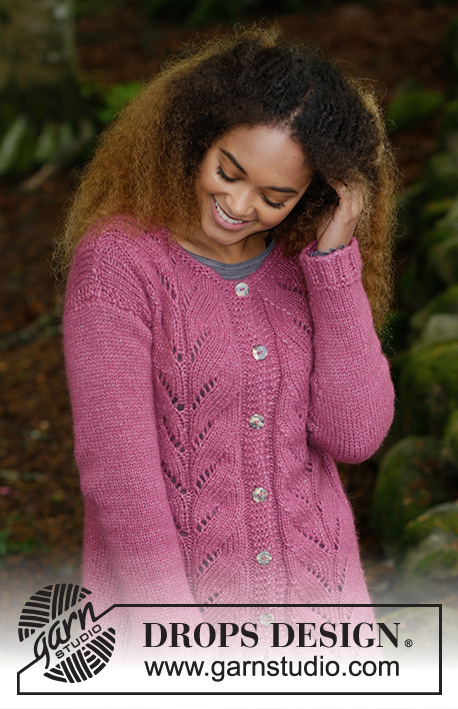
Cardigan lavorato ai ferri con motivo traforato e coste. Taglie: S - XXXL. Il maglione è lavorato in DROPS Air.
DROPS 179-18 |
||||||||||||||||
|
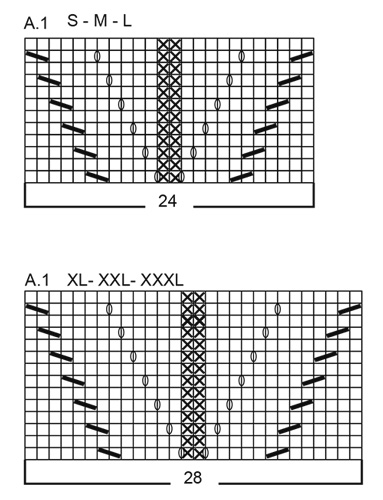
INFORMAZIONI PER IL MODELLO: COSTA/MAGLIA LEGACCIO (lavorata in tondo): 1 costa = 2 giri. 1 giro diritto e 1 giro rovescio. COSTA/MAGLIA LEGACCIO (lavorata avanti e indietro): 1 costa = 2 ferri diritto MOTIVO: Vedere il diagramma A.1. Il diagramma mostra tutti i ferri del motivo visto dal diritto del lavoro. Vedere il diagramma per la vostra taglia. SUGGERIMENTO PER LE DIMINUZIONI (per il lato): Iniziare 3 maglie prima del segnapunti a lato: 2 maglie insieme a diritto, 2 maglie diritto (il segnapunti è tra queste 2 maglie), passare 1 maglia a diritto senza lavorarla, 1 maglia diritto, accavallare la maglia passata sopra quella appena lavorata. SUGGERIMENTO PER GLI AUMENTI (per il centro sotto le maniche): Iniziare 1 maglia prima del segnapunti, fare 1 gettato, 2 maglie diritto (il segnapunti è al centro di queste 2 maglie), fare 1 gettato (= 2 maglie aumentate). Sul giro successivo, lavorare i gettati a diritto ritorto per evitare buchi. ASOLE: Diminuire per le asole sul bordo destro. 1 ASOLA = lavorare insieme a diritto la 3° e 4° dal bordo e fare 1 gettato. Sul ferro successivo lavorare i gettati a diritto = buco. Diminuire per le asole quando il lavoro misura: S: 16, 25, 34, 43, 52 e 61 cm M: 16, 25, 34, 43, 53 e 63 cm L: 16, 25, 35, 45, 55 e 65 cm XL: 16, 24, 32, 40, 49, 58 e 67 cm XXL: 16, 24, 33, 42, 51, 60 e 69 cm XXXL: 16, 26, 35, 44, 53, 62 e 71 cm ---------------------------------------------------------- CARDIGAN: Lavorato avanti e indietro dal centro davanti, dal basso verso gli scalfi. Poi il davanti e il dietro vengono lavorati avanti e indietro sui ferri circolari in modo separato. Le maniche vengono lavorate in tondo con i ferri a doppia punta/ferri circolari corti. CORPO: Avviare 204-220-232-252-272-296 maglie con i ferri circolari n° 5 mm e Air. Lavorare 1 ferro rovescio dal rovescio del lavoro, poi lavorare a coste come segue – dal diritto del lavoro: 5 maglie a MAGLIA LEGACCIO – leggere la descrizione sopra, * 2 maglie diritto/2 maglie rovescio, ripetere *-* fino a quando rimangono 7 maglie, 2 maglie diritto e 5 maglie a maglia legaccio. Continuare a coste fino a quando il lavoro misura 6 cm. Passare ai ferri circolari n° 6 mm e lavorare 1 costa su tutte le maglie, ALLO STESSO TEMPO sul 1° ferro della costa, distribuire 34-38-38-42-46-50 diminuzioni on modo uniforme sul ferro = 170-182-194-210-226-246 maglie. Continuare a lavorare come segue – dal diritto del lavoro: 5 maglie a maglia legaccio, 2 maglie rovescio, A.1 (= 24-24-24-28-28-28 maglie), 2 maglie rovescio, lavorare 25-31-37-37-45-55 maglie diritto, 2 maglie rovescio, A.1, 2 maglie rovescio, A.1, lavorare 25-31-37-37-45-55 maglie diritto, 2 maglie rovescio, A.1, 2 maglie rovescio e 5 maglie legaccio. Continuare questo motivo verso l’alto. FARE ATTENZIONE ALLA TENSIONE DEL LAVORO! Inserire 1 segnapunti a ogni lato, a 45-48-51-55-59-64 maglie dal centro davanti (dietro = 80-86-92-100-108-118 maglie). Quando il lavoro misura 8 cm diminuire 1 maglia a ogni lato del segnapunti ai lati = 4 diminuzioni, LEGGERE IL SUGGERIMENTO PER LE DIMINUZIONI! Diminuire ogni 12-12-13-13-14-14 cm un totale di 4 volte = 154-166-178-194-210-230 maglie. ALLO STESSO TEMPO quando il lavoro misura 16 cm iniziare a diminuire per le ASOLE – leggere la descrizione sopra. Quando il lavoro misura 48-49-50-51-52-53 cm lavorare a coste su 14 maglie a ogni lato (= 7 maglie a ogni lato dei segnapunti ai lati). Quando sono state lavorate 2 coste sulle maglie ai lati, lavorare il ferro successivo come segue – dal diritto del lavoro: lavorare 37-40-43-47-51-56 maglie, intrecciare le 8 maglie successive per lo scalfo (= 4 maglie a ogni lato del segnapunti ai lati), lavorare 64-70-76-84-92-102 maglie, intrecciare le 8 maglie successive per lo scalfo, lavorare 37-40-43-47-51-56 maglie. Ogni parte adesso è lavorata in modo separato. DIETRO: = 64-70-76-84-92-102 maglie. Continuare con il motivo come prima, le 3 maglie più esterne a ogni lato ora vengono lavorate a maglia legaccio. Quando il lavoro misura 66-68-70-72-74-76 cm intrecciare le 26-26-28-28-30-30 maglie centrali per il collo e ogni spalla viene finita in modo separato. Intrecciare 1 maglia sul ferro successivo dal collo = 18-21-23-27-30-35 maglie rimaste sulla spalla. Continuare a lavorare fino a quando il lavoro misura circa 68-70-72-74-76-78 cm (le maglie rimaste in A.1 vengono lavorate a maglia rasata) e intrecciare. Lavorare l’altra spalla nello stesso modo. DAVANTI DESTRO: = 37-40-43-47-51-56 maglie. Continuare con il motivo come prima, le 3 maglie più esterne a lato vengono ora lavorate a maglia legaccio. RICORDARSI DELLE ASOLE. Continuare a lavorare fino a quando il lavoro misura 62-64-66-68-70-72 cm. Ora mettere le prime 15-15-16-16-17-17 maglie centrali in sospeso per il collo. Continuare il motivo come prima e intrecciare per il collo all’inizio di ogni ferro dal collo come segue: 2 maglie 1 volta e 1 maglia 2 volte = 18-21-23-27-30-35 maglie rimaste sulla spalla. Continuare a lavorare fino a quando il lavoro misura 68-70-72-74-76-78 cm (le maglie rimaste in A.1 vengono lavorate a maglia rasata) e intrecciare. Lavorare l’altra spalla nello stesso modo. DAVANTI SINISTRO: Lavorare come per il destro, ma al contrario. MANICA: La manica viene lavorata in tondo con i ferri a doppia punta/ferri circolari. Avviare 40-40-44-48-52-52 maglie con i ferri a doppia punta n° 5 mm e Air. Lavorare 1 giro diritto, poi lavorare a coste, 2 maglie diritto/2 maglie rovescio. Lavorare a coste per 5 cm, poi passare ai ferri a doppia punta n° 6 mm, lavorare 1 COSTA, leggere la descrizione sopra, sul 1° giro delle coste diminuire 6-6-8-10-12-12 maglie in modo uniforme sul giro = 34-34-36-38-40-40 maglie. Continuare a maglia rasata. Inserire 1 segnapunti all’inizio del giro = centro sotto la manica. Lavorare a maglia rasata in tondo. Quando il lavoro misura 8-8-8-8-10-9 cm aumentare 2 maglie al centro sotto la manica – LEGGERE IL SUGGERIMENTO PER GLI AUMENTI. Aumentare in questo modo ogni 3½-3-2½-2½-2-2 cm per un totale di 12-13-14-14-15-16 volte = 58-60-64-66-70-72 maglie. Quando il lavoro misura 49-48-47-46-44-41 cm (misure più corte per le taglie più grandi a causa della maggiore ampiezza delle spalle), intrecciare le 6 maglie centrali sotto la manica e l’arrotondamento della manica viene poi lavorato avanti e indietro sui ferri circolari. Lavorare a maglia rasata e intrecciare all’inizio di ogni ferro a ogni lato come segue: 3 maglie 3 volte = 34-36-40-42-46-48 maglie. La manica misura circa 52-51-50-48-47-44 cm. Intrecciare le maglie rimaste. Lavorare l’altra manica nello stesso modo. CONFEZIONE: Cucire i margini delle spalle. Attaccare le maniche. Attaccare i bottoni sul davanti sinistro. COLLO: Riprendere circa 80 - 100 maglie (comprese le maglie in sospeso) con i ferri circolari n° 5 mm e Air. Lavorare 2 coste avanti e indietro poi intrecciare a diritto dal diritto del lavoro. |
||||||||||||||||
Spiegazioni del diagramma |
||||||||||||||||
|
||||||||||||||||
 |
||||||||||||||||
 |
||||||||||||||||
Avete terminato questo modello?Allora taggate le vostre foto con #dropspattern #lotusjacket o inviatele alla #dropsfan gallery. Avete bisogno di aiuto con questo modello?Troverete 27 video tutorial, una sezione per i commenti/domande e molto altro guardando il modello su www.garnstudio.com © 1982-2026 DROPS Design A/S. Ci riserviamo tutti i diritti. Questo documento, compreso tutte le sue sotto-sezioni, è protetto dalle leggi sul copyright. Potete leggere quello che potete fare con i nostri modelli alla fine di ogni modello sul nostro sito. |
||||||||||||||||


Con oltre 40 anni di esperienza nel design di modelli di maglia e uncinetto, DROPS Design offre la più estesa collezione di modelli gratuiti su internet - tradotti in 17 lingue. Ad oggi vi possiamo fornire 324 cataloghi e 12290 modelli - 9561 dei quali sono tradotti in Italiano.
Ci stiamo impegnando molto per darvi il meglio che vi possiamo offrire in termini di maglia e uncinetto, ispirazioni e consigli così come filati di grande qualità ad un prezzo incredibile! Volete utilizzare i nostri modelli per qualcosa d'altro oltre al vostro uso personale? Potete leggere tutto ciò che è consentito nel testo sul Copyright in basso su tutte le pagine dei nostri modelli. Buon lavoro!
Lasciare un commento sul modello DROPS 179-18
Noi saremmo felici di ricevere i tuoi commenti e opinioni su questo modello!
Se vuoi fare una domanda, fai per favore attenzione a selezionare la categoria corretta nella casella qui sotto per velocizzare il processo di risposta. I campi richiesti sono indicati da *.