
Categorie popolari
State cercando un filato?


Commenti / Domande (67)
![]() Thi ha scritto:
Thi ha scritto:
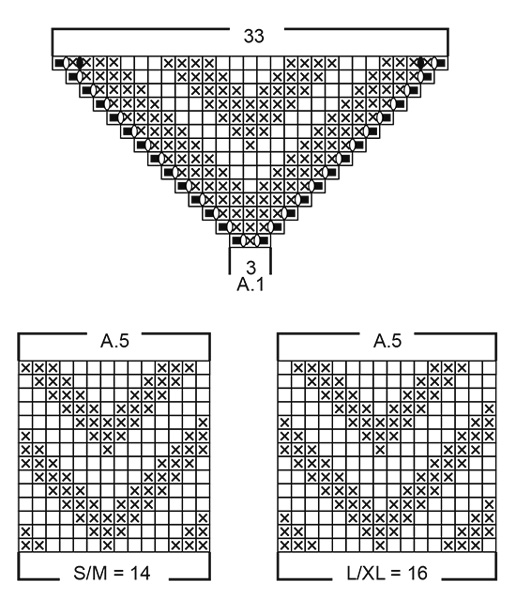
Hei, i diagram 5 skal jeg begynne 1.omg nedenfra og fra ventre til høyre, og fortsett 2. omg fra høyre? Jeg så ikke forklaringen til x i diagram, betyr det er vrang masker? Eller x betyr strikke vrang fra rett og rett fra vrang? Tusen takk på forhånd!
10.03.2019 - 22:00DROPS Design ha risposto:
Hei Thi, Diagrammene leses fra bunnen og oppover og fra høyre til venstre. Da er andre rad lest fra venstre til høyre. x i diagrammet betyr vrang fra retten og rett fra vrangen og tomme ruter betyr rett fra retten og vrang fra vrangen. God fornøyelse!
11.03.2019 - 08:00
![]() Betti ha scritto:
Betti ha scritto:
Ik lees dit patroon: begin bij de punt (3 steken) en eindig bij de brede kant (midden voor en richting de hals). Is dit dan niet maar een halve sjaal? Hoe komt je anders aan twee punten?
18.02.2019 - 18:13DROPS Design ha risposto:
Dag Betti,
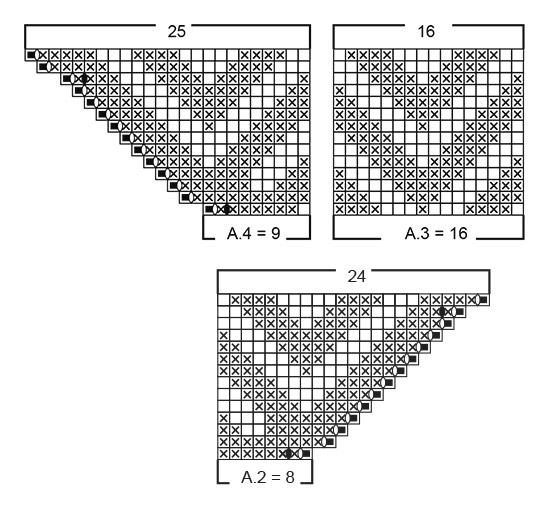
De sjaal heeft de vorm van een driehoek (vergelijkbaar met de driehoekige vorm van het telpatroon A.1), dus met drie punten en je begint in de onderste punt en je breit naar boven toe, waarbij de sjaal steeds breder wordt.
22.02.2019 - 14:22
![]() Helene Olofsrud ha scritto:
Helene Olofsrud ha scritto:
Ska sticka sjalen men det är inte markerat någon ökning son skall göras ska jag öka efter kantmaskan?
24.01.2019 - 11:15DROPS Design ha risposto:
Hei Helene. økningene er tegnet inn i diagrammene som små hvite ovaler, innenfor kantmaskene. Tips til neste gang: om du stiller sprøsmålet ditt som et "spørsmål" isteden for en "kommentar" vil vi se det mye raskere. God fornøyelse
11.02.2019 - 08:38
![]() Berit ha scritto:
Berit ha scritto:
Hallo,ich hatte das tuch schon gestrickt bis zu den 33 maschen,dann hab ich weitergeschrickt a2-8maschen,a3-16maschen a4 9machen ,hatte die reihen dann fertig,hab die maschen gezählt u blieben bei 33 maschen,um auf die 65 maschen zu kommen muss ich bei a2 mit zunahme u a4 mit zunahme stricken ?
12.01.2019 - 09:08DROPS Design ha risposto:
Liebe Berit, bei der 1. Reihe in A.2 nehmen Sie 2 Maschen zu (= 1 Randmasche, 1 Umschlag, 1 M li, 1 Umschlag, 6 M li), und am Ende A.4 nehmen Sie auch 2 Maschen zu: 1 M re, 6 M li, 1 Umschlag, 1 M li, 1 Umschlag, 1 Randmasche) = 4 Maschen werden bei der 1. Reihe A.2/A.4 zugenommen, dann nehmen Sie nur 1 Masche in je A.2/A.4 (= 2 Zunahmen pro Reihe) und bei der 13. Reihe nehmen Sie wieder 2 Maschen in A.2/A.4 = 4 Zunahmen = 65 M wenn Diagramme fertig sind. Viel Spaß beim stricken!
14.01.2019 - 09:35
![]() Berit ha scritto:
Berit ha scritto:
Hallo,stricke gerade das tuch und komme nicht weiter ,wie kommen sie auf 97 maschen ,kann rechnen wie ich will komm nicht auf die maschenzahl,
11.01.2019 - 14:36DROPS Design ha risposto:
Liebe Berit, bei der letzten Reihen der Diagramme haben Sie: A.2 (= 24 M.), 3 x A.3 (= 3 x 16 M = 48 M.), A.4 (= 25 M) = 24+48+25= 97 M. Viel Spaß beim stricken!
11.01.2019 - 15:11
![]() Stela ha scritto:
Stela ha scritto:
Oh, never mind my last question! I see now a tiny circle between the stitches that I completely missed! It’s after the first and before the last stitches that the YO is worked.
04.10.2018 - 03:23
![]() Stela ha scritto:
Stela ha scritto:
Yes, I understand the yarn over between the stitches, but I don’t understand how you can hav YO at the very beginning and at the very end of the row to then knit them on the next row. And so in each row, not in every second row! I’m an experienced knitter, but I really don’t get this one. I tried everything! Thank you!
04.10.2018 - 03:04DROPS Design ha risposto:
Hi again, Stela, There are no yarn overs at the end of the rows. They are between the edge stitch and the next stitch on both sides. Hope this clarifies things for you and happy knitting!
04.10.2018 - 07:52
![]() Stela ha scritto:
Stela ha scritto:
I don't understand how the side increases in each row are made. Where does the stich to be knit come from?
03.10.2018 - 06:13DROPS Design ha risposto:
Hi Stela, Whenever you see a circle symbol (either filled in or open) you make a yarn over, which gives you the increased stitch. So, for example in A.1 first row, there are 2 yarn overs which are worked twisted on the next row to avoid holes. I hope this helps and happy knitting!
03.10.2018 - 07:58
![]() Marie ha scritto:
Marie ha scritto:
Bonjour, Sur le diagramme, il y a deux symboles différents pour le jeté ( un "plein" et un "vide") mais l'explication est la même : "faire 1 jeté entre 2 mailles, au rang suivant tricoter le jeté torse pour éviter les trous". Y a t'il une raison à cela, faut-il procéder de manière différente?
19.09.2018 - 09:03DROPS Design ha risposto:
Bonjour Marie, ces 2 jetés vont se faire de la même façon, mais l'un d'eux se fait à 1 m du bord et l'autre à 2 m du bord, le symbole est différent juste pour bien les visualiser. Bon tricot!
19.09.2018 - 10:11
![]() Susana ha scritto:
Susana ha scritto:
Después de tejer este chall al lavarlo como indica el patrón , ha perdido el dibujo se quedo plano y sin ondas ¿ por que? Hay solución? Gracias
26.07.2018 - 21:50DROPS Design ha risposto:
Hola Susana. Lamentablemente no puedo decir si hay solución en tu caso. Air es la lana muy delicada por lo que un detergente no adecuado o lavarlo a temperaturas demasiado altas de agua pueden afectar a calidad de la prenda.
31.07.2018 - 11:57
|
||||||||||||||||
Green Sea#greenseaset |
||||||||||||||||
 |
 |
|||||||||||||||
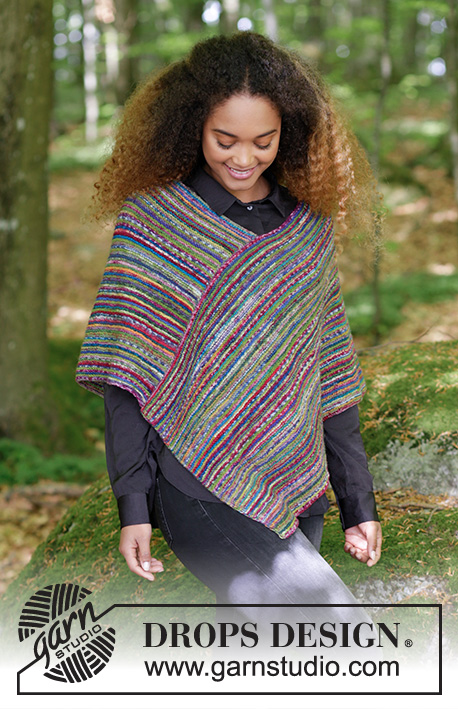
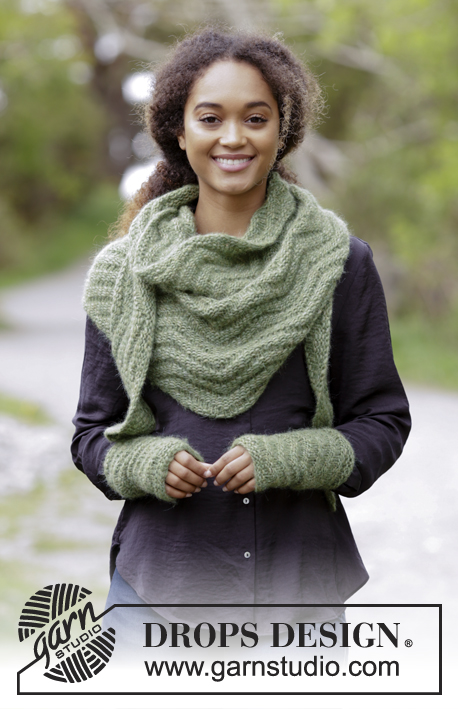
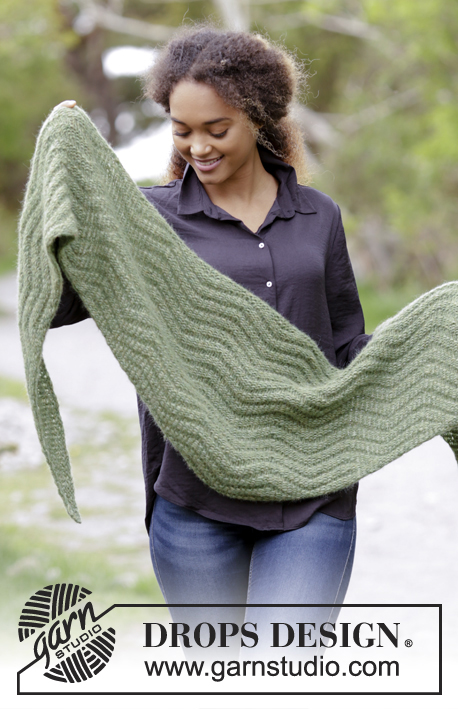
Completo ai ferri formato da: scialle e scalda polsi con motivo a zig-zag. Il completo è lavorato in DROPS Air.
DROPS 180-26 |
||||||||||||||||
|
INFORMAZIONI GENERALI: PUNTO LEGACCIO (avanti e indietro): 1 costa a legaccio = lavorare 2 ferri a diritto. MOTIVO: Scialle: Vedere i diagrammi da A.1 a A.4. Scalda polsi: Vedere il diagramma A.5. I diagrammi mostrano tutti i ferri del motivo visti sul diritto del lavoro. Seguire il diagramma corrispondente alla propria taglia. ---------------------------------------------------------- SCIALLE: Si lavora avanti e indietro sui ferri circolari dalla punta al centro sul davanti verso il collo. Avviare 3 maglie sui ferri circolari n° 8 con il filato Air. Lavorare 1 ferro a rovescio sul rovescio del lavoro. Lavorare il diagramma A.1 - vedere il MOTIVO sopra. Dopo aver lavorato il diagramma A.1, ci sono 33 maglie sul ferro. RICORDARSI DI MANTENERE LA CORRETTA TENSIONE DEL LAVORO! Proseguire con il motivo come segue: diagramma A.2 (= 8 maglie), diagramma A.3 (= 16 maglie), diagramma A.4 (= 9 maglie). Dopo aver lavorato i diagrammi da A.2 a A.4 una volta in verticale in verticale, ci sono 65 maglie. Proseguire come segue: diagramma A.2 (= 8 maglie), diagramma A.3 (= 16 maglie) 3 volte in tutto in larghezza, diagramma A.4 (= 9 maglie). Dopo aver lavorato i diagrammi da A.2 a A.4 una volta in verticale, ci sono 97 maglie. Ripetere ora i diagrammi da A.2 a A.4 e proseguire con gli aumenti - quindi ogni volta che i diagrammi da A.2 a A.4 vengono completati in verticale, è possibile lavorare 2 ripetizioni in più del diagramma A.3 in larghezza. Proseguire in questo modo finché il lavoro non misura 44 cm al centro. Lavorare 2 coste a PUNTO LEGACCIO - vedere le spiegazioni sopra. Intrecciare facendo delle maglie gettate - quindi fare 1 maglia gettata dopo ogni 5 maglie (intrecciare le maglie gettate come fossero maglie normali). ---------------------------------------------------------- SCALDA POLSI: Si lavorano avanti e indietro sui ferri. Avviare 30-34 maglie (comprese 1 maglia vivagno da ciascun lato) sui ferri n° 5 con il filato Air. Lavorare 2 coste a PUNTO LEGACCIO - vedere le spiegazioni sopra. Proseguire come segue: Lavorare 1 maglia vivagno a punto legaccio, diagramma A.5 (= 14-16 maglie) 2 volte in tutto in larghezza - vedere il MOTIVO sopra, lavorare 1 maglia vivagno a punto legaccio. RICORDARSI DI MANTENERE LA CORRETTA TENSIONE DEL LAVORO! Proseguire finché il lavoro non misura 21-22 cm. Lavorare 2 coste a legaccio. Intrecciare con il filato messo doppio. Cucire insieme all’interno di 1 maglia vivagno a punto legaccio. Lavorare un altro scalda polsi in modo uguale. |
||||||||||||||||
Spiegazioni del diagramma |
||||||||||||||||
|
||||||||||||||||
 |
||||||||||||||||
 |
||||||||||||||||
Avete terminato questo modello?Allora taggate le vostre foto con #dropspattern #greenseaset o inviatele alla #dropsfan gallery. Avete bisogno di aiuto con questo modello?Troverete 17 video tutorial, una sezione per i commenti/domande e molto altro guardando il modello su www.garnstudio.com © 1982-2026 DROPS Design A/S. Ci riserviamo tutti i diritti. Questo documento, compreso tutte le sue sotto-sezioni, è protetto dalle leggi sul copyright. Potete leggere quello che potete fare con i nostri modelli alla fine di ogni modello sul nostro sito. |
||||||||||||||||


Con oltre 40 anni di esperienza nel design di modelli di maglia e uncinetto, DROPS Design offre la più estesa collezione di modelli gratuiti su internet - tradotti in 17 lingue. Ad oggi vi possiamo fornire 324 cataloghi e 12290 modelli - 9561 dei quali sono tradotti in Italiano.
Ci stiamo impegnando molto per darvi il meglio che vi possiamo offrire in termini di maglia e uncinetto, ispirazioni e consigli così come filati di grande qualità ad un prezzo incredibile! Volete utilizzare i nostri modelli per qualcosa d'altro oltre al vostro uso personale? Potete leggere tutto ciò che è consentito nel testo sul Copyright in basso su tutte le pagine dei nostri modelli. Buon lavoro!
Lasciare un commento sul modello DROPS 180-26
Noi saremmo felici di ricevere i tuoi commenti e opinioni su questo modello!
Se vuoi fare una domanda, fai per favore attenzione a selezionare la categoria corretta nella casella qui sotto per velocizzare il processo di risposta. I campi richiesti sono indicati da *.