
Categorie popolari
State cercando un filato?


Commenti / Domande (67)
![]() Karin ha scritto:
Karin ha scritto:
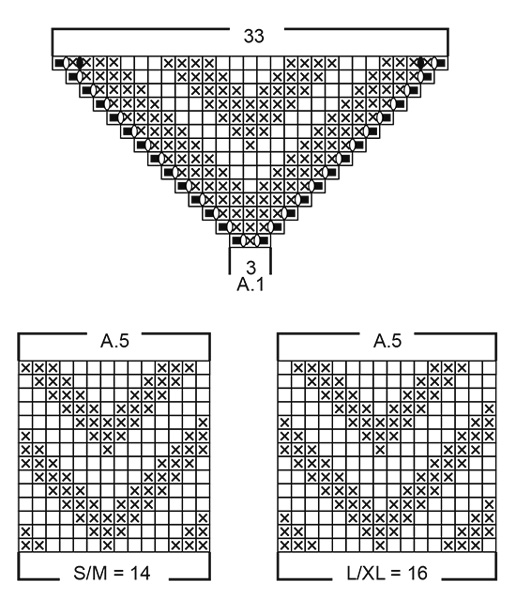
Hallo Dropsdesign, Wat een mooi patroon! Ik heb een vraag over A5, het lijkt net alsof de lege vakjes en kruisjes zijn omgekeerd? omdat de rijen van 3 en 4 steken anders zijn dan in de andere schema's? groeten Karin
12.12.2019 - 19:56DROPS Design ha risposto:
Dag Karin,
Het telpatroon A.5 is op de juiste wijze weergegeven. Dit telpatroon wordt voor de polswarmers gebruikt, waarbij inderdaad de verhouding van de steken anders zijn.
16.12.2019 - 15:46
![]() Susanne ha scritto:
Susanne ha scritto:
Liebes DROPS-Team, ich arbeite aktuell an dem gestrickten Tuch GREEN SEA. Ich bin jetzt an der Stelle mit 97 Maschen in der Reihe. Leider verstehe ich die Anleitung nicht, wie ich jetzt weiterstricken soll. Vorher war A.2, dann 3x A.3 und dann A4. Wie geht es jetzt weiter? Ich kann es leider nicht klar erkennen. Ganz erzlichen Dank für Ihre Antwort. Viele Grüße von Susanne
28.10.2019 - 09:12DROPS Design ha risposto:
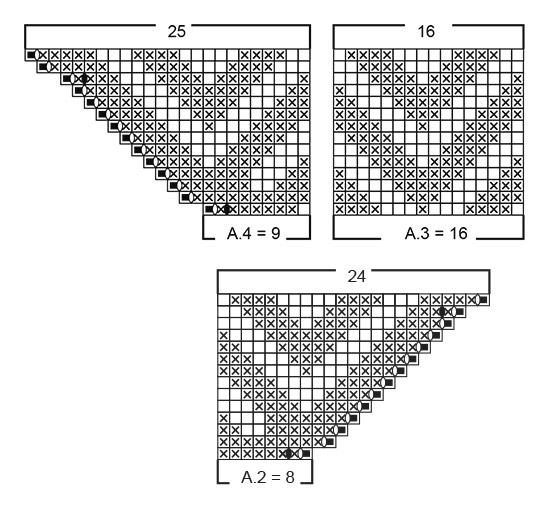
Liebe Suzanne, jetzt stricken Sie wie zuvor, aber die zugenommenen Maschen werden jetzt in A.3 gestrickt, dh: A.2 (= 8 M), wiederholen Sie A.3 bis 9 Maschen bleiben und stricken Sie A.4 über diese letzten 9 Maschen. A.3 stricken Sie jetzt 2 mal mehr in der Breite als zuvor. Viel Spaß beim stricken!
04.11.2019 - 12:43
![]() Kjersti Kristoffersen ha scritto:
Kjersti Kristoffersen ha scritto:
Hei. Hvor mange masker har man på det meste?
30.08.2019 - 09:46DROPS Design ha risposto:
Hei Kjersti. Det er det ikke skrevet, men det kan man fint regne seg til når man leser oppskriften. mvh Drops design
02.09.2019 - 14:52
![]() Maya ha scritto:
Maya ha scritto:
El esquema a seguir no coresponde al diseño del chal que se ve en la foto!!!
18.08.2019 - 06:18
![]() Sylvie ha scritto:
Sylvie ha scritto:
Oups... Il s'agit des diagrammes A2 et A4(et non A5...) Désolé 😉
06.08.2019 - 16:53
![]() Sylvie ha scritto:
Sylvie ha scritto:
Bonjour Très heureuse d'avoir trouvé ce chouette modèle, mais j'ai un petit doute concernant les augmentations doubles des diagrammes A2 et A5: au niveau de quel rang faut il les augmenter, rang 12 ou rang 13? Ou bien est ce fait volontairement ainsi, mais je ne pense pas car cela decalerait tout l'ouvrage à mon avis... Merci pour votre aide
06.08.2019 - 16:51DROPS Design ha risposto:
Bonjour Sylvie, on augmente en faisant 2 jetés dans A.2 et dans A.4 au 1er rang et au 13ème rang (= au rang suivant, on a 2 mailles en plus). Bon tricot!
07.08.2019 - 12:16
![]() Elisa ha scritto:
Elisa ha scritto:
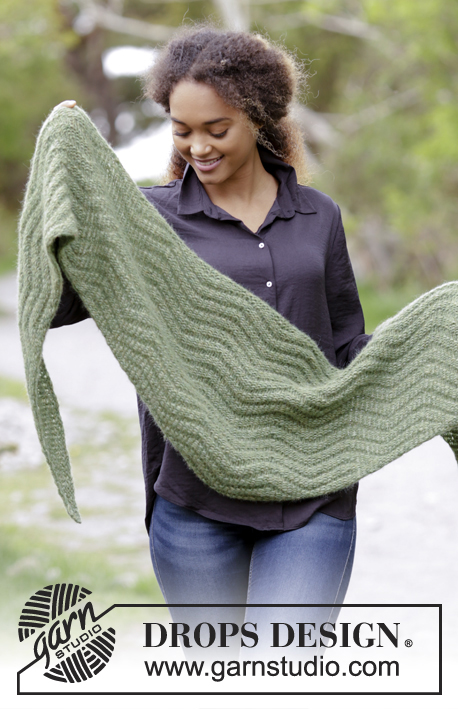
Is the diagram correct? The photo shows a wave pattern. The diagram does not. Thank you.
25.07.2019 - 13:10DROPS Design ha risposto:
Dear Elisa, yes, diagram is correct - this pattern is not common wave patt. with YOs, but structural one, with purled stitches. Please see more detailed picture (under the main picture). Happy knitting!
25.07.2019 - 14:43
![]() Elisa ha scritto:
Elisa ha scritto:
Question. Diagram does not show wave in the pattern as in the photo. Is there another diagram?
25.07.2019 - 13:06DROPS Design ha risposto:
Dear Elisa, pattern on the shawl is kind of zig-zag pattern, not common wave with YOs. So the diagram is correct for this pattern. See more detailed picture (under the main picture). Happy knitting!
27.07.2019 - 20:42
![]() Kitty ha scritto:
Kitty ha scritto:
Thanks for the reply. That’s what I have been doing and it still looks like holes or much larger stitches along the edge - is this normal or what am I doing wrong?
19.04.2019 - 00:08DROPS Design ha risposto:
Dear Kitty, to have a small hole is kind of normal. You can help it if you try to do the yarnover slightly thighter than usual, i.e pull the yarn back a little. Happy Knitting!
19.04.2019 - 10:51
![]() Kitty ha scritto:
Kitty ha scritto:
Hi there, I’m struggling to understand the A1 chart. As there are YO one stitch from either end of the rows, when these are being worked on the following row (just after/before next YO) will some be knitted into the back and others purled into the back? This is my first time using a chart and it still looks like I have holes or missed stitches when I do this? Thanks
18.04.2019 - 23:12DROPS Design ha risposto:
Dear Kitty, the yarnovers are knitted twisted (knit or purled through the back loop) in the next row, so there will be no hole on their places. I jope this helps. Happy Knitting!
18.04.2019 - 23:57
|
||||||||||||||||
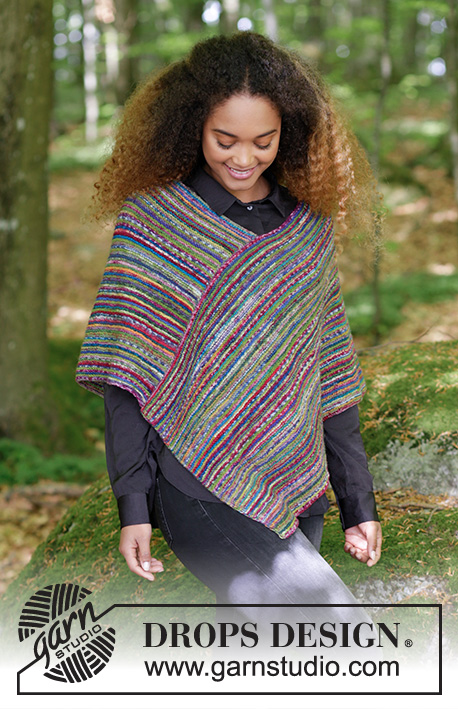
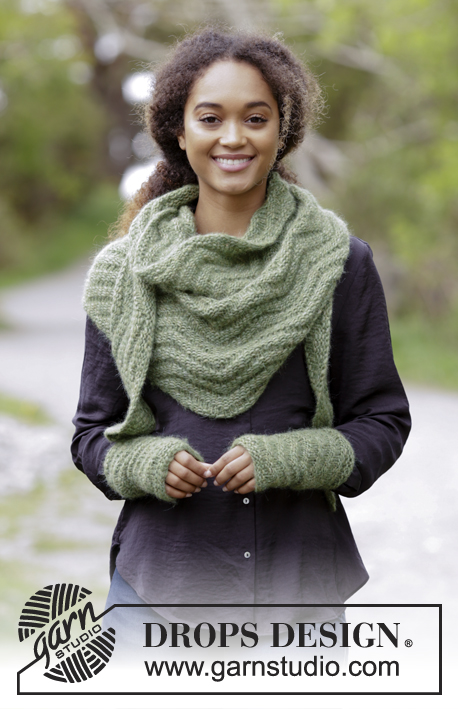
Green Sea#greenseaset |
||||||||||||||||
 |
 |
|||||||||||||||
Completo ai ferri formato da: scialle e scalda polsi con motivo a zig-zag. Il completo è lavorato in DROPS Air.
DROPS 180-26 |
||||||||||||||||
|
INFORMAZIONI GENERALI: PUNTO LEGACCIO (avanti e indietro): 1 costa a legaccio = lavorare 2 ferri a diritto. MOTIVO: Scialle: Vedere i diagrammi da A.1 a A.4. Scalda polsi: Vedere il diagramma A.5. I diagrammi mostrano tutti i ferri del motivo visti sul diritto del lavoro. Seguire il diagramma corrispondente alla propria taglia. ---------------------------------------------------------- SCIALLE: Si lavora avanti e indietro sui ferri circolari dalla punta al centro sul davanti verso il collo. Avviare 3 maglie sui ferri circolari n° 8 con il filato Air. Lavorare 1 ferro a rovescio sul rovescio del lavoro. Lavorare il diagramma A.1 - vedere il MOTIVO sopra. Dopo aver lavorato il diagramma A.1, ci sono 33 maglie sul ferro. RICORDARSI DI MANTENERE LA CORRETTA TENSIONE DEL LAVORO! Proseguire con il motivo come segue: diagramma A.2 (= 8 maglie), diagramma A.3 (= 16 maglie), diagramma A.4 (= 9 maglie). Dopo aver lavorato i diagrammi da A.2 a A.4 una volta in verticale in verticale, ci sono 65 maglie. Proseguire come segue: diagramma A.2 (= 8 maglie), diagramma A.3 (= 16 maglie) 3 volte in tutto in larghezza, diagramma A.4 (= 9 maglie). Dopo aver lavorato i diagrammi da A.2 a A.4 una volta in verticale, ci sono 97 maglie. Ripetere ora i diagrammi da A.2 a A.4 e proseguire con gli aumenti - quindi ogni volta che i diagrammi da A.2 a A.4 vengono completati in verticale, è possibile lavorare 2 ripetizioni in più del diagramma A.3 in larghezza. Proseguire in questo modo finché il lavoro non misura 44 cm al centro. Lavorare 2 coste a PUNTO LEGACCIO - vedere le spiegazioni sopra. Intrecciare facendo delle maglie gettate - quindi fare 1 maglia gettata dopo ogni 5 maglie (intrecciare le maglie gettate come fossero maglie normali). ---------------------------------------------------------- SCALDA POLSI: Si lavorano avanti e indietro sui ferri. Avviare 30-34 maglie (comprese 1 maglia vivagno da ciascun lato) sui ferri n° 5 con il filato Air. Lavorare 2 coste a PUNTO LEGACCIO - vedere le spiegazioni sopra. Proseguire come segue: Lavorare 1 maglia vivagno a punto legaccio, diagramma A.5 (= 14-16 maglie) 2 volte in tutto in larghezza - vedere il MOTIVO sopra, lavorare 1 maglia vivagno a punto legaccio. RICORDARSI DI MANTENERE LA CORRETTA TENSIONE DEL LAVORO! Proseguire finché il lavoro non misura 21-22 cm. Lavorare 2 coste a legaccio. Intrecciare con il filato messo doppio. Cucire insieme all’interno di 1 maglia vivagno a punto legaccio. Lavorare un altro scalda polsi in modo uguale. |
||||||||||||||||
Spiegazioni del diagramma |
||||||||||||||||
|
||||||||||||||||
 |
||||||||||||||||
 |
||||||||||||||||
Avete terminato questo modello?Allora taggate le vostre foto con #dropspattern #greenseaset o inviatele alla #dropsfan gallery. Avete bisogno di aiuto con questo modello?Troverete 17 video tutorial, una sezione per i commenti/domande e molto altro guardando il modello su www.garnstudio.com © 1982-2026 DROPS Design A/S. Ci riserviamo tutti i diritti. Questo documento, compreso tutte le sue sotto-sezioni, è protetto dalle leggi sul copyright. Potete leggere quello che potete fare con i nostri modelli alla fine di ogni modello sul nostro sito. |
||||||||||||||||


Con oltre 40 anni di esperienza nel design di modelli di maglia e uncinetto, DROPS Design offre la più estesa collezione di modelli gratuiti su internet - tradotti in 17 lingue. Ad oggi vi possiamo fornire 324 cataloghi e 12239 modelli - 9505 dei quali sono tradotti in Italiano.
Ci stiamo impegnando molto per darvi il meglio che vi possiamo offrire in termini di maglia e uncinetto, ispirazioni e consigli così come filati di grande qualità ad un prezzo incredibile! Volete utilizzare i nostri modelli per qualcosa d'altro oltre al vostro uso personale? Potete leggere tutto ciò che è consentito nel testo sul Copyright in basso su tutte le pagine dei nostri modelli. Buon lavoro!
Lasciare un commento sul modello DROPS 180-26
Noi saremmo felici di ricevere i tuoi commenti e opinioni su questo modello!
Se vuoi fare una domanda, fai per favore attenzione a selezionare la categoria corretta nella casella qui sotto per velocizzare il processo di risposta. I campi richiesti sono indicati da *.