
Categorie popolari
State cercando un filato?


Commenti / Domande (23)
![]() Leeanne ha scritto:
Leeanne ha scritto:
Addtnl. info for my last comments: I was confused by the first sentence in the short rows instructions stating to do 6 rows over all stitches. I thought that was part of the directions and the piece started with 6 rows before starting the short row repeat cycle but that is incorrect. This sentence is just telling you that there are 6 rows included in the short row instruction cycle that are not, in fact, short rows – 6 full rows and 2 short rows (not in that order) are listed in the row cycle.
06.09.2025 - 15:15
![]() Leeanne ha scritto:
Leeanne ha scritto:
(Cont. from previous two comments) next row starts with R3 and finishes with L3 and last row starts with L4 and finishes with R4. Then you start the cycle again with the first short row. So yes, the short row cycle is short row, full row, short row, full row, full row, full row, full row, full row as the pattern states (1 SR followed by 1 full row followed by 1 SR followed by 5 full rows). There are no edges in which you are not doing a picot edge instruction which allows for an even 8 row cycle
06.09.2025 - 15:08
![]() Leeanne ha scritto:
Leeanne ha scritto:
(continued from my previous comment) work the L2 row to the first marker and turn to work back to the “beginning” of the left side row, ending with L3, turn and start a new row with L4, working all the way across, ending with R4, (all the remaining rows in the cycle go all the way across – no more short rows) next row begins with R1 and goes all the way across to the last 4 stitches, ending in L1, turn and start with L2 and go all the way across to finish with R2, (cont. in next comment)
06.09.2025 - 15:03
![]() Leeanne ha scritto:
Leeanne ha scritto:
For anyone that needs it, here is the cycle of rows, combining picot edge with short rows instructions (it helps to draw this out on paper): start with right side 1 (R1) and work a short row (to first marker only, not all the way across), turn and work back to the beginning and knit the last four with R2, turn to start next row beginning with R3 and knit all the way across, ending this row with L1, then start the second short row with L2, (continued in next comment)
06.09.2025 - 14:58
![]() Leeanne ha scritto:
Leeanne ha scritto:
I figured it out! It is definitely not too complicated but they could have written this pattern differently so it wouldn’t take weeks or trial and error to figure out how to work the short rows in with the picot edge. Maybe we were just making it too complicated. I don’t have enough room to write the pattern in this comment so I’ll start a new one. It is easier to draw your lines and mark each end with the picot line number but I’ll try to write it here in my next comment.
06.09.2025 - 14:55
![]() Leeanne ha scritto:
Leeanne ha scritto:
I think I get it! I will test it in the morning and comment again trying to explain it for others if I have it right. My last two comments are wrong for sure. It helps to draw the rows as a picture on paper and mark the ends with the line number.
06.09.2025 - 05:10
![]() Leeanne ha scritto:
Leeanne ha scritto:
Revising my last comment: I now have it written as: short row, R1 &L1 on the same row, short row, R2 & L2, short row, R3 & L3, short row, R4 & L4. But this adds up to 8 rows on the sides and only 4 rows in the middle, not 6. Also not sure why the short rows directions refers to the middle stitches as being 70 (for the second size) when it’s only 30 (if excluding 25 on each end) or 72 (if excluding only the outermost 4 on each end).
06.09.2025 - 04:26
![]() Leanne ha scritto:
Leanne ha scritto:
The directions for the short rows are difficult to figure out. I’ve been working at this for a few weeks with my MIL, have restarted my project 7 times and we still don’t have it right. So we are alternating between right and left rows 1, 2, etc. when doing full rows? We are not doing any picot edge instructions when doing short rows, correct? To incoorporate the short rows, does it go: left row 1, right row 1, short row, left row 2, right row 2, short row, etc. through all four edge rows?
06.09.2025 - 02:40
![]() Leeanne ha scritto:
Leeanne ha scritto:
In addition to my last comment, I’m also confused because it says for garter stitch to knit two rows. The main directions says start with the right Picot edge, then knit the directions for garter stitch for the rest of the row, except for the last four and then knit the directions for the left edge on the last four. How do you knit two rows for the garter stitch directions in between doing the right and left edges?
14.07.2025 - 19:22DROPS Design ha risposto:
Dear Leeanne, the garter stitch structure is 2 knit rows. So whenever most of the stitches in the row are knitted, both from the right side and the wrong side, the resulting texture will be garter stitch. In the picot edges we are already using garter stitch, since all other stitches except for the 4 stitches on each side for the picot are knitted from the right side and the wrong side. So you just need to work as indicated; the edges will have the picot texture while the remaining stitches are knitted. Happy knitting!
19.07.2025 - 17:47
![]() Leeanne ha scritto:
Leeanne ha scritto:
A video of the actual pattern, please! This is so confusing. I’ve now learned how to do picot edges and short rows, but I can’t understand how to do both at the same time. How do you know which row of the picot edge you’re on if you’ve turned around and gone the other direction halfway through a row? And then when you start the next row do you count as if half the row is row 5 and half is row 6 or just continue with the next direction for that edge in sequence, ignoring row numbers?
14.07.2025 - 19:18DROPS Design ha risposto:
Dear Leeanne, please remember to mark your comments as questions so that we can see them and answer sooner. When you are combining the short rows and the picot edges, count only the rows where you reach the edges; those rows where you turn before reaching the edges are not taken into account for the picot edges on that side. Happy knitting!
19.07.2025 - 17:48
|
|
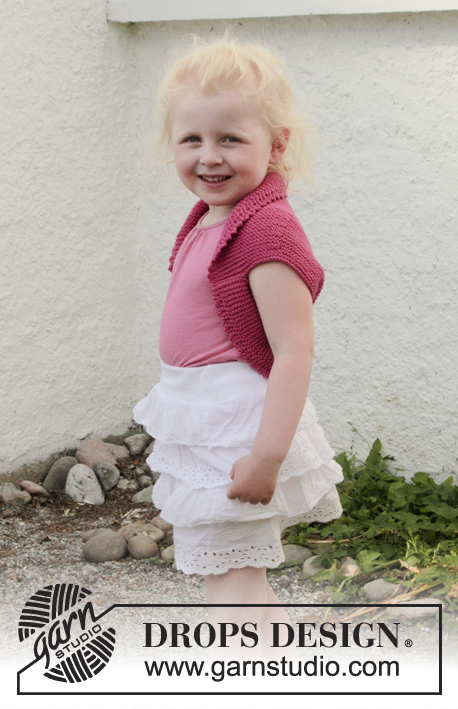
Berry Kiss#berrykissvest |
|
 |
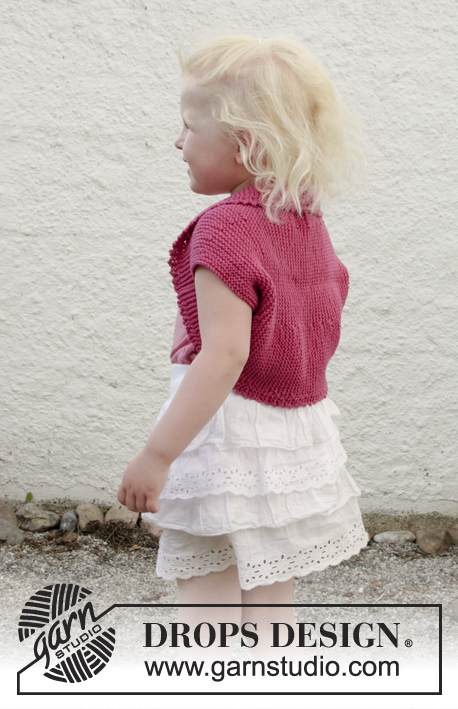 |
Bolero lavorato ai ferri con ferri accorciati, bordi a picot e maglia legaccio in DROPS Cotton Merino. Taglie: Da 3 a 12 anni.
DROPS Children 28-7 |
|
|
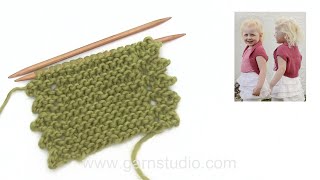
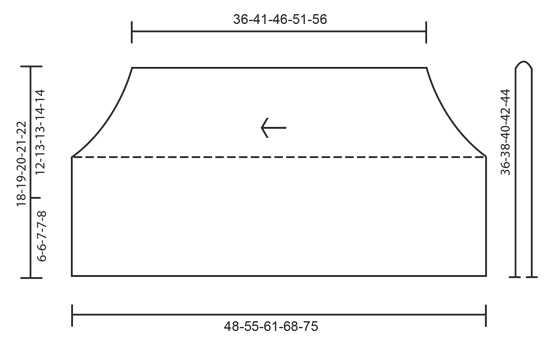
PUNTO LEGACCIO (avanti e indietro): 1 costa a legaccio = 2 ferri a diritto. BORDO A PICOT (avanti e indietro sul ferro): LATO DESTRO FERRO 1 (= diritto del lavoro): Lavorare a diritto. FERRO 2 (= rovescio del lavoro): Lavorare a diritto finché non rimangono 4 maglie, lavorare queste 4 maglie come segue: 2 maglie insieme a diritto, 1 maglia gettata, lavorare 2 volte a diritto ognuna delle ultime 2 maglie = 2 maglie in più. FERRO 3 (= diritto del lavoro): Passare la 1a maglia a diritto senza lavorarla, 1 maglia diritto, accavallare la maglia passata sulla maglia lavorata, 1 maglia diritto e accavallare l’ultima maglia sul ferro di destra sulla prima maglia; sono state diminuite 2 maglie – lavorare le restanti maglie sul ferro a diritto. FERRO 4 (= rovescio del lavoro): lavorare a diritto. Ripetere i ferri da 1 a 4. LATO SINISTRO: FERRO 1 (= diritto del lavoro): Lavorare a diritto finché non rimangono 4 maglie, lavorare queste maglie come segue: Lavorare 2 maglie insieme a diritto, 1 maglia gettata, lavorare 2 volte a diritto ognuna delle ultime 2 maglie = 2 nuove maglie sul ferro. FERRO 2 (= rovescio del lavoro): Passare la prima maglia a diritto senza lavorarla, 1 maglia diritto, accavallare la maglia passata sulla maglia lavorata, 1 maglia diritto e accavallare l’ultima maglia sulla prima maglia del ferro di destra; sono state diminuite 2 maglie – poi lavorare le restanti maglie del ferro a diritto. FERRO 3 (= diritto del lavoro): Lavorare a diritto. FERRO 4 (= rovescio del lavoro): Lavorare a diritto. Ripetere i ferri da 1 a 4. FERRI ACCORCIATI: Lavorare 6 ferri su tutte le maglie, * lavorare 24-25-26-27-28 maglie (fino al primo segno), girare, stringere il filo e lavorare fino alla fine del ferro. Lavorare 1 ferro su tutte le maglie, girare, lavorare 24-25-26-27-28 maglie (fino al primo segno), girare, stringere il filo e lavorare fino alla fine del ferro. Lavorare 5 ferri su tutte le maglie *, ripetere da *-*. Quindi ad ogni ripetizione, si lavorano 6 ferri a punto legaccio (= 3 coste a legaccio) sulle 66-70-72-80-86 maglie centrali e 8 ferri a punto legaccio (4 coste a legaccio) sulle maglie da ciascun lato. -------------------------------------------------------- BOLERO: Si lavora da lato a lato, avanti e indietro sui ferri circolari da uno scalfo all’altro. Piegare poi il bolero in due e cucire i lati. Avviare 76-80-84-88-92 maglie con il filato Cotton Merino e i ferri circolari n° 4. Inserire 1 segno dopo le prime 24-25-26-27-28 maglie e 1 segno prima delle ultime 24-25-26-27-28 maglie (= 28-30-32-34-36 maglie tra i segni). Lavorare come segue – sul diritto del lavoro: lavorare il BORDO A PICOT LATO DESTRO, PUNTO LEGACCIO – vedere le spiegazioni sopra, sulle 68-72-76-80-84 maglie successive, BORDO A PICOT LATO SINISTRO sulle 4 maglie successive. RICORDARSI DI MANTENERE LA CORRETTA TENSIONE DEL LAVORO! Proseguire a punto legaccio e con il bordo picot sulle 4 maglie più esterne da ciascun lato; ALLO STESSO TEMPO, lavorare A FERRI ACCORCIATI – vedere le spiegazioni sopra ! Quando il lavoro misura circa 36-41-46-51-56 cm (misurare nel punto più corto) intrecciare le maglie senza stringere troppo il filo. CONFEZIONE: Piegare il bolero in due – lo schema mostra il lavoro quando è piegato. Cucire insieme i 6-6-7-7-8 cm più in basso, bordo contro bordo da ciascun lato (= 12-13-13-14-14 cm per lo scalfo). |
|
 |
|
Avete terminato questo modello?Allora taggate le vostre foto con #dropspattern #berrykissvest o inviatele alla #dropsfan gallery. Avete bisogno di aiuto con questo modello?Troverete 18 video tutorial, una sezione per i commenti/domande e molto altro guardando il modello su www.garnstudio.com © 1982-2026 DROPS Design A/S. Ci riserviamo tutti i diritti. Questo documento, compreso tutte le sue sotto-sezioni, è protetto dalle leggi sul copyright. Potete leggere quello che potete fare con i nostri modelli alla fine di ogni modello sul nostro sito. |
|


Con oltre 40 anni di esperienza nel design di modelli di maglia e uncinetto, DROPS Design offre la più estesa collezione di modelli gratuiti su internet - tradotti in 17 lingue. Ad oggi vi possiamo fornire 324 cataloghi e 12290 modelli - 9561 dei quali sono tradotti in Italiano.
Ci stiamo impegnando molto per darvi il meglio che vi possiamo offrire in termini di maglia e uncinetto, ispirazioni e consigli così come filati di grande qualità ad un prezzo incredibile! Volete utilizzare i nostri modelli per qualcosa d'altro oltre al vostro uso personale? Potete leggere tutto ciò che è consentito nel testo sul Copyright in basso su tutte le pagine dei nostri modelli. Buon lavoro!
Lasciare un commento sul modello DROPS Children 28-7
Noi saremmo felici di ricevere i tuoi commenti e opinioni su questo modello!
Se vuoi fare una domanda, fai per favore attenzione a selezionare la categoria corretta nella casella qui sotto per velocizzare il processo di risposta. I campi richiesti sono indicati da *.