
Categorie popolari
State cercando un filato?


Commenti / Domande (60)
![]() Maria ha scritto:
Maria ha scritto:
Non mi è chiara una cosa.. per quanto riguarda la faglia s sono 144 punti totali avanti e dietro? Calcolando il lavoro quando si divide tra il davanti e il dietro sono 66 m. Ma viene sttesstissimo, non misura 51 cm il collo ma la metà..
19.09.2018 - 22:24DROPS Design ha risposto:
Buongiorno Maria. Le maglie da avviare per il davanti e il dietro sono 144. Le misure e il numero delle maglie sono corretti se il suo campione corrisponde a quello indicato nelle spiegazioni. Buon lavoro!
20.09.2018 - 10:50
![]() Marie ha scritto:
Marie ha scritto:
Bonjour Est ce que je pourrais commencer les manches par le haut en prenant le nombre final et en relevant ce nombre de mailles directement sur le corps du tricot ? Cela m'éviterait d'assembler le haut des manches , soit l'arrondi qui en réalité est tout droit. En ayant bien sur cousu le haut des épaules du devant et arrière du travail , mais pas encore les cotés. Et terminer les coutures des cotés et le long des manches en dernier . Merci bcp.
03.09.2018 - 13:36DROPS Design ha risposto:
Bonjour Marie, vous pouvez effectivement relever les mailles des manches le long de l'emmanchure et les tricoter de haut en bas si vous préférez. Il vous faudra alors ajuster les explications qui elles sont indiquées de bas en haut. Votre magasin DROPS saura vous conseiller si besoin, même par mail ou téléphone. Bon tricot!
03.09.2018 - 15:22
![]() Ilona ha scritto:
Ilona ha scritto:
Quanta lana di gruppo D devo usare?
31.08.2018 - 22:34Oksana ha scritto:
I agree with previous comments - it describes a nonstandard neck formation and doesnt say about it additionly, giving whole picture for better understanding. May be there is a sense to make a tutorial video - might help. I havent got this moment: ... and knit up 2 stitches in each side (between the stitches for the neck and the stitches on the shoulder)... So are these stickes to be knitted up exactly on two sides of the middle 32-32-34-34-36-36 stitches? Thanks!
16.08.2018 - 16:27DROPS Design ha risposto:
Dear Oksana, you slip the middle 32-36 sts (see size) on a thread and work 2 rows over the first 17-31 sts casting off 1 st towards neck on 2nd row, slip these sts on a thread. Work then 2 rows over the last 17-31 sts casting off 1 st towards neck on 2nd row. Work now 1 row over all sts: 16-30 sts from 1st shoulder, pick up 2 sts in the 2 rows worked over shoulder sts, work the middle sts for neck, pick up 2 sts in the 2 rows worked over 2nd shoulder and work the remaining 16-30 sts. On next row from WS increase evenly and work rib for 7 cm over all sts. Happy knitting!
17.08.2018 - 09:48
![]() Sabine ha scritto:
Sabine ha scritto:
Liebes Drops Team, ich stricke gerade diesen Pullover in Grösse XL. Stimmt es, dass die Ärmel am oberen Ende nur 40 cm breit sind? Oder irre ich mich? Es scheint doch sehr eng zu sein. Vielen Dank und herzliche Grüsse Sabine
10.07.2018 - 22:33DROPS Design ha risposto:
Liebe Sabine, es stimmt ja so, in diesem Modell sind die Ärmel nicht so breit -siehe auch Maßskizze. Viel Spaß beim stricken!
11.07.2018 - 07:54
![]() Jos Ab ha scritto:
Jos Ab ha scritto:
Can this pattern be done with sport weight yarn using only one strand? Also, I don\'t understand the instructions for decreasing the body. Does it not matter when you decrease as long as you decrease 12 total stitches?
27.05.2018 - 00:36Debbie Kulak ha scritto:
Thank you for your explanation. When working the 2 rows on the each shoulder are you decreasing at the neck edge or shoulder? How do you knit both shoulders with the stitches on thread in the middle. After the first shoulder I cant't figure out how to knit the second with the same skein of yarn that I used for the first. Every attempt I've made using the same skein results in joining the stitches in the round. Is the second shoulder knitted with an additional skein of yarn?
08.05.2018 - 12:29DROPS Design ha risposto:
Dear Mrs Kulak, when working the 2 rows on each shoulder you will dec towards neck, not towards armhole. You will have to knit each shoulder separately, ie cut the yarn after 1st shoulder and join the yarn again to work 2nd shoulder. Happy knitting!
08.05.2018 - 12:31Debbie Kulak ha scritto:
Help\\r\\nPlease explain the pattern instructions for the front piece. They make no sense. I went to a local knitting shop and asked an expert to help me. She couldn\\\'t understand the instructions either. \\r\\nThank you\\r\\nDebbie Kulak
07.05.2018 - 23:47DROPS Design ha risposto:
Dear Mrs Kulak, you will first work 2 rows over the sts for each shoulder (leaving the middle sts on a thread for neck). Then work back all sts from first shoulder, pick up 2 sts before sts on a thread for neck, work sts from thread, pick up 2 sts before next shoulder and work last shoulder. Now work next row from WS inc sts evenly and continue with rib P2/K2 inside 2 sts in garter st on each side for 7 cm. Happy knitting!
08.05.2018 - 08:55
![]() Marie ha scritto:
Marie ha scritto:
Bonjour, j’ai reçu en cadeau 6 balles de laine (50g-112m) de baby alpaca indiecita DK du Perou. J’aimerais faire ce chandail avec cette laine. Premièrement est-ce que j’ai assez de laine ? Et est-il possible de faire une équivalence, cette laine se tricotant avec des aiguilles de 4 ou 4.5 mm. Merci à l’avance.
05.03.2018 - 02:18DROPS Design ha risposto:
Bonjour Marie, nos modèles sont faits avec des laines que nous connaissons et dont la vente nous permet de proposer des modèles gratuits. Nous ne sommes donc pas en mesure de pouvoir vous aider, merci pour votre compréhension.
05.03.2018 - 09:39
![]() JACOB Dominique ha scritto:
JACOB Dominique ha scritto:
Bonjour, lorsque j'arrive à l'encolure pour le dos et le devant, quand je laisse les 32 mailles centrales sur un fil et qu'après avoir tricoté les côtés comme indiqué, je reprends toutes les mailles, cela fait des trous de chaque côté de l'encolure, puisque je l'ai laissée en attente pour tricoter les côtés ; que faire et est-ce normal? Merci pour votre réponse. Bonne journée.
20.02.2018 - 11:24DROPS Design ha risposto:
Bonjour Mme Jacob, quand vous reprenez les mailles des épaules et de l'encollure, vous relevez en même temps 2 m de chaque côté de l'encolure (entre les mailles en attente), si nécessaire, relevez des mailles supplémentaires pour éviter les trous, mais pensez à bien ajuster sur le nombre de mailles indiqué dès le 1er rang. Bon tricot!
20.02.2018 - 14:50
|
|
Bente#bentesweater |
|
 |
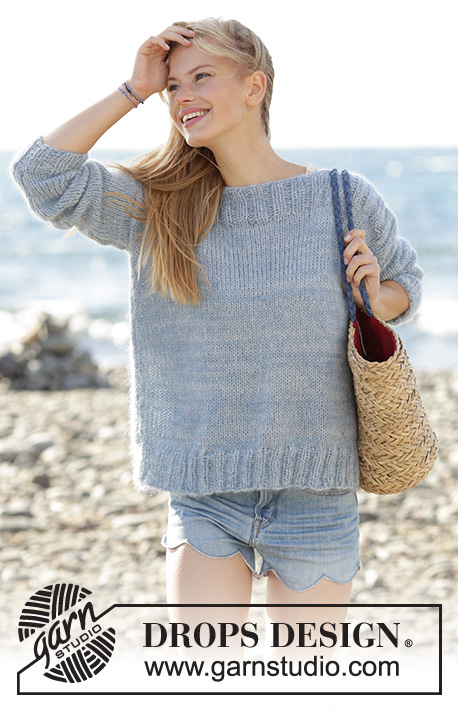 |
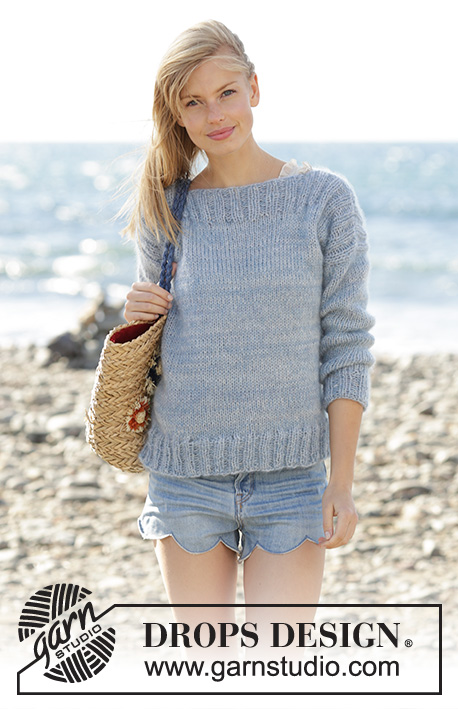
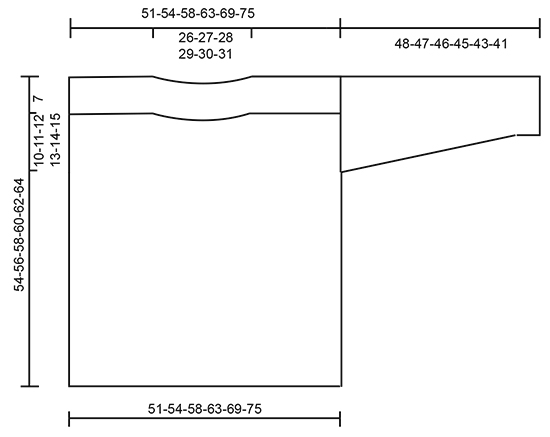
Maglione ai ferri a maglia rasata e a coste lavorato con 1 capo del filato DROPS Alpaca e 2 capi del filato DROPS Kid-Silk. Taglie: Dalla S alla XXXL.
DROPS 177-2 |
|
|
SUGGERIMENTO PER GLI AUMENTI: Aumentare come segue, al centro sotto la manica – iniziare 1 maglia prima del segno: fare 1 maglia gettata, lavorare 2 maglie a diritto (il segno si trova tra queste due maglie), 1 maglia gettata. Al giro successivo lavorare le maglie gettate a diritto ritorto per evitare che si formino dei buchi. ---------------------------------------------------------- MAGLIONE: Si lavora in tondo sui ferri circolari fino agli scalfi; lavorare poi il davanti e il dietro separatamente avanti e indietro. DAVANTI e DIETRO: Avviare 144-152-164-176-192-208 maglie sui ferri circolari n° 6 con 1 capo del filato Alpaca, 1 capo del filato Kid-Silk colore panna + 1 capo del filato Kid-Silk colore azzurro acciaio chiaro (= 3 capi). Lavorare 1 giro a diritto. Proseguire a coste (2 maglie diritto/ 2 maglie rovescio). Lavorare a coste per 7 cm. Passare ai ferri circolari n° 7 e lavorare 1 giro a maglia rasata e allo stesso tempo diminuire 12-12-12-12-12-12 maglie a intervalli regolari = 132-140-152-164-180-196 maglie. Proseguire a maglia rasata. Quando il lavoro misura 37-38-39-40-41-42 cm, lavorare solo sulle prime 66-70-76-82-90-98 maglie, mettere in attesa su un ferma maglie le ultime 66-70-76-82-90-98 maglie. DAVANTI: = 66-70-76-82-90-98 maglie. Proseguire a maglia rasata. Quando il lavoro misura 46-48-50-52-54-56 cm, mettere in attesa su un ferma maglie le 32-32-34-34-36-36 maglie centrali per lo scollo. Lavorare 1 ferro a diritto sul diritto del lavoro sulle prime 17-19-21-24-27-31 maglie (fino al segno), girare, lavorare insieme a rovescio le prime 2 maglie e lavorare le restanti maglie a rovescio. Mettere le maglie in attesa su un ferma maglie. Lavorare 1 ferro a diritto sul diritto del lavoro sulle ultime 17-19-21-24-27-31 maglie, girare e lavorare 1 ferro a rovescio sul rovescio del lavoro, alla fine del ferro lavorare le ultime 2 maglie insieme a rovescio. Riportare sui ferri di lavoro tutte le maglie e lavorare 1 ferro a diritto sul diritto del lavoro e, allo stesso tempo, riprendere 2 maglie da ciascun lato dello scollo (tra le maglie dello scollo e le maglie della spalla) = 68-72-78-84-92-100 maglie. Lavorare 1 ferro a rovescio sul rovescio del lavoro e aumentare 6-6-4-6-6-6 maglie a intervalli regolari sul ferro = 74-78-82-90-98-106 maglie. Passare ai ferri circolari n° 6 e lavorare come segue – sul diritto del lavoro: 2 maglie a diritto * 2 maglie a rovescio, 2 maglie a diritto *, ripetere da *-* su tutto il ferro. Lavorare a coste per 7 cm; il lavoro misura ca.54-56-58-60-62-64 cm, poi intrecciare lavorando a diritto le maglie a diritto e a rovescio le maglie a rovescio. DIETRO: Lavorare come indicato per il davanti. MANICHE: Si lavorano in tondo sui ferri a doppia punta. Passare ai ferri circolari corti quando ci sono sufficienti maglie. Avviare 32-32-36-36-40-40 maglie sui ferri a doppia punta n° 6 con 1 capo del filato Alpaca, 1 capo del filato Kid-Silk colore del f white e 1 capo del filato Kid-Silk light steel blue (= 3 capi). Lavorare 1 giro a maglia rasata, proseguire a coste (2 maglie a diritto/ 2 maglie a rovescio). Lavorare a coste per 5 cm. Passare ai ferri a doppia punta n° 7; lavorare 1 giro a maglia rasata e al tempo stesso diminuire 4-4-6-6-8-6 maglie a intervalli regolari sul giro = 28-28-30-30-32-34 m. Inserire 1 segno all’inizio del giro = centro, sotto la manica. Lavorare a maglia rasata. Quando il lavoro misura 7 cm, aumentare 1 maglia da ciascun lato del segno – VEDERE IL SUGGERIMENTO PER GLI AUMENTI. Aumentare ogni 5½-4½-4½-4-4-4 cm in tutto 8-9-9-10-10-10 volte = 44-46-48-50-52-54 maglie. Intrecciare le maglie quando il lavoro misura 48-47-46-45-43-41 cm. ATTENZIONE! Misure più corte nelle taglie più grandi perché le spalle sono più larghe. CONFEZIONE: Cucire le spalle, lasciare ca.26-27-28-29-30-31 cm per lo scollo. Montare le maniche. |
|
 |
|
Avete terminato questo modello?Allora taggate le vostre foto con #dropspattern #bentesweater o inviatele alla #dropsfan gallery. Avete bisogno di aiuto con questo modello?Troverete 24 video tutorial, una sezione per i commenti/domande e molto altro guardando il modello su www.garnstudio.com © 1982-2026 DROPS Design A/S. Ci riserviamo tutti i diritti. Questo documento, compreso tutte le sue sotto-sezioni, è protetto dalle leggi sul copyright. Potete leggere quello che potete fare con i nostri modelli alla fine di ogni modello sul nostro sito. |
|


Con oltre 40 anni di esperienza nel design di modelli di maglia e uncinetto, DROPS Design offre la più estesa collezione di modelli gratuiti su internet - tradotti in 17 lingue. Ad oggi vi possiamo fornire 324 cataloghi e 12290 modelli - 9561 dei quali sono tradotti in Italiano.
Ci stiamo impegnando molto per darvi il meglio che vi possiamo offrire in termini di maglia e uncinetto, ispirazioni e consigli così come filati di grande qualità ad un prezzo incredibile! Volete utilizzare i nostri modelli per qualcosa d'altro oltre al vostro uso personale? Potete leggere tutto ciò che è consentito nel testo sul Copyright in basso su tutte le pagine dei nostri modelli. Buon lavoro!
Lasciare un commento sul modello DROPS 177-2
Noi saremmo felici di ricevere i tuoi commenti e opinioni su questo modello!
Se vuoi fare una domanda, fai per favore attenzione a selezionare la categoria corretta nella casella qui sotto per velocizzare il processo di risposta. I campi richiesti sono indicati da *.