
Categorie popolari
State cercando un filato?


Commenti / Domande (13)
![]() ScGabriele ha scritto:
ScGabriele ha scritto:
Ich zähle am Ende des Diagramm A1 mit Umschlag nur 15 Maschen nicht 16?
05.06.2022 - 00:18DROPS Design ha risposto:
Liebe ScGabriele, A.1 beginnt über 4 Maschen und es werden 2 Maschen am Ende jeder der nächsten 6 Reihen angeschlagen , so haben Sie 4 M + 2 x 6 = 16 Maschen auf der Nadel. Viel Spaß beim stricken!
07.06.2022 - 08:22
![]() Mariana ha scritto:
Mariana ha scritto:
No me resultan muy claras las instrucciones, sobre todo la sección referida a las rayas o stripes. Me encantaría si hicieran un video explicando este patrón y como se debe leer el diagrama, como agregar puntos al final de la fila , no me queda claro como se agregan, veo que en youtube tienen videos sobre ciertos patrones. Gracias!
05.02.2022 - 07:49DROPS Design ha risposto:
Hola Mariana, no hacemos videos personalizados, pero cada vez vamos añadiendo más vídeos a nuestra colección, puedes seguir nuestras redes sociales para ver los nuevos videos que se publiquen. En todos casos, tienes bajo el patrón una lista de vídeos y lecciones que pueden ayudarte a realizar la labor.
05.02.2022 - 18:32
![]() Hannelis Olsen ha scritto:
Hannelis Olsen ha scritto:
Jeg har strikket A1 en gang nu går jeg videre til A2 strikker 2 masker nu er det A 3 strikker jeg en maske slår om strikker en maske slår om og videre i alt 4 gange det kan jeg ikke få til t passe der er jo 16 masker på pinden så det bliver megen end 4 gange Det er sådan jeg læser det håber du vil hjælpe mig Mvh Hannelis
19.03.2020 - 15:48DROPS Design ha risposto:
Hei Hannelis. Du har 16 masker når A.1 er ferdig strikket. Nå strikker du A.2 (over 2 masker), så A.3 4 ganger (over 12 masker) og til slutt A.4 (over 2 masker). 2+12+2 = 16 masker. Når 1. rad er strikket, har du 16 masker og 8 kast på pinnen. God Fornøyelse!
23.03.2020 - 09:48
![]() Barbara ha scritto:
Barbara ha scritto:
I have completed the diagrams A2-A4 and am still struggling to understand this pattern, ending up with over 80 stitches instead of 58. What have I done wrong. Could you please tell me how many stitches should be on the needle at the end of each patterned row (A3, rows 1, 3, 7, 11, 15). Thanks.
04.03.2019 - 19:15DROPS Design ha risposto:
Dear Barbara, when diagrams are worked one time in height you should have 76 sts (pattern has been edited): 20 sts in A.2, 9 sts in each of the 4 A.3 and 20 sts in A.4. Happy knitting!
07.03.2019 - 09:29
![]() Barbara ha scritto:
Barbara ha scritto:
Diagramm 3: is there an increase in this row? Please give further explanation of: between 2 stitches make 1 yarn—over = knit 2 stitches together. Is that , two stitches together after the yarn—over?
27.02.2019 - 08:57DROPS Design ha risposto:
Dear Barbara, you are increasing in diagram A.3 on row 1 (= K1, YO, K1, YO, K1), as well as on the rows where you will work 1 YO on each side of the middle st in A.3, on the row with dec and YO there will be no decreases, but you will have one more hole. Happy knitting!
27.02.2019 - 09:11
![]() ALLINSON SHERRATT ha scritto:
ALLINSON SHERRATT ha scritto:
Hi, I've just finished knitting this & wonder if you added a crochet edge to the top. From the photograph it seems similar to the cast off edge. Did you block it before photographing it as the sides of mine look frilly ? I've started another one which I think I will knit in just one colour!!!
12.05.2018 - 13:15DROPS Design ha risposto:
Dear Mrs Sherrattt, there is no crochet edge along the top but you can work one if you like to. You can block your work to the finsihed measurements to get it flat. Happy knitting!
14.05.2018 - 09:40
![]() Birgit Stauenberg ha scritto:
Birgit Stauenberg ha scritto:
Jeg kan ikke få maskeantallet til at passe. Hvis jeg strikker A2, A3, A4 og stopper lige under linjen med X, så er der 52 masker og ikke 58? Mvh. Birgit
05.03.2018 - 16:36DROPS Design ha risposto:
Hej Birgit, tror du at du mangler en pind med 6 udtagninger, det er svært at gætte sig til hvor den mangler. Du ser alle udtagninger i diagrammerne. Held og lykke!
13.03.2018 - 15:59
![]() Nicki ha scritto:
Nicki ha scritto:
Dear Drops-Team, Sorry I still don't understand. Do I cast on two stiches at the start and at the end of each row? Or only at the end? Many thanks
07.08.2017 - 18:56DROPS Design ha risposto:
Dear Nicki, you will increase either at the beginning or at the end of the row, follow arrows in diagram showing knitting direction and increase when there is the 2nd symbol in diagram saying "knit 1 stitch and cast on 2 new stitches after this stitch". Happy knitting!
08.08.2017 - 08:53
![]() Nicki ha scritto:
Nicki ha scritto:
I'm starting A.x. Diagram and I'm wondering what's meant with 'cast on 2 new stitches at the end of every row in each side', specifically in each side? As the increases are shown just on one side of a row (the end of a row), where is the other side supposed to be? Many thanks
07.08.2017 - 09:09DROPS Design ha risposto:
Dear Nicki, the two stitches should be cast on at the end of each row, in other words, each side of the shawl, thus it will be simmetric at the end. Happy Knitting!
07.08.2017 - 16:58
![]() Miriam Duguid ha scritto:
Miriam Duguid ha scritto:
I would like to knit Sweet Mauve by Drops Pattern but don't see the amounts of Brushed Alpaca Silk I would need in the pattern. Can you help me?
29.01.2017 - 00:06DROPS Design ha risposto:
Dear Mrs Duguid, you will find required amount of yarn under tab "Materials" (with needle size and tension), ie: 50 g in each colour - Brushed Alpaca Silk = 25 g balls, read more here. Happy knitting!
30.01.2017 - 11:36
|
|||||||||||||||||||
Sweet Mauve#sweetmauveshawl |
|||||||||||||||||||
|
|
|||||||||||||||||||
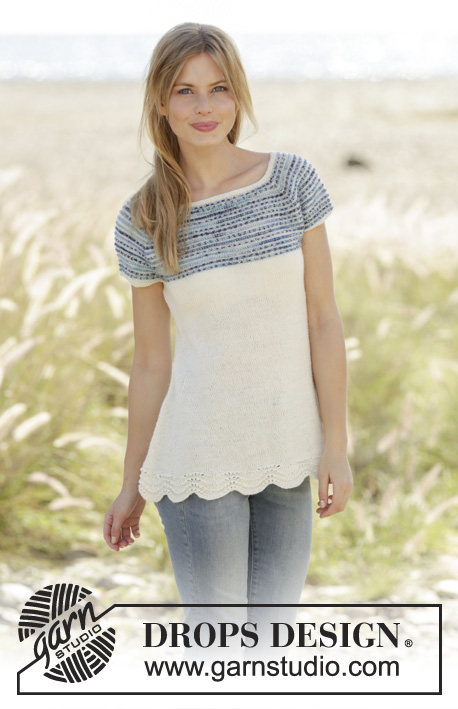
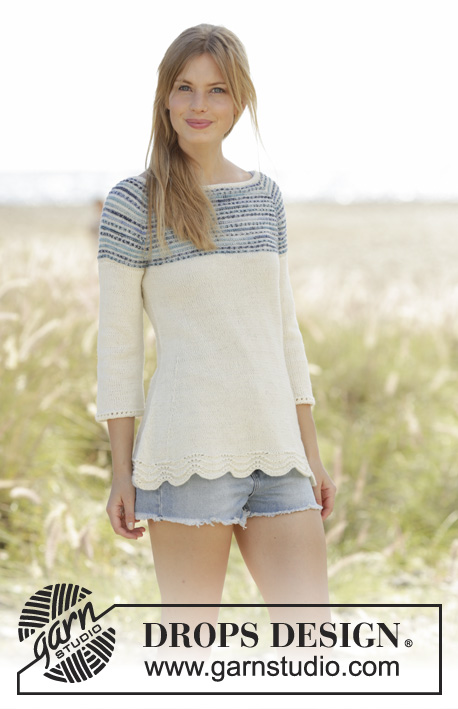
Scialle lavorato ai ferri con motivo traforato e strisce in DROPS Brushed Alpaca Silk, lavorato dall’alto in basso (top down).
DROPS 177-20 |
|||||||||||||||||||
|
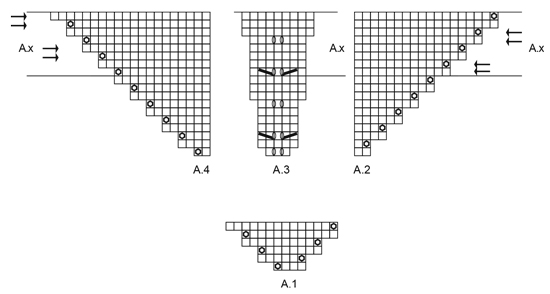
MOTIVO: Vedere i diagrammi A.1-A.4. I diagrammi mostrano tutti i ferri del motivo visti dal diritto del lavoro. STRISCE: Quando il lavoro misura circa 35 cm, lavorare le strisce con 1 riga per colore. Quindi lavorare 1 riga con lavanda chiaro e 1 riga con il panna ogni due righe dallo stesso lato del lavoro. A causa di ciò dovrete aumentare in modo diverso rispetto a prima nel motivo A.x ai lati. Seguire gli aumenti nel motivo A.x su A.3, ma seguire la spiegazione su come aumentare ai lati. Le frecce nel diagramma mostra la direzione del lavoro. FERRO 1 = diritto del lavoro: passare al panna e lavorare 1 ferro diritto dal diritto del lavoro e avviare 2 nuove maglie alla fine del ferro (questo è il 1° ferro di A.x). Non girare il lavoro. FERRO 2 = diritto del lavoro: Usare il capo lavanda chiaro per avviare 2 nuove maglie all’inizio del ferro dal diritto del lavoro (fare gli occhielli a ritorto sul ferro), poi lavorare 1 ferro diritto dal diritto del lavoro (questo è il 2° ferro di A.x). Girare il lavoro. FERRO 3 = rovescio del lavoro: Usare il capo in panna per avviare 2 nuove maglie all’inizio del ferro dal diritto del lavoro (fare gli occhielli a ritorto sul ferro), poi lavorare 1 ferro rovescio dal rovescio del lavoro (questo è il 3° ferro di A.x). Non girare il lavoro. FERRO 4 = rovescio del lavoro: passare al lavanda chiaro e lavorare 1 ferro rovescio dal rovescio del lavoro e avviare 2 nuove maglie alla fine del ferro (questo è il 4° ferro di A.x). Girare il lavoro. Ripetere questi 4 ferri fino a quando sono stati lavorati 10 cm a strisce. ---------------------------------------------------------- SCIALLE: Avviare 4 maglie con i ferri circolari n° 6 mm con lavanda chiaro. Lavorare seguendo il diagramma A.1, quindi lavorare a maglia rasata e avviare nuove maglie alla fine di ogni ferro. Quando il diagramma è stato lavorato 1 volta in verticale, ci sono 76 maglie sul ferro. Poi lavorare seguendo i diagrammi A.2, A.3 e A.4 come segue: A.2 su 2 maglie, ripetere A.3 fino a quando rimangono 2 maglie sul ferro (= 4 volte) e lavorare A.4 su 2 maglie. NOTA: Aumentare le maglie in tutti i diagrammi. Quando il diagramma è stato lavorato 1 volta in verticale, ci sono 58 maglie sul ferro. Inserire 4 segnapunti, 1 segnapunti al centro di ogni ripetizione di A.3. Spostare i segnapunti verso l’alto, i segnapunti rendono più semplice vedere dove vanno fatti gli aumenti (fare il motivo traforato). Poi ripetere gli aumenti ai lati come mostrato in A.x, quindi avviare 2 nuove maglie alla fine di ogni ferro a ogni lato. Continuare gli aumenti (motivo traforato) al centro di ogni ripetizione di A.3 come mostrato in A.x e il n° di maglie a ogni lato di A.3 aumenta, per cui spostare i segnapunti verso l’alto. Continuare ad aumentare e lavorare in questo modo fino a quando il lavoro misura circa 35 cm (misurare l’altezza al centro del lavoro) e aggiustarlo in modo che il ferro successivo sia il 1° ferro in A.x. Ora lavorare le STRISCE – leggere la spiegazione sopra. Continuare con le strisce e gli aumenti ai lati come spiegato sopra e con gli aumenti (motivo traforato) come mostrato in A.x su A.3 fino a quando il lavoro misura circa 45 cm (misurare l’altezza al centro del lavoro) e aggiustarlo in modo che il ferro successivo sia il 1° o 4° ferro in A.x. Ora continuare con il panna, ma aumentare ai lati come indicato ancora in A.x e continuare gli aumenti (facendo il motivo traforato) su A.3 come mostrato in A.x fino a quando il lavoro misura circa 55 cm, aggiustarlo in modo che il ferro successivo sia dal rovescio del lavoro. Lavorare 1 ferro diritto dal rovescio del lavoro. Usare il filo doppio e intrecciare senza stringere sul ferro successivo lavorando a diritto dal diritto del lavoro. Tagliare e affrancare il filo. |
|||||||||||||||||||
Spiegazioni del diagramma |
|||||||||||||||||||
|
|||||||||||||||||||
 |
|||||||||||||||||||
Avete terminato questo modello?Allora taggate le vostre foto con #dropspattern #sweetmauveshawl o inviatele alla #dropsfan gallery. Avete bisogno di aiuto con questo modello?Troverete 16 video tutorial, una sezione per i commenti/domande e molto altro guardando il modello su www.garnstudio.com © 1982-2026 DROPS Design A/S. Ci riserviamo tutti i diritti. Questo documento, compreso tutte le sue sotto-sezioni, è protetto dalle leggi sul copyright. Potete leggere quello che potete fare con i nostri modelli alla fine di ogni modello sul nostro sito. |
|||||||||||||||||||


Con oltre 40 anni di esperienza nel design di modelli di maglia e uncinetto, DROPS Design offre la più estesa collezione di modelli gratuiti su internet - tradotti in 17 lingue. Ad oggi vi possiamo fornire 324 cataloghi e 12290 modelli - 9561 dei quali sono tradotti in Italiano.
Ci stiamo impegnando molto per darvi il meglio che vi possiamo offrire in termini di maglia e uncinetto, ispirazioni e consigli così come filati di grande qualità ad un prezzo incredibile! Volete utilizzare i nostri modelli per qualcosa d'altro oltre al vostro uso personale? Potete leggere tutto ciò che è consentito nel testo sul Copyright in basso su tutte le pagine dei nostri modelli. Buon lavoro!
Lasciare un commento sul modello DROPS 177-20
Noi saremmo felici di ricevere i tuoi commenti e opinioni su questo modello!
Se vuoi fare una domanda, fai per favore attenzione a selezionare la categoria corretta nella casella qui sotto per velocizzare il processo di risposta. I campi richiesti sono indicati da *.