
Categorie popolari
State cercando un filato?


Commenti / Domande (19)
![]() Gabriele ha scritto:
Gabriele ha scritto:
Hallo, bitte schreibt mir doch wie und wo die Knopflöcher angebracht werden. Vielen Dank!
11.05.2019 - 19:14DROPS Design ha risposto:
Liebe Gabriele, es wird keine Knopflöcher eingearbeitet, die Knöpfe werden durch die Löcher der rechten Blende (A.1) geschlossen. Viel Spaß beim stricken!
13.05.2019 - 09:07Bellinda Notari ha scritto:
De 6x42 st mind IN LARGE, zijn VERSCHRIKKELIJK MOEILIJK ; het is niet hoe Drops het gemakkelijk uitlegt. MOET 3 uur uitrekenen om het zelfs dan nog niet correct te hebben;GRAAG NOG HULP AUB 0m body,mouw & aan voorboorden:evenredig correct te meerderen,AUB!!
21.12.2018 - 16:59DROPS Design ha risposto:
Dag Bellinda,
Op de naalden waar een pijl staat in het patroon, minder je 42 steken. Dit minderen doe je gelijkmatig over alle steken (de biessteken niet meegerekend. Dus tel het aantal steken (exclusief de biessteken) en deel deze door 42. Als je dan bijvoorbeeld op 9 uitkomt (ik zeg maar wat), minder je door steeds de 8e en 9e steek samen te breien. Als je niet op een heel getal uitkomt, bijvoorbeeld op 8,7 ofzo, dan minder je af en toe de 7e en 8e steek. Het gaat erom dat die 42 steken goed verdeeld worden over de hele toer.
01.01.2019 - 20:47
![]() Bellinda Notari ha scritto:
Bellinda Notari ha scritto:
Measurement you sent with another PULLOVER do not match AT ALL with my cardigan ; are the meas. 40-42,43 cm ment for length of arms or the width of armholes?
07.12.2018 - 12:22DROPS Design ha risposto:
Dear Mrs Notari, that's right, the lesson is only explaining how to read a diagram and the measurements. The measurements calculated in the answer yesterday were from the number of stitches (= width) as explained in the pattern at the beginning and at the end of sleeve. Please contact the store where you bought your yarn for any further individual assistance with measurements, it will be much easier for them (and for you) to help you. Happy knitting!
07.12.2018 - 14:28
![]() Bellinda Notari ha scritto:
Bellinda Notari ha scritto:
A foto or small draft along side with the measurements you explained in details ; would help me enormously & i think which is adequate in this situation ; because i dont understand very good where the measurements all stand for in the sleeve ; i would be very greatefully thankful for your huge & great effort. Hugs Bellinda
06.12.2018 - 20:38DROPS Design ha risposto:
Dear Mrs Notari, you will find here how to read a measurement chart - I calculated the measurements on sleeve (last asnwer) from the number of stitches in both sizes you asked for with the tension of this pattern. Should you need any further individual assistance, please you are welcome to contact your DROPS store - even per mail or telephone. Happy knitting!
07.12.2018 - 08:13
![]() Bellinda Notari ha scritto:
Bellinda Notari ha scritto:
DESPERATE NEED ALL MEASUREMENTS OF SLEEVES FOR SIZES L & XL PLEASE ; DUE TO QUITE LARGE LIMBS! SORRY
05.12.2018 - 18:29DROPS Design ha risposto:
Dear Mrs Notari, if your tension is right (= 24 m x 32 rows stocking st = 10 x 10 cm), sleeve starts with 56-58 sts = 23-24 cm - after all increase you have 96-100 sts = 40 -42 cm and after sts have been cast off for armhole after 43-42 cm, 84-88 sts remain = 35-37 cm. Happy knitting!
06.12.2018 - 09:25
![]() Bellinda Notari ha scritto:
Bellinda Notari ha scritto:
But wish to know ALL MEASURES of the sleeves : the wrists & ALL MEASURES of the armholes, length SLEEVE TILL FAIR ISLE, width of the arm outcuts (ALL MEASUREMENTS), the hight of the arm outcuts the shape the armholes, the width of the arms on the upperarms & also the lower arms, the length of the shoulders & ALL MEASURES from the neck, just as it was mentioned in the past & which are missing in your designe pattern, because I struggle with these measurements to choose Large or XL for sleeves?
04.12.2018 - 17:05DROPS Design ha risposto:
Dear Mrs Notari, you will find all relevant & importantn measurements in the chart for both sizes. Compare a similar garment you have and like the shape to find out the matching size. Read more about how to choose a size here. Happy knitting!
05.12.2018 - 07:59
![]() Irene ha scritto:
Irene ha scritto:
Mangler det informasjon om knapphull, eller er det bare jeg som ikke finner det...........?
17.02.2018 - 18:59DROPS Design ha risposto:
Hei Irene, Knappene kneppes gjennom hullene i høyre stolpen. God fornøyelse!
18.02.2018 - 07:06
![]() Sabine Lormann ha scritto:
Sabine Lormann ha scritto:
Het patroon van dit vestje heb ik ook gezien als trui met lange mouwen. Echter, ik kan het niet bij de patronen vinden! Bestaat het patroon nog? Ik zou dit heel graag willen breien! Ik hoor het graag!
20.09.2017 - 10:23DROPS Design ha risposto:
Hallo Sabine, De trui-versie van dit patroon is nog niet beschikbaar in het Nederlands, maar wordt binnenkort (in oktober) wel vertaald. Vooralsnog is hij beschikbaar in het Engels. Mocht je daarmee voorlopig uit de voeten kunnen, dan vindt je 24.09.2017 - 10:45
Stevenson ha scritto:
Hi, because the Yoke starts on the WS - does that mean the first line of the chart begins showing a WS row? Thanks Carole
01.08.2017 - 15:38DROPS Design ha risposto:
Hi Carole, All the rows in the pattern are shown from the right side. The first row of the yoke is where you work the body and sleeves together on the circular needle, from the wrong side, while at the same time decreasing evenly on the row. Then you work pattern from the right side. Happy knitting.
01.08.2017 - 15:51
![]() Federica Del Carratore ha scritto:
Federica Del Carratore ha scritto:
Nella spiegazione del corpo c'è scritto: "Quando il lavoro misura 8 cm diminuire 1 maglia a ogni lato dei segnapunti" Si intende 8 cm dall'inizio del lavoro, vero? Grazie fin d'ora!
25.07.2017 - 19:35DROPS Design ha risposto:
Buongiorno Federica. Sì, sono 8 cm dall'inizio del lavoro. Buon lavoro!
25.07.2017 - 19:47
|
|||||||||||||||||||||||||
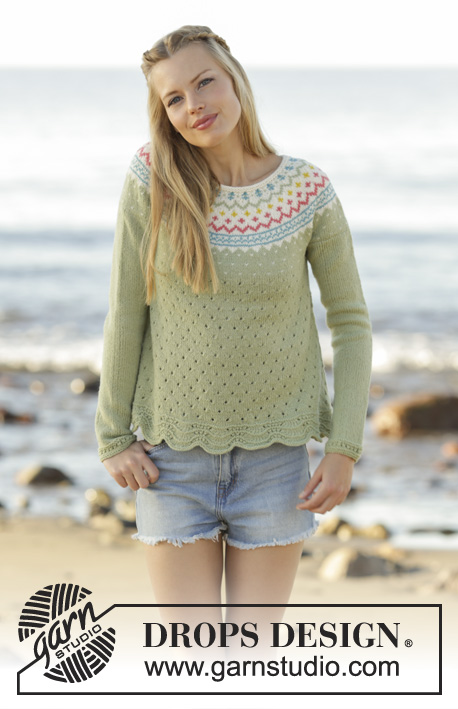
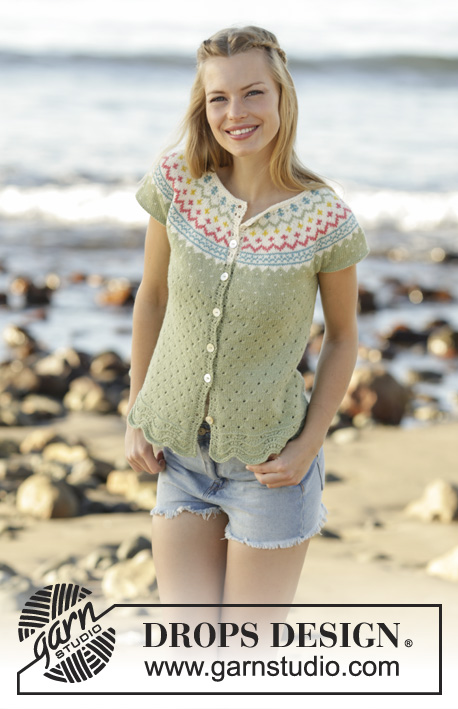
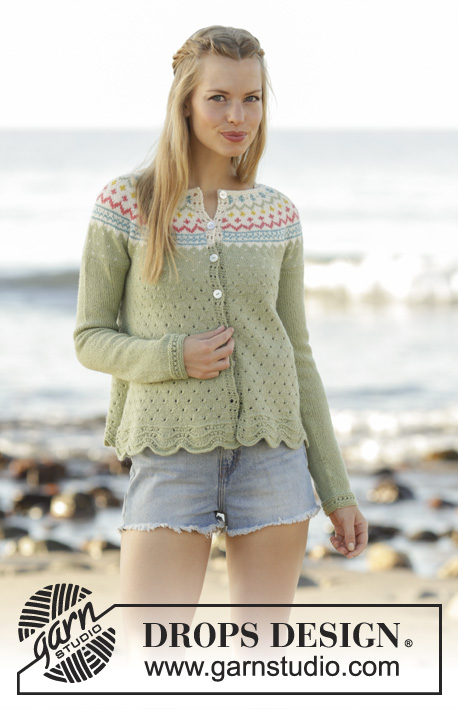
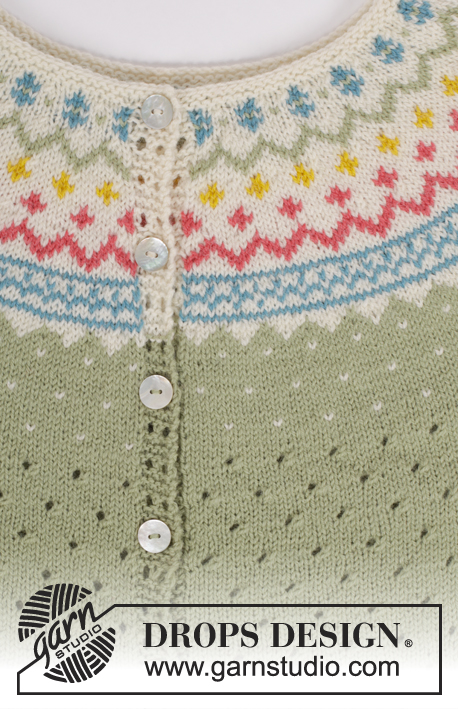
Spring Valley Cardigan#springvalleycardigan |
|||||||||||||||||||||||||
 |
 |
||||||||||||||||||||||||
Cardigan lavorato ai ferri con motivo ad onde, sprone rotondo e motivo multicolore in DROPS Flora. Taglie: S - XXXL.
DROPS 175-8 |
|||||||||||||||||||||||||
|
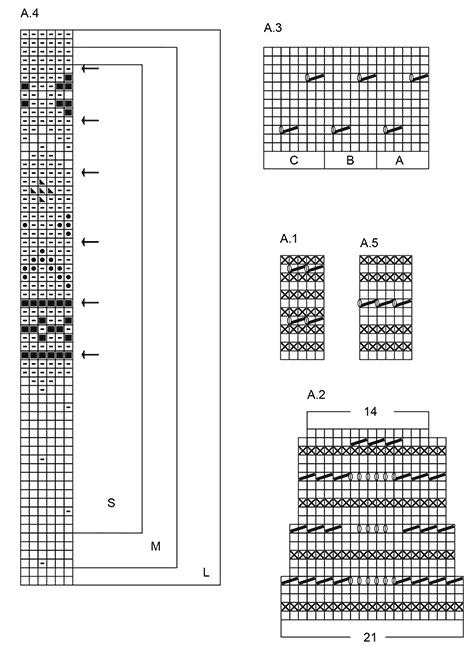
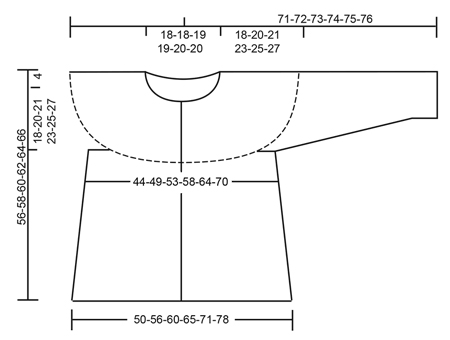
MOTIVO: Vedere i diagrammi A.1-A.5. I diagrammi mostrano tutti i ferri del motivo visti dal diritto del lavoro. Tutto A.4 è lavorato a maglia rasata – vedere il diagramma per la vostra taglia. SUGGERIMENTO PER LE DIMINUZIONI-1: Iniziare 3 maglie prima del segnapunti a lato. Lavorare 2 maglie insieme a diritto, 2 maglie diritto (il segnapunti è tra queste 2 maglie), passare 1 m a diritto senza lavorarla, 1 maglia diritto, accavallare la maglia passata sopra quella appena lavorata. Quando si diminuisce ai lati, lavorare le maglie che non rientrano in A.3 a maglia rasata. SUGGERIMENTO PER LE DIMINUZIONI-2: Per stabilire dove diminuire sul ferro, contare il n° totale di maglie sul ferro (ad es. 377 maglie), meno i bordi (ad es. 10 maglie) e dividere le maglie rimaste per il numero di maglie da diminuire (ad es. 42) = 8,7. In altre parole, in questo esempio, vengono lavorate insieme ogni 7° e 8° maglia. Non diminuire sui bordi. Diminuire lavorando 2 maglie insieme a diritto dal diritto del lavoro e 2 maglie insieme a rovescio dal rovescio del lavoro. SUGGERIMENTO PER GLI AUMENTI: Aumenti al centro sotto il braccio: aumentare 1 m facendo 1 gettato. Lavorare fino a quando c’è 1 maglia rimasta prima del segnapunti. Fare 1 gettato, lavorare 2 maglie diritto (il segnapunti è tra queste 2 maglie) e fare 1 gettato. Sul giro successivo lavorare i gettati a ritorto per evitare buchi (gli aumenti vengono lavorati a maglia rasata). “COSTE” A MAGLIA LEGACCIO/MAGLIA LEGACCIO (lavorate avanti e indietro): 1 «costa» = lavorare 2 ferri diritto. ALZATA: Iniziare dal diritto del lavoro e lavorare a diritto le prime 53-55-57-59-61-63 maglie, inserire un segnapunti (= centro dietro), lavorare le 7-7-7-8-8-8 maglie successive a diritto, girare, tirare il filo e lavorare 14-14-14-16-16-16 maglie a diritto, girare, tirare il filo e lavorare 21-21-21-24-24-24 maglie a diritto, girare, tirare il filo e lavorare 28-28-28-32-32-32 maglie. Continuare avanti e indietro in questo modo lavorando 7-7-7-8-8-8 maglie in più ogni volta fino a quando sono state lavorate le 63-63-63-72-72-72 maglie centrali, lavorare il resto del ferro a diritto. ---------------------------------------------------------- CARDIGAN: Il cardigan è lavorato avanti e indietro con i f circolari dal centro davanti dal basso verso l’alto. CORPO: Avviare 367-409-451-472-514-556 maglie (comprese 5 m per il corpo a ogni lato verso il centro davanti) con i ferri circolari n° 3 mm e il pistacchio. Lavorare come segue – dal diritto del lavoro: A.1 sulle prime 5 maglie, A.2 sulle 357-399-441-462-504-546 maglie successive (= 17-19-21-22-24-26 ripetizioni in larghezza), finire con A.1 sulle ultime 5 maglie. FARE ATTENZIONE ALLA TENSIONE DEL LAVORO! Quando è stato lavorato il penultimo ferro di A.2, ci sono 248-276-304-318-346-374 maglie sul ferro, sull’ultimo ferro di A.2 aggiustare il n° di maglie in modo unoforme sul ferro a 251-281-299-323-353-383 maglie. Continuare a lavorare come segue – dal diritto del lavoro: A.1 sulle prime 5 maglie come prima, A.3 A (= 6 maglie), A.3 B sulle 228-258-276-300-330-360 maglie successive, A.3 C sulle 7 maglie successive e A.1 sulle ultime 5 maglie come prima. Inserire 2 segnapunti nel lavoro, all’interno di 65-73-77-83-91-98 maglie da ogni lato (dietro = 121-135-145-157-171-187 maglie). Quando il lavoro misura 8 cm diminuire 1 maglia a ogni lato dei segnapunti (= 4 maglie diminuite) – LEGGERE IL SUGGERIMENTO PER LE DIMINUZIONI-1. Diminuire ogni 3 cm in totale 8-9-9-9-9-9 volte = 219-245-263-287-317-347 maglie. Quando il lavoro misura 34-34-35-35-35-35 cm intrecciare 10-10-12-12-14-16 maglie a ogni lato dal diritto del lavoro (= 5-5-6-6-7-8 maglie a ogni lato di ogni segnapunti) = 199-225-239-263-289-315 maglie. Lasciare il lavoro da parte e lavorare le maniche. MANICHE: La manica è lavorata in tondo con i ferri a doppia punta, dal basso verso l’alto, passare ai ferri circolari corti quando ci sono abbastanza maglie. Avviare 50-52-56-58-60-64 maglie con i ferri a doppia punta n° 3 mm e il pistacchio. Lavorare A.5 su tutte le maglie. Quando A.5 è stato lavorato una volta in altezza continuare a maglia rasata su tutte le maglie. Inserire 1 segnapunti all’inizio del giro = centro sotto il braccio. Quando il lavoro misura 6-6-6-6-8-8 cm aumentare 1 maglia a ogni lato del segnapunti al centro sotto il braccio – LEGGERE IL SUGGERIMENTO PER GLI AUMENTI. Aumentare ogni 3-2-1½-1½-1-1 cm in totale 13-17-20-21-23-23 volte = 76-86-96-100-106-110 maglie. Quando il lavoro misura 44-43-43-42-40-39 cm intrecciare 10-10-12-12-14-16 maglie al centro sotto il braccio (= 5-5-6-6-7-8 maglie a ogni lato del segnapunti) = 66-76-84-88-92-94 maglie. Lavorare un’altra manica nello stesso modo. SPRONE: (1° ferro = rovescio del lavoro). Lavorare le maniche sullo stesso ferro circolare n° 3 mm del corpo dove sono state intrecciate le maglie per lo scalfo, allo stesso tempo distribuire 2-0-0-4-6-4 diminuzioni in modo uniforme sul ferro = 329-377-407-435-467-499 maglie. Continuare a lavorare come segue – dal diritto del lavoro: A.1 sulle prime 5 maglie, A.4 sulle 318-366-396-424-456-488 maglie successive (= 53-61-66-53-57-61 ripetizioni di A.4), finire con la 1° maglia di A.4 e A.1 sulle ultime 5 maglie. Continuare il motivo verso l’alto, ALLO STESSO TEMPO distribuire 36-42-42-40-40-48 diminuzioni in modo uniforme su ogni ferro con la freccia – LEGGERE IL SUGGERIMENTO PER LE DIMINUZIONI-2. Dal 1°-1°-1°-2°-2°-2° ferro con diminuzioni, continuare lavorando A.1 a ogni lato con il panna. Quando A.4 è finito in altezza ci sono 113-125-155-155-187-163 maglie sul ferro. Lavorare 1 ferro a diritto dal diritto del lavoro con il panna dove vengono diminuite 6-14-40-36-64-36 maglie in modo uniforme sul ferro = 107-111-115-119-123-127 maglie. Lavorare 1 ferro a rovescio dal rovescio del lavoro. Per una vestibilità migliore lavorare una piccola ALZATA sul dietro del collo con il panna – vedere la descrizione sopra. Finire lavorando 2 “COSTE” con il panna – leggere la descrizione sopra, poi intrecciare. Il cardigan misura circa 56-58-60-62-64-66 cm fino alla spalla. CONFEZIONE: Cucire le aperture sotto le maniche. Attaccare i bottoni distribuiti in modo uniforme sul bordo sinistro, i bottoni vengono allacciati attraverso i buchi sul bordo destro. |
|||||||||||||||||||||||||
Spiegazioni del diagramma |
|||||||||||||||||||||||||
|
|||||||||||||||||||||||||
 |
|||||||||||||||||||||||||
 |
|||||||||||||||||||||||||
 |
|||||||||||||||||||||||||
Avete terminato questo modello?Allora taggate le vostre foto con #dropspattern #springvalleycardigan o inviatele alla #dropsfan gallery. Avete bisogno di aiuto con questo modello?Troverete 25 video tutorial, una sezione per i commenti/domande e molto altro guardando il modello su www.garnstudio.com © 1982-2026 DROPS Design A/S. Ci riserviamo tutti i diritti. Questo documento, compreso tutte le sue sotto-sezioni, è protetto dalle leggi sul copyright. Potete leggere quello che potete fare con i nostri modelli alla fine di ogni modello sul nostro sito. |
|||||||||||||||||||||||||


Con oltre 40 anni di esperienza nel design di modelli di maglia e uncinetto, DROPS Design offre la più estesa collezione di modelli gratuiti su internet - tradotti in 17 lingue. Ad oggi vi possiamo fornire 324 cataloghi e 12290 modelli - 9561 dei quali sono tradotti in Italiano.
Ci stiamo impegnando molto per darvi il meglio che vi possiamo offrire in termini di maglia e uncinetto, ispirazioni e consigli così come filati di grande qualità ad un prezzo incredibile! Volete utilizzare i nostri modelli per qualcosa d'altro oltre al vostro uso personale? Potete leggere tutto ciò che è consentito nel testo sul Copyright in basso su tutte le pagine dei nostri modelli. Buon lavoro!
Lasciare un commento sul modello DROPS 175-8
Noi saremmo felici di ricevere i tuoi commenti e opinioni su questo modello!
Se vuoi fare una domanda, fai per favore attenzione a selezionare la categoria corretta nella casella qui sotto per velocizzare il processo di risposta. I campi richiesti sono indicati da *.