
Categorie popolari
State cercando un filato?


Commenti / Domande (69)
![]() Evelyn ha scritto:
Evelyn ha scritto:
Sorry - habe mir das auf Excell ausgedruckt und statt 13x nur 7x eingetragen... MEIN FEHLER!!!
30.04.2018 - 15:44
![]() Evelyn ha scritto:
Evelyn ha scritto:
Also ich kenn mich nicht aus - wenn ich mit 101 M beginne und dann A2 13x stricke habe ich am Ende 131 M und nicht 231... woher nehme ich die fehlenden 100 M??? Bitte um HILFE. DANKE
30.04.2018 - 15:35DROPS Design ha risposto:
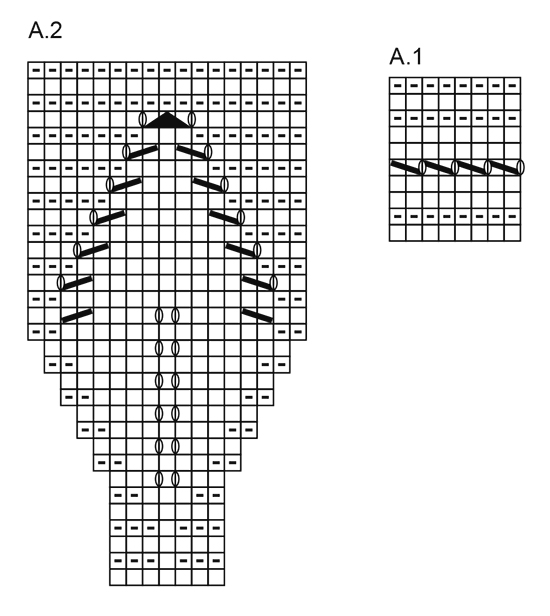
Liebe Evelyn, A.2 beginnt mit 7 M und es sind 17 M in jedem Rapport wenn A.2 1x in der Höhe gestrickt wird, dann haben Sie: 5 M kraus re., 13 x A.2 (= 13 x 17 = 221), 5 M kraus re. = 5+221+5= 231 M. Viel Spaß beim stricken!
30.04.2018 - 15:46
![]() Tina ha scritto:
Tina ha scritto:
Hallo, Ich habe das Halsbündchen gestrickt. Ich verstehe nicht wie ich mit A2 anfangen soll. Drei Maschen links, eine rechts, drei Maschen links, und das in Folge? Kann ja nicht sein da ich dann hätt ich ja 12 Blätter. Bitte um Aufklärung und bedanke mich dafür.
22.04.2018 - 11:41DROPS Design ha risposto:
Liebe Tina, A.2 beginnt von der Vorderseite (= Hinreihe) mit 7 M rechts), bei der nächsten Reihe (= Rückreihe) stricken Sie: 3 M re, 1 M li (= glatt rechts), 3 M re. Sie stricken: 5 M A.1, 12 x A.2 (= 12x 7 m = 84 M) und 5 M A.1 = 5+84+5= 94 M. Viel Spaß beim stricken!
23.04.2018 - 10:24
![]() Llewellyn ha scritto:
Llewellyn ha scritto:
In der deutschen korrektur soll ich für größe 7/8 jahre 94 maschen anschlagen in der englischen 84, welcher anschlag stimmt jetzt für diese größe danke Frau Llewellyn
21.04.2018 - 21:22DROPS Design ha risposto:
Liebe Frau Llewellyn, es werden 94 M für Größe 7/8 Jahren angeschlagen. Viel Spaß beim stricken!
23.04.2018 - 09:21
![]() Sarah ha scritto:
Sarah ha scritto:
Hi. Könnte mir bitte jemand sagen wo die Makierer hin kommen. Kann nichts dazu in der anleitung finden
08.04.2018 - 11:46DROPS Design ha risposto:
Liebe Sarah, die Markierer sollen in den neuen angeschlagenen Maschen nach Teilung eingesetzt, dh Sie haben die Maschen der Ärmel stillgelegt und 6 neuen Maschen angeschlagen, Markierer soll in der Mitte dieser 6 Maschen eingesetzt werden. Viel Spaß beim stricken!
09.04.2018 - 10:25
![]() Nella ha scritto:
Nella ha scritto:
Sorry , can you please clarify your answer. I dont understand what you mean by just correction should be edited. Is the correction wrong ? It says to cast on 91 stitches. Please advise if I cast on 91 or 101 for size 13? Also, please advise there is no 5 garter stitches in A.1 as per the correction? Third question, the pattern calls for circular needle 3.5 AND 4.0 but I can't find in the pattern where you switch to a size 4 circular needle. Thank you
21.03.2018 - 15:42DROPS Design ha risposto:
Dear Nella, in s ize 13/14 years you cast on 101 sts (as in the written pattern) and work A.1 with 5 front band sts in garter st on each side. You work yoke with needle size 3,5 mm and switch to circular needle size 4 mm when working BODY and SLEEVES. Happy knitting!
06.04.2018 - 10:05
![]() Nella ha scritto:
Nella ha scritto:
Sorry I am a new knitter and I am confused about the pattern corrections. To confirm for size 13- cast on 91 stitches instead of 101? Directions work A.1 over all stitches means NO 5 stitches in garter . Is that correct? Thank you Nella
20.03.2018 - 18:07DROPS Design ha risposto:
Dear Nella, in size 13 cast on 101 sts, pattern has been properly edited, just correction should be edited. Happy knitting!
21.03.2018 - 09:02
![]() Olivia Hardy ha scritto:
Olivia Hardy ha scritto:
Bonjour, le jeté au niveau des boutonnières, faut-il le tricoter à l'endroit au rang suivant? Merci.
18.02.2018 - 17:48DROPS Design ha risposto:
Bonjour Mme Hardy, tout à fait, on le tricote à l'endroit au rang suivant pour former un trou. Bon tricot!
19.02.2018 - 10:12
![]() Sabine Jungmann ha scritto:
Sabine Jungmann ha scritto:
Liebes Team! Ich verstehe das mit den neu aufgenommenen 6 Maschen unter dem Arm nicht. Stricke ich die jetzt mit? Oder werden die auch still gelegt? Lg Sabine
17.02.2018 - 17:52DROPS Design ha risposto:
Liebe Frau Jungmann, die 6 Maschen unter den Ärmel werden auch beim Rumpfteil gestrickt. Bei den Ärmeln werden 1 M in jedem dieser Maschan aufgefassen, diese 6 Maschen sind für Armloch. Viel Spaß beim stricken!
19.02.2018 - 09:25
![]() Olivia ha scritto:
Olivia ha scritto:
Bonjour, je voudrais faire le diagramme A2 en échantillon. Au niveau des parties du diagramme où il n'y a pas de mailles mentionnées qu'est-ce que je dois tricoter? Merci.
10.02.2018 - 18:02DROPS Design ha risposto:
Bonjour Olivia, le diagramme A.2 comporte des augmentations (qui vont former l'empiècement arrondi), ainsi, on commence avec 7 mailles et on augmente aux rangs 7 à 17 = on a alors 17 m et on termine le diagramme. Bon tricot!
12.02.2018 - 08:50
|
|||||||||||||||||||
Sweet Bay Jacket#sweetbayjacket |
|||||||||||||||||||
 |
 |
||||||||||||||||||
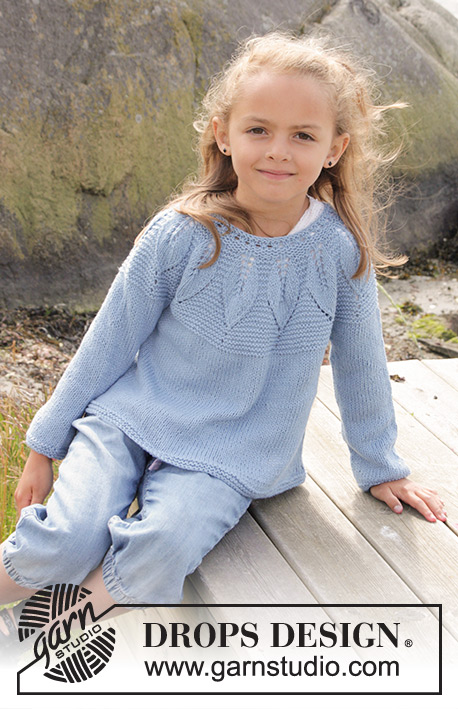
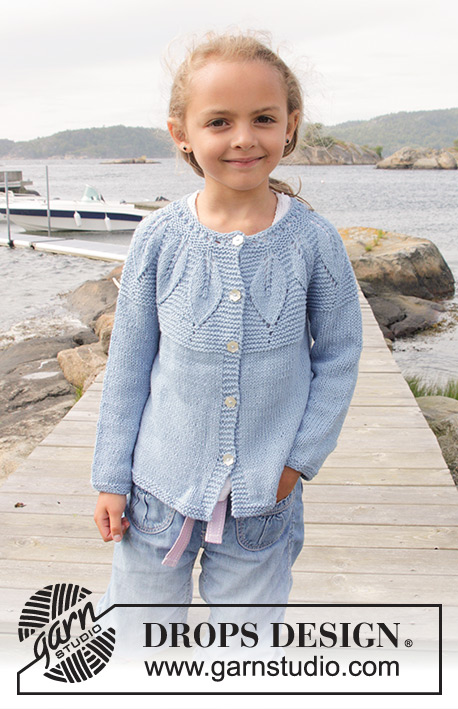
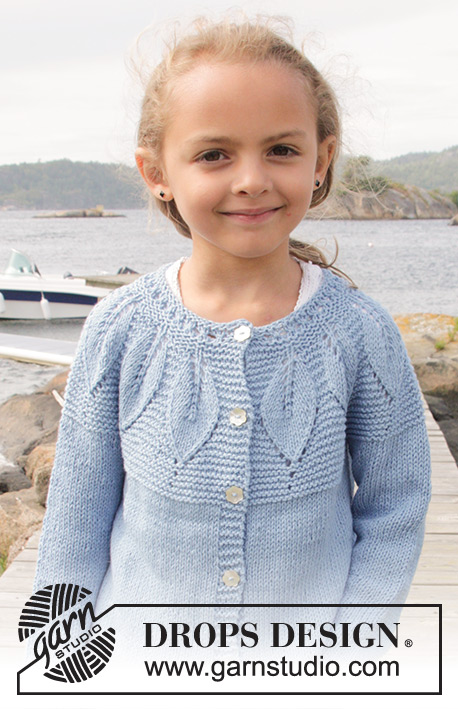
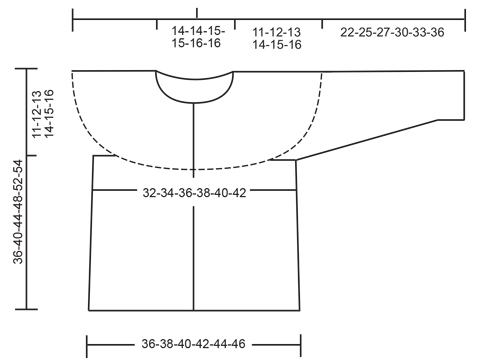
Cardigan lavorato ai ferri a maglia legaccio con motivo a foglie e sprone rotondo, lavorato dall’alto in basso (top down) in DROPS Belle. Taglie: 3 - 14 anni.
DROPS Children 27-24 |
|||||||||||||||||||
|
M LEGACCIO (avanti e indietro): Lavorare tutti i f a dir. 1 “costa” a m legaccio = 2 f dir. M LEGACCIO (lavorata in tondo): 1 “costa” a m legaccio = 2 giri. * 1 giro dir e 1 giro rov *, ripetere *-*. MOTIVO: Vedere i diagrammi A.1 e A.2. I diagramma mostrano tutti i f del motivo visti dal diritto del lavoro. SUGGERIMENTO PER GLI AUMENTI: Aumentare 1 m a ogni lato di tutti i segnapunti (= 4 aumenti). Iniziare 1 m prima del segnapunti e lavorare come segue: 1 gettato, 2 m dir (il segnapunti è tra queste 2 m), 1 gettato. Sul f successivo lavorare il gettato a ritorto per evitare i buchi. ASOLE: Diminuire per le asole sul bordo destro (cioè il bordo alla fine del f visto dal diritto del lavoro). 1 asola = lavorare insieme a dir la 3° e la 4° m dal bordo e fare 1 gettato. Diminuire per le asole quando il lavoro misura (dal bordo di avvio e lungo il bordo): TAGLIE 3/4: 2, 8, 14, 22 e 28 cm TAGLIE 5/6: 2, 8, 14, 22 e 28 cm TAGLIE 7/8: 2, 8, 14, 22, 28 e 36 cm. TAGLIE 9/10: 2, 8, 14, 22, 28 e 36 cm. TAGLIE 11/12: 2, 8, 14, 22, 28, 36 e 42 cm TAGLIE 13/14: 2, 8, 14, 22, 28, 36 e 42 cm ---------------------------------------------------------- CARDIGAN: Lavorato avanti e indietro sui f circolari, dall’alto in basso (top down). SPRONE: Avviare 87-87-94-94-101-101 m con i f circolari corti n° 3,5 mm con Belle. Diminuire per le ASOLE sul bordo destro – leggere la spiegazione sopra. Lavorare 5 m a M LEGACCIO – leggere la spiegazione sopra (= bordo), A.1 fino a quando rimangono 5 m, 5 m a legaccio (= bordo). Sui giri con i gettati in A.1 finire con 1 m dir prima del bordo. Quando A.1 è stato lavorato 1 volta in verticale, lavorare come segue: 5 m a m legaccio, A.2 (= 7 m), ripetere A.2 11-11-12-12-13-13 volte in totale, finire con 5 m a m legaccio. FARE ATTENZIONE ALLA TENSIONE DEL LAVORO! Quando A.2 è stato lavorato 1 volta in verticale ci sono 197-197-214-214-231-231 m sul f e il lavoro misura circa 10 cm. Continuare a m legaccio, ALLO STESSO TEMPO aumentare 1 m al centro di tutte le ripetizioni (= 11-11-12-12-13-13 aumenti), aumentare con 1 gettato, lavorare il gettato a dir sul f successivo per fare buchi. Ripetere gli aumenti ogni 1-1-1½-1½-2-2 cm altre 0-1-1-2-1-2 volte = 208-219-238-250-257-270 m. Lavorare 1 f dir e allo stesso tempo aggiustare il n° di m a 210-222-234-250-262-276. Continuare a m legaccio fino a quando il lavoro misura 11-12-13-14-15-16 cm. Continuare a lavorare a m legaccio fino a quando il lavoro misura 11-12-13-14-15-16 cm. Continuare a lavorare come segue (= dal diritto del lavoro): lavorare le prime 36-38-40-42-44-45 m (= davanti), trasferire le 38-40-42-46-48-52 m successive su un fermamaglie (= manica), avviare 6 nuove m sotto la manica, lavorare le 62-66-70-74-78-82 m successive (= dietro), trasferire le 38-40-42-46-48-52 m successive su un fermamaglie (= manica), avviare 6 nuove m sotto la manica, lavorare le 36-38-40-42-44-45 m rimaste (= davanti). CORPO: Ora ci sono 146-154-162-170-178-184 m per il corpo. Inserire un segnapunti a ogni lato del corpo dove sono state avviate le m sotto le maniche (= 3 nuove m a ogni lato del segnapunti). ORA MISURARE IL LAVORO DA QUI. Passare ai f circolari n° 4 mm. Continuare a m rasata e a m legaccio sui bordi. Quando il lavoro misura 4 cm, aumentare 1 m a ogni lato di tutti i segnapunti (= 4 aumenti) - LEGGERE IL SUGGERIMENTO PER GLI AUMENTI. Ripetere gli aumenti ogni 5-6-7-8-9-10 cm altre 3 volte = 162-170-178-186-194-200 m. Continuare a m rasata e a m legaccio fino a quando il lavoro misura 24-27-30-33-36-37 cm, lavorare 3 “coste”. Intrecciare. MANICA: Riportare le m dal fermamaglie ai f a doppia punta n° 4 mm (= 38-40-42-46-48-52 m). Riprendere 1 m in ognuna delle 6 m avviate sotto la manica = 44-46-48-52-54-58 m. Inserire 1 segnapunti al centro sotto la manica. Ora misurare il lavoro da qui. Lavorare a m rasata. Quando il lavoro misura 3 cm diminuire 1 m a ogni lato del segnapunti, ripetere le diminuzioni ogni 7-5-5-4-4-4 cm altre 2-3-3-5-5-7 volte = 38-38-40-40-42-42 m. Continuare a m rasata fino a quando la manica misura 21-24-26-29-32-35 cm, lavorare 3 “coste” e intrecciare. CONFEZIONE: Attaccare i bottoni sul davanti sinistro. |
|||||||||||||||||||
Spiegazioni del diagramma |
|||||||||||||||||||
|
|||||||||||||||||||
 |
|||||||||||||||||||
 |
|||||||||||||||||||
Avete terminato questo modello?Allora taggate le vostre foto con #dropspattern #sweetbayjacket o inviatele alla #dropsfan gallery. Avete bisogno di aiuto con questo modello?Troverete 25 video tutorial, una sezione per i commenti/domande e molto altro guardando il modello su www.garnstudio.com © 1982-2026 DROPS Design A/S. Ci riserviamo tutti i diritti. Questo documento, compreso tutte le sue sotto-sezioni, è protetto dalle leggi sul copyright. Potete leggere quello che potete fare con i nostri modelli alla fine di ogni modello sul nostro sito. |
|||||||||||||||||||


Con oltre 40 anni di esperienza nel design di modelli di maglia e uncinetto, DROPS Design offre la più estesa collezione di modelli gratuiti su internet - tradotti in 17 lingue. Ad oggi vi possiamo fornire 324 cataloghi e 12290 modelli - 9561 dei quali sono tradotti in Italiano.
Ci stiamo impegnando molto per darvi il meglio che vi possiamo offrire in termini di maglia e uncinetto, ispirazioni e consigli così come filati di grande qualità ad un prezzo incredibile! Volete utilizzare i nostri modelli per qualcosa d'altro oltre al vostro uso personale? Potete leggere tutto ciò che è consentito nel testo sul Copyright in basso su tutte le pagine dei nostri modelli. Buon lavoro!
Lasciare un commento sul modello DROPS Children 27-24
Noi saremmo felici di ricevere i tuoi commenti e opinioni su questo modello!
Se vuoi fare una domanda, fai per favore attenzione a selezionare la categoria corretta nella casella qui sotto per velocizzare il processo di risposta. I campi richiesti sono indicati da *.