
Categorie popolari
State cercando un filato?


Commenti / Domande (6)
![]() Galey Luu ha scritto:
Galey Luu ha scritto:
I am making the 6-8 year old patter for the mittens. When you start the thumb gusset, do you go white yarn, beige yarn, white yarn? or is it all white yarn on either side?
06.12.2024 - 20:11DROPS Design ha risposto:
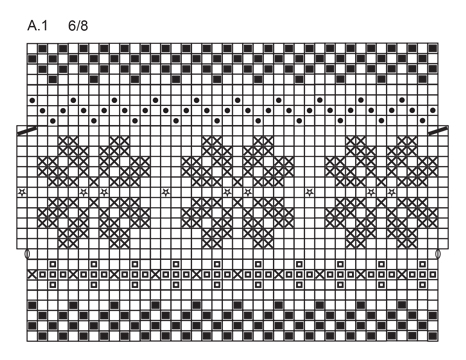
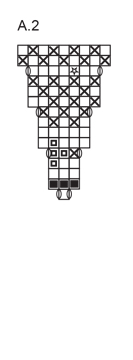
Dear Galey, the thumb gusset is worked according to A.2. In the 4th round of A.1, in the 2nd stitch of the round you work the first round of A.2. So instead of a simple knit stitch in off white work 1 yarn over, 1 knit stitch, 1 yarn over, as indicated in the second chart (all in off white). The rest of the stitches are worked as in A.1, while the stitches for the thumb gusset are worked according to A.2. Happy knitting!
08.12.2024 - 18:23
![]() Carina ha scritto:
Carina ha scritto:
Förstår inte hur man stickar när man gör tumkilen. Om jag förstår det rätt ska man först sticka en maska i början på varvet, göra ett omslag, sticka en maska, göra ett omslag och sen fortsätta med A1. Men jag förstår inte riktigt hur jag ska läsa in diagrammen på nästa varv. Är det de två omslagen och maskan mellan dem som ska stickas enligt A2? Och ska jag göra första maskan innan dessa enligt A1? Och hur/var i diagrammet fortsätter jag efter maskorna för tumkilen?
03.10.2023 - 20:37DROPS Design ha risposto:
Hei Carina. Når du skal starte med 4. omgang av A.1 starter du omgangen med 1.rad av A.2 (kast-1 rett maske, 1 kast), deretter strikker du etter diagram A.1 (4. rad) i den str. du strikker. På neste omgang strikker du 2. rad på diagram A.2 og 5.rad på diagram A.1. På 5.rad av tommelkilen økes det igjen. mvh DROPS Design
16.10.2023 - 11:22
![]() Mi Riches ha scritto:
Mi Riches ha scritto:
I am knitting this in the 6-8 year old measurements. I have just got to transferring the 9 thumb gusset stitches plus one on each side. I have 11 stitches on stitch holder, 40 left on my needle. I am about to cast on 3 more "behind the held stitches". Where do these three stitches go now? If I keep on needles I will have 43 (not 30). If I put on stitch holders I will have 14 (not 11). This is very confusing. I find this terminology misleading as how can 3 stitches be held behind ?
16.08.2023 - 22:01DROPS Design ha risposto:
Dear Mrs Riches, cast on these 3 new stitches to "replace" the 11 stitches slipped on a thread - you will create a hole and will later pick up stitches along this side to work thumb. See this video from time code 2:29: how to slip stitches on a thread and how to cast on new stitches over the stitches on the thread. Happy knitting!
17.08.2023 - 09:42
![]() Sara ha scritto:
Sara ha scritto:
Förstår inte hur man stickar när man gör tumkilen. Om jag förstår det rätt ska man först sticka en maska i början på varvet, göra ett omslag, sticka en maska, göra ett omslag och sen fortsätta med A1. Men jag förstår inte riktigt hur jag ska läsa in diagrammen på nästa varv. Är det de två omslagen och maskan mellan dem som ska stickas enligt A2? Och ska jag göra första maskan innan dessa enligt A1? Och hur/var i diagrammet fortsätter jag efter maskorna för tumkilen?
18.10.2018 - 22:43
![]() ROSA ha scritto:
ROSA ha scritto:
Hola, otra duda: si los aum del pulgar se empiezan después de haber completado 3 vtas de A.1, NO coinciden las vtas para tejer con los mismos colores, creo que se debe empezar después de haber completado 2 vtas de A.1, o no es así?? gracias.
16.11.2016 - 12:31DROPS Design ha risposto:
Hola Rosa. En principio no tenemos correcciones para este patrón. pasaré tu pregunta al departamento de diseño para que lo revisen
19.11.2016 - 18:26
![]() ROSA ha scritto:
ROSA ha scritto:
Hola, tengo una duda, para talla 9/12: si los aum del pulgar se hacen a los lados del 2º p de la vta, como se debe hacer el 1º p de la vta? se hace siguiendo el diagrama A.1 o se debe incluir dentro de los p del pulgar siguiendo diagrama A.2? Gracias.
16.11.2016 - 11:30DROPS Design ha risposto:
Hola Rosa. Los aumentos para el pulgar se trabajan según el diagrama A.2
19.11.2016 - 18:18
|
|||||||||||||||||||||||||
Prairie Fairy Mittens#prairiefairymittens |
|||||||||||||||||||||||||
|
|
|||||||||||||||||||||||||
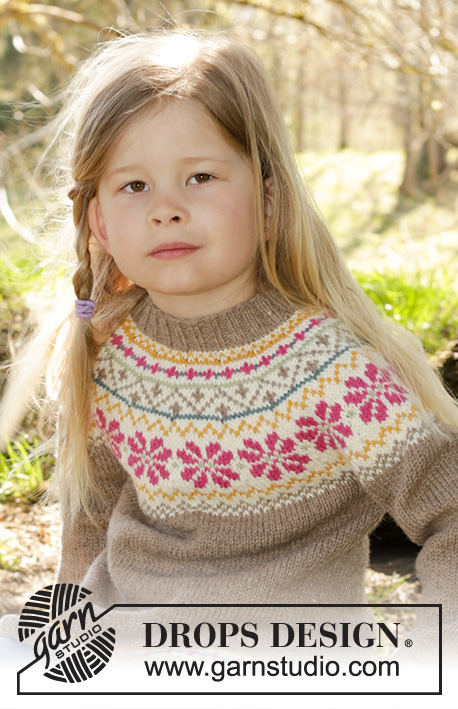
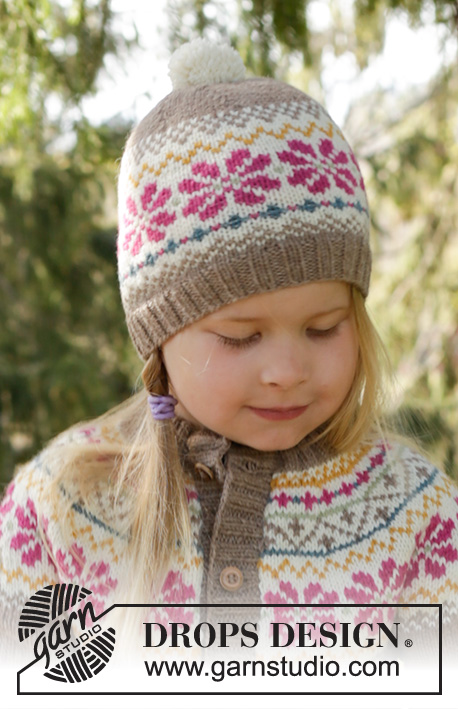
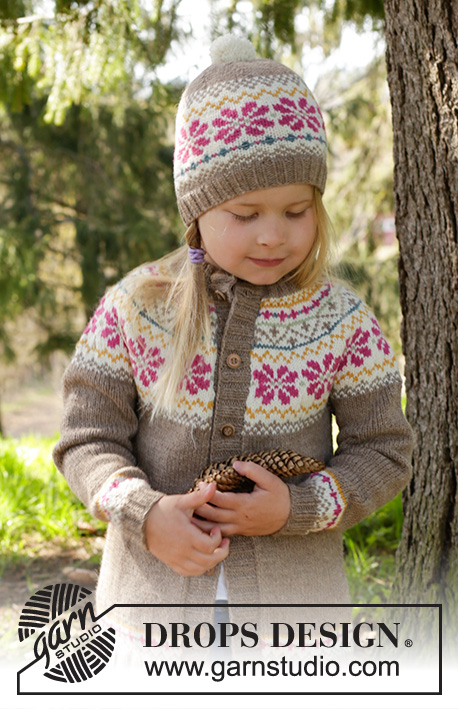
Muffole lavorate ai ferri con motivo nordico in DROPS Lima. Taglie: 3 - 12 anni.
DROPS Children 27-7 |
|||||||||||||||||||||||||
|
MOTIVO: Vedere i diagrammi A.1 e A.2. Vedere il diagramma A.1 per la taglia. Lavorare tutto il motivo a m rasata. ---------------------------------------------------------- MUFFOLE: Lavorate in tondo con i f a doppia punta. Avviare 32-36-40 m con i f a doppia punta n° 2,5 mm con beige. Lavorare a coste = 2 m dir/2 m rov per 4-5-6 cm. Passare ai f a doppia punta n° 3 mm e lavorare 1 giro a m rasata e allo stesso tempo distribuire 4-4-8 aumenti in modo uniforme = 36-40-48 m. Continuare con il diagramma A.1. FARE ATTENZIONE ALLA TENSIONE DEL LAVORO! Quando sono stati lavorati 3 giri in A.1, iniziare ad aumentare per il tassello del pollice – aumentare a ogni lato della 2° m sul giro – aumentare facendo 1 gettato, sul giro successivo lavorare i gettati a dir ritorto per evitare buchi per il tassello del pollice. Lavorare il tassello del pollice seguendo il diagramma A.2. Ripetere gli aumenti ogni 4 giri altre 2-3-3 volte (aumentare a ogni lato di tutte le m del pollice, cioè 2 aumenti tra ogni gettato). Alla fine di tutti gli aumenti, ci sono 7-9-9 m per il pollice e 42-48-56 m in totale sul f. Quando il lavoro misura un totale di 10-12-14 cm, trasferire le 7-9-9 m del pollice + 1 m a ogni lato di queste su un fermamaglie. Avviare 3 nuove m dietro le m del pollice = 36-40-48 m sul f. Quando A.1 è stato lavorato una volta in verticale, lavorare con il beige, sul 1° giro distribuire 0-2-0 aumenti in modo uniforme = 36-42-48 m. ALLO STESSO TEMPO quando il lavoro misura 15-17-19 cm, inserire 6 segnapunti nel lavoro con 6-7-8 in mezzo. Sul successivo, diminuire 1 m dopo ogni segnapunti lavorando 2 m insieme a dir. Ripetere le diminuzioni a giri alterni altre 2 volte e poi su ogni giro 2-3-4 volte = 6 m rimaste sul f. Tagliare il filo e farlo passare attraverso le m rimaste e tirare bene. La muffola misura circa 17-19-22 cm. POLLICE: Riportare le 9-11-11 m del fermamaglie sul tassello del pollice sui f a doppia punta n° 3 mm, inoltre riprendere 5 m con il beige nel bordo dietro le m del pollice = 14-16-16 m. Lavorare a m rasata in tondo con il beige per 3½-4½-5½ cm. Sul giro successivo, lavorare tutte le m insieme 2 a 2 a dir, tagliare il filo, farlo passare attraverso le m rimaste, tirare bene e affrancare. Lavorare un’altra muffola. |
|||||||||||||||||||||||||
Spiegazioni del diagramma |
|||||||||||||||||||||||||
|
|||||||||||||||||||||||||
 |
|||||||||||||||||||||||||
 |
|||||||||||||||||||||||||
 |
|||||||||||||||||||||||||
 |
|||||||||||||||||||||||||
Avete terminato questo modello?Allora taggate le vostre foto con #dropspattern #prairiefairymittens o inviatele alla #dropsfan gallery. Avete bisogno di aiuto con questo modello?Troverete 19 video tutorial, una sezione per i commenti/domande e molto altro guardando il modello su www.garnstudio.com © 1982-2026 DROPS Design A/S. Ci riserviamo tutti i diritti. Questo documento, compreso tutte le sue sotto-sezioni, è protetto dalle leggi sul copyright. Potete leggere quello che potete fare con i nostri modelli alla fine di ogni modello sul nostro sito. |
|||||||||||||||||||||||||


Con oltre 40 anni di esperienza nel design di modelli di maglia e uncinetto, DROPS Design offre la più estesa collezione di modelli gratuiti su internet - tradotti in 17 lingue. Ad oggi vi possiamo fornire 324 cataloghi e 12290 modelli - 9561 dei quali sono tradotti in Italiano.
Ci stiamo impegnando molto per darvi il meglio che vi possiamo offrire in termini di maglia e uncinetto, ispirazioni e consigli così come filati di grande qualità ad un prezzo incredibile! Volete utilizzare i nostri modelli per qualcosa d'altro oltre al vostro uso personale? Potete leggere tutto ciò che è consentito nel testo sul Copyright in basso su tutte le pagine dei nostri modelli. Buon lavoro!
Lasciare un commento sul modello DROPS Children 27-7
Noi saremmo felici di ricevere i tuoi commenti e opinioni su questo modello!
Se vuoi fare una domanda, fai per favore attenzione a selezionare la categoria corretta nella casella qui sotto per velocizzare il processo di risposta. I campi richiesti sono indicati da *.