
Categorie popolari
State cercando un filato?


Commenti / Domande (41)
![]() Gosia ha scritto:
Gosia ha scritto:
Nie rozumię tego opisu, czy możecie trochę to jaśniej wytłumaczyć. Jak mam robić ścieg francuski i jednocześnie ściągacz francuski, nie znalazłam nigdzie opisu. ŚCIEG FRANCUSKI (na okrągło): Przer.: *1 okr. na prawo, 1 okr. na lewo*, powt. od *-*. 1 „ściągacz" francuski = 2 okr. ŚCIEG FRANCUSKI (w tę i z powrotem): Przer. wszystkie rzędy na prawo. 1 „ściągacz" francuski = 2 rz. na prawo.
08.03.2026 - 00:10DROPS Design ha risposto:
Witaj Gosiu, ścieg francuski oznacza, że przerabiasz wszystkie rzędy na prawo w robótce w tę i z powrotem, a w robótce na okrągło przerabiasz 1 okrążenie na prawo, 1 okrążenie na lewo, itd. Ściągacz francuski oznacza 2 rzędy przerobione ściegiem francuskim, czyli 1 ściągacz francuski to jest 1 widoczny rządek oczek lewych. Zobacz również video TUTAJ. Pozdrawiamy!
11.03.2026 - 11:14
![]() Kathrin ha scritto:
Kathrin ha scritto:
Vielen Dank für die Antwort. Aber wieso 50 Rd.? Um 25x Zunahme braucht es doch viel mehr Rd. 1.Rd. insgesamt 8 Umschläge, 2.Rd Umschläge rechts verstricken = 8 Zunahmen. 3.Rd. 8 Umschläge und 2 Maschen jeweils zusammen stricken = keine Zunahmen, 4.Rd. Umschläge rechts verstricken =keine Zunahmen. Also um 8 Maschen zuzunehmen, werden laut Beschreibung 4 Rd. gestrickt. Um 25x 8 Maschen zuzunehmen, braucht es doch 25x4 Rd.= 100 Rd.und das sind mehr als 25 cm Höhe. Wo ist mein Denkfehler?
20.11.2024 - 17:06DROPS Design ha risposto:
Liebe Kathrin, es wird in L=3. Größe - insgesamt 25 Mal in jeder 2. Runde für beide Ärmel und Rumpfteil zugenommen = 50 Runden insgesamt; bei der 1. Runde nehmen Sie zuerst 4 Maschen für Vorder- + Rückenteil und 2 M für jede Ärmel = 12 Zunahmen, dann nehmen Sie nur 2 Maschen bei jeder Raglanlinie = 8 Maschen insgesamt. Beachten Sie daß die Zunahmen für Ärmel und Rumpfteil gleichzeitig gestrickt werden und nicht zuerst Rumpf dann Ärmel. Viel Spaß beim Stricken!
21.11.2024 - 08:30
![]() Kathrin ha scritto:
Kathrin ha scritto:
Ich komme mit der Raglanzunahme nicht klar. Bei der Gr.L muss ich jede 2. Reihe insgesamt 8 Maschen zunehmen und den Gesamtblock von 4 Reihen 25x wiederholen. Ich habe ihn jetzt 12x gestrickt und bin schon bei 20cm Höhe. Laut Skizze soll es 25cm Höhe ergeben. Bei mir wird es um vieles höher. Die Maschenprobe ist 17/18 Maschen für 10 cm. Was habe ich falsch gemacht?
20.11.2024 - 11:41DROPS Design ha risposto:
Liebe Kathrin, die Raglanzunahmen werden auf einem verschieden Rythmus beim Rumpfteil und bei den Ärmeln gestrickt, so nehmen Sie so zu: beim Vorder und Rückenteil : jeweils 2 Maschen 1 Mal in jeder 2. Runde, dann jeweils 1 Masche 24 Mal in jeder 2. Runde - und gleichzeitig bei den Ärmeln so zunehmen: jeweils 1 Masche 25 Mal insgesamt in jeder 2. Runde (es wird nie in jeder 4. Runde in L zugenommen). So insgesamt stricken Sie 50 Runden = ca 22 cm. Viel Spaß beim Stricken!
20.11.2024 - 15:35
![]() Karin ha scritto:
Karin ha scritto:
På sidan 2 finns övningstips för raglan. Gör man hela den beskrivningen i en följd?
27.09.2023 - 23:19DROPS Design ha risposto:
Hej Karin, ökningstipsen beskriver HUR du ökar till raglan. Följ mönstret från där det står OK och när du kommer til raglan, hoppar du upp och läser hur du ökar :)
05.10.2023 - 10:14
![]() Anna ha scritto:
Anna ha scritto:
Dzień dobry, czy nie ma pomyłki na początku opisu? Wydaje mi się, że 62 oczka to bardzo mało. Jeżeli 17 oczek daje 10 cm, to 62 oczka da ok. 36 cm, tj. mniej więcej obwód szyi. O ile dobrze widzę, to ten sweter jest wkładany przez głowę i ma dużo większy dekolt. Z góry dziękuję za odpowiedź.
06.05.2019 - 16:37DROPS Design ha risposto:
Witaj Anno! Na górze przerabiasz ściegiem francuskim, jest on bardziej rozciągliwy niż np. dżersej. Po pierwsze nabierz luźno i oczka, a po drugie przerabiaj dosyć luźno ściegiem francuskim przy dekolcie. Zawsze możesz też wykonać dekolt na nieco większych drutach. Powodzenia!
06.05.2019 - 18:01
![]() Diana Blakeley ha scritto:
Diana Blakeley ha scritto:
The yardage amount for this pattern seem to way off. 400g of the main and 50 g of the contrast????? Also what are the finished measurements for this pattern? Thank you for the help.
01.05.2019 - 02:21DROPS Design ha risposto:
Dear Diana, there are no mistakes in the yarn amount. Air is 150 m for each skein, so the total amount required for the main colour is 1200 m and for the contrast colour is 150 m. Moreover, you can find the sketch with the finished measurements scrolling down the pattern page. Happy knitting!
01.05.2019 - 09:44
![]() Lana Miu ha scritto:
Lana Miu ha scritto:
I just read some other Raglan sweater instructions, I see I DO NOT join the circle at 66 sts. I re-read your pattern, but not clear as to when I join the round and start knitting in the round, please help, thanks
25.02.2019 - 19:22DROPS Design ha risposto:
Dear Mrs Miu, jumper is worked in the round top down, so that yoke will be also worked in the round: cast on the sts for yoke and join to work 1 ridge in garter stitch in the round and continue in the round. For the bottom edge of the jumper, you will then work front and back piece separately back and forth for vents. Happy knitting!
26.02.2019 - 10:43
![]() Lana Miu ha scritto:
Lana Miu ha scritto:
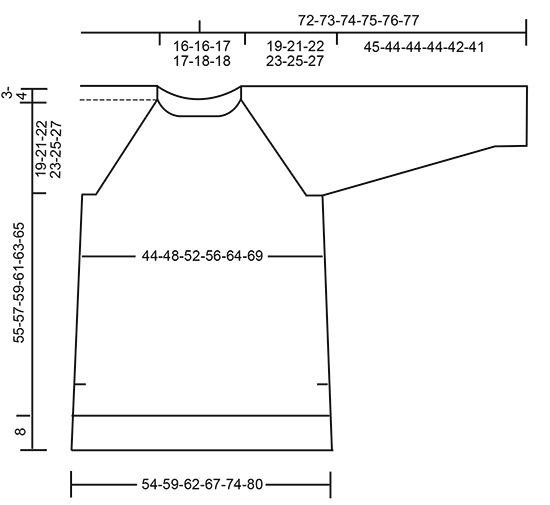
Thank you for writing back and try to explain. I am sorry I am still needing more explanation. According to the instructions, I would cast on 66 stitches in the round, I am not able to locate the 12CM mentioned in your reply. I can see the 3-4CM at the top of the diagram, that would mean 17cm + 17cm + 4cm + 4cm total 52cm which is still small to get through the head and much different than the picture closer to a boat neckline, I am wondering if I am not understanding the instructions. Help!
25.02.2019 - 16:57DROPS Design ha risposto:
Dear Miu, the 3-4 cm at the top of the pattern are for shoulder, these are the sts from neck that are counted for shoulders on each side, ie front and back piece so that you have 6 cm on each shoulder. Make sure your tension is right and use larger needles to cast on if required so that the neck is not too tight, the pattern is right and has already been worked successfully several times. In this pattern, there is no elevation on back piece, ie both neck on front and back piece will be the same (chart is standard). Happy knitting!
26.02.2019 - 10:20
![]() Lana Miu ha scritto:
Lana Miu ha scritto:
I have a question regarding the neck size, according to the diagram, at 17 CM double that is 34 CM which seems extremely small, a typical head is closer to 60 CM. How does one put on the sweater? Please help. BY the way, I checked the gauge, and cast on the number of stitch for a large, in the round, 66 sts. I was not able to get it over my heard.
24.02.2019 - 06:42DROPS Design ha risposto:
Dear Mrs Miu, the 17 cm is matching the width of neck seen from RS (from side to side), you should have approximately 17 cm for neck + 17 for front + 12 cm for each shoulder (= see the 3 cm for shoulders at top of diagram). Make sure you get the correct tension, cast on the stitches with a larger needle to avoid the casting edge being too tight so that you can get the head through. Happy knitting!
25.02.2019 - 10:33
![]() Tine ha scritto:
Tine ha scritto:
Jeg sidder og læser opskriften og tænker, at den her vil jeg gerne prøve at strikke; men når jeg læser kommentarerne, så er der flere som spørger ind til antallet af masker ved start/halsen.. Der er dog ikke noget svar? Jeg kan nemlig heller ikke helt gennemskue, hvordan man får kraven på billedet med det antal masker...
02.12.2018 - 11:26
|
|
Lilla Camilla#lillacamillasweater |
|
 |
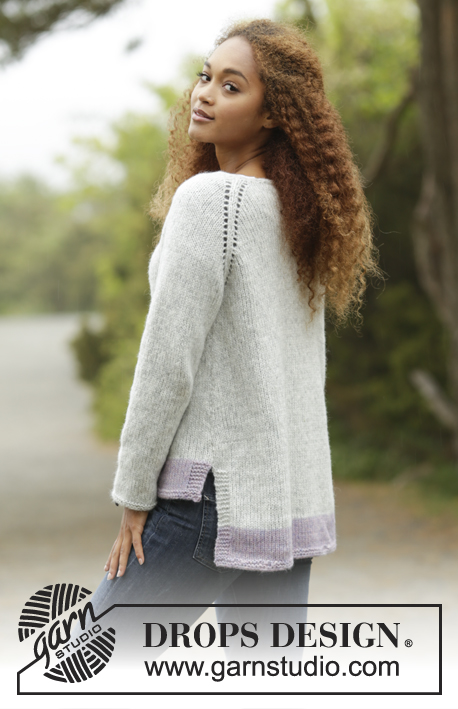 |
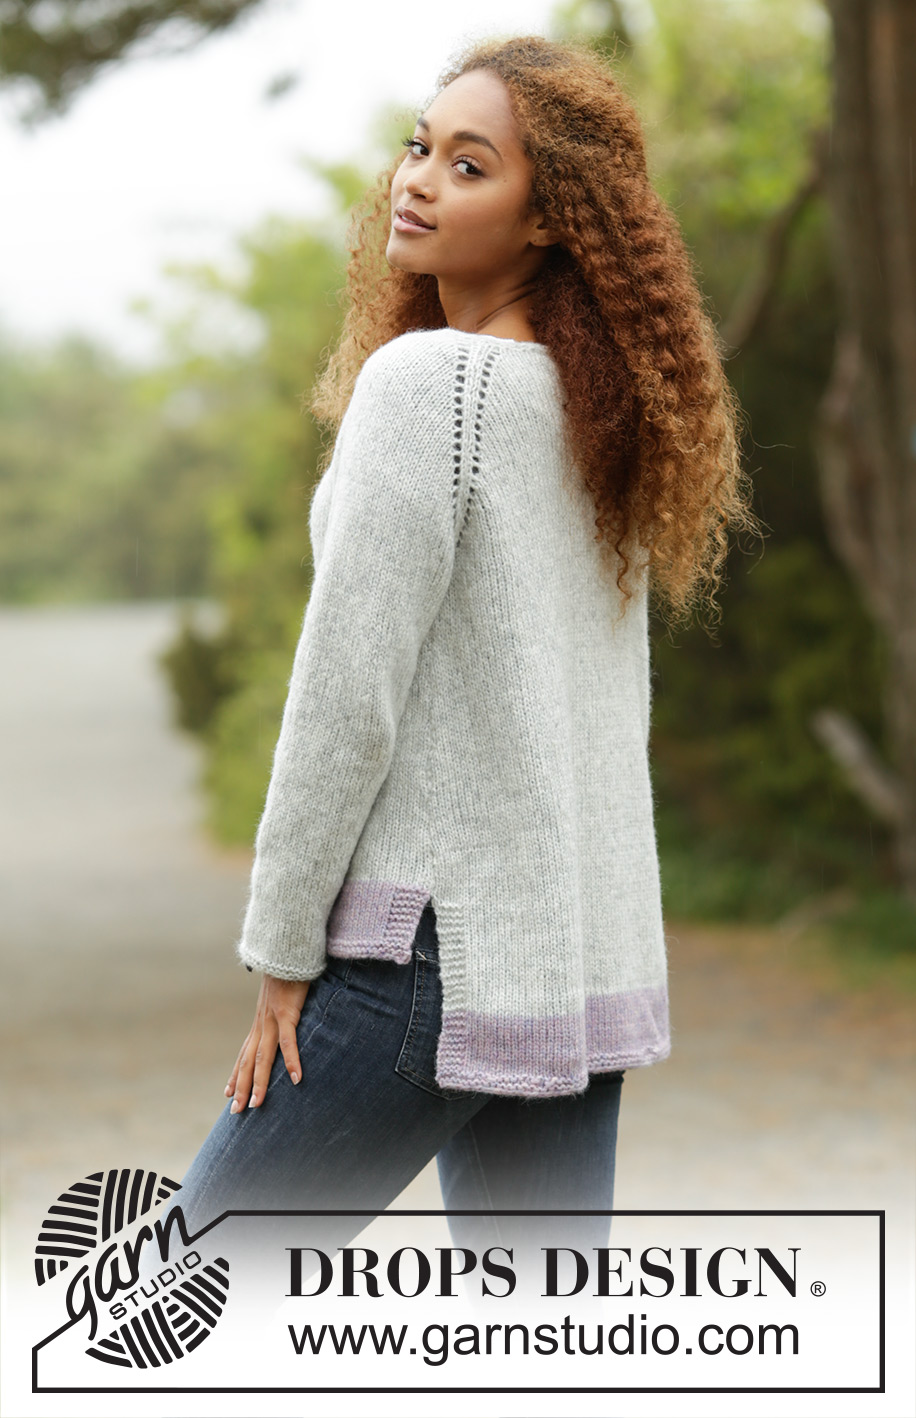
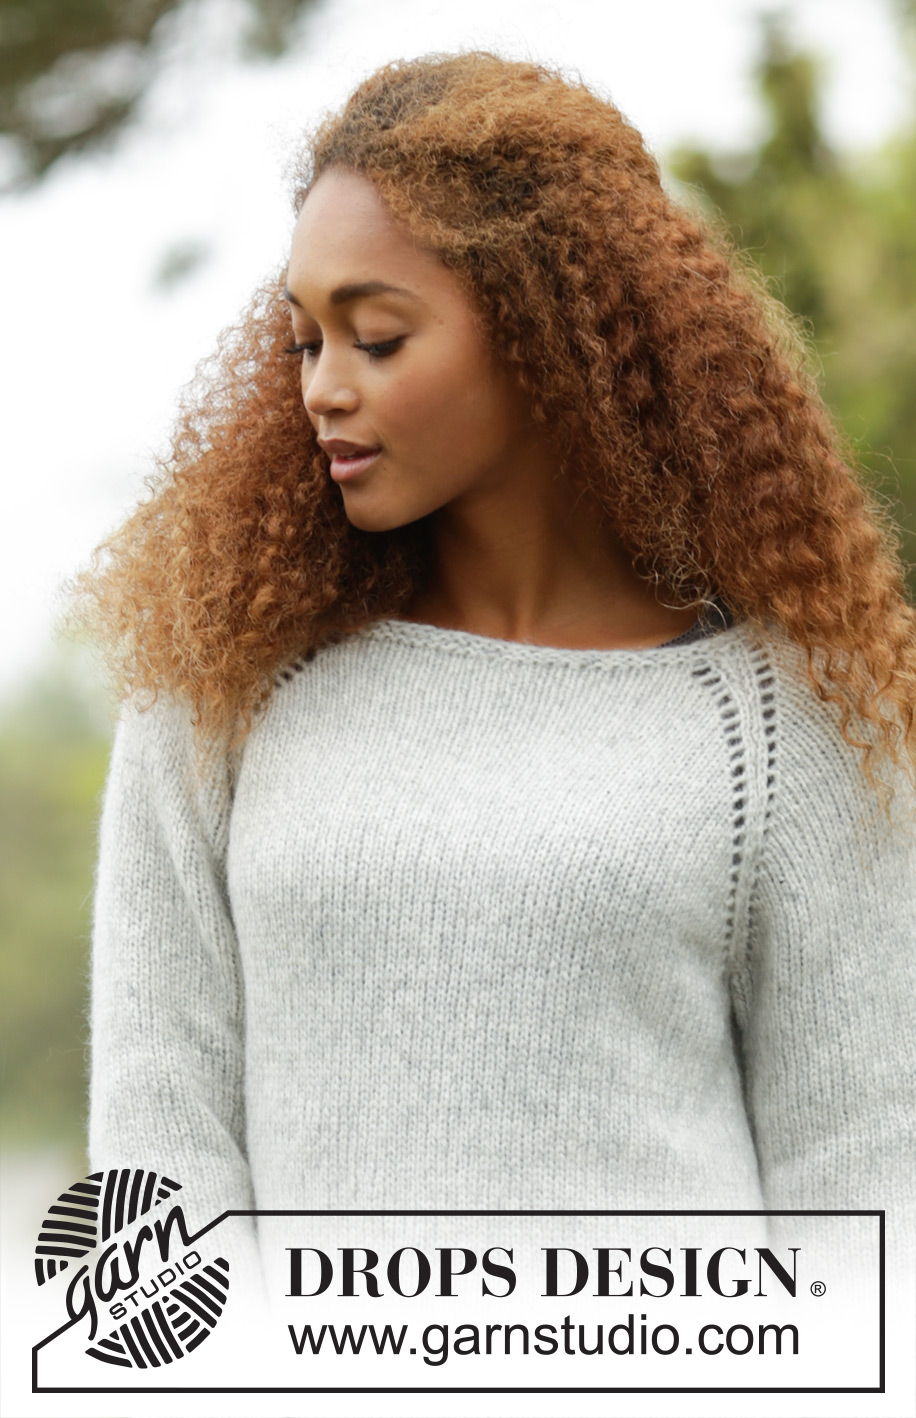
Maglione DROPS lavorato ai ferri con raglan, lavorato dall’alto in basso (top down) in ”Air”. Taglie: S - XXXL.
DROPS 172-33 |
|
|
M LEGACCIO (lavorata in tondo): 1 “costa” a m legaccio = 2 giri. * 1 giro dir e 1 giro rov *, ripetere *-*. M LEGACCIO (avanti e indietro): Lavorare tutti i f a dir. 1 “costa” a m legaccio = 2 f dir. SUGGERIMENTO PER GLI AUMENTI PER IL RAGLAN: Aumentare per il raglan a ogni lato dei 4 segnapunti - NOTA: Il n° degli aumenti è diverso sul dietro/davanti e sulle maniche. Aumentare 2 m a ogni lato del davanti e dal dietro a giri alterni (= 8 aumenti): Aumentare come segue prima del segnapunti: Iniziare 2 m prima del segnapunti e lavorare come segue: lavorare 2 m nella 1° m, 1 gettato, 1 m dir, segnapunti. Aumentare come segue dopo il segnapunti: segnapunti, 1 m dir, 1 gettato e lavorare 2 m nella m successiva. Sul giro successivo lavorare il gettato a dir per fare il buco. Aumentare 1 m a ogni lato del davanti e del dietro o su ogni manica a giri alterni (= 4 aumenti sul dietro/davanti o 4 m sulle maniche): Aumentare come segue prima del segnapunti: iniziare 1 m prima del segnapunti e lavorare come segue: 1 gettato, 1 m dir, segnapunti. Aumentare come segue dopo il segnapunti: Segnapunti, 1 m dir, 1 gettato. Sul giro successivo lavorare il gettato a dir per fare il buco. Aumentare 1 m a ogni lato del davanti e del dietro o su ogni manica ogni 4 giri (= 4 aumenti sul dietro/davanti o 4 m sulle maniche): Aumentare come segue prima del segnapunti: Giro 1: iniziare 1 m prima del segnapunti e lavorare come segue: 1 gettato, 1 m dir, segnapunti. Giro 2: lavorare i gettati a dir per fare i buchi. Giro 3: iniziare 2 m prima del segnapunti e lavorare come segue: 2 m insieme a dir, 1 gettato, 1 m dir, segnapunti (= nessun aumento). Giro 4: lavorare i gettati a dir per fare i buchi. Aumentare 2 m a ogni lato del davanti e dal dietro a giri alterni (= 8 aumenti): Aumentare come segue prima del segnapunti: Iniziare 2 m prima del segnapunti e lavorare come segue: lavorare 2 m nella 1° m, 1 gettato, 1 m dir, segnapunti. Aumentare come segue dopo il segnapunti: segnapunti, 1 m dir, 1 gettato e lavorare 2 m nella m successiva. Sul giro successivo lavorare il gettato a dir per fare il buco. Aumentare come segue dopo il segnapunti: Giro 1: Segnapunti, 1 m dir, 1 gettato. Giro 2: lavorare il gettato a dir per fare il buco. Giro 3: Segnapunti, 1 m dir, 1 gettato, 2 m insieme a dir (= nessun aumento). Giro 4: lavorare il gettato a dir per fare il buco. SUGGERIMENTO PER GLI AUMENTI (applicato agli aumenti ai lati del corpo): Iniziare 1 m prima del segnapunti e fare 1 gettato, 2 m dir (il segnapunti è al centro di queste 2 m), fare 1 gettato (= 2 aumenti). Sul giro successivo lavorare i gettati a dir ritorto per evitare buchi. SUGGERIMENTO PER LE DIMINUZONI: Diminuire al centro sotto la manica come segue: iniziare 3 m prima del segnapunti e lavorare 2 m insieme a dir, 2 m dir (il segnapunti è al centro di queste m), passare 1 m a dir senza lavorarla, 1 m dir, accavallare la m passata sopra quella appena lavorata (= 2 diminuzioni). ---------------------------------------------------------- MAGLIONE: Lavorato in tondo con i f circolari, dall’alto in basso (top down). Lavorare le maniche in tondo con i f circolari/a doppia punta. SPRONE: Avviare 62-62-66-74-78-78 m con i f circolari n° 4,5 mm con il grigio perla e lavorare 1 “costa” a M LEGACCIO – leggere la spiegazione sopra. Lavorare 1 giro dir e allo stesso tempo distribuire 10 aumenti in modo uniforme = 72-72-76-84-88-88 m. Passare ai f circolari corti n° 5 mm e lavorare come segue (= inizio del giro = centro dietro): 13-13-14-14-15-15 m a m rasata (= metà dietro), inserire un segnapunti, 10-10-10-14-14-14 m a m rasata (= manica), inserire un segnapunti, 26-26-28-28-30-30 m a m rasata (= davanti), inserire un segnapunti, 10-10-10-14-14-14 m a m rasata (= manica), inserire un segnapunti, m rasata sulle ultime 13-13-14-14-15-15 m sul giro (= metà dietro). FARE ATTENZIONE ALLA TENSIONE DEL LAVORO E LEGGERE TUTTA LA SEZIONE SEGUENTE PRIMA DI CONTINUARE: Sul giro successivo iniziare gli aumenti per il RAGLAN – LEGGERE IL SUGGERIMENTO PER GLI AUMENTI. Aumentare a ogni lato dei 4 segnapunti ma aumentare in modo diverso sul davanti/dietro e sulle maniche come segue: DAVANTI E DIETRO: Aumentare 2 m a ogni lato sul davanti e sul dietro a giri alterni 0-2-1-3-6-8 volte, aumentare 1 m a ogni lato sul davanti e sul dietro a giri alterni 20-21-24-24-22-22 volte e aumentare 1 m a ogni lato sul davanti e sul dietro ogni 4 giri 1-0-0-0-0-0 volte. MANICHE: Aumentare 1 m a ogni lato su ogni manica a giri alterni 16-23-25-24-22-22 volte e aumentare 1 m a ogni lato su ogni manica ogni 4 giri 3-0-0-1-3-4 volte. Alla fine di tutti gli aumenti = 232-264-280-304-324-344 m sul f. Il lavoro misura 22-24-25-27-29-31 cm dalla spalla (19-21-22-23-25-27 cm dal bordo di avvio). Ora lavorare come segue: lavorare le prime 34-38-40-44-49-53 m (= metà dietro), trasferire le 48-56-60-64-64-66 m successive su un fermamaglie (= manica), avviare 6-6-8-8-10-12 m sotto la manica (inserire 1 segnapunti al centro di queste nuove m), lavorare le 68-76-80-88-98-106 m successive (= davanti), trasferire le 48-56-60-64-64-66 m successive su un fermamaglie (= manica), avviare 6-6-8-8-10-12 m sotto la manica (inserire 1 segnapunti al centro di queste nuove m), lavorare le 34-38-40-44-49-53 m rimaste (= metà dietro). ORA MISURARE IL LAVORO DA QUI. CORPO: = 148-164-176-192-216-236 m. Lavorare a m rasata in tondo con il grigio perla fino a quando il lavoro misura 3 cm. Ora aumentare 1 m a ogni lato di entrambi i segnapunti – LEGGERE IL SUGGERIMENTO PER GLI AUMENTI (= 4 aumenti). Aumentare ogni 3 cm 9 volte = 184-200-212-228-252-272 m. Continuare a m rasata fino a quando il lavoro misura 28-28-29-30-30-30 cm. Riportare le m tra il 2° e il 1° segnapunti su un fermamaglie (= dietro), poi lavorare avanti e indietro sulle 92-100-106-114-126-136 m rimaste (= davanti). Passare al foschia viola e lavorare a m rasata con 5 m a M LEGACCIO a ogni lato – leggere la spiegazione sopra. Continuare in questo modo per 7 cm, poi lavorare 2 coste su tutte le m, intrecciare. DIETRO: Riportare 92-100-106-114-126-136 m dal fermamaglie sui f circolari n° 5 mm. Lavorare a m rasata con 5 m a m legaccio a ogni lato. Quando il lavoro misura 8 cm passare al foschia viola, continuare a m rasara e m legaccio per 7 cm. Poi lavorare 2 coste su tutte le m, intrecciare. MANICA: Riportare le m dal fermamaglie sui f circolari/a doppia punta n° 5 mm e inoltre avviare 6-6-8-8-10-12 nuove m sotto le maniche = 54-62-68-72-74-78 m. Inserire un segnapunti al centro delle nuove m sotto le maniche – ORA MISURARE IL LAVORO DA QUI. Lavorate a m rasata in tondo con i f circolari/doppia punta. Quando il lavoro misura 3 cm, diminuire 1 m a ogni lato del segnapunti – LEGGERE IL SUGGERIMENTO PER LE DIMINUZIONI. Ripetere le diminuzioni ogni 3½-2½-2-2-2-1½ cm per un totale di 10-13-15-16-17-18 volte. Alla fine delle diminuzioni, rimangono 34-36-38-40-40-42 m sul giro. Quando la manica misura 44-43-43-43-41-40 cm, passare ai f a doppia punta n° 4,5 mm. Lavorare 2 “coste” e intrecciare SENZA STRINGERE. La manica misura circa 45-44-44-44-42-41 cm (NOTA: Misure più corte per le taglie più grandi a causa del collo più ampio e dello sprone più lungo). Lavorare l’altra manica nello stesso modo. CONFEZIONE: Cucire le aperture sotto le maniche. |
|
 |
|
Avete terminato questo modello?Allora taggate le vostre foto con #dropspattern #lillacamillasweater o inviatele alla #dropsfan gallery. Avete bisogno di aiuto con questo modello?Troverete 29 video tutorial, una sezione per i commenti/domande e molto altro guardando il modello su www.garnstudio.com © 1982-2026 DROPS Design A/S. Ci riserviamo tutti i diritti. Questo documento, compreso tutte le sue sotto-sezioni, è protetto dalle leggi sul copyright. Potete leggere quello che potete fare con i nostri modelli alla fine di ogni modello sul nostro sito. |
|


Con oltre 40 anni di esperienza nel design di modelli di maglia e uncinetto, DROPS Design offre la più estesa collezione di modelli gratuiti su internet - tradotti in 17 lingue. Ad oggi vi possiamo fornire 324 cataloghi e 12290 modelli - 9561 dei quali sono tradotti in Italiano.
Ci stiamo impegnando molto per darvi il meglio che vi possiamo offrire in termini di maglia e uncinetto, ispirazioni e consigli così come filati di grande qualità ad un prezzo incredibile! Volete utilizzare i nostri modelli per qualcosa d'altro oltre al vostro uso personale? Potete leggere tutto ciò che è consentito nel testo sul Copyright in basso su tutte le pagine dei nostri modelli. Buon lavoro!
Lasciare un commento sul modello DROPS 172-33
Noi saremmo felici di ricevere i tuoi commenti e opinioni su questo modello!
Se vuoi fare una domanda, fai per favore attenzione a selezionare la categoria corretta nella casella qui sotto per velocizzare il processo di risposta. I campi richiesti sono indicati da *.