
Categorie popolari
State cercando un filato?


Commenti / Domande (35)
![]() Karola Hunger ha scritto:
Karola Hunger ha scritto:
In der Anleitung wird Babyalpaka Silk in mittelgrau angegeben. Diese Farbe steht aber nicht zur Auswahl. Da gibt es nur hellgrau und grau. Welche Farbe ist gemeint? LG Karola
02.02.2020 - 12:38DROPS Design ha risposto:
Liebe Frau Hunger, die Farbennamen sind regelmäßig akualisiert/verbessert, die Farbennummer ist aber die richtige, dh Farbe Nr 8465. Viel Spaß beim stricken!
03.02.2020 - 10:07
![]() Mona ha scritto:
Mona ha scritto:
Ich verstehe diesen Satz der Anleitung nicht: GLEICHZEITIG in der ersten R 2 M über jedem Linksbereich à 4 M abnehmen (indem 2 M re zusgestr werden) Was ist das Linksteil? Wo muss ich zusammenstricken?
21.12.2019 - 21:02DROPS Design ha risposto:
Liebe Mona, die Maschen sind auf der Nadel so verteilt, daß Sie 2 Mal 4 linke Maschen ( bei Hin-Reihen, dh rechte Maschen bei Rückreihen) stricken. Diese linke Maschen sollen Sie jetzt abnehmen, dh 2 Maschen rechts zusammen x 2 über diese 4 linken Maschen. Viel Spaß beim stricken!
02.01.2020 - 09:50
![]() Sophia ha scritto:
Sophia ha scritto:
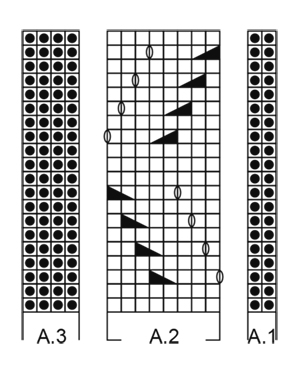
I am reading the pattern at the moment and don't understand the last few rows of the left back/front piece. It says to "work 3 ridges - at the same time on first row dec 2 sts over each P section of 4 sts (dec by K2 tog)" which makes me think I should still be following the repeating pattern. However, I thought ridges were two rows of K - that's what it says earlier - so I'm not sure what I should be doing! Please can you help? Thank you.
18.03.2019 - 18:19DROPS Design ha risposto:
Dear Sophia, you are right 1 ridge = 2 rows of K - when you have to work the 3 ridges, you will decrease 1 stitch in each of the P-sections with 4 sts (= A.3) when working the first row of these 3 riddges, ie you knit all sts and at the same time decrease by K2 tog the previous sections worked with P4. Happy knitting!
19.03.2019 - 10:06
![]() Claudia Ashley ha scritto:
Claudia Ashley ha scritto:
Hello I am reading the pattern at the moment but I am stuck on the repeating pattern .if I cast 144 stitches and then knit following the pattern A1 2stitches then repeat A2-A3 10 tiMrs then A2 and finish with A1i calculate that to 132 stitches. So what do I miss what do I do with the 10 stitches which are left?
14.09.2018 - 11:20DROPS Design ha risposto:
Dear Mrs Ashley, you work: A.1 (= 2 sts), then repeat *A.2 (= 8 sts), A.3 (= 4 sts)* a total of 11 times (= over the next 132 sts), you have now worked 134 sts, 10 sts remain on left needle, work A.2 (= 8 sts) and A.1 (= 2 sts). Happy knitting!
14.09.2018 - 13:15
![]() Leslie Jarvis ha scritto:
Leslie Jarvis ha scritto:
Thanks for your prompt reply! However I’m still not understanding the directions for binding off for the sleeve cap. If I’m making the smallest size and begin with a total of 60 sts, I begin the next row by binding off four sts, which leaves me with 56 sts. I turn the work, bind off another 4 and so on 3 more times, which is a total of 20 sts bound off and my remaining st count is 40, not 20.
14.08.2018 - 13:21DROPS Design ha risposto:
Dear Mrs Jarvis, there are 60 sts after all increases have been done, now cast off 4 sts at the beginning of every row on each side (= both from RS and from WS) a total of 5 times: *work 1 RS row casting off the first 4 sts, turn and cast off 4 sts at the beg of next row from WS* ( = 8 sts are now cast off in total, 4 on each side), repeeat from *-* a total of 5 times (= 8 sts x 5 = 40 sts are now cast off = 60-40= 20 sts remain. Happy knitting!
14.08.2018 - 16:26Leslie Jarvis ha scritto:
I have a question about the directions for casting off the sleeve cap. It says at the beginning of every row “Cast off 4 sts 5 times in total in each side = 20-24-26-30-34-36 sts.” Are the numbers 20-24-26 etc the total number of sts cast off, or the total number of sts remaining? My understanding of the directions is that I should cast off 4sts at the beginning of each row for the next 5 rows, but I’m not sure I have that correct.
14.08.2018 - 05:00DROPS Design ha risposto:
Dear Leslie, yes, the number 20-24-26-30-34-36 refers to the number of stitches left on the needles after you cast of. You understand the directions correctly, you have to cast of the 4 stitches at the beginning of every row for the next row. Happy Knitting!
14.08.2018 - 07:57
![]() Karlijn ha scritto:
Karlijn ha scritto:
Hoi, Ik heb het vest af en het patroon is prachtig geworden. Nu heb ik alleen nog een vraag over het in model krijgen van het vest. Wat moet ik doen om het zo in model te krijgen zoals op de foto? Als ik het nu aan trek dan zit het nog niet helemaal zoals het zou moeten. Alvast bedankt!
01.11.2017 - 10:43DROPS Design ha risposto:
Hallo Karlijn, Waarschijnlijk bedoel je dat het kantpatroon nog een beetje 'in elkaar zit'. Om het mooi plat te krijgen pers ik dit altijd op met het strijkijzer. Maar LET OP: doe dit heel voorzichtig. Gebruik een oude theedoek, bevochtig deze en leg deze over het werk heen op de strijplank. Dan heel voorzichtig en kort met het strijkijzer er over.
01.11.2017 - 18:42
![]() Linda ha scritto:
Linda ha scritto:
Hur ska man göra vid hålet för armen? Ska man bara avmaska och på nästa varv lägga upp nya maskor (så det blir ett litet hål) eller har det blivit något fel i mönstret?
25.09.2017 - 23:46DROPS Design ha risposto:
Jo, du ska göra precis som det står i mönstret. Ärmhålet kommer att bli tillräckligt stort då det stickas vidare.
26.09.2017 - 14:32
![]() Rubina ha scritto:
Rubina ha scritto:
Buongiorno, vorrei sapere se per questo modello posso sostituire il Kid-Silk con Brushed Alpaca Sik
18.08.2017 - 10:45DROPS Design ha risposto:
Buongiorno Rubina, il modello è lavorato con 1 capo per qualità, quindi 2 capi di filati appartenenti al gruppo A (= 1 capo del gruppo C). Se vuole può utilizzare 1 capo di Brushed Silk che appartiene al gruppo C, controllando che il campione corrisponda a quello indicato. Buon lavoro!
18.08.2017 - 11:26
![]() Markéta Vlková ha scritto:
Markéta Vlková ha scritto:
Kterou přízi typu C a kolik byste mi prosím doporučili tak, aby co nejlépe vyhovovala velikosti L? Děkuji.
03.05.2017 - 14:26DROPS Design ha risposto:
Milá Markéto, na tento kabátek je ideální vzdušná příze Air - na velikost L budete potřebovat 9 klubíček. Hodně zdaru! Hana
05.05.2017 - 08:06
|
|||||||||||||||||||
Winter Bird#winterbirdcardigan |
|||||||||||||||||||
 |
 |
||||||||||||||||||
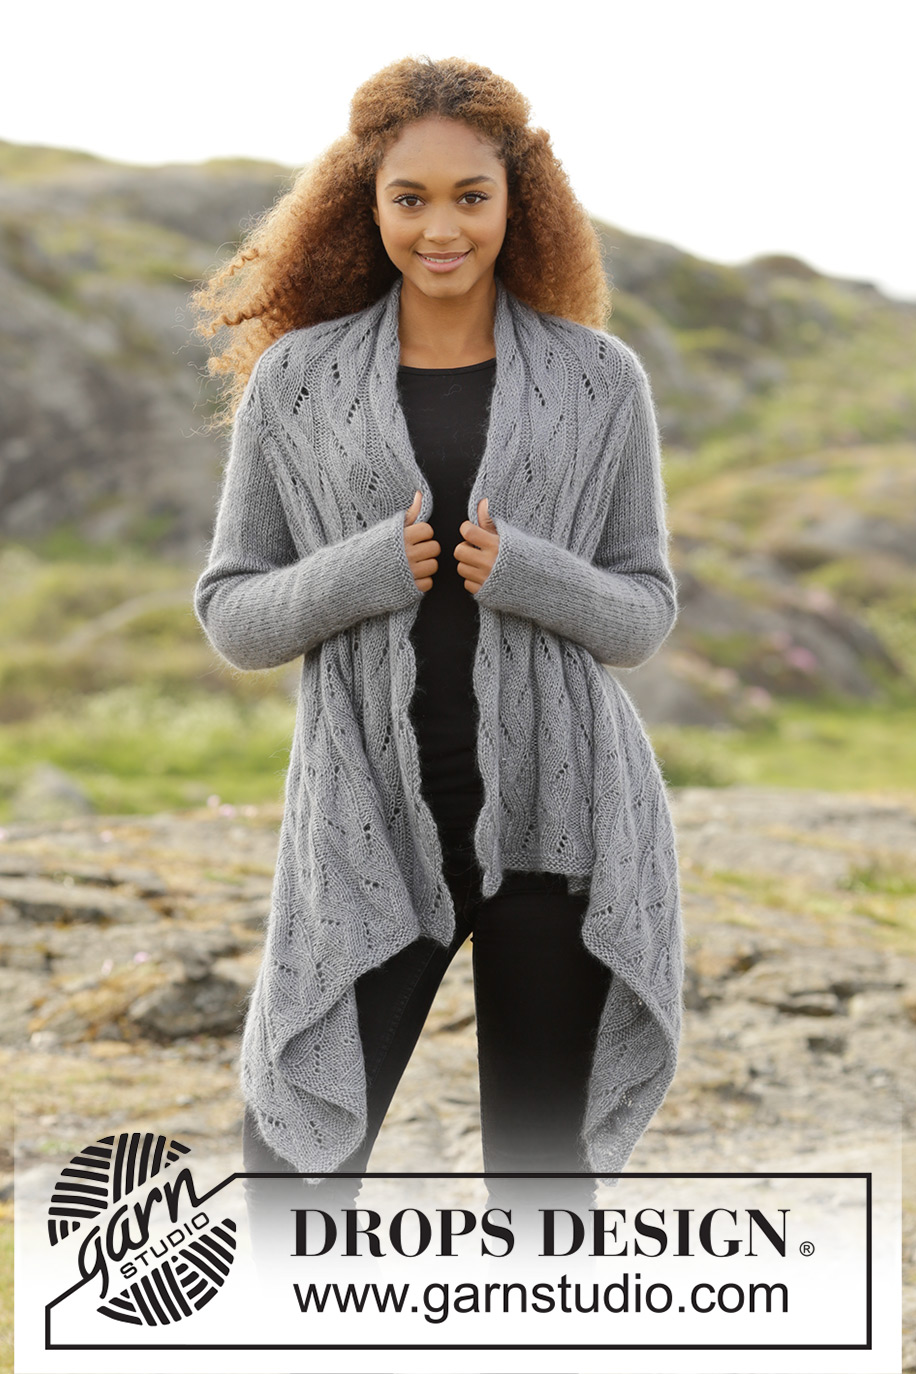
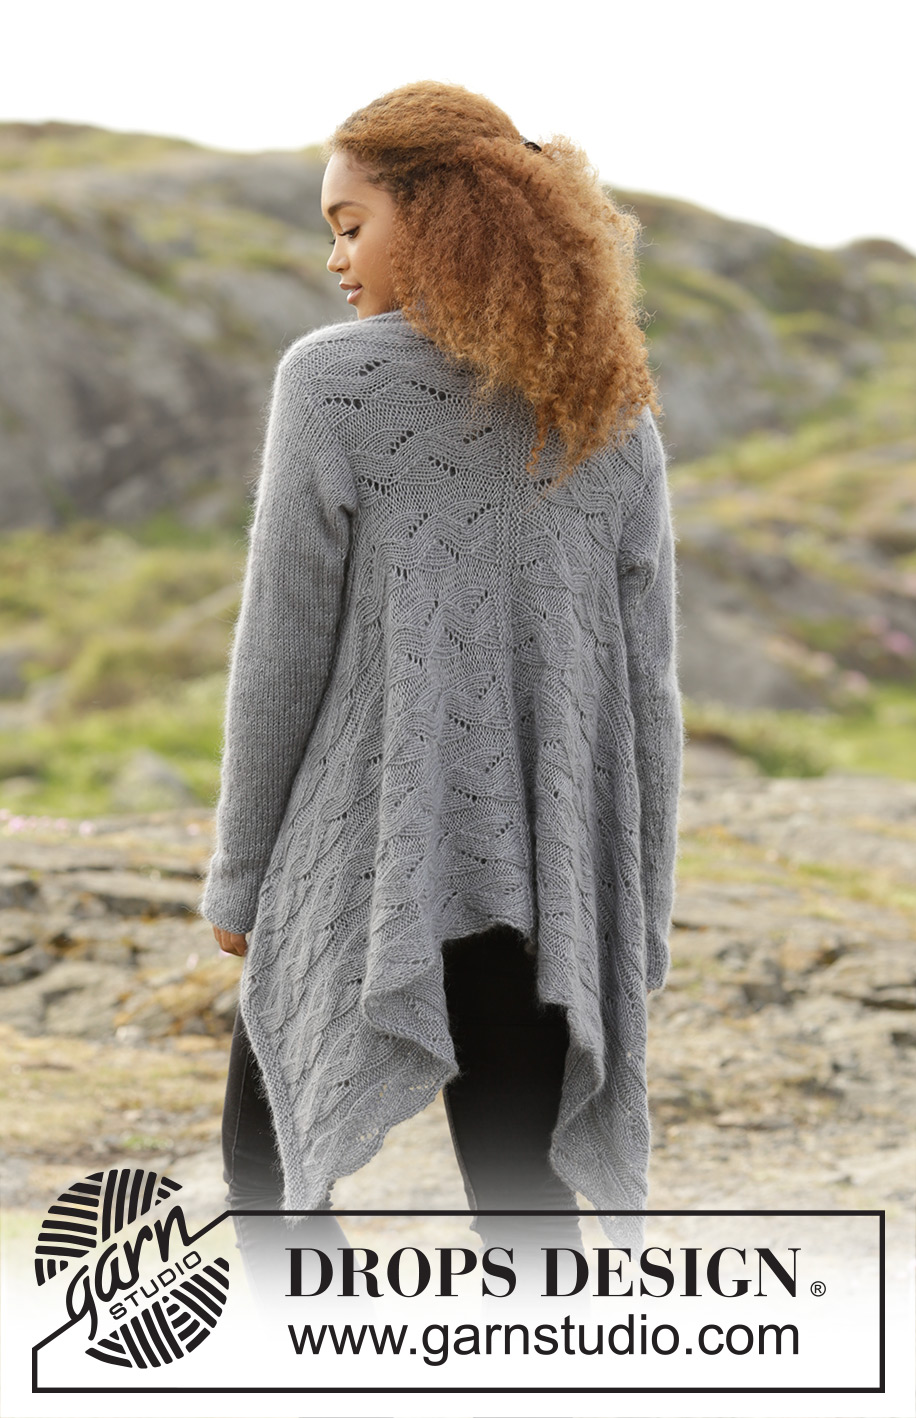
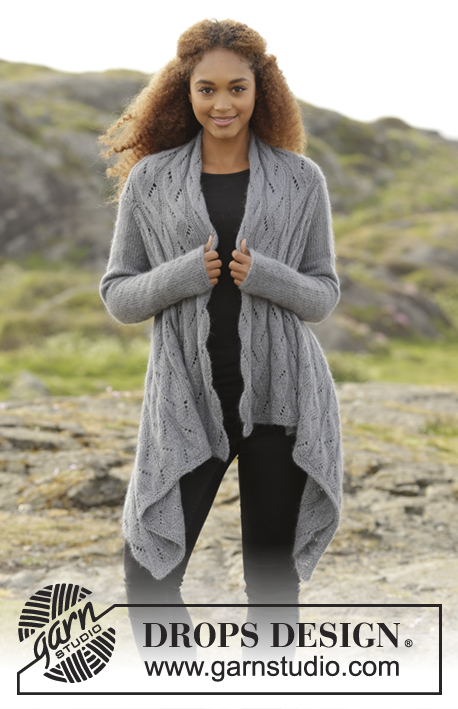
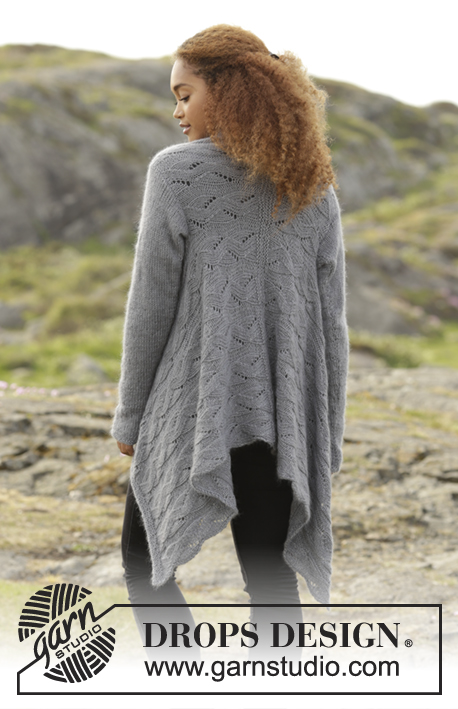
Cardigan quadrato DROPS lavorato ai ferri con motivo traforato, lavorato da lato a lato in "BabyAlpaca Silk" e "Kid-Silk". Taglie: S - XXXL.
DROPS 173-6 |
|||||||||||||||||||
|
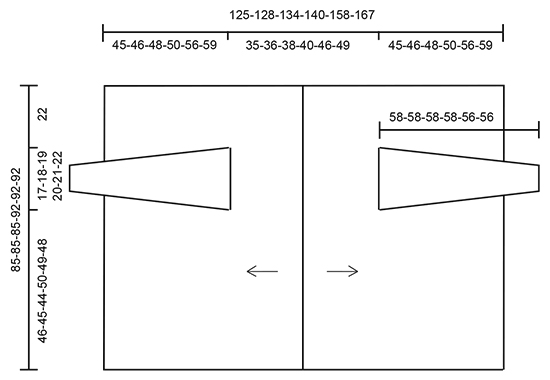
M LEGACCIO (avanti e indietro sui f): Lavorare tutti i f a dir. 1 “costa” a m legaccio = 2 f dir. MOTIVO: Vedere i diagrammi A.1-A.3. I diagrammi mostrano tutti i f del motivo visti dal diritto del lavoro. SUGGERIMENTO PER GLI AUMENTI: Tutti gli aumenti sono fatti dal diritto del lavoro. Aumentare all’interno della m legaccio e di 1 m dir: fare 1 gettato, sul f successivo, lavorare il gettato a rov ritorto per evitare buchi. ---------------------------------------------------------- CARDIGAN: Lavorato in 2 parti da lato a lato che poi vengono cucite insieme alla fine. Lavorare dal centro dietro sul dietro verso il centro davanti. DIETRO/DAVANTI SINISTRO: Lavorato avanti e indietro sui f circolari per avere spazio per tutte le m. Avviare 144-144-144-156-156-156 m con i f n° 4 mm con 1 capo di BabyAlpaca Silk e 1 capo di Kid-Silk (= 2 capi). Lavorare 2 coste a M LEGACCIO – leggere la spiegazione sopra. Passare ai f circolari n° 5 mm e lavorare come segue dal diritto del lavoro: lavorare A.1 (= 2 m) * A.2 (= 8 m), A.3 (= 4 m) *, ripetere *-* altre 10-10-10-11-11-11 volte, A.2 (= 8 m), finire con A.1 (= 2 m). Continuare il motivo in questo modo. FARE ATTENZIONE ALLA TENSIONE DEL LAVORO! Quando il lavoro misura 17½-18-19-20-23-24½ cm, intrecciare per lo scalfo dal diritto del lavoro come segue: lavorare le prime 38 m, intrecciare le 29-31-32-34-36-38 m successive e lavorare come prima sulle ultime 77-75-74-84-82-80 m. ORA MISURARE IL LAVORO DA QUI! Sul f successivo avviare 29-31-32-34-36-38 nuove m sulle m intrecciate e continuare il motivo come prima. Quando il lavoro misura 43-44-46-48-54-57 cm, lavorare 3 “coste” – ALLO STESSO TEMPO sul 1° f diminuire 2 m in ogni sezione a rov di 4 m (diminuire lavorando 2 m insieme a dir) = 122-122-122-132-132-132 m. Intrecciare SENZA STRINGERE. DIETRO/DAVANTI DESTRO: Avviare e lavorare come per il davanti/dietro sinistro ma intrecciare per lo scalfo dopo le prime 38 m iniziando dal rovescio del lavoro e avviare le nuove m dal diritto del lavoro. MANICA: Lavorata avanti e indietro sui f circolari. Avviare 38-38-40-40-44-44 m (compresa 1 m di vivagno a ogni lato) con i f circolari n° 4 mm con 1 capo di BabyAlpaca + 1 capo di Kid-Silk (= 2 capi). Lavorare 2 “coste”. Passare ai f circolari n° 5 mm e lavorare a m rasata con 1 m di vivagno a m legaccio a ogni lato. Quando il lavoro misura 11-12-12-13-12-11 cm, aumentare 1 m all’interno della m di vivagno e lavorare 1 m dir a ogni lato del lavoro – leggere il SUGGERIMENTO PER GLI AUMENTI (= 2 aumenti). Ripetere gli aumenti ogni 4-3-3-2½-2½-2½ cm 11-13-13-15-15-16 volte in totale = 60-64-66-70-74-76 m. Quando il lavoro misura 53-53-53-53-51-51 cm (NOTA: Misure più corte per le taglie più grandi a causa della maggiore ampiezza delle spalle), intrecciare per l’arrotondamento della manica all’inizio di ogni f come segue: intrecciare 4 m 5 volte in totale a ogni lato = 20-24-26-30-34-36 m. Intrecciare le m rimaste, il lavoro misura circa 58-58-58-58-56-56 cm. Lavorare l’altra manica. CONFEZIONE: Cucire insieme i bordi di avvio nel filo più esterno delle m di vivagno. Attaccare le maniche. Cucire il margine sotto il braccio all’interno della m di vivagno. |
|||||||||||||||||||
Spiegazioni del diagramma |
|||||||||||||||||||
|
|||||||||||||||||||
 |
|||||||||||||||||||
 |
|||||||||||||||||||
Avete terminato questo modello?Allora taggate le vostre foto con #dropspattern #winterbirdcardigan o inviatele alla #dropsfan gallery. Avete bisogno di aiuto con questo modello?Troverete 21 video tutorial, una sezione per i commenti/domande e molto altro guardando il modello su www.garnstudio.com © 1982-2026 DROPS Design A/S. Ci riserviamo tutti i diritti. Questo documento, compreso tutte le sue sotto-sezioni, è protetto dalle leggi sul copyright. Potete leggere quello che potete fare con i nostri modelli alla fine di ogni modello sul nostro sito. |
|||||||||||||||||||


Con oltre 40 anni di esperienza nel design di modelli di maglia e uncinetto, DROPS Design offre la più estesa collezione di modelli gratuiti su internet - tradotti in 17 lingue. Ad oggi vi possiamo fornire 324 cataloghi e 12290 modelli - 9561 dei quali sono tradotti in Italiano.
Ci stiamo impegnando molto per darvi il meglio che vi possiamo offrire in termini di maglia e uncinetto, ispirazioni e consigli così come filati di grande qualità ad un prezzo incredibile! Volete utilizzare i nostri modelli per qualcosa d'altro oltre al vostro uso personale? Potete leggere tutto ciò che è consentito nel testo sul Copyright in basso su tutte le pagine dei nostri modelli. Buon lavoro!
Lasciare un commento sul modello DROPS 173-6
Noi saremmo felici di ricevere i tuoi commenti e opinioni su questo modello!
Se vuoi fare una domanda, fai per favore attenzione a selezionare la categoria corretta nella casella qui sotto per velocizzare il processo di risposta. I campi richiesti sono indicati da *.