
Categorie popolari
State cercando un filato?


Commenti / Domande (47)
![]() Nemtanu Anisoara ha scritto:
Nemtanu Anisoara ha scritto:
Si puo tradure in italiano?
09.03.2026 - 15:27DROPS Design ha risposto:
Hi, the Italian version is availableHERE. Happy knitting!
08.04.2026 - 14:22
![]() Sabine ha scritto:
Sabine ha scritto:
Wer das Tuch auch in Big Merino (Garngruppe C) stricken möchte: meines wiegt 349 gr, ich habe 144 gr für den Zopf und 205 gr für den Hauptteil des Schals benötigt. Viel Spaß, es lohnt sich! :-)
28.09.2025 - 15:41
![]() Sabine ha scritto:
Sabine ha scritto:
Ein wunderschönes Tuch, das ich, um es etwas dünner zu haben, mit Drops Big Merino (Garngruppe C) gestrickt habe mit einer 6,5er Nadel und zweifarbig, so dass sich der Zopfrand noch mehr hervorhebt. Bei einer Länge von 85cm habe ich, damit sich die Spitze des Tuchs bei dieser dünneren Wolle nicht einrollt 5 verkürzte Reihen gestrickt (statt 3). Beim nächsten Mal stricke ich es wieder mit Garngruppe C mit einer 7 - 8er Nadel und mit 16 Maschen für den Zopf - freue mich schon!
28.09.2025 - 15:25
![]() Carol Maitland ha scritto:
Carol Maitland ha scritto:
Hi I was just answered my question by the Drops Team but my question was not really answered.I understand the increase in the first row,it’s the 4 row increase I do not understand.Where do I do this increase on the 4th row and where do I do the decrease on the 4th row, Thks again Carol.
12.09.2025 - 14:16DROPS Design ha risposto:
Dear Carol, you have one 4-row increase section explained in the pattern. In this section, in ROW 1 you increase 1 stitch, by working 2 stitches in the first stitch after the marker. Then you work ROWS 2-4 with knit and A.1. Now you repeat these 4 rows, increasing always in the ROW 1 repeat, in the stitch right after the marker. That is, you increase not in ROW 4 but in every 4th row (out of rows 1-4 you increase in one of them, row 1). The decreases follow the same format, where you decrease 2 stitches after the marker every time that you repeat ROW 1 of the decreases. Happy knitting!
15.09.2025 - 01:39
![]() Carol Maitland ha scritto:
Carol Maitland ha scritto:
Hi I sent a question yesterday,about where to add the extra stitch in the 4 th row.Has not been answered.
10.09.2025 - 18:01DROPS Design ha risposto:
Dear Carol, please see our answer above. Happy knitting!
15.09.2025 - 01:40
![]() Carol Maitland ha scritto:
Carol Maitland ha scritto:
Hi itsays on the shawl to increase every 4th row,where do I do this and when I decrease where do I do that. Thks Carol.c
09.09.2025 - 21:05DROPS Design ha risposto:
Hi Carol, After the first 14 rows, you work 4 new rows which are then repeated onwards increasing 1 stitch in the first stitch after the marker-thread on the first of these 4 rows. The decreases begin after the short rows, and again 1 stitch is decreased straight after the marker-thread on the first of the 4 rows which are repeated onwards. Regards, Drops Team.
12.09.2025 - 11:03
![]() Carol Maitland ha scritto:
Carol Maitland ha scritto:
Then it says repeat 1st to 4th row,so every 4th row I add a stitch,where at the beginning. sorry my keyboard keys were stuck,thks Carol Maitland
15.08.2025 - 19:56DROPS Design ha risposto:
Dear Mrs Maitland, work as previously explained under rows 1-4: you will increase 1 stitch just after A.1 on first row = you will increase 1 stitch on every 4th row. Happy knitting!
18.08.2025 - 08:15
![]() Carol Maitland ha scritto:
Carol Maitland ha scritto:
Hi I currently working on this pattern,have some questions. Row 2 on second part says knit until marker then A1 over the next 12 stitches,does this mean I purl them because the pattern says to purl from the wrong side. Row 3,is this the cable row.so I put 6 cable stitches at back and knit the next 6 then do the cable stitches,but have noticed that the beginning of my working yarn is at the cable end.Do I carry it at the back before knitting the 6 stitches on the cable needle.
15.08.2025 - 19:52DROPS Design ha risposto:
Dear Mrs Maitland, from wrong side you will purl the stitches of A.1, on 3rd row start diagram - see in this video how to work this diagram and how to work the cable at the beginning of the row. Happy knitting!
18.08.2025 - 08:13
![]() Renate Huber ha scritto:
Renate Huber ha scritto:
Sehr schön gefällt mir ausgezeichnet
03.09.2024 - 15:54
![]() Monique ha scritto:
Monique ha scritto:
Une fois le produit fini, avec la même laine et j'ai obtenu un châle beaucoup trop long par rapport à sa largeur. Il faut peut être faire des augmentations plus rapides pour avoir un châle plus large.
09.03.2023 - 09:08
|
|||||||
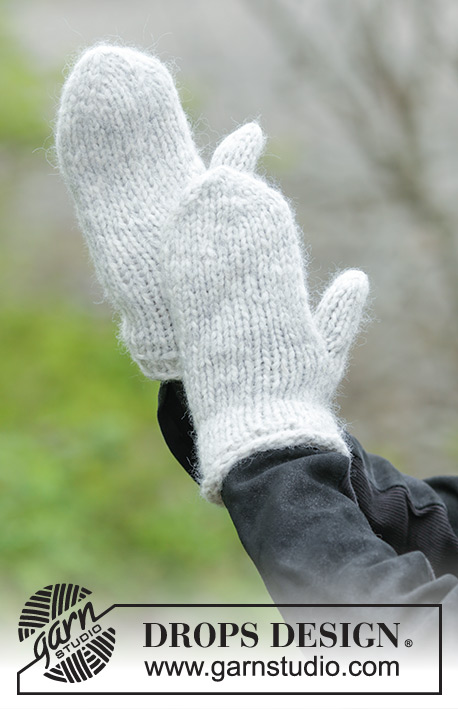
Winter Cozy#wintercozyset |
|||||||
 |
 |
||||||
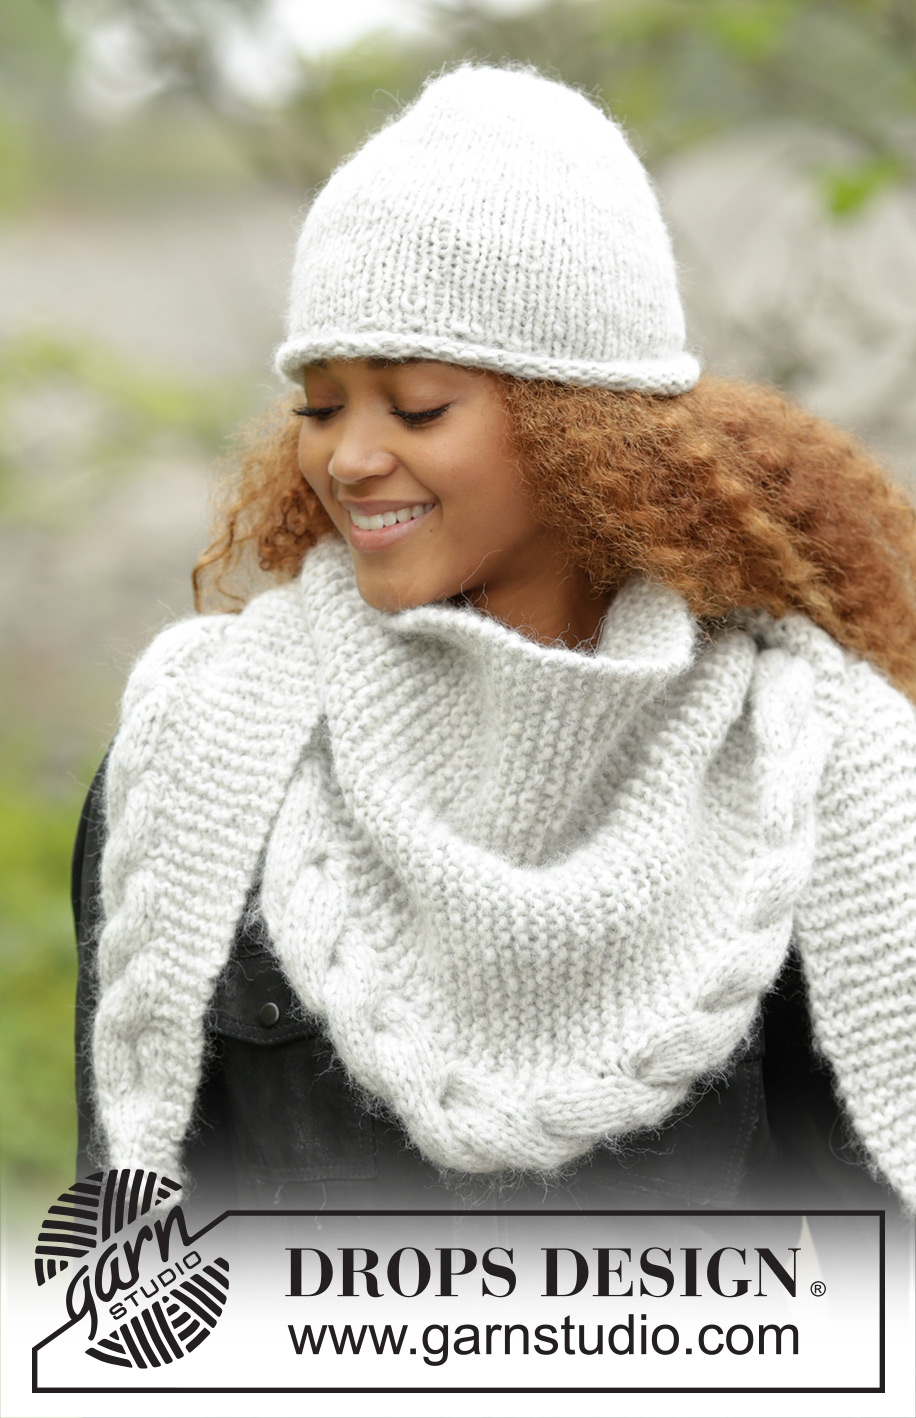
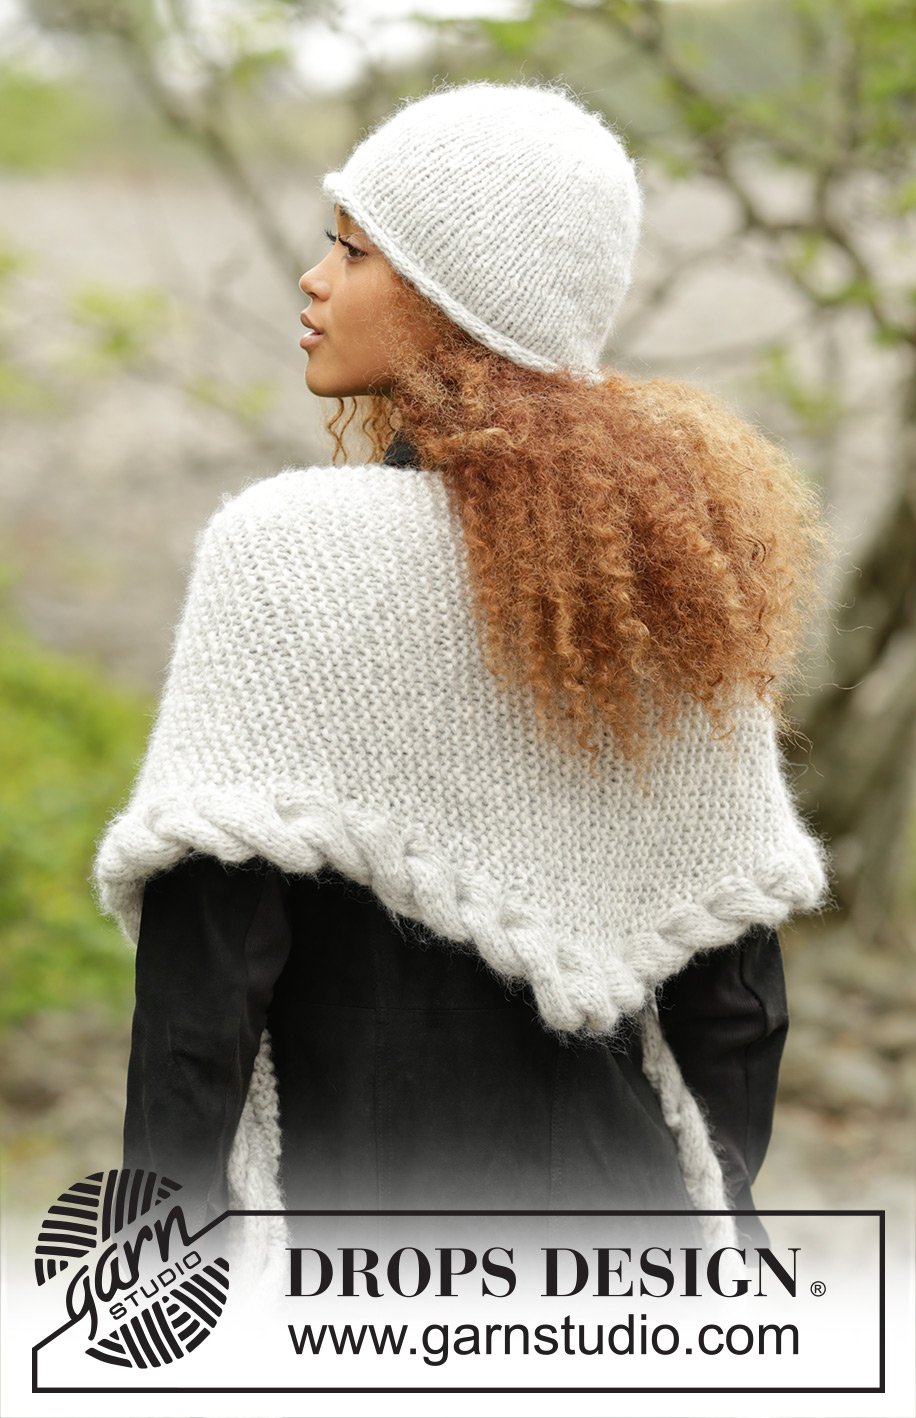
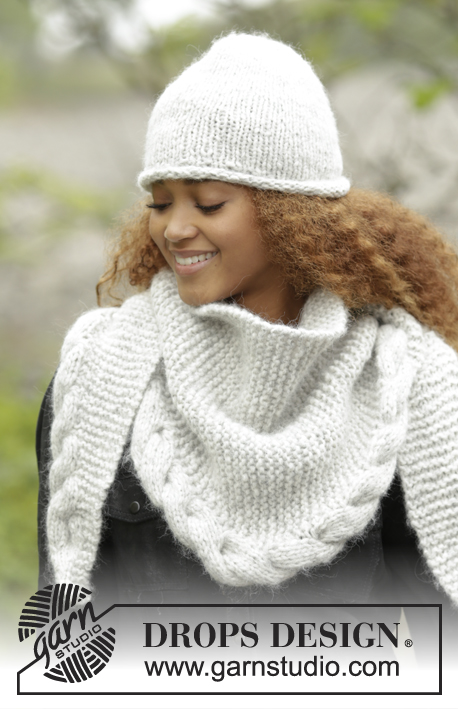
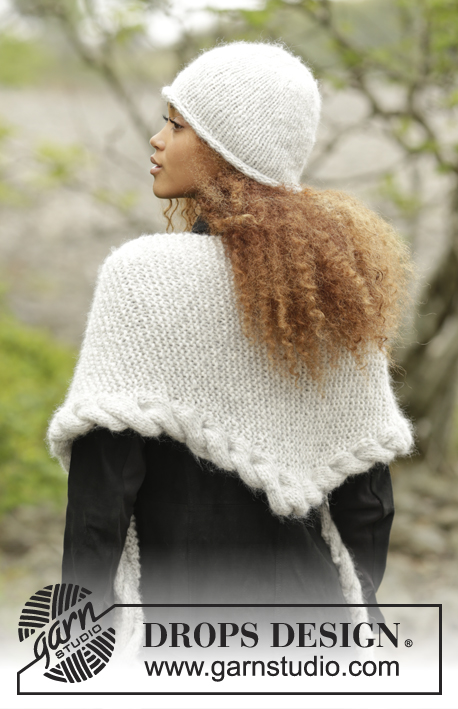
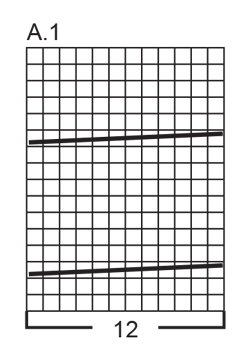
Completo ai ferri formato da: Berretto DROPS in "Cloud" o "Air" e scialle lavorato nel senso della lunghezza, a punto legaccio, con treccia sul bordo, in "Cloud" o "Air".
DROPS 172-10 |
|||||||
|
BERRETTO: SUGGERIMENTO PER LE DIMINUZIONI: Passare 1 m a dir senza lavorarla, 1 m dir, accavallare la m passata sulla m lavorata. ---------------------------------------------------------- BERRETTO: Avviare 56-60 m sui ferri circolari n° 7 con il filato Cloud o 2 capi di Air. Lavorare 4 giri a maglia rasata (= bordo arrotolato). Lavorare il giro successivo come segue: * 1 m dir, 1 m rov *, ripetere da *-* su tutto il giro. Lavorare ancora 1 giro lavorando a dir le m dir e a rov le m rov. Proseguire a maglia rasata fino alla fine del lavoro. RICORDARSI DI MANTENERE LA CORRETTA TENSIONE DEL LAVORO! Quando il lavoro misura 21-22 cm, inserire 8-10 segni nel lavoro, a distanza di 7-6 m l’uno dall’altro. Al giro successivo, diminuire 1 m dopo ogni segno - vedere IL SUGGERIMENTO PER LE DIMINUZIONI (= 8-10 m diminuite). Diminuire in questo modo ogni 2 giri per un totale di 3 volte, poi ad ogni giro per un totale di 2 volte. Al giro successivo, lavorare tutte le m a 2 a 2 insieme a dir ritorto = 8-5 m sui ferri. Tagliare il filo, passarlo attraverso le restanti m, stringere e fermare il filo. Il lavoro misura ca.26-27 cm dall’alto verso il basso (compreso il bordo arrotolato). ---------------------------------------------------------- SCIALLE: SUGGERIMENTO PER IL LAVORO: Lavorare lo scialle a punto legaccio con una treccia lungo il bordo inferiore. Lavorare questa treccia sulle 12 m più esterne. Non lavorare nessuna m vivagno nella treccia (quindi lavorare la m del diagramma A.1 sul bordo dello scialle a maglia rasata sia sul diritto del lavoro che sul rovescio del lavoro, come una maglia normale), in caso contrario la treccia non si attorciglierà e non avrà la forma corretta. MOTIVO: Vedere il diagramma A.1. Il diagramma mostra tutti i ferri del motivo, visti sul diritto del lavoro. SUGGERIMENTO PER PRENDERE LE MISURE: Misurare lo scialle lungo il lato senza aumenti / diminuzioni. ---------------------------------------------------------- SCIALLE: Si lavora nel senso della lunghezza. Avviare 3 m sui ferri circolari n° 8 con il filato Cloud o 2 capi di Air e lavorare come segue: FERRO 1 (= diritto del lavoro): Lavorare tutte le m a dir. FERRO 2 (= rovescio del lavoro): 2 m dir, lavorare 2 volte a dir la m successiva (lavorare quindi la m sia nel filo davanti che in quello dietro) = 4 m. FERRO 3 (= diritto del lavoro): 1 m dir, 1 m gettata, 3 m dir = 5 m. FERRO 4 (= rovescio del lavoro): 3 m dir, lavorare la m gettata a rov ritorto (lavorare quindi la m nel filo dietro e non in quello davanti), 1 m rov. FERRO 5 (= diritto del lavoro): 2 m dir, 1 m gettata, 3 m dir = 6 m. FERRO 6 (= rovescio del lavoro): 3 m dir, lavorare la m gettata a rov ritorto, 2 m rov. FERRO 7 (= diritto del lavoro): 3 m dir, 1 m gettata, 3 m dir = 7 m. FERRO 8 (= rovescio del lavoro): 3 m dir, lavorare la m gettata a rov ritorto, 3 m rov. FERRO 9 (= diritto del lavoro): 4 m dir, 1 m gettata, 3 m dir = 8 m. FERRO 10 (= rovescio del lavoro): 3 m dir, lavorare la m gettata a rov ritorto, 4 m rov. FERRO 11 (= diritto del lavoro): 5 m dir, 1 m gettata, 3 m dir = 9 m. FERRO 12 (= rovescio del lavoro): 3 m dir, lavorare la m gettata a rov ritorto, 5 m rov. FERRO 13 (= diritto del lavoro): lavorare 2 volte a dir ognuna delle prime 6 m, inserire 1 segno, 3 m dir = 15 m. FERRO 14 (= rovescio del lavoro): 3 m dir, segno, 12 m rov. Continuare a lavorare e ad aumentare in questo modo - VEDERE IL SUGGERIMENTO PER IL LAVORO e RICORDARSI DI MANTENERE LA CORRETTA TENSIONE DEL LAVORO. FERRO 1 (= diritto del lavoro): Lavorare il diagramma A.1 sulle prime 12 m, lavorare 2 volte la prima m dopo il segno e lavorare le restanti m a dir (= 1 m aumentata). FERRO 2 (= rovescio del lavoro): Lavorare a dir fino al segno e lavorare il diagramma A.1 sulle ultime 12 m. FERRO 3 (= diritto del lavoro): lavorare il diagramma A.1 sulle prime 12 m, segno, lavorare le restanti m a dir. FERRO 4 (= rovescio del lavoro): Lavorare a dir fino al segno e lavorare il diagramma A.1 sulle ultime 12 m. Ripetere i ferri da 1 a 4 (quindi aumentare 1 m ogni 4 ferri) finché ci sono 56 m. Il lavoro misura ora ca.81 cm - VEDERE IL SUGGERIMENTO PER PRENDERE LE MISURE. Lavorare ora a ferri accorciati per evitare che la treccia sia troppo stretta sulla punta, come segue: * Lavorare 2 ferri in piano sulle 12 m del diagramma A.1, lavorare 2 ferri avanti e indietro in piano su tutte le m come prima ma senza aumentare *, ripetere da *-* 3 volte in tutto. Lavorare di nuovo 2 ferri in piano sulle 12 m del diagramma A.1. Continuare a lavorare e a diminuire come segue: FERRO 1 (= diritto del lavoro): Lavorare il diagramma A.1 sulle prime 12 m, lavorare insieme a dir le prime 2 m dopo il segno e lavorare le restanti m sul ferro a dir (= 1 m diminuita). FERRO 2 (= rovescio del lavoro): Lavorare a dir fino al segno e lavorare il diagramma A.1 sulle ultime 12 m. FERRO 3 (= diritto del lavoro): diagramma A.1 sulle prime 12 m, segno, lavorare a dir le restanti m sul ferro. FERRO 4 (= rovescio del lavoro): Lavorare a dir fino al segno e lavorare il diagramma A.1 sulle ultime 12 m. Ripetere i ferri da 1 a 4 (quindi diminuire 1 m ogni 4 ferri) finché sui ferri non rimangono 15 m (il lavoro misura ora ca.159 cm). Proseguire come segue: FERRO 1 (= diritto del lavoro): Lavorare tutte le m del diagramma A.1 insieme a 2 a 2 a dir, segno, 3 m dir = sui ferri rimangono 9 m. FERRO 2 (= rovescio del lavoro): 3 m dir, 6 m rov. FERRO 3 (= diritto del lavoro): 4 m dir, 2 m insieme a dir, 3 m dir = 8 m. FERRO 4 (= rovescio del lavoro): 3 m dir, 5 m rov. FERRO 5 (= diritto del lavoro): 3 m dir, 2 m insieme a dir, 3 m dir = 7 m. FERRO 6 (= rovescio del lavoro): 3 m dir, 4 m rov. FERRO 7 (= diritto del lavoro): 2 m dir, 2 m insieme a dir, 3 m dir = 6 m. FERRO 8 (= rovescio del lavoro): 3 m dir, 3 m rov. FERRO 9 (= diritto del lavoro): 1 m dir, 2 m insieme a dir, 3 m dir = 5 m. FERRO 10 (= rovescio del lavoro): 3 m dir, 2 m rov. FERRO 11 (= diritto del lavoro): 2 m insieme a dir, 3 m dir = 4 m. FERRO 12 (= rovescio del lavoro): 4 m dir. FERRO 13 (= diritto del lavoro): 2 m insieme a dir, 2 m dir. FERRO 14 (= rovescio del lavoro): Intrecciare le m lavorandole a dir. |
|||||||
Spiegazioni del diagramma |
|||||||
|
|||||||
 |
|||||||
Avete terminato questo modello?Allora taggate le vostre foto con #dropspattern #wintercozyset o inviatele alla #dropsfan gallery. Avete bisogno di aiuto con questo modello?Troverete 25 video tutorial, una sezione per i commenti/domande e molto altro guardando il modello su www.garnstudio.com © 1982-2026 DROPS Design A/S. Ci riserviamo tutti i diritti. Questo documento, compreso tutte le sue sotto-sezioni, è protetto dalle leggi sul copyright. Potete leggere quello che potete fare con i nostri modelli alla fine di ogni modello sul nostro sito. |
|||||||


Con oltre 40 anni di esperienza nel design di modelli di maglia e uncinetto, DROPS Design offre la più estesa collezione di modelli gratuiti su internet - tradotti in 17 lingue. Ad oggi vi possiamo fornire 325 cataloghi e 12298 modelli - 9569 dei quali sono tradotti in Italiano.
Ci stiamo impegnando molto per darvi il meglio che vi possiamo offrire in termini di maglia e uncinetto, ispirazioni e consigli così come filati di grande qualità ad un prezzo incredibile! Volete utilizzare i nostri modelli per qualcosa d'altro oltre al vostro uso personale? Potete leggere tutto ciò che è consentito nel testo sul Copyright in basso su tutte le pagine dei nostri modelli. Buon lavoro!
Lasciare un commento sul modello DROPS 172-10
Noi saremmo felici di ricevere i tuoi commenti e opinioni su questo modello!
Se vuoi fare una domanda, fai per favore attenzione a selezionare la categoria corretta nella casella qui sotto per velocizzare il processo di risposta. I campi richiesti sono indicati da *.