
Categorie popolari
State cercando un filato?


Commenti / Domande (21)
![]() Tanya ha scritto:
Tanya ha scritto:
I have lovely cashmere wool and would really like to knit this. But not experienced in making a gauge, the wool does not suggest a needle size
19.04.2026 - 16:06DROPS Design ha risposto:
Hi Tanya, try the trial-and-error method. If you want to have the same size as in the pattern, your swatch shoud be the same (17 sts x 22 rows in stocking st). Happy knitting!
20.04.2026 - 09:49
![]() Krystyna ha scritto:
Krystyna ha scritto:
Co to znaczy “przerabiać teraz 0-2-0-2 rz. dżersejem”. Jak to należy przerabiać ?
06.01.2025 - 04:09DROPS Design ha risposto:
Witaj Krysiu, dżersejem oznacza przerabiać na prawo na prawej stronie robótki, a na lewo na lewej stronie. Tutaj zwróć uwagę na to, że 2 rozmiarach nie przerabiasz tych 2 rzędów dżersejem ponieważ w opisie jest liczba 0. 2 rzędy dżersejem przerabiasz tylko, gdy wykonujesz rozmiar L/XL lub XXXL. Pozdrawiamy!
07.01.2025 - 12:15
![]() Rosa ha scritto:
Rosa ha scritto:
Se puede tejer en agujas rectas?
16.11.2024 - 20:53DROPS Design ha risposto:
Hola Rosa, puedes trabajar con agujas rectas largas, pero a lo mejor no te entran todos los puntos en ellas. Es por eso que aquí indicamos que se use una aguja circular, que es más cómoda para trabajar con muchos puntos.
17.11.2024 - 21:28
![]() Krystyna ha scritto:
Krystyna ha scritto:
Czy wzory A1,A2, A3 nalezy zaczac robic od gory schematu, czy od dolu ?
30.10.2024 - 03:22DROPS Design ha risposto:
Witaj Krysiu, schematy przerabiamy od dołu - od prawej do lewej strony na prawej stronie robótki i od lewej do prawej strony na lewej stronie robótki. Pozdrawiamy!
30.10.2024 - 08:30
![]() Adri Pienaar ha scritto:
Adri Pienaar ha scritto:
Is it possible to work this pattern in the round doing away with the buttons and bands? The same goes for FIrst date pattern number 154 - 4 Thank you
11.04.2023 - 13:49DROPS Design ha risposto:
Dear Mrs Pienaar, the vents/opening belong to the design, it might be even not wide enough without the opening. But it might also work, you might have to have a try to check if it's okay for you. Happy knitting!
11.04.2023 - 16:49
![]() Britt Pettersen ha scritto:
Britt Pettersen ha scritto:
Skal det på A.1 strikkes 4 omg. rett i tillegg til de to første rillene? Det ser ikke slik ut på bildet?
13.05.2022 - 18:12DROPS Design ha risposto:
Hei Britt. Jo, det skal strikkes 4 pinner med glattstrikk. Om du har mulighet, prøv å forstørre bildet og da ser det det godt. mvh DROPS Design
16.05.2022 - 08:14
![]() Rapcsák Károlyné Gabi ha scritto:
Rapcsák Károlyné Gabi ha scritto:
Hello DROPS Design, Elkészítettem a modellt . A vállánál nagyon bő lett. Mit rontottam el? Üdvözlettel Gabi
13.10.2021 - 15:25
![]() Kim D'Andrade ha scritto:
Kim D'Andrade ha scritto:
Pattern 0-1273 Brushed Alpaca Silk Cape (15) Light Sea Green How many Balls of Wool do you need for XXL? Please specific for Canada? And How much per Ball?
01.03.2021 - 23:27DROPS Design ha risposto:
Dear Kim, for size XXL, you will need 10 balls of Brushed Alpaca Silk yarn. For other information, please see the yarn's page here. Happy Knitting!
01.03.2021 - 23:53
![]() Anna ha scritto:
Anna ha scritto:
Questo modello si può realizzare anche con i ferri diritti? Se sì come devo leggere la legenda dei punti?
18.11.2020 - 17:08DROPS Design ha risposto:
Buonasera Anna, questo modello essendo aperto è lavorato in piano: può seguire le istruzioni lavorando come indicato. Buon lavoro!
18.11.2020 - 22:01
![]() Jean Amico ha scritto:
Jean Amico ha scritto:
For size X/XL last section needs 266 stitches. If there are 4 garter stitches on each end that would equal 8 stitches, plus 18 stitches times 16 equals 288 stitches. SoI now have 296 stitches. Why are there 30 extra stitches?
23.08.2020 - 18:02DROPS Design ha risposto:
Hi Jean, You should have 298 stitches when you reach the last section. As you say, 8 band stitches, 18 x 16 = 288, and 2 stitches in A.2 (after the first band). This adds up to 298. Happy knitting!
24.08.2020 - 07:21
|
||||||||||||||||
Summer Stream |
||||||||||||||||
|
|
||||||||||||||||
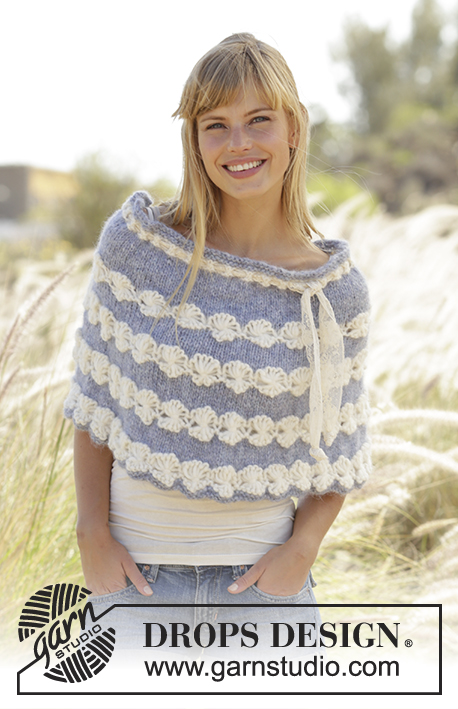
Poncho DROPS ai ferri, a punto legaccio con motivo traforato e bottoni su un lato, lavorato dall’alto verso il basso (top down), in "Brushed Alpaca Silk". Taglie: Dalla S alla XXXL.
DROPS Extra 0-1273 |
||||||||||||||||
|
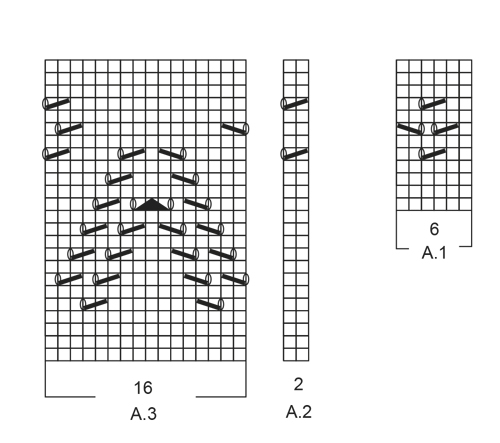
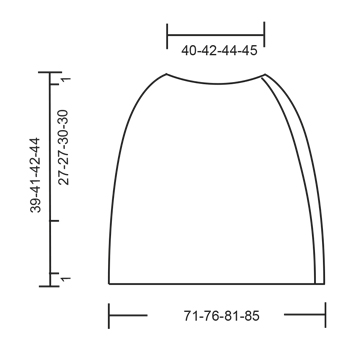
PUNTO LEGACCIO (avanti e indietro sui ferri): Lavorare tutti i ferri a dir. 1 “costa” a legaccio = 2 ferri a dir. MOTIVO: Vedere i diagrammi da A.1 a A.3. I diagrammi mostrano tutti i ferri del motivo, visti sul diritto del lavoro. SUGGERIMENTO PER GLI AUMENTI: Per aumentare 1 m, fare 1 m gettata; al ferro successivo, lavorare la m gettata a dir ritorto, quindi lavorarla nel filo posteriore e non in quello anteriore, per evitare che si formi un buco. ASOLE: Intrecciare le m per le asole sul bordo destro. Poiché il capo viene lavorato top down, intrecciare le m alla fine del ferro lavorato sul diritto del lavoro. 1 asola = lavorare insieme a dir la 3a e la 4a m dal bordo e fare 1 m gettata. Intrecciare le m per le asole quando il lavoro misura: TAGLIA S/M: 1, 8 e 17 cm TAGLIA L/XL: 1, 8 e 17 cm TAGLIA XXL: 1, 9 e 19 cm TAGLIA XXXL: 1, 9 e 19 cm ---------------------------------------------------------- PONCHO: Si lavora avanti e indietro sui ferri circolari, dall’alto verso il basso (top down). Avviare 144-151-158-161 m morbide con il filato Brushed Alpaca Silk sui ferri circolari n° 5. Lavorare 2 coste a PUNTO LEGACCIO - vedere le spiegazioni sopra e aumentare 27-32-37-40 m a intervalli regolari nel corso dell’ultimo ferro sul diritto del lavoro (non aumentare sulle prime e sulle ultime 4 m sui ferri) - VEDERE IL SUGGERIMENTO PER GLI AUMENTI! Ci sono ora 171-183-195-201 m. RICORDARSI DI INTRECCIARE LE M PER LE ASOLE ! Al ferro successivo, lavorare come segue (= diritto del lavoro): 4 m per il bordo a punto legaccio, ripetere il diagramma A.1 (= 6 m) finché non rimangono 5 m (= 27-29-31-32 volte), 1 m a maglia rasata, 4 m per il bordo a punto legaccio. RICORDARSI LA TENSIONE DEL LAVORO! Dopo aver lavorato il diagramma A.1 1 volta in verticale, lavorare a legaccio per 4-4-5-5 cm e nel corso dell’ultimo ferro sul diritto del lavoro, aumentare 36-36-42-48 m = 207-219-237-249 m. Lavorare ora il diagramma A.1 con 4 m per il bordo a punto legaccio da ciascun lato (lavorare l’ultima m prima del bordo a maglia rasata). Dopo aver lavorato il diagramma A.1 una volta in verticale, proseguire a legaccio per 4-4-5-5 cm e nel corso dell’ultimo ferro sul diritto del lavoro, aumentare 36-42-42-42 m a intervalli regolari = 243-261-279-291 m. Lavorare ora il diagramma A.1 con 4 m a punto legaccio per il bordo da ciascun lato (lavorare l’ultima m prima del bordo a maglia rasata). Dopo aver lavorato il diagramma A.1 una volta in verticale, proseguire a legaccio per 4-4-5-5 cm e nel corso dell’ultimo ferro sul diritto del lavoro aumentare 7-5-3-7 m a intervalli regolari = 250-266-282-298 m. Lavorare ora 0-2-0-2 ferri a maglia rasata con 4 m per il bordo a punto legaccio da ciascun lato. Proseguire con il motivo come segue: 4 m per il bordo a punto legaccio, diagramma A.2 (= 2 m), ripetere il diagramma A.3 (= 16 m) 15-16-17-18 volte in larghezza, 4 m per il bordo a punto legaccio. Quando tutto il diagramma è stato lavorato una volta in verticale, lavorare 0-2-0-2 ferri a maglia rasata con 4 m per il bordo a punto legaccio da ciascun lato. Lavorare ora 2 coste a legaccio su tutte le m. Intrecciare le m senza stringere troppo il filo. Assicurarsi che il bordo di chiusura delle m non sia troppo stretto. CONFEZIONE: Attaccare i bottoni sul bordo sinistro. |
||||||||||||||||
Spiegazioni del diagramma |
||||||||||||||||
|
||||||||||||||||
 |
||||||||||||||||
 |
||||||||||||||||
Avete terminato questo modello?Allora taggate le vostre foto con #dropspattern o inviatele alla #dropsfan gallery. Avete bisogno di aiuto con questo modello?Troverete 16 video tutorial, una sezione per i commenti/domande e molto altro guardando il modello su www.garnstudio.com © 1982-2026 DROPS Design A/S. Ci riserviamo tutti i diritti. Questo documento, compreso tutte le sue sotto-sezioni, è protetto dalle leggi sul copyright. Potete leggere quello che potete fare con i nostri modelli alla fine di ogni modello sul nostro sito. |
||||||||||||||||


Con oltre 40 anni di esperienza nel design di modelli di maglia e uncinetto, DROPS Design offre la più estesa collezione di modelli gratuiti su internet - tradotti in 17 lingue. Ad oggi vi possiamo fornire 324 cataloghi e 12290 modelli - 9561 dei quali sono tradotti in Italiano.
Ci stiamo impegnando molto per darvi il meglio che vi possiamo offrire in termini di maglia e uncinetto, ispirazioni e consigli così come filati di grande qualità ad un prezzo incredibile! Volete utilizzare i nostri modelli per qualcosa d'altro oltre al vostro uso personale? Potete leggere tutto ciò che è consentito nel testo sul Copyright in basso su tutte le pagine dei nostri modelli. Buon lavoro!
Lasciare un commento sul modello DROPS Extra 0-1273
Noi saremmo felici di ricevere i tuoi commenti e opinioni su questo modello!
Se vuoi fare una domanda, fai per favore attenzione a selezionare la categoria corretta nella casella qui sotto per velocizzare il processo di risposta. I campi richiesti sono indicati da *.