
Categorie popolari
State cercando un filato?


Commenti / Domande (74)
![]() Birte Eskildsen ha scritto:
Birte Eskildsen ha scritto:
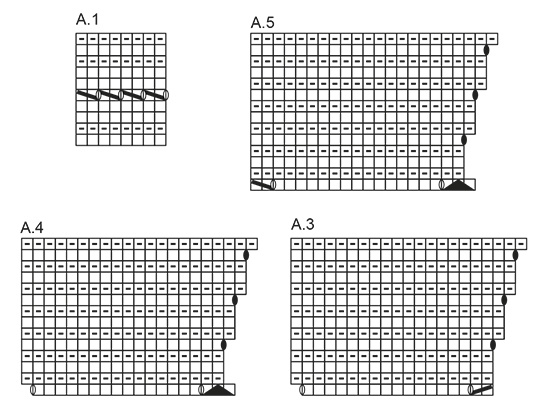
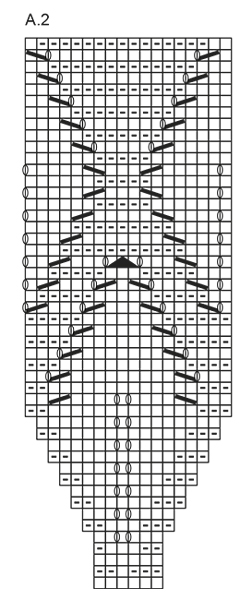
Er færdig med A2 og skal nu strikke A3 hvordan forstår jeg A3 gentag . De 17 masker passer ikke med at mønster på A2 var over 18 masker
25.04.2020 - 21:34DROPS Design ha risposto:
Hej Birte, Du strikker kun 1 rapport i bredden af A.3, og så fortsætter du med A.4, det vil sige at på sidste mønster pind havde du 13 masker glatstrik imellem omslagene, og på 1. mønsterpind i A.3 og A.4 har du 15 masker glat imellem omslagene. God fornøjelse!
28.04.2020 - 13:28
![]() Tscepke Reinhild ha scritto:
Tscepke Reinhild ha scritto:
Die anleitung "summer leaves" 169-3 macht mir schwierigkeiten: ich habe 95 m angeschlagen. in der anleitung steht muster A2 = 6M, es hat aber 18M! an der stelle komme ich nicht weiter? bitte helfen sie mir u. benachrichtigen sie mich.. möglichst schnell. mit vielem dank u. freundl. grüssen frau r. tschepke
06.04.2020 - 16:49DROPS Design ha risposto:
Liebe Frau Tscepke, Diagramme lesen Sie von unten nach oben, dh A.2 beginnt mit 6 Maschen und endet mit 18 Maschen. Hier lesen Sie mehr über Diagramme. Viel Spaß beim stricken!
09.04.2020 - 14:25
![]() Helena Enlund ha scritto:
Helena Enlund ha scritto:
Hej! Hur många knapphål kommer bak på oket o vilka mellanrum?
04.02.2020 - 13:31DROPS Design ha risposto:
Hej, det ska vara 4 knapphål längs oket. I t.ex. storlek M görs knapphålen med 6 cm mellanrum.
10.02.2020 - 17:45
![]() Kerstin Limseth ha scritto:
Kerstin Limseth ha scritto:
Jeg har strikket 5 rader på A2, skal jeg da øke på hver side av de 8 maskene ut pinnen, og gjør jeg det ved å plukke opp mellom maskene? Hilsen Kerstin
29.06.2019 - 15:38DROPS Design ha risposto:
Hej. Det är de två kasten på pinne 5 som blir de ökade maskorna, så du ska inte öka något mer utöver dem. Lycka till!
01.07.2019 - 14:27
![]() Iri ha scritto:
Iri ha scritto:
Meiner Meinung nach stimmt in der Strickschrift etwas nicht.. die Blattspitzen können unmöglich bei a4 und a5 gestrickt werden.. sie müssten doch schon bei a3 mit aufgeführt sein..
13.05.2019 - 08:17DROPS Design ha risposto:
Liebe Iri, A.3 muss über die ersten Maschen vom 1. A.2 gestrickt sein, 1 Masche bleibt in A.2, die wird mit nächsten A.4 gestrickt sein, so enden jede Blattmuster mit der Doppeltze Abnahmen in A.4/A.5 (letzes Blattmuster endet mit A.5). Viel Spaß beim stricken!
13.05.2019 - 10:40
![]() Nanny ha scritto:
Nanny ha scritto:
Wil hier graag aan beginnen. Eerst goed doorlezen. Dan valt me correctie op: Correctie: tekst symbool nr. 6 en 7 Hier begrijp ik niets van. Wat wordt hiermee bedoeld?
06.03.2019 - 20:55DROPS Design ha risposto:
Dag Nanny,
De correctie is al doorgevoerd in het online patroon. Als je het patroon voor 19-10-2016 hebt afgedrukt, druk hem dan even opnieuw af.
07.03.2019 - 20:11
![]() Emelie ha scritto:
Emelie ha scritto:
Wieviel Wolle bräuchte ich mit Drops Nord, ein- oder zweifädig?
21.01.2019 - 21:31DROPS Design ha risposto:
Liebe Emelie, DROPS Nord gehört zur Garngruppe A und DROPS Muskat zur Garngruppe B, so daß Nord ist hier keine Alternative. Am besten suchen Sie die Modellen der Garngruppe A. Hier lesen Sie mehr über Garnalternativen und Gruppen. Viel Spaß beim stricken!
22.01.2019 - 08:24
![]() Fran A. Catenacci ha scritto:
Fran A. Catenacci ha scritto:
Question: The back of the garment is not pictured and I did not realize that there are buttons on the back. Is it possible to eliminate the buttonholes and buttons on the short sleeved top? Thanks, Fran
10.01.2019 - 21:11DROPS Design ha risposto:
Dear Mrs Catenacci, this might be possible, just make sure the neck will be wide enough to go over the head - should you need any assistance adjusting the pattern to your own taste please contact the store where you bought the yarn- even per mail or telephone. Happy knitting!
11.01.2019 - 09:46Gisela ha scritto:
Ist ein Photo von der Hinterseite gemacht worden? Das würde ich gern sehen als Anhaltspunkt
15.07.2018 - 23:11DROPS Design ha risposto:
Liebe Gisela, es gibt kein Photo von der Hinterseite, beide Seiten sind hier gleich gestrickt, es gibt hier nur dazu 5 Maschen kraus rechts für die Blende oben in der Mitte Rückenteil. Viel Spaß beim stricken!
16.07.2018 - 09:21
![]() Bertha ha scritto:
Bertha ha scritto:
Hallo, wenn ich bei dem Model keine Knopfleiste machen will wieviel Maschen muss ich dann weg lasse? Denke mal 10 oder?
14.07.2018 - 11:35
|
||||||||||||||||||||||
Summer Leaves Top#summerleavestop |
||||||||||||||||||||||
|
|
||||||||||||||||||||||
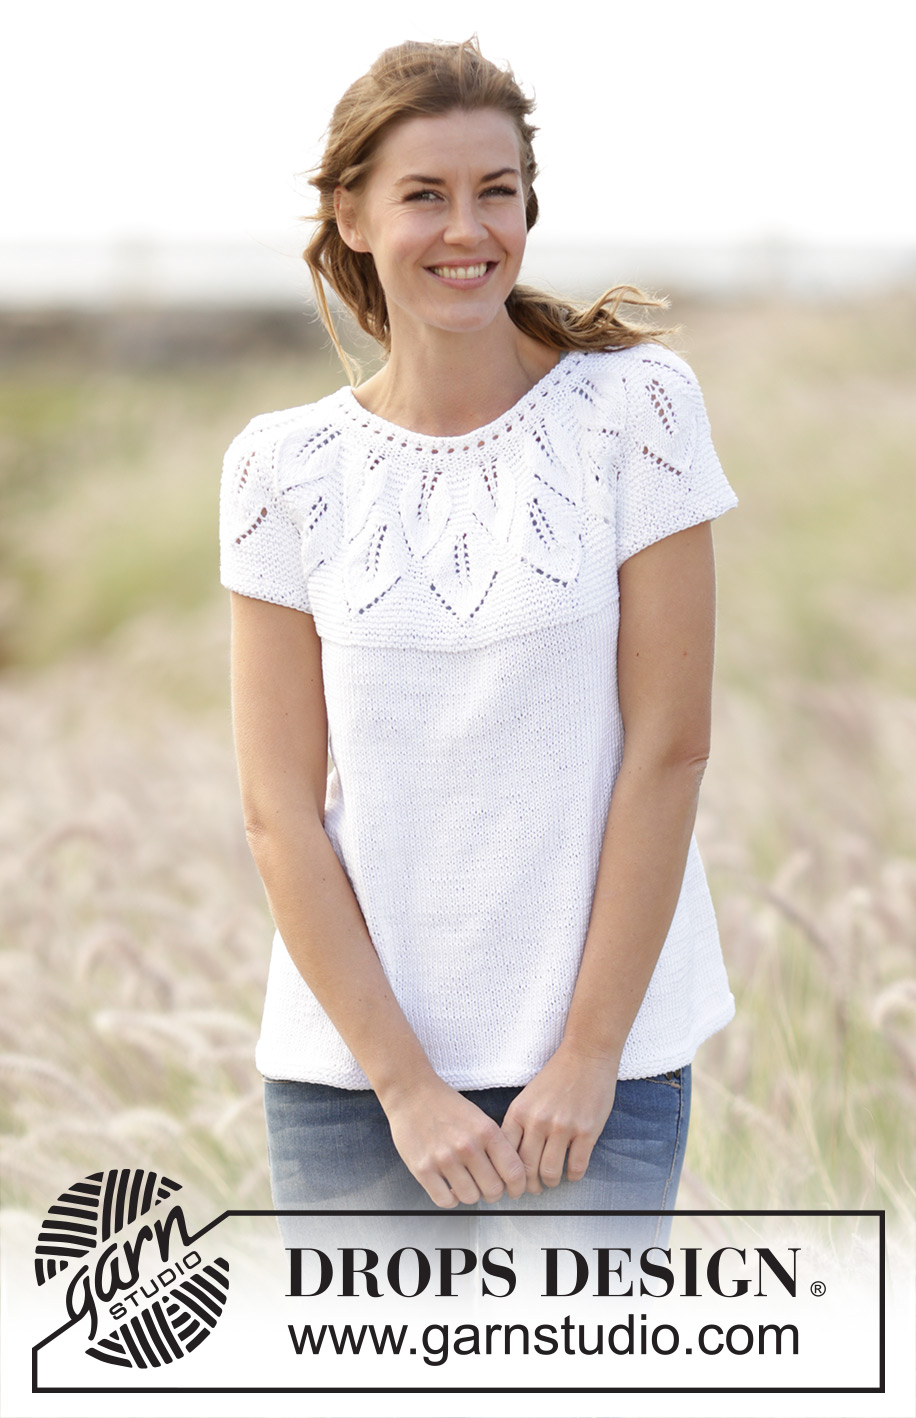
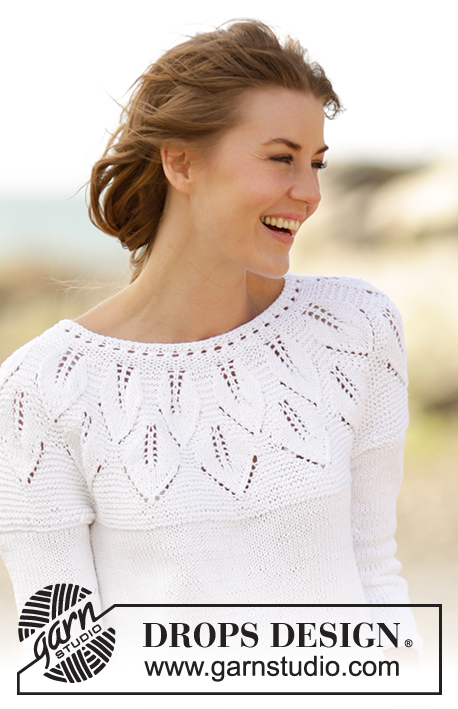
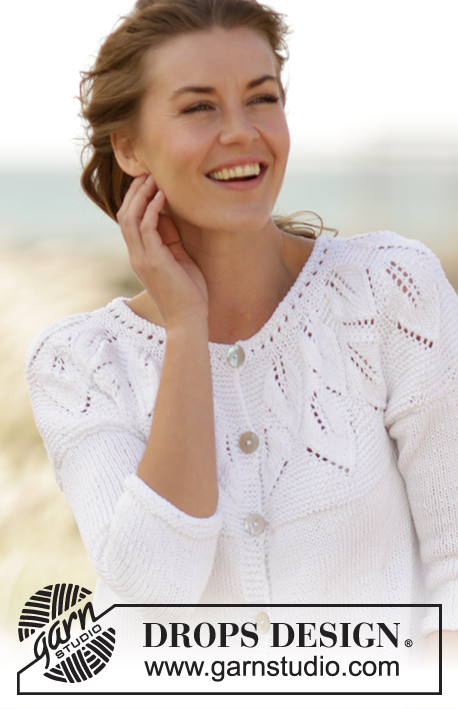
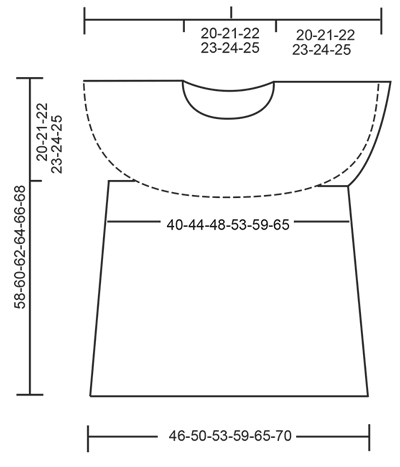
Maglia DROPS lavorata ai ferri con motivo a foglie, “coste” a m legaccio e sprone rotondo, lavorato dall’alto in basso (top down) in ”Muskat”. Taglie: S-XXXL.
DROPS 170-27 |
||||||||||||||||||||||
|
M LEGACCIO (avanti e indietro): Lavorare tutti i f a dir. 1 “costa” a m legaccio = 2 f dir. M LEGACCIO (in tondo): 1 “costa” a m legaccio = 2 giri. * 1 giro dir e 1 giro rov *, ripetere *-*. MOTIVO: Vedere i diagrammi A.1-A.5. I diagrammi mostrano tutti i f del motivo visti dal diritto del lavoro. ASOLE: Diminuire per le asole alla fine del f visto dal diritto del lavoro. Lavorare fino a quando rimangono 4 m. Fare 1 gettato, lavorare insieme a dir le 2 m successive, lavorare le ultime 2 m sul f. Diminuire per le asole quando il lavoro misura (dal bordo di avvio e lungo il bordo): TAGLIA S: 2, 8, 14 e 19 cm TAGLIA M: 2, 8, 14 e 20 cm. TAGLIA L: 2, 8, 14 e 21 cm. TAGLIA XL: 2, 8, 15 e 22 cm. TAGLIA XXL: 2, 9, 16 e 23 cm. TAGLIA XXXL: 2, 9, 16 e 24 cm. ---------------------------------------------------------- MAGLIA: Lavorato dall’alto in basso (top down). Lo sprone è lavorato avanti e indietro sui f circolari con i bottoni sul collo, poi si lavora il corpo in tondo. SPRONE: Avviare 89-95-101-113-125-131 m con i f circolari n° 3,5 mm con Muskat. Intrecciare per le ASOLE al centro dietro – leggere la spiegazione sopra. Lavorare 5 m a M LEGACCIO – leggere la spiegazione sopra (= bordo), A.1 fino a quando rimangono 5 m, 5 m a m legaccio (= bordo). Quando A.1 è stato lavorato 1 volta in verticale, continuare come segue: 5 m a m legaccio, A.2 (= 6 m), ripetere A.2 13-14-15-17-19-20 volte in totale, finire con la 1° m in A.2 (in modo che il motivo sia lo stesso a ogni lato), finire con 5 m a m legaccio. FARE ATTENZIONE ALLA TENSIONE DEL LAVORO! Quando A.2 è stato lavorato 1 volta in verticale, ci sono 245-263-281-317-353-371 m sul f. Poi lavorare come segue: 5 m a m legaccio, A.3 (= 17 m), ripetere A.4 11-12-13-15-17-18 volte, A.5 (= 20 m) e 5 m a m legaccio. Quando A.3-A.5 è stato lavorato 1 volta in verticale, ci sono 284-305-326-368-410-431 m sul f. Continuare a m legaccio fino a quando il lavoro misura 20-21-22-23-24-25 cm, sull’ultimo f dal rovescio del lavoro aggiustare il n° di m a 283-307-331-365-397-429. Continuare a lavorare come segue (dal diritto del lavoro): intrecciare le prime 5 m, lavorare le prime 39-43-47-53-59-65 m (= metà dietro), trasferire le 61-65-69-74-78-82 m successive su un fermamaglie (= manica), avviare 6 nuove m sotto le maniche, lavorare le 78-86-94-106-118-130 m successive (= davanti), trasferire le 61-65-69-74-78-82 m successive su un fermamaglie (= manica), avviare 6 nuove m sotto la manica, lavorare le 39-43-47-53-59-65 m rimaste (= metà dietro). CORPO: Ora ci sono 168-184-200-224-248-272 m per il corpo. Inserire un segnapunti a ogni lato del corpo dove sono state avviate le nuove m sotto la manica (= 3 nuove m a ogni lato del segnapunti). ORA MISURARE IL LAVORO DA QUI. Passare ai f circolari n° 4 mm. Continuare a m rasata, ora lavorare in tondo. Quando il lavoro misura 4 cm, aumentare 1 m a ogni lato di tutti i segnapunti (= 4 aumenti). Ripetere gli aumenti ogni 5-5-5-6-6-6 cm altre 5 volte = 192-208-224-248-272-296 m. Continuare a m rasata fino a quando il lavoro misura 34-35-36-37-38-39 cm, passare ai f circolari n° 3,5 mm e lavorare 3 “coste” a M LEGACCIO – leggere la spiegazione sopra. Intrecciare. Tutto il lavoro misura circa 58-60-62-64-66-68 cm. MANICA: Riportare le m dal fermamaglie sui f a doppia punta n° 3,5 mm (= 61-65-69-74-78-82 m). Riprendere 1 m in ognuna delle 6 m avviate sotto la manica = 67-71-75-80-84-88 m. Lavorare 2 “coste” a M LEGACCIO – leggere la spiegazione sopra, poi intrecciare. CONFEZIONE: Mettere il bordo senza bottoni sotto il bordo con le asole e affrancare i bottoni. Attaccare i bottoni. |
||||||||||||||||||||||
Spiegazioni del diagramma |
||||||||||||||||||||||
|
||||||||||||||||||||||
 |
||||||||||||||||||||||
 |
||||||||||||||||||||||
 |
||||||||||||||||||||||
Avete terminato questo modello?Allora taggate le vostre foto con #dropspattern #summerleavestop o inviatele alla #dropsfan gallery. Avete bisogno di aiuto con questo modello?Troverete 28 video tutorial, una sezione per i commenti/domande e molto altro guardando il modello su www.garnstudio.com © 1982-2026 DROPS Design A/S. Ci riserviamo tutti i diritti. Questo documento, compreso tutte le sue sotto-sezioni, è protetto dalle leggi sul copyright. Potete leggere quello che potete fare con i nostri modelli alla fine di ogni modello sul nostro sito. |
||||||||||||||||||||||


Con oltre 40 anni di esperienza nel design di modelli di maglia e uncinetto, DROPS Design offre la più estesa collezione di modelli gratuiti su internet - tradotti in 17 lingue. Ad oggi vi possiamo fornire 324 cataloghi e 12290 modelli - 9561 dei quali sono tradotti in Italiano.
Ci stiamo impegnando molto per darvi il meglio che vi possiamo offrire in termini di maglia e uncinetto, ispirazioni e consigli così come filati di grande qualità ad un prezzo incredibile! Volete utilizzare i nostri modelli per qualcosa d'altro oltre al vostro uso personale? Potete leggere tutto ciò che è consentito nel testo sul Copyright in basso su tutte le pagine dei nostri modelli. Buon lavoro!
Lasciare un commento sul modello DROPS 170-27
Noi saremmo felici di ricevere i tuoi commenti e opinioni su questo modello!
Se vuoi fare una domanda, fai per favore attenzione a selezionare la categoria corretta nella casella qui sotto per velocizzare il processo di risposta. I campi richiesti sono indicati da *.