
Categorie popolari
State cercando un filato?


Commenti / Domande (91)
![]() Margaret ha scritto:
Margaret ha scritto:
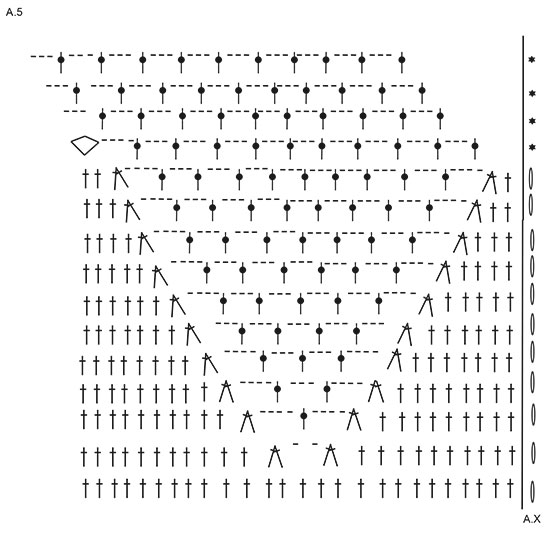
Row 6 on pattern A5 starts chain 3 all other rows on A5 are chain 4 is that a print error.
19.11.2016 - 11:47DROPS Design ha risposto:
Dear Margaret, start each of the first 11 rows in A.5 with 3 ch, and finish each row with 1 sl st in 3rd ch from beg of round. Happy crocheting!
21.11.2016 - 09:18
![]() Hanne ha scritto:
Hanne ha scritto:
Hallo, ja, genauso steht es in der Anleitung und genau diese finde ich unverständlich:-(
19.10.2016 - 19:53DROPS Design ha risposto:
Liebe Hanne, so müssen Sie diese Reihe häkeln und wiederholen, dh über immer weniger Maschen (verkürzten Reihen) und gleichzeitig in jeder R. zunehmen.
20.10.2016 - 11:47
![]() Hanne ha scritto:
Hanne ha scritto:
Ich verstehe nicht die Anleitung für das Vorderteil. Soll tatsächlich mit 3 Luftmaschen begonnen werden? Wie funktioniert das? Und was ist mit verkürzten Reihen gemeint? Können Sie das etwas besser beschreiben, es wäre ärgerlich so kurz vor Ende aufgeben zu müssen:-(
17.10.2016 - 21:06DROPS Design ha risposto:
Liebe Hanne, das Vorderteil wird über die 49 Stb gehäkelt, jede Reihe so anfangen: 3 Lm, 1 Lm-Bogen überspringen, 1 fM um den nächsten Lm-Bogen, 3 Lm, 1 Stb um den nächsten Lm-Bogen, dann weiter wie zuvor mit Zunahmen häkeln bis 2 Lm-Bögen (von den 49) übrig sind. Arbeit drehen und immer so hin- und zurück häkeln, bis die Arbeit 15 cm ab dem Markierer misst.
18.10.2016 - 09:10
![]() Bernie Sullivan ha scritto:
Bernie Sullivan ha scritto:
Would it be possible to have a written pattern instead of a diagram for"Endless Love" pattern?
03.10.2016 - 16:14DROPS Design ha risposto:
Dear Mrs Sullivan, this pattern is only available with diagrams. You will find just above diagrams each symbol and the st/the group of sts it refers to. Repeat each row in the diagrams around, starting at the bottom corner on the right side towards the left. Remember you will get further individual assistance from your DROPS store. Happy crocheting!
03.10.2016 - 16:42
![]() Elma Swier ha scritto:
Elma Swier ha scritto:
Ik begin eigenlijk net met haken van patroon lezen maar de delen van A1 tot A6 worden die later aan elkaar vast gemaakt? En hebben jullie niet een filmpje waar je zo een beetje kan mee haken ? Anders ben ik eigenlijk te enthousiast geweest om zo'n mooi vest te willen gaan haken.
09.08.2016 - 14:47DROPS Design ha risposto:
Beste mevrouw Swier, A.1 tot en met A.6 zijn geen losse delen. Als u het patroon stap voor stap volgt, haakt u steeds een aantal van deze patronen mee, dat gaat vanzelf. Er is geen video voor het hele vest, dat is niet mogelijk, maar als u boven aan het patroon het tabblad 'video's' aanklikt, vindt u 7 handige video's voor technieken die in het patroon gebruikt worden. Als u het lastig vindt een heel patroon te doorgronden (dat is even wennen) dan kunt u wellicht een brei/haakgroep in de buurt zoeken waarbij mensen elkaar helpen.
09.08.2016 - 16:05
![]() Tineke ha scritto:
Tineke ha scritto:
Zijn de 3 lossen waar oa patroon A3 mee begint ipv een stokje of begin je met 3 lossen en doe je dan 6x patroon herhalen?
15.07.2016 - 22:20DROPS Design ha risposto:
Hoi Tineke. A.X zijn de 3 lossen waarmee je begint en eindigt. Je haakt dus eerst de 3 lossen en daarna herhaal je de twee patronen 6 keer.
19.07.2016 - 13:54
![]() Susan Hall ha scritto:
Susan Hall ha scritto:
I need help in starting the Front Piece. Where exactly do you begin. Directions say to skip first 16 dc, do you skip from where you ended on last rnd of rw 15? Thank you
10.07.2016 - 00:15DROPS Design ha risposto:
Dear Mrs Hall, that's right, skip the first 16 dc counting from the beg of rounds worked before. Happy crocheting!
11.07.2016 - 09:16Ana ha scritto:
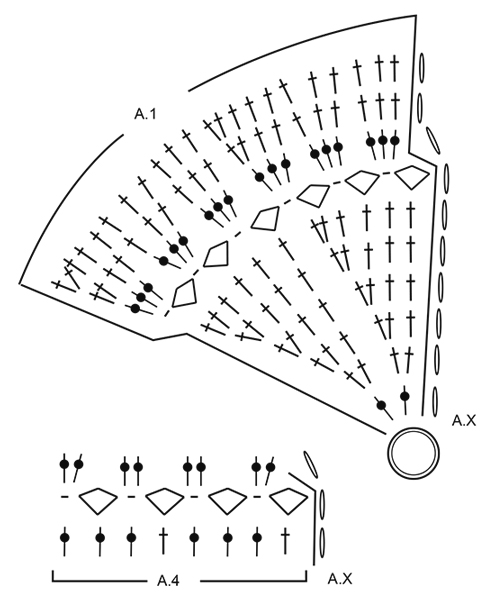
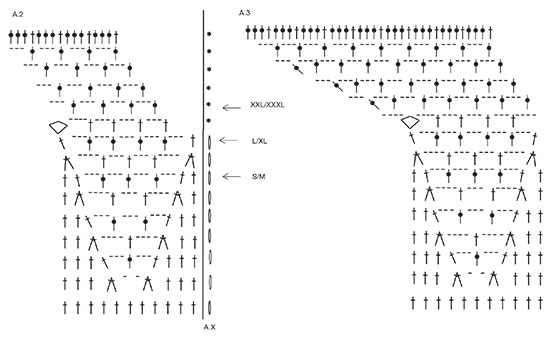
I need help with the sceme A2 and A3 in pattern 168-12. I don't understand how should I increase from 228 sts to 312 sts on the end of A2 and A3. I crochet 9 rounds and then don't understand how to continue after * in round 10. In first repetition I do sl sts then crochet A2 and A3 and then I should repeat them 5 more times, but I don't know how to continue!!! There are 4 ch at the end of A3 that shift to the left. How should I crochet them?
24.06.2016 - 15:53DROPS Design ha risposto:
Dear Ana, when you have 228 sts in A.2/A.3, work next round with armhole, then continue diagram as before in the round. When both diagrams have been worked 1 time in height, there are 318 sts. From round 10 incl. you start round crocheting sl sts to first ch-space then replace 1st tr on this round with 3 ch (see also star in diagram). Happy crocheting!
24.06.2016 - 17:16
![]() Susan Carpenter ha scritto:
Susan Carpenter ha scritto:
The armholes are a little a bit tight, even in the larger sizes. Any suggestions to accommodate a larger arms?
19.06.2016 - 20:17DROPS Design ha risposto:
Dear Mrs Carpenter, check that the chain worked over armholes when skipping sts is not too tight (use a crochet hook a size larger if requested) so that armholes won't be too tight. You can also check measurements for each size (in cm) in chart at bottom of the pattern. Happy crocheting!
20.06.2016 - 09:05
![]() Truus Meerstra ha scritto:
Truus Meerstra ha scritto:
Bij patroon A4 staat het teken voor het samen haken van 3 stokjes, maar als je telt worden telkens 2 stokjes samen gehaakt. Wat is nu precies de bedoeling?
19.05.2016 - 19:08DROPS Design ha risposto:
Hoi Truus. Je haakt 3 stk samen zoals beschreven bij het symbool. Dit maakt een soort nopje, je moet niet tellen hoeveel stokjes er later zijn in het patroon.
20.05.2016 - 10:59
|
||||||||||||||||||||||||||||
Endless Love#endlesslovecardigan |
||||||||||||||||||||||||||||
 |
 |
|||||||||||||||||||||||||||
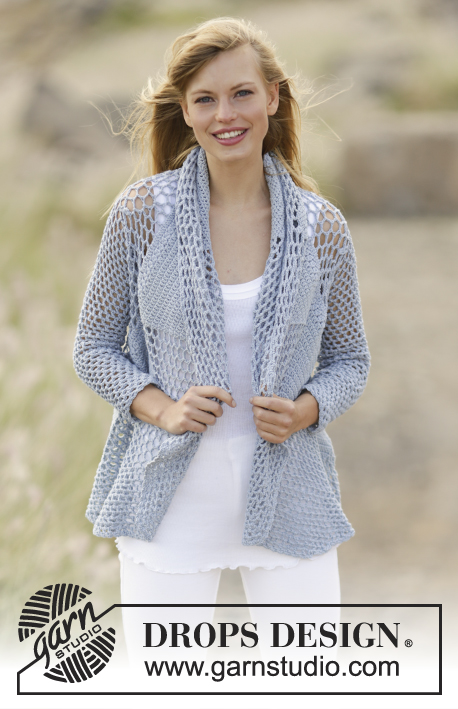
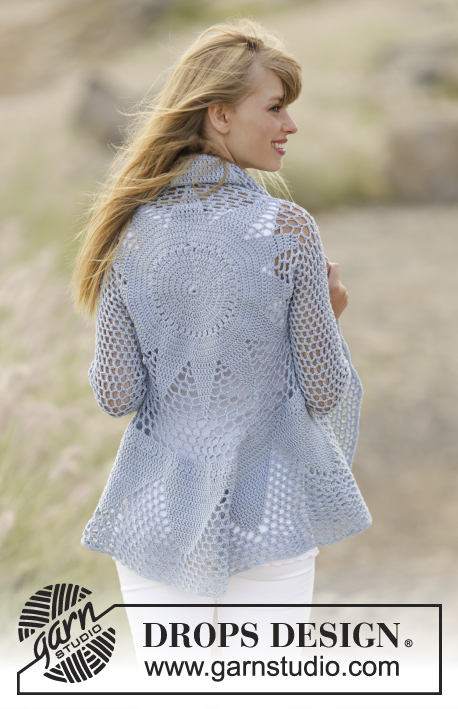
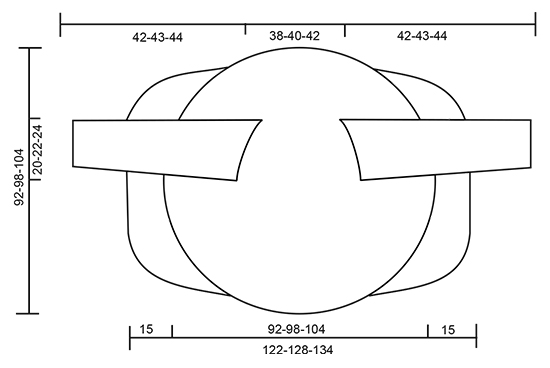
Cardigan DROPS lavorato all’uncinetto a cerchio con maglie alte e motivo traforato in ”Cotton Merino”. Taglie: S - XXXL.
DROPS 168-12 |
||||||||||||||||||||||||||||
|
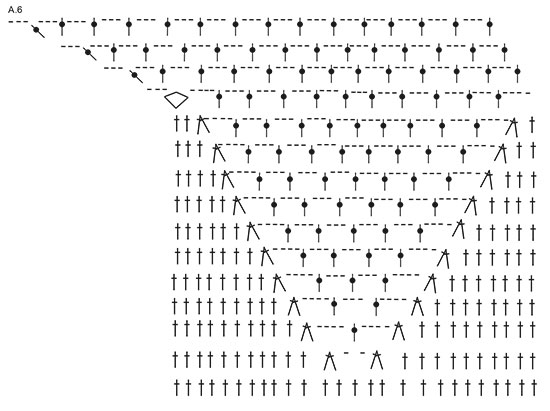
MOTIVO: Vedere i diagrammi A.1-A.6. SUGGERIMENTO PER LE DIMINUZIONI: Lavorare 1 m.a attorno all’arco di cat successivo ma aspettare con l’ultimo passaggio, lavorare la m.a successiva attorno all’arco di cat successivo (non lavorare 3 cat tra la m.a), sull’ultimo passaggio, far passare il filo attraverso tutte e 3 le m sull’uncinetto. SUGGERIMENTO PER IL LAVORO (applicato alle maniche): Dopo l’ultima m.a sul giro, continuare fino al giro successivo con 1 m.a nell’arco di cat successivo (= 1° arco di cat sul giro successivo). NOTA: Inserire un segnapunti all’inizio del giro tra l’ultima cat e la 1° m.a sul giro successivo, spostare il segnapunti verso l’alto. NOTA: ASSICURARSI DI NON SPOSTARE I SEGNAPUNTI. ---------------------------------------------------------- CARDIGAN LAVORATO A CERCHIO: Lavorato in tondo dal centro verso l’esterno. Avviare 4 cat con Cotton Merino con l’uncinetto n° 4 mm e formare un anello con 1 m.bss. Poi lavorare seguendo il diagramma A.1 (= 6 ripetizioni in larghezza) NOTA: A.x mostra come inizia e finisce, ed è in aggiunta al diagramma. FARE ATTENZIONE ALLA TENSIONE DEL LAVORO! Quando tutto il diagramma A.1 è stato lavorato in verticale (= 132 m.a), continuare come segue: lavorare * A.2 (= 11 m.a), A.3 (= 11 m.a) *, ripetere *-* 6 volte in totale. Lavorare fino alla freccia nel diagramma compresa – vedere la freccia per la vostra taglia, ora ci sono 228-252-264 m sul giro. Lavorare il giro successivo come segue: Continuare a lavorare sulle prime 34-36-38 m, lavorare 36-40-44 cat, e saltare le 36-40-44 m successive (= scalfo), lavorare fino a quando rimangono 70-76-82 m, lavorare 36-40-44 cat e saltare le 36-40-44 m successive (= scalfo), continuare a lavorare sulle ultime 34-36-38 m. Sul giro successivo continuare seguendo il diagramma, lavorare il motivo come nel diagramma attorno agli archi di cat a ogni lato. Quando sono stati lavorati A.2 e A.3, ci sono 312 m.a sul giro. Continuare con A.4 (= 39 ripetizioni sul giro). Il 1° giro di A.4 mostra l’ultimo giro di A.2/A.3, non lavorare questo giro. Continuare a lavorare come segue: lavorare * A.5 (= 26 m.a), A.6 (= 26 m.a) *, ripetere *-* 6 volte in totale. Quando è stato lavorato A.5/A.6, ci sono 600 m sul giro (150 m.a con 3 cat tra ognuna). La taglia S/M finisce qui. TAGLIE M/L -XXL/XXXL: Lavorare altri 2-4 giri come l’ultimo giro in A.5/A.6 = 162-174 m.a con 3 cat in mezzo. TUTTE LE TAGLIE: Il lavoro misura circa 46-49-52 cm dal centro (92-98-104 cm in totale). DAVANTI: Lavorati avanti e dietro in un lato con righe accorciate. Tagliare il filo, saltare le prime 13-16-19 m.a sul giro, poi lavorare sulle 49 m.a successive + archi di cat come segue (inserire un segnapunti qui): lavorare 3 cat, saltare 1 arco di cat, 1 m.b attorno all’arco di cat successivo, 3 cat (questi 2 archi di cat non vengono più lavorati), 1 m.a attorno all’arco di cat successivo, lavorare il motivo come prima fino a quando rimangono 2 archi di cat (cioè archi di cat tra m.a, non lavorare più attorno a questi 2 archi di cat), girare il lavoro. Continuare con righe accorciate in questo modo, ALLO STESSO TEMPO aumentare 1 m.a + 3 m nell’arco di cat centrale su ogni riga (lavorare 1 m.a + 3 cat + 1 m.a nello stesso spazio). Continuare con gli aumenti e diminuzioni su ogni riga fino a quando il lavoro misura 15 cm dal segnapunti. Saltare 26-32-38 m.a, poi lavorare a righe accorciate sulle 49 m.a successive (13-16-19 m.a rimaste sul giro). Lavorare nello stesso modo dell’altro lato. BORDO ALL’UNCINETTO: Lavorare un bordo attorno a tutto il cerchio come segue: 1 m.b attorno al 1° arco di cat, * 3 cat, 1 m.b attorno all’arco di cat successivo *, ripetere *-* e finire con 1 m.bss nella 1° m.b. Chiudere e affrancare. MANICHE: Lavorate in tondo, dall’alto in basso. Iniziare al centro sotto uno scalfo, lavorare 1 m.b attorno al 1° arco di cat, 6 cat (= 1 m.a + 3 cat), saltare la 1° m.a e lavorare 1 m.a attorno all’arco di cat successivo, * 3 cat, 1 m.a attorno all’arco di cat successivo *, ripetere *-* per tutto il giro (lavorare 1 m.a + 3 cat attorno agli angoli), finire il giro con 1 m.a attorno alle prime 6 cat, poi continuare a lavorare in tondo senza finire – LEGGERE IL SUGGERIMENTO PER IL LAVORO = 21-23-25 m.a + 21-23-25 archi di cat. Continuare con 1 m.a + 3 cat attorno a ogni arco. Quando il lavoro misura 4 cm, diminuire 1 arco di cat prima del segnapunti – LEGGERE IL SUGGERIMENTO PER LE DIMINUZIONI! Ripetere le diminuzioni ogni 4½ cm altre 7 volte, diminuire in modo alternato prima e dopo il segnapunti = 13-15-17 tr + 13-15-17 archi di cat. Continuare fino a quando il lavoro misura 42-43-44 cm. BORDI DELLE MANICHE LAVORATI ALL’UNCINETTO: Lavorare un bordo attorno alle maniche come segue: 1 m.b attorno al 1° arco di cat, * 3 cat, 1 m.b attorno all’arco di cat successivo *, ripetere *-* e finire con 1 m.bss nella 1° m.b. Chiudere e affrancare. Lavorare l’altra manica nello stesso modo. |
||||||||||||||||||||||||||||
Spiegazioni del diagramma |
||||||||||||||||||||||||||||
|
||||||||||||||||||||||||||||
 |
||||||||||||||||||||||||||||
 |
||||||||||||||||||||||||||||
 |
||||||||||||||||||||||||||||
 |
||||||||||||||||||||||||||||
 |
||||||||||||||||||||||||||||
Avete terminato questo modello?Allora taggate le vostre foto con #dropspattern #endlesslovecardigan o inviatele alla #dropsfan gallery. Avete bisogno di aiuto con questo modello?Troverete 7 video tutorial, una sezione per i commenti/domande e molto altro guardando il modello su www.garnstudio.com © 1982-2026 DROPS Design A/S. Ci riserviamo tutti i diritti. Questo documento, compreso tutte le sue sotto-sezioni, è protetto dalle leggi sul copyright. Potete leggere quello che potete fare con i nostri modelli alla fine di ogni modello sul nostro sito. |
||||||||||||||||||||||||||||


Con oltre 40 anni di esperienza nel design di modelli di maglia e uncinetto, DROPS Design offre la più estesa collezione di modelli gratuiti su internet - tradotti in 17 lingue. Ad oggi vi possiamo fornire 324 cataloghi e 12290 modelli - 9561 dei quali sono tradotti in Italiano.
Ci stiamo impegnando molto per darvi il meglio che vi possiamo offrire in termini di maglia e uncinetto, ispirazioni e consigli così come filati di grande qualità ad un prezzo incredibile! Volete utilizzare i nostri modelli per qualcosa d'altro oltre al vostro uso personale? Potete leggere tutto ciò che è consentito nel testo sul Copyright in basso su tutte le pagine dei nostri modelli. Buon lavoro!
Lasciare un commento sul modello DROPS 168-12
Noi saremmo felici di ricevere i tuoi commenti e opinioni su questo modello!
Se vuoi fare una domanda, fai per favore attenzione a selezionare la categoria corretta nella casella qui sotto per velocizzare il processo di risposta. I campi richiesti sono indicati da *.