
Categorie popolari
State cercando un filato?


Lasciare un commento sul modello DROPS 168-12
Noi saremmo felici di ricevere i tuoi commenti e opinioni su questo modello!
Se vuoi fare una domanda, fai per favore attenzione a selezionare la categoria corretta nella casella qui sotto per velocizzare il processo di risposta. I campi richiesti sono indicati da *.
|
||||||||||||||||||||||||||||
Endless Love |
||||||||||||||||||||||||||||
 |
 |
|||||||||||||||||||||||||||
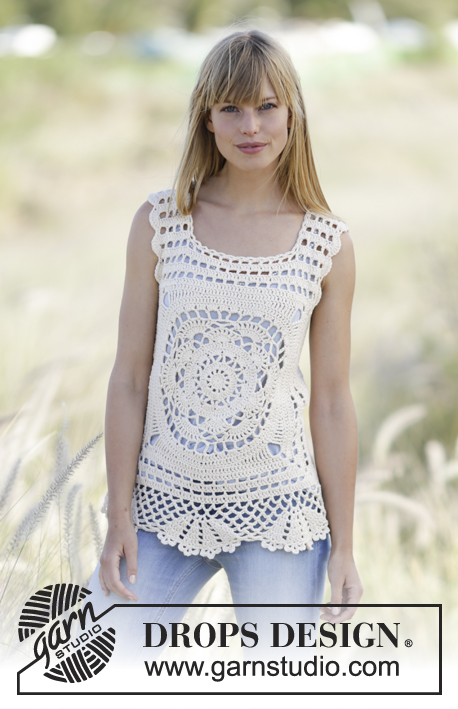
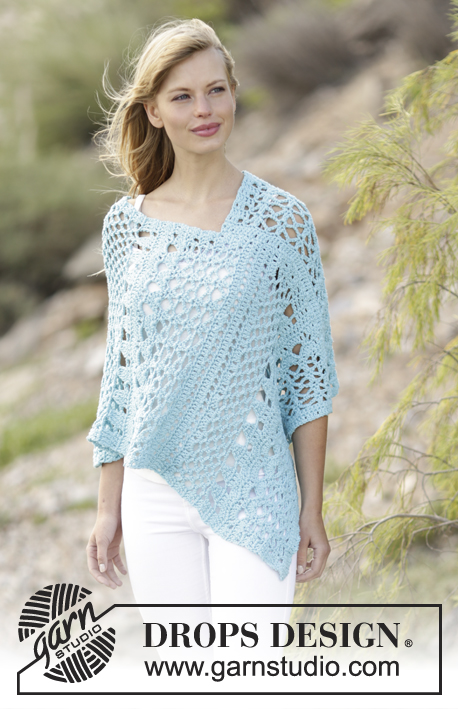
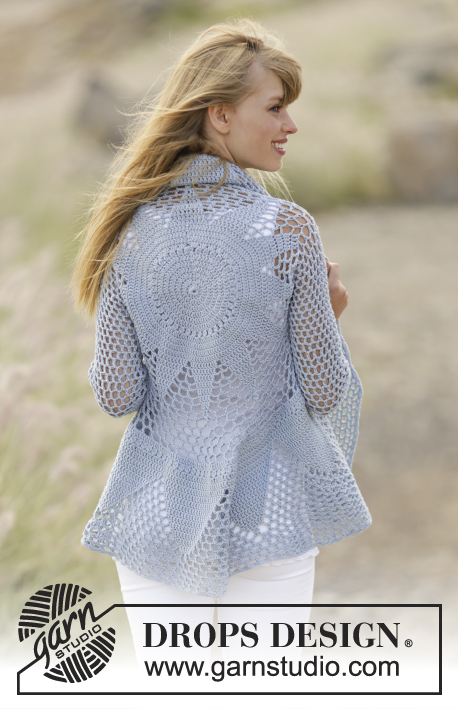
Cardigan DROPS lavorato all’uncinetto a cerchio con maglie alte e motivo traforato in ”Cotton Merino”. Taglie: S - XXXL.
DROPS 168-12 |
||||||||||||||||||||||||||||
|
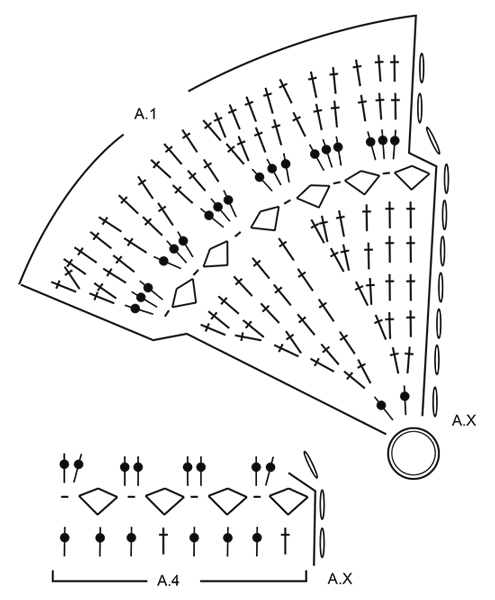
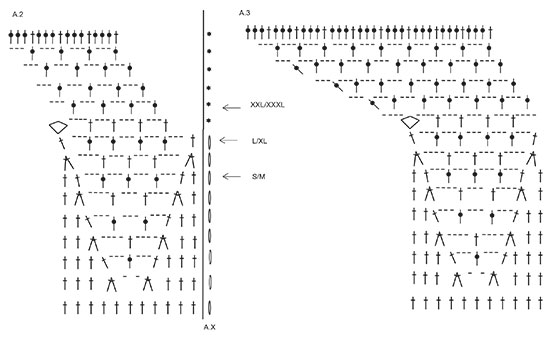
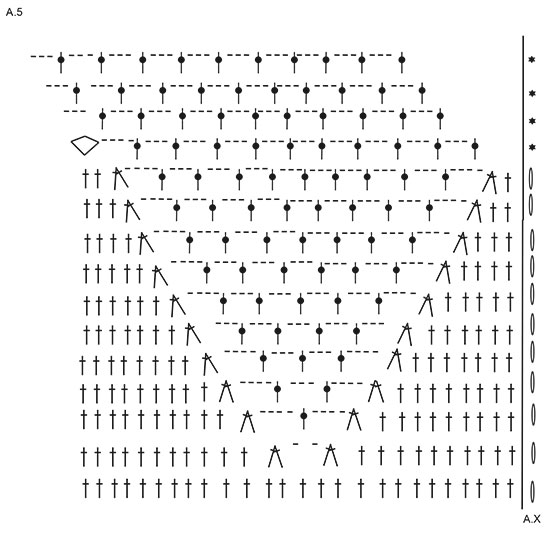
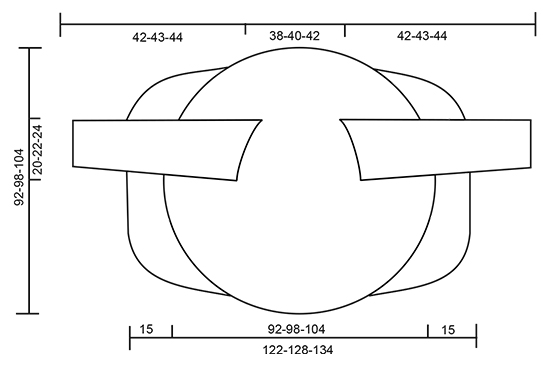
MOTIVO: Vedere i diagrammi A.1-A.6. SUGGERIMENTO PER LE DIMINUZIONI: Lavorare 1 m.a attorno all’arco di cat successivo ma aspettare con l’ultimo passaggio, lavorare la m.a successiva attorno all’arco di cat successivo (non lavorare 3 cat tra la m.a), sull’ultimo passaggio, far passare il filo attraverso tutte e 3 le m sull’uncinetto. SUGGERIMENTO PER IL LAVORO (applicato alle maniche): Dopo l’ultima m.a sul giro, continuare fino al giro successivo con 1 m.a nell’arco di cat successivo (= 1° arco di cat sul giro successivo). NOTA: Inserire un segnapunti all’inizio del giro tra l’ultima cat e la 1° m.a sul giro successivo, spostare il segnapunti verso l’alto. NOTA: ASSICURARSI DI NON SPOSTARE I SEGNAPUNTI. ---------------------------------------------------------- CARDIGAN LAVORATO A CERCHIO: Lavorato in tondo dal centro verso l’esterno. Avviare 4 cat con Cotton Merino con l’uncinetto n° 4 mm e formare un anello con 1 m.bss. Poi lavorare seguendo il diagramma A.1 (= 6 ripetizioni in larghezza) NOTA: A.x mostra come inizia e finisce, ed è in aggiunta al diagramma. FARE ATTENZIONE ALLA TENSIONE DEL LAVORO! Quando tutto il diagramma A.1 è stato lavorato in verticale (= 132 m.a), continuare come segue: lavorare * A.2 (= 11 m.a), A.3 (= 11 m.a) *, ripetere *-* 6 volte in totale. Lavorare fino alla freccia nel diagramma compresa – vedere la freccia per la vostra taglia, ora ci sono 228-252-264 m sul giro. Lavorare il giro successivo come segue: Continuare a lavorare sulle prime 34-36-38 m, lavorare 36-40-44 cat, e saltare le 36-40-44 m successive (= scalfo), lavorare fino a quando rimangono 70-76-82 m, lavorare 36-40-44 cat e saltare le 36-40-44 m successive (= scalfo), continuare a lavorare sulle ultime 34-36-38 m. Sul giro successivo continuare seguendo il diagramma, lavorare il motivo come nel diagramma attorno agli archi di cat a ogni lato. Quando sono stati lavorati A.2 e A.3, ci sono 312 m.a sul giro. Continuare con A.4 (= 39 ripetizioni sul giro). Il 1° giro di A.4 mostra l’ultimo giro di A.2/A.3, non lavorare questo giro. Continuare a lavorare come segue: lavorare * A.5 (= 26 m.a), A.6 (= 26 m.a) *, ripetere *-* 6 volte in totale. Quando è stato lavorato A.5/A.6, ci sono 600 m sul giro (150 m.a con 3 cat tra ognuna). La taglia S/M finisce qui. TAGLIE M/L -XXL/XXXL: Lavorare altri 2-4 giri come l’ultimo giro in A.5/A.6 = 162-174 m.a con 3 cat in mezzo. TUTTE LE TAGLIE: Il lavoro misura circa 46-49-52 cm dal centro (92-98-104 cm in totale). DAVANTI: Lavorati avanti e dietro in un lato con righe accorciate. Tagliare il filo, saltare le prime 13-16-19 m.a sul giro, poi lavorare sulle 49 m.a successive + archi di cat come segue (inserire un segnapunti qui): lavorare 3 cat, saltare 1 arco di cat, 1 m.b attorno all’arco di cat successivo, 3 cat (questi 2 archi di cat non vengono più lavorati), 1 m.a attorno all’arco di cat successivo, lavorare il motivo come prima fino a quando rimangono 2 archi di cat (cioè archi di cat tra m.a, non lavorare più attorno a questi 2 archi di cat), girare il lavoro. Continuare con righe accorciate in questo modo, ALLO STESSO TEMPO aumentare 1 m.a + 3 m nell’arco di cat centrale su ogni riga (lavorare 1 m.a + 3 cat + 1 m.a nello stesso spazio). Continuare con gli aumenti e diminuzioni su ogni riga fino a quando il lavoro misura 15 cm dal segnapunti. Saltare 26-32-38 m.a, poi lavorare a righe accorciate sulle 49 m.a successive (13-16-19 m.a rimaste sul giro). Lavorare nello stesso modo dell’altro lato. BORDO ALL’UNCINETTO: Lavorare un bordo attorno a tutto il cerchio come segue: 1 m.b attorno al 1° arco di cat, * 3 cat, 1 m.b attorno all’arco di cat successivo *, ripetere *-* e finire con 1 m.bss nella 1° m.b. Chiudere e affrancare. MANICHE: Lavorate in tondo, dall’alto in basso. Iniziare al centro sotto uno scalfo, lavorare 1 m.b attorno al 1° arco di cat, 6 cat (= 1 m.a + 3 cat), saltare la 1° m.a e lavorare 1 m.a attorno all’arco di cat successivo, * 3 cat, 1 m.a attorno all’arco di cat successivo *, ripetere *-* per tutto il giro (lavorare 1 m.a + 3 cat attorno agli angoli), finire il giro con 1 m.a attorno alle prime 6 cat, poi continuare a lavorare in tondo senza finire – LEGGERE IL SUGGERIMENTO PER IL LAVORO = 21-23-25 m.a + 21-23-25 archi di cat. Continuare con 1 m.a + 3 cat attorno a ogni arco. Quando il lavoro misura 4 cm, diminuire 1 arco di cat prima del segnapunti – LEGGERE IL SUGGERIMENTO PER LE DIMINUZIONI! Ripetere le diminuzioni ogni 4½ cm altre 7 volte, diminuire in modo alternato prima e dopo il segnapunti = 13-15-17 tr + 13-15-17 archi di cat. Continuare fino a quando il lavoro misura 42-43-44 cm. BORDI DELLE MANICHE LAVORATI ALL’UNCINETTO: Lavorare un bordo attorno alle maniche come segue: 1 m.b attorno al 1° arco di cat, * 3 cat, 1 m.b attorno all’arco di cat successivo *, ripetere *-* e finire con 1 m.bss nella 1° m.b. Chiudere e affrancare. Lavorare l’altra manica nello stesso modo. |
||||||||||||||||||||||||||||
Spiegazioni del diagramma |
||||||||||||||||||||||||||||
|
||||||||||||||||||||||||||||
|
||||||||||||||||||||||||||||
|
||||||||||||||||||||||||||||
|
||||||||||||||||||||||||||||

|
||||||||||||||||||||||||||||
|
||||||||||||||||||||||||||||
|
Avete realizzato questo o un altro dei nostri modelli? Taggate le vostre foto nei social media con #dropsdesign in modo che possiamo vederle! Avete bisogno di aiuto con questo modello?Troverete video tutorial, una sezione per i commenti/domande e molto altro guardando il modello su www.garnstudio.com © 1982-2024 DROPS Design A/S. Ci riserviamo tutti i diritti. Questo documento, compreso tutte le sue sotto-sezioni, è protetto dalle leggi sul copyright. Potete leggere quello che potete fare con i nostri modelli alla fine di ogni modello sul nostro sito. |
||||||||||||||||||||||||||||


Con oltre 40 anni di esperienza nel design di modelli di maglia e uncinetto, DROPS Design offre la più estesa collezione di modelli gratuiti su internet - tradotti in 17 lingue. Ad oggi vi possiamo fornire 304 cataloghi e 11422 modelli - 8666 dei quali sono tradotti in Italiano.
Ci stiamo impegnando molto per darvi il meglio che vi possiamo offrire in termini di maglia e uncinetto, ispirazioni e consigli così come filati di grande qualità ad un prezzo incredibile! Volete utilizzare i nostri modelli per qualcosa d'altro oltre al vostro uso personale? Potete leggere tutto ciò che è consentito nel testo sul Copyright in basso su tutte le pagine dei nostri modelli. Buon lavoro!
Commenti / Domande (89)
Hi. I've read the pattern over and over and studied the charts, but I can't get the correct number of sts on my armhole round. And I don't see how the number of sts will increase on remaining A2 / A3 the rounds after the armholes.
15.04.2017 - 13:55DROPS Design answered:
Dear Roni, to create armholes, skip the number of sts stated for your size and crochet the relevant number of chains on both places for armholes. On next round, work next round in diagram as for your size as before, ie in the sts from previous row as well as around the both ch-spaces for armholes. Happy crocheting!
18.04.2017 - 10:29Hallo Drops disign . Ik kom niet uit met de patroon van de voorpand. Als ik aan weer zijde 2 losse lussen niet haken, kom mijn voorpand niet tot 15 cm. En het wordt niet zo vorm als de tekening. ik denk dat ik het patroon niet begrijp. Er staat vermeld tegelijk meerderen, waar moet het meerderen ? Kunt u het patroon uitleggen ? Dank u wel
21.03.2017 - 22:50DROPS Design answered:
Hoi Jennider. Je plaatst een markeerder in het werk als je begint met haken van het voorpand. Door het haken van de verkorte toeren (2 l-lussen minder aan het begin en eind van elke toer) minder je in het werk. Tegelijkertijd moet je meerderen in de middelste lus (tel en markeer eventueel eerst deze middelste lus voordat je begint). Je gaat zo door tot het werk 15 cm meet vanaf de geplaatste markeerder. Klopt je afmeting niet (heb je niet genoeg steken over bijvoorbeeld), dan controleer ook even je stekenverhouding.
22.03.2017 - 11:34Hallo Drops Design Dank u wel voor uw uitleg. Alleen nog 1 vraag over het begin van de het overslaan van 2 losse lussen. Is dat daarna elke toer weer 2 losse lussen overslaan ? Dus ook aan beide zijde ?
21.03.2017 - 16:34DROPS Design answered:
Dat klopt. Er staat tussen haakjes: over deze 2 l-lussen wordt niet meer gehaakt.
21.03.2017 - 16:50Ik begrijp de voorpand niet. Kunt u nog een keer Uitleggen ? Dank u
21.03.2017 - 10:15DROPS Design answered:
Hoi Jennifer, Als het goed is heb je, wanneer je aan het voorpand begint, een cirkel gemaakt met 2 openingen voor de armsgaten. Nu moet je aan de beide zijkanten van deze cirkel de voorpanden haken (zie ook schema / plattegrond van het werkstuk onderaan de beschrijving. Je slaat 13-16-19 stokjes over, ofwel je begint 13-16-19 stokjes verderop t.o.v. waar je de cirkel had afgehecht. Daar begin je dus heen en weer te haken volgens de beschrijving in het patroon. Hopelijk is het nu duidelijker voor je. Als dat nog niet zo is, dan graag even aangeven waar je precies tegenaan loopt.
21.03.2017 - 16:20Bonjour, Je suis bloquée à la fin du travail en cercle. je ne comprends pas la suite et ce qui est expliqué ne semble pas donner le résultat de la photo. Merci pour vos explications complémentaires.
27.02.2017 - 17:55DROPS Design answered:
Bonjour Annie, vous pouvez poser votre question ici, ou bien contacter votre magasin DROPS pour toute assistance personnalisée. Bon crochet!
28.02.2017 - 08:37Ich versuche mich schon zum xten Mal an dieser tollen Jacke aber es will einfach nichts werden. Gleich zu Beginn in der 3ten Reihe beginnt sich die Arbeit zu wölben. Was mache ich falsch? ○4LM zum Kreis ○12 Stäbchen in den Kreis ○verdoppeln... Ist doch richtig oder nicht?
20.02.2017 - 19:27DROPS Design answered:
Liebe Martine, an der 1. Runde häkeln Sie 2 Stäbchen im Luftmschenring x 6 = 12 Stäbchen, an der 2. Runde häkeln Sie 2 Stäbchen in jedem Stäbchen = 24 Stäbchen. Beachten Sie, daß Ihre Maschenprobe stimmt. Viel Spaß beim häkeln!
21.02.2017 - 09:28Hallo, ik heb de ster gehaakt en wil nu aan de mouwen beginnen. Ik begrijp niet dat jullie beginnen te tellen in st, steken denk ik. Als je dan die st optelt, klopt het totaal niet.(2x36+ 2x40 + 76 =228 i.p.v. 252 voor L/XL. Tellen jullie lussen en stokjes als steken? De lussen haken om de mouwen te maken begrijp ik wel. Het is de verdeling die ik moeilijk vind. Reeds bedankt Arlette
27.12.2016 - 00:19Do you recommend blocking the finished garment?
22.11.2016 - 16:27DROPS Design answered:
Dear Jane, some crocheters always block their work, have a talk with your DROPS store, they will then have tips & advices for you. Happy crocheting!
23.11.2016 - 09:13Row 6 on pattern A5 starts chain 3 all other rows on A5 are chain 4 is that a print error.
19.11.2016 - 11:47DROPS Design answered:
Dear Margaret, start each of the first 11 rows in A.5 with 3 ch, and finish each row with 1 sl st in 3rd ch from beg of round. Happy crocheting!
21.11.2016 - 09:18Hallo, ja, genauso steht es in der Anleitung und genau diese finde ich unverständlich:-(
19.10.2016 - 19:53DROPS Design answered:
Liebe Hanne, so müssen Sie diese Reihe häkeln und wiederholen, dh über immer weniger Maschen (verkürzten Reihen) und gleichzeitig in jeder R. zunehmen.
20.10.2016 - 11:47