
Categorie popolari
State cercando un filato?


Commenti / Domande (54)
![]() Crocus ha scritto:
Crocus ha scritto:
Encore moi. Une photo en plan rapproché du fameux raglan aurait été une aide très précieuse. Je me suis rarement sentie aussi nulle devant des explications. Je me suis même demandé si ma tête fonctionnait correctement. c'est dire ! :-)
04.06.2018 - 09:26
![]() Crocus ha scritto:
Crocus ha scritto:
Les explications des premiers rangs du raglan/motif ajouré sont complexes et j'ai déjà détricoté plusieurs fois. Ce qui me rassure quant à mes capacités de tricoteuse et de compréhension, c'est que je ne suis apparemment pas la seule. Beaucoup de personnes ont séché devant le texte.
04.06.2018 - 09:22DROPS Design ha risposto:
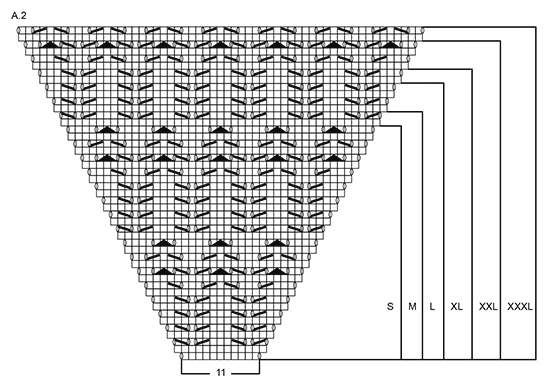
Bonjour Crocus, on augmente pour le raglan d'abord 12 mailles (4 m pour le dos et 2 m pour les devants soit 2 m avant/après A.2 et seulement 2 m pour les manches soit 1 m après A.2 au début de la manche et 1 m avant A.2 à la fin de la manche) 1-15 fois au total en fonction de la taille, puis on va augmenter seulement 8 m (= 1 m avant/après chaque A.2) 16-9 fois au total. Bon tricot!
04.06.2018 - 09:49
![]() MARCEAU ha scritto:
MARCEAU ha scritto:
Bonjour Je ne comprends pas comment faire le raglan au niveau des manches, pour faire les diagrammes ( et agrandir les dessins )
10.02.2018 - 14:05DROPS Design ha risposto:
Bonjour Mme Marceau, les augmentations du raglan des manches figurent dans le diagramme A.2, tricotez A.2 le nombre de rangs indiqué pour votre taille et augmentez en même temps pour le dos et les devants comme indiqué dans les explications pour votre taille. Bon tricot!
12.02.2018 - 08:41
![]() Gisela ha scritto:
Gisela ha scritto:
Bei den Raglanzunahmen in den Rückreihen verstehe ich nicht, welche Umschläge links verschränkt gestrickt werden sollen. Alle Umschläge im Rücken- und Vorderteil?
05.02.2018 - 11:43DROPS Design ha risposto:
Liebe Gisela, nur die Umschläge neben den Markierern (= Raglanlinien) werden "normal" gestrickt, die anderen (= 2. und 3. der 4 Umschläge), die 1. und 4. Umschläge werden verschränkt gestrickt. Viel Spaß beim stricken!
05.02.2018 - 13:20
![]() Henrietta Ho-Asjoe ha scritto:
Henrietta Ho-Asjoe ha scritto:
I am confused about the RAGLAN section -- P the closest to markers on the next round to make holes, P YO towards the back/ front piece twisted to avoid holes -- when do I do the P I am also confused about the increases and the number of times. I am making my sweater in small size. Thank you.
08.01.2018 - 18:07DROPS Design ha risposto:
Dear Mrs Ho-Asjoe, you will P twisted the first of both YOs before A.2 and the last of both YOs after A.2 and you will P the 2nd YO before A.2 and the first YO after A.2. In size S you will increase 2 sts that way only 1 time. Then increase 1 st before + 1 st after A.2 (= 8 sts increased on row) a total of 16 times every RS row. Happy knitting!
09.01.2018 - 09:35
![]() Sergeant ha scritto:
Sergeant ha scritto:
Bildet paa denne modellen (r-690) viser en ganske stor utringning, som jeg ikke faar til aa stemme med maalene paa tegningen (str L har nakkevidde paa 21cm). Jeg har kommet 5 cm avgaarde paa arbeidet str L, men oppnaar ikke den vide luftige utringningen som paa bildet. Jeg oensker virkelig denne vide utringningen, men er redd for at ved aa velge en stoerre stoerrelse blir den altfor vid over brystet. Har dere noen raad? Er veldig motivert for den ser saa fin ut!!
16.11.2017 - 14:00DROPS Design ha risposto:
Hej, jo men hvis du slår det antal masker løst op som står i opskriften, så vil du ifølge strikkefastheden, få den vide udringning som du ser på billedet. God fornøjelse!
05.12.2017 - 14:38
![]() Gloria Knight ha scritto:
Gloria Knight ha scritto:
Is there any way that the charts can be magnified as I am finding it difficult to see the markings clearly, especially the A! chart where I could not see the y/o symbol within the k2tog . I only know the y/o is needed because of drops design answer
09.06.2017 - 18:49DROPS Design ha risposto:
Dear Mrs Knight, you can try to zoom on your screen (browser) or to enlarge diagrams when printing/phocopying them. Happy knitting!
12.06.2017 - 08:57
![]() Gloria Knight ha scritto:
Gloria Knight ha scritto:
Also c/0 instruction states (incl 5 band sts in each side towards mid front)????? does this mean the c/0 number includes 10 stitches for bands at either end of needle as the pattern is worked back and forth on circular needles.
09.06.2017 - 14:36DROPS Design ha risposto:
Dear Mrs Knight, the front band sts are included in the number of sts to cast on. Happy knitting!
09.06.2017 - 17:22
![]() Gloria Knight ha scritto:
Gloria Knight ha scritto:
I am totally confused. Pattern says to c/0 101 stitches for jacket after 1st row knit to use chart A1. I read the pattern therefore = 5 rows knit, then w/s k2tog which i took to be for whole row, however after doing further 4 rows knit and increasing 15 stitches on last row I only have 67 stitches and not 116. A! chart only reps resents 10 stitches, should it just be 10 stitches I decreased on.
09.06.2017 - 14:35DROPS Design ha risposto:
Dear Mrs Knight, when working row 5 in A.1 repeat (K2 tog, 1 YO) = number of sts will keep constant, the dec will be compensate by the YOs. You keep then 101 sts + 15 sts inc evenly = 116 sts. Happy knitting!
09.06.2017 - 17:21
![]() Gillian ha scritto:
Gillian ha scritto:
Hello. Between what stitches do I place the markers? Between the 2 stitches in stocking stitch before A2 (11stitches)?
30.05.2017 - 14:58DROPS Design ha risposto:
Dear Gillian, markers are inserted between the 2 sts in stocking st before A.2, and then between the 2 sts after A.2. Happy knitting!
30.05.2017 - 15:37
|
|||||||||||||||||||
Sea Nymph Cardigan#seanymphcardigan |
|||||||||||||||||||
|
|
|||||||||||||||||||
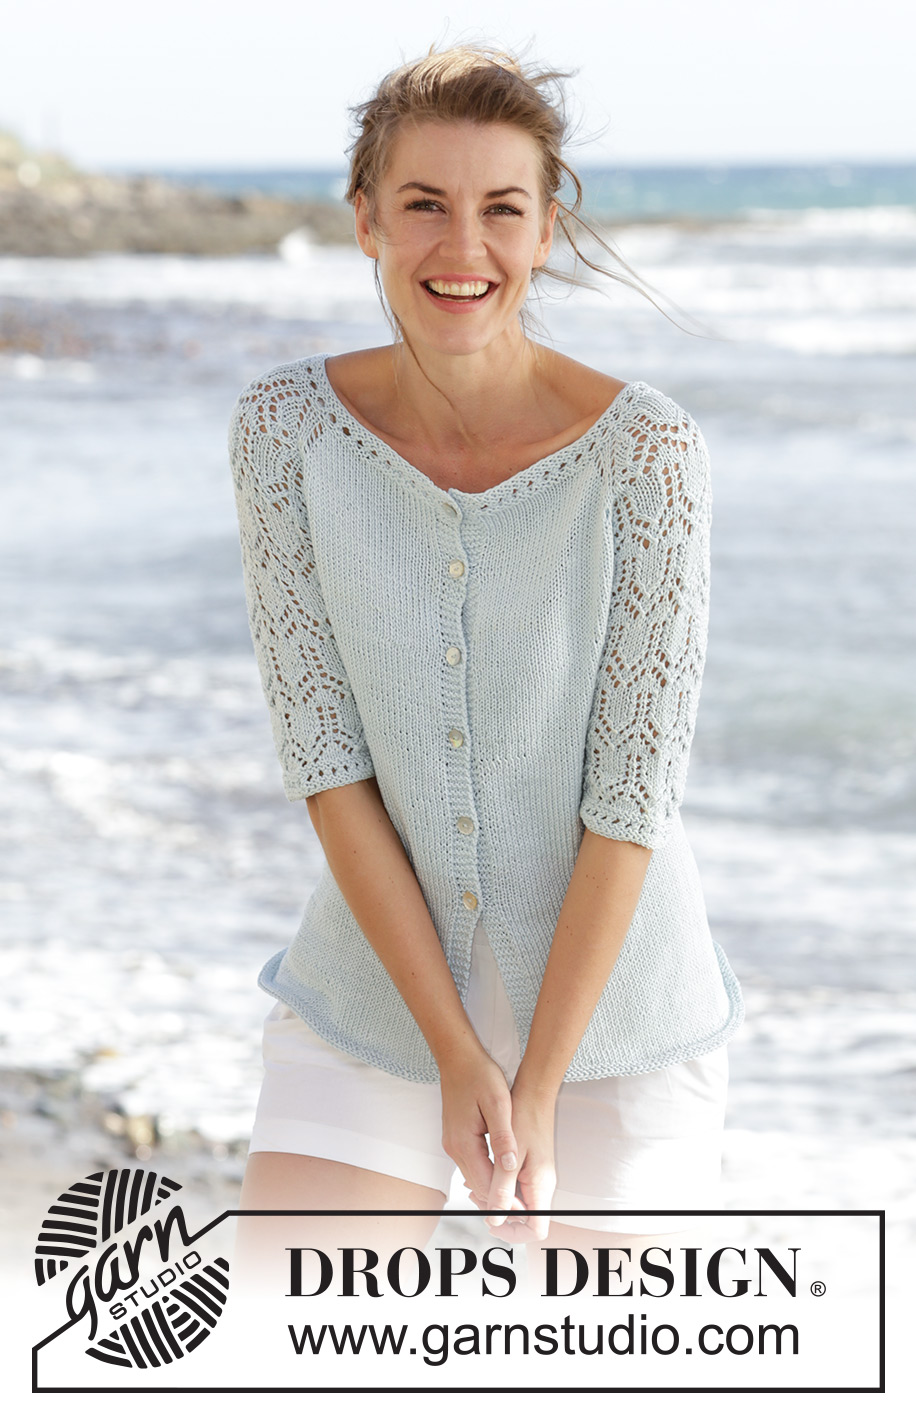
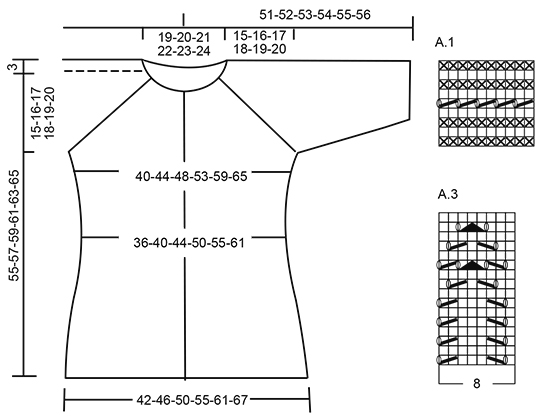
Cardigan DROPS lavorato ai ferri con raglan, motivo traforato e maniche a ¾ in "Muskat". Lavorato dall’alto in basso (top down). Taglie: S - XXXL.
DROPS 169-5 |
|||||||||||||||||||
|
M LEGACCIO (avanti e indietro): Lavorare tutti i f a dir. 1 “costa” a m legaccio = 2 f dir. MOTIVO: Vedere i diagrammi A.1-A.3. I diagrammi mostrano tutti i f del motivo visti dal diritto del lavoro. Scegliere il diagramma per la vostra taglia. RAGLAN: Aumentare su ogni f dal diritto del lavoro (a f alterni) come segue: Aumentare 4 m sul dietro, 2 m su ogni davanti e 2 m su ogni manica (= 12 aumenti, gli aumenti sulla manica sono disegnati nel motivo) – iniziare 3 m prima di ogni A.2 e lavorare come segue: 1 gettato, 1 m dir, 1 gettato, 2 m dir (il segnapunti è al centro di queste m), A.2, 2 m dir (il segnapunti è al centro di queste m), 1 gettato, 1 m dir, 1 gettato. Lavorare a rov i gettati più vicini al segnapunti sul giro successivo per fare i buchi, lavorare a rov ritorto i gettati verso il davanti/dietro per evitare i buchi. Aumentare 12 m in questo modo altre 0-2-3-7-10-14 volte (= 1-3-4-8-11-15 volte in totale, il 1° aumento è spiegato nel testo). Poi aumentare su ogni f dal diritto del lavoro (a f alterni) come segue: Aumentare 2 m sul dietro, 1 m su ogni davanti e 2 m su ogni manica (= 8 aumenti, gli aumenti sulle maniche sono disegnati nel motivo) – iniziare 2 m prima di ogni A.2 e lavorare come segue: 1 gettato, 2 m dir (il segnapunti è al centro di queste m), A.2, 2 m dir (il segnapunti è al centro di queste m), 1 gettato. Lavorare a rov i gettati sul f successivo per fare i buchi. Aumentare 8 m in questo modo 16-15-16-13-12-9 volte in totale. ASOLE: Diminuire per le asole sul bordo destro. 1 asola = lavorare insieme a dir la 2° e la 3° m dal bordo e fare 1 gettato. Diminuire per le asole quando il lavoro misura (misurati dal bordo di avvio): TAGLIA S-M-L: 2, 9, 16, 23, 30 e 37 cm. TAGLIA XL-XXL-XXXL: 2, 9, 16, 23, 30, 37 e 44 cm ---------------------------------------------------------- CARDIGAN: Lavorato avanti e indietro sui f circolari, dall’alto in basso (top down). Avviare 97-101-105-109-113-117 m (comprese 5 m per il bordo a ogni lato verso il centro davanti) con i f circolari n° 4 mm con Muskat. Lavorare 1 ferro dir dal diritto del lavoro, poi lavorare A.1, (1° ferro = dal rovescio del lavoro) con 5 m a m legaccio a ogni lato sull’ultimo ferro di A.1 distribuire 15 aumenti in modo uniforme = 112-116-120-124-128-132 m. Poi lavorare come segue dal centro davanti e dal diritto del lavoro: 5 m a m legaccio, 17-18-19-20-21-22 m a m rasata, 1 gettato, 1 m a m rasata, 1 gettato, 2 m a m rasata (inserire un segnapunti tra queste m), A.2 (= 11 m), 2 m a m rasata (inserire un segnapunti tra queste m), 1 gettato, 1 m a m rasata, 1 gettato, 34-36-38-40-42-44 m a m rasata, 1 gettato, 1 m a m rasata, 1 gettato, 2 m a m rasata (inserire un segnapunti tra queste m), A.2, 2 m a m rasata (inserire un segnapunti tra queste m), 1 gettato, 1 m a m rasata, 1 gettato, 17-18-19-20-21-22 m a m rasata, 5 m a m legaccio. Continuare questo motivo, e aumentare per il RAGLAN come spiegato sopra, il 1° aumento ora è finito. FARE ATTENZIONE ALLA TENSIONE DEL LAVORO! Quando A.2 è stato lavorato in verticale – vedere i segni per la vostra taglia, ci sono 252-272-296-324-356-384 m sul giro, ora gli aumenti sono finiti. Lavorare il f successivo come segue dal rovescio del lavoro: Lavorare 43-47-51-57-63-69 m (= davanti destro), trasferire le 45-47-51-53-57-59 m successive su un fermamaglie (= manica), avviare 8 m sotto la manica, lavorare le 76-84-92-104-116-128 m successive (= dietro), trasferire le 45-47-51-53-57-59 m successive su un fermamaglie (= manica), avviare 8 nuove m sotto la manica, lavorare le ultime 43-47-51-57-63-69 m (= davanti sinistro). CORPO: Ora ci sono 178-194-210-234-258-282 m sul corpo. Continuare a m rasata e a m legaccio come prima. Inserire un segnapunti a ogni lato, al centro delle 8 nuove m che sono state avviate. ORA MISURARE IL LAVORO DA QUI. Quando il lavoro misura 4 cm, diminuire 1 m a ogni lato del segnapunti (= 4 diminuzioni), ripetere le diminuzioni ogni 4-4-4-5-5-5 cm 3 volte in totale = 162-178-194-218-242-266 m. Quando il lavoro misura 22-23-24-25-26-27 cm, aumentare 1 m a ogni lato di tutti i segnapunti (= 4 aumenti), ripetere gli aumenti ogni 2 cm altre 5 volte = 186-202-218-242-266-290 m. Quando il lavoro misura 36-37-38-39-40-41 cm, lavorare 2 coste su tutte le m. Intrecciare 1 m dir/1 m rov (per evitare un bordo di chiusura ondulato), il lavoro misura circa 55-57-59-61-63-65 cm dal bordo di avvio. MANICA: Lavorata in tondo. Riportare le m delle maniche sui f a doppia punta n° 4 mm, riprendere 1 m in ognuna delle 8 m sotto la manica = 53-55-59-61-65-67 m. Inserire 1 segnapunti al centro sotto la manica = inizio del giro. ORA MISURARE IL LAVORO DA QUI! Poi lavorare come segue: 6-7-1-2-4-6 m a m rasata, A.3 sulle 40-40-56-56-56-56 m successive (iniziare A.3 dove finisce A.2 per la vostra taglia), 7-8-2-3-5-7 m a m rasata. Quando il lavoro misura 4 cm, diminuire 1 m a ogni lato del segnapunti. Lavorare le m che non rientrano nel motivo a m rasata, assicurarsi che il n° di diminuzioni e aumenti del motivo sia corretto. Ripetere le diminuzioni ogni 7-7-5-5-3-3 cm altre 2-2-3-3-4-4 volte = 47-49-51-53-55-57 m. Quando il lavoro misura 24-23-23-22-22-21 cm, lavorare A.1 su tutte le m, poi intrecciare. Lavorare l’altra manica nello stesso modo. Attaccare i bottoni sul davanti sinistro. |
|||||||||||||||||||
Spiegazioni del diagramma |
|||||||||||||||||||
|
|||||||||||||||||||
 |
|||||||||||||||||||
 |
|||||||||||||||||||
Avete terminato questo modello?Allora taggate le vostre foto con #dropspattern #seanymphcardigan o inviatele alla #dropsfan gallery. Avete bisogno di aiuto con questo modello?Troverete 23 video tutorial, una sezione per i commenti/domande e molto altro guardando il modello su www.garnstudio.com © 1982-2026 DROPS Design A/S. Ci riserviamo tutti i diritti. Questo documento, compreso tutte le sue sotto-sezioni, è protetto dalle leggi sul copyright. Potete leggere quello che potete fare con i nostri modelli alla fine di ogni modello sul nostro sito. |
|||||||||||||||||||


Con oltre 40 anni di esperienza nel design di modelli di maglia e uncinetto, DROPS Design offre la più estesa collezione di modelli gratuiti su internet - tradotti in 17 lingue. Ad oggi vi possiamo fornire 324 cataloghi e 12290 modelli - 9561 dei quali sono tradotti in Italiano.
Ci stiamo impegnando molto per darvi il meglio che vi possiamo offrire in termini di maglia e uncinetto, ispirazioni e consigli così come filati di grande qualità ad un prezzo incredibile! Volete utilizzare i nostri modelli per qualcosa d'altro oltre al vostro uso personale? Potete leggere tutto ciò che è consentito nel testo sul Copyright in basso su tutte le pagine dei nostri modelli. Buon lavoro!
Lasciare un commento sul modello DROPS 169-5
Noi saremmo felici di ricevere i tuoi commenti e opinioni su questo modello!
Se vuoi fare una domanda, fai per favore attenzione a selezionare la categoria corretta nella casella qui sotto per velocizzare il processo di risposta. I campi richiesti sono indicati da *.