
Categorie popolari
State cercando un filato?


Commenti / Domande (55)
![]() Janneke Koster ha scritto:
Janneke Koster ha scritto:
Ik vind dit een erg mooi patroon, maar ik kan hem niet meer in Mn favorieten zetten. Klopt dit? Er stond toch altijd ergens een hartje om hem in de favorieten te plaatsen. Deze kan ik nergens meer vinden? Hoe kan dat???
28.08.2017 - 22:38DROPS Design ha risposto:
Hallo Janneke, Bovenaan het patroon, na het stuk over hoeveel garen en welke naalden je nodig hebt, staat een roze knop, waarmee je hem kunt toevoegen aan je favorieten.
29.08.2017 - 17:45
![]() Brandi Perkins ha scritto:
Brandi Perkins ha scritto:
In the first row where it says skip chain 1 am I supposed to chain 1 and skip the next chain or just skip the next chain?
25.08.2017 - 04:54DROPS Design ha risposto:
Hello Brandi. You just skip the next chain. Happy crocheting!
25.08.2017 - 14:55
![]() Melitta Wicht ha scritto:
Melitta Wicht ha scritto:
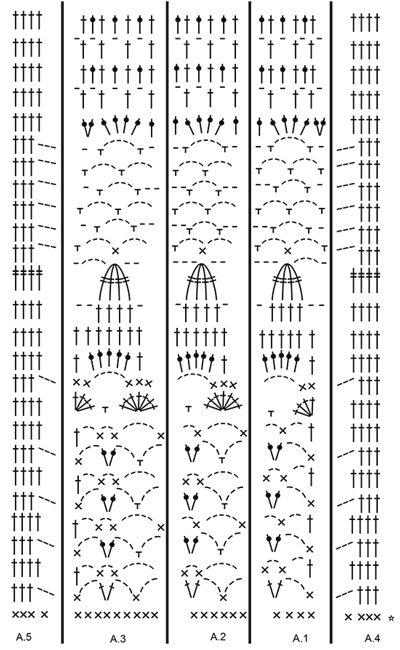
Guten Tag, ich möchte den DROPS 168-13 häkeln leider verstehe ich das Diagramm nicht. Muß ich das Diagramm von rechts nach links häkeln (1. Reihe) und in der nächsten Reihe von links nach rechts (2. R) usw. Bitte um kurze Antwort. Danke im voraus,
26.04.2017 - 12:00DROPS Design ha risposto:
Liebe Frau Wicht, ja genau, Hinreihen lesen Sie von unten am rechten Ecke von rechts nach links, und Rückreihen von links nach rechts. Viel Spaß beim häkeln!
26.04.2017 - 15:02
![]() Monika ha scritto:
Monika ha scritto:
In the diagram, it shows a row of SC at the bottom, is this the second row as described in text part of the pattern, or a second row of sc?
19.02.2017 - 18:23DROPS Design ha risposto:
Dear Monica, the sc row at the very start of diagram is the one explained at the very beg of the pattern (see star-symbol). Happy crocheting!
20.02.2017 - 10:21
![]() Frances Miller ha scritto:
Frances Miller ha scritto:
When following the chart, do I go A4, A1, A2, A3, A5 each row or do I reverse it when doing the next row and then go back to A4 to start next row?
17.09.2016 - 04:45DROPS Design ha risposto:
Dear Mrs Miller you work from A.4 to A.5 on the first row, and then from A.5 to A.4 on the next row. Happy crocheting!
18.09.2016 - 23:19
![]() Frances Miller ha scritto:
Frances Miller ha scritto:
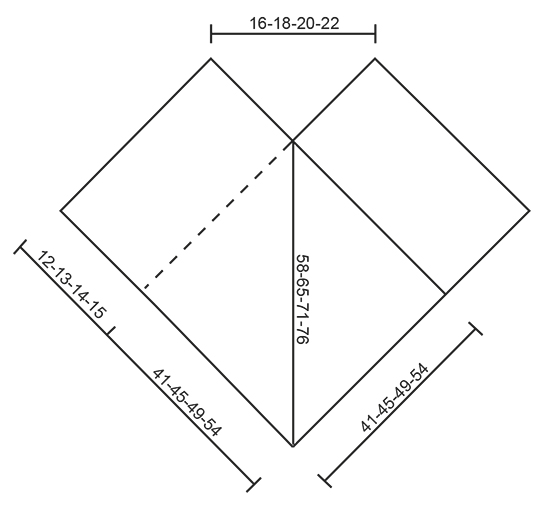
In the diagram showing the pieces attached are the measurements written in cm? Also can you tell what finished measurements are for each size? I am not sure what size to make for someone who has 39" bust.
07.09.2016 - 15:12DROPS Design ha risposto:
Dear Mrs Miller, all measurements in chart are in cm, taken flat from side to side. A good idea would be to measure a similar garment she has and like the shape to find out the matching size - read more here. Happy crocheting!
07.09.2016 - 15:51
![]() Silje ha scritto:
Silje ha scritto:
Veldig kjekk oppskrift. Eneste er at jeg sitter litt fast på diagrammet når jeg er ferdig med første repetisjon. Hvordan gjentar jeg diagrammet? Antall masker i siste runde vs første runde (andre runde i diagrammet) stemmer ikke overens...?
26.07.2016 - 18:20DROPS Design ha risposto:
Hei Silje. Du skal haekle paa samme maade igen som i begyndelsen: A.4 = 4 m, A.1 = 4 m, A.2 = 6 m, A.3 = 9 m og A.5 = 4 m per gentagelse. Du har rigtig nok 6 m til slut af A.1, men du har 7 til slut i A.3 - saa totalt skulle du have det samme antal masker. Dvs, det rykker lidt, men naar du starter forfra gaar du tilbage igen om du forstaar :-)
29.07.2016 - 11:16
![]() Kelly Taylor ha scritto:
Kelly Taylor ha scritto:
Is there any way to get a written out version of this pattern? I'm not used to having only the diagram to work with, and am having some trouble figuring it out. I would greatly appreciate any help you can offer. Thank you!
25.07.2016 - 18:35DROPS Design ha risposto:
Dear Mrs Taylor, there is only diagram to this pattern, each symbol in diagram represents 1 st or 1 group of sts as explained under diagram text - start at the bottom corner on the right side and read towards the left: A.4 1 time in width, A.1 1 time in width, repeat A.2 6-7-8-9 times in width, A.3 1 time in width, and finish with A.5 1 time in width. From WS read from the left towards the right: A.5, A.3, repeat A.2, A.1 and finish with A.4. Happy crocheting!
26.07.2016 - 10:09
![]() Åse Westgaard ha scritto:
Åse Westgaard ha scritto:
Hei. Dette gjelder oppskrift 168-13, men det er generelt alle oppskriftene deres. Hvorfor står det hekle(legg opp) et antall masker, så står det (tel: antall masker) det samme maskeantallet ?? Med vennlig hilsen Åse
30.06.2016 - 10:58DROPS Design ha risposto:
Hej Åse. Der staar ikke noget tel i opskriften? Jeg tror det er din Skype der er koplet paa en maade og aendrer antallet til et telefonnummer.
30.06.2016 - 11:47
![]() Judy ha scritto:
Judy ha scritto:
How much yarn, eg how many balls of 50g , is required for small Drops 168-13 please. Sorry if I have missed information on pattern
10.06.2016 - 10:34DROPS Design ha risposto:
Dear Judy. S/M uses 450 gr = 9 balls. You can find it at the top of the pattern. ;-)
10.06.2016 - 10:44
|
|||||||||||||||||||||||||||||||
Sky Love#skyloveponcho |
|||||||||||||||||||||||||||||||
 |
 |
||||||||||||||||||||||||||||||
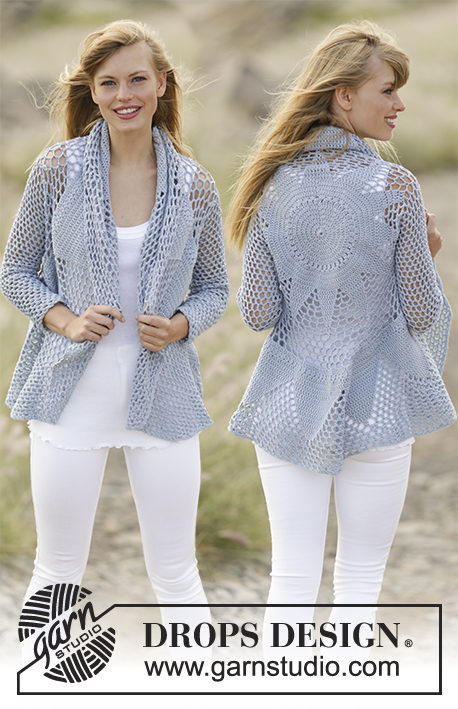
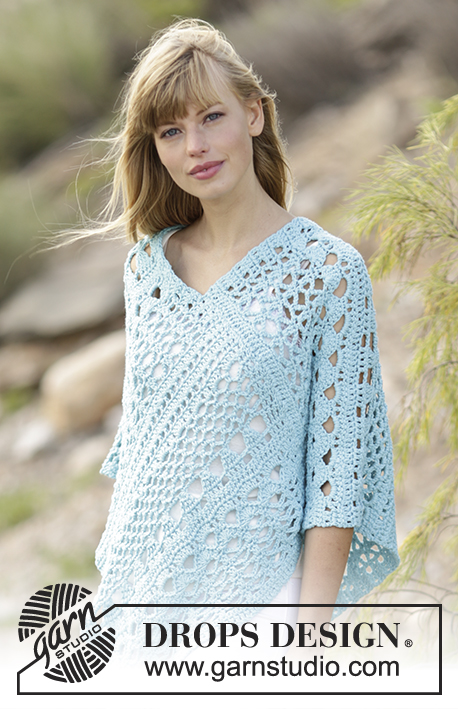
Poncho DROPS all’uncinetto, con motivo traforato, in "Paris". Taglie: Dalla S alla XXXL.
DROPS 168-13 |
|||||||||||||||||||||||||||||||
|
INFORMAZIONI PER IL LAVORO: Iniziare ogni riga di m.b con 1 cat (sostituisce la prima m.b). Iniziare ogni riga di m.a con 3 cat (sostituiscono la prima m.a). Iniziare ogni riga di m.a.d con 4 cat (sostituiscono la prima m.a.d). MOTIVO: Vedere i diagrammi da A.1 a A.5. ---------------------------------------------------------- PONCHO: Si lavora come fossero 2 sciarpe unite insieme alla fine per formare un poncho. Con l’uncinetto n° 5 ed il filato Paris, avviare 77-85-93-101 cat. Lavorare 1 m.a nella 4a cat dall’uncinetto (= 2 m.a), 1 m.a nella cat successiva, * saltare 1 cat, 1 m.a in ognuna delle 3 cat successive *, ripetere da *-* su tutto il ferro = 57-63-69-75 m.a. Lavorare 1 m.b in ogni m.a (= sul rovescio del lavoro) – vedere le INFORMAZIONI PER IL LAVORO = 57-63-69-75 m.b. Proseguire come segue: diagramma A.4 sulle prime 4 m.b, diagramma A.1 sulle 4 m.b successive, diagramma A.2 sulle 36-42-48-54 m.b successive (= 6-7-8-9 volte in larghezza), diagramma A.3 sulle 9 m.b successive, finire con il diagramma A.5 sulle ultime 4 m.b. Proseguire con il motivo in questo modo. RICORDARSI LA TENSIONE DEL LAVORO! Proseguire finché il lavoro non misura 65-71-77-84 cm; finire con una riga di m.a del diagramma. Tagliare il filo. Lavorare una seconda parte in modo uguale. CONFEZIONE: Mettere l’ultima riga della prima parte contro il lato lungo destro della seconda parte – dal basso, a partire dalla catenella di base e risalire per 41-45-49-54 cm – assicurarsi di non tirare troppo il lavoro. Cucire le 2 parti insieme con piccoli punti. Poi cucire in modo uguale l’ultima riga della seconda parte al lato destro della prima parte. |
|||||||||||||||||||||||||||||||
Spiegazioni del diagramma |
|||||||||||||||||||||||||||||||
|
|||||||||||||||||||||||||||||||
 |
|||||||||||||||||||||||||||||||
 |
|||||||||||||||||||||||||||||||
Avete terminato questo modello?Allora taggate le vostre foto con #dropspattern #skyloveponcho o inviatele alla #dropsfan gallery. Avete bisogno di aiuto con questo modello?Troverete 8 video tutorial, una sezione per i commenti/domande e molto altro guardando il modello su www.garnstudio.com © 1982-2026 DROPS Design A/S. Ci riserviamo tutti i diritti. Questo documento, compreso tutte le sue sotto-sezioni, è protetto dalle leggi sul copyright. Potete leggere quello che potete fare con i nostri modelli alla fine di ogni modello sul nostro sito. |
|||||||||||||||||||||||||||||||


Con oltre 40 anni di esperienza nel design di modelli di maglia e uncinetto, DROPS Design offre la più estesa collezione di modelli gratuiti su internet - tradotti in 17 lingue. Ad oggi vi possiamo fornire 324 cataloghi e 12291 modelli - 9562 dei quali sono tradotti in Italiano.
Ci stiamo impegnando molto per darvi il meglio che vi possiamo offrire in termini di maglia e uncinetto, ispirazioni e consigli così come filati di grande qualità ad un prezzo incredibile! Volete utilizzare i nostri modelli per qualcosa d'altro oltre al vostro uso personale? Potete leggere tutto ciò che è consentito nel testo sul Copyright in basso su tutte le pagine dei nostri modelli. Buon lavoro!
Lasciare un commento sul modello DROPS 168-13
Noi saremmo felici di ricevere i tuoi commenti e opinioni su questo modello!
Se vuoi fare una domanda, fai per favore attenzione a selezionare la categoria corretta nella casella qui sotto per velocizzare il processo di risposta. I campi richiesti sono indicati da *.