
Categorie popolari
State cercando un filato?


Commenti / Domande (51)
![]() Cristina Serrenho ha scritto:
Cristina Serrenho ha scritto:
Olá tem alguém aí para responder se faz favor. Essa receita está errada, comecei com 98 pts como diz, e ao fim de fazer o diagrama A1 não dá os 322 . Queiram rectificar a receita!!
09.04.2020 - 12:56DROPS Design ha risposto:
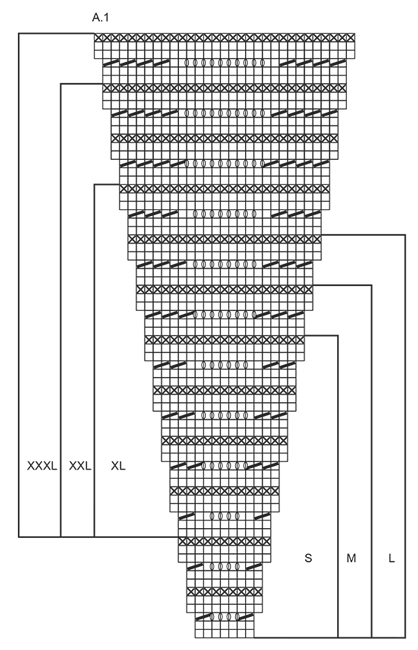
Bom dia, Estivemos a verificar e não há qualquer erro. São feitos 16 aumentos no diagrama A,1 para o tamanho L. Como se repete A.1 14 vezes em largura, 14 x 16 = 224 malhas. A juntar às 98 malhas do princípio = 322 malhas. Aconselhamos a que veja novamente o diagrama para o tamanho L. Bom Tricô!
15.04.2020 - 12:52
![]() Cristina Serrenho ha scritto:
Cristina Serrenho ha scritto:
Ola bom dia. Para mim que quero fazer este modelo em tamanho L, monto 98 pontos na agulha e faço o motivo A1, e ao fim não me dá os 322 pontos como diz aqui na vossa receita. Será que esta receita não está errada.
06.04.2020 - 17:45DROPS Design ha risposto:
Olá, Para o tamanho L, não começa o motivo A.1 pela 1.ª carreira em baixo do diagrama mas sim pela carreira de pontos tricô assinalada para o tamanho L. (=24 carreiras no total). Bom Tricô!
14.04.2020 - 11:58
![]() Sari ha scritto:
Sari ha scritto:
Hej! Dom nya maskorna man lägger upp och som ökas efter 3 cm, kommer dom inte att vara vågmönstrade?
20.08.2019 - 20:12DROPS Design ha risposto:
Hej Sari, nej de nya maskor stickas inte i A.2 men i räta och aviga maskor enligt A.2. Lycka till :)
10.09.2019 - 15:08
![]() Heidi ha scritto:
Heidi ha scritto:
Slå enten 98 eller 154 m på. Er det ikke et meget stort spring mellem størrelserne?
16.08.2019 - 17:23DROPS Design ha risposto:
Hei Heidi. Det er et stort spring mellom størrelsene når man legger opp, men om du ser diagram A.1 justeres maskeantallet og springet mellom maskeantallet er "normalt" etter A.1 er ferdig strikket, (=266-294-322-350-406-434 masker på pinnen). mvh DROPS design
23.09.2019 - 10:22
![]() Maréka ha scritto:
Maréka ha scritto:
Bonjour, je vous ai déja envoyé cette question hier mais cela n'a pas été enregistré.Je commence ce pull 168-34 et je voudrais savoir quand on commence le A1 taille S au 4ème rangs on doit augmenter une maille au début et à la fin du motif et ceci 14 fois, et je vous savoir si cette maille en plus est un jété, ou si c'est autre chose ensuite on doit faire 7 mailles endroits.Merci de votre patience . Bonne journée
08.07.2019 - 10:30DROPS Design ha risposto:
Bonjour Maréka, toutes les augmentations à faire figurent dans A.1: au 3ème rang de A.1 on tricote: 2 m ens à l'end, (1 jeté, 1 m end)x3, 1 jeté, 2 m ens à l'end = on va diminuer 2 m mais augmenter 4 m = on augmente ainsi 2 m dans chaque A.1. Bon tricot!
08.07.2019 - 10:44
![]() Kristin ha scritto:
Kristin ha scritto:
På bolen står det «Fortsett med 10 rapporter av A2. Når A2 er strikket 1 gang i høyden, strikkes A3 en gang over alle rapporter av A2.» Betyr det at A3 skal strikkes kun en gang eller 10 ganger?
07.04.2019 - 22:30DROPS Design ha risposto:
Hei Kristin. Du strikker A.3 over alle maskene, men kun 1 gang i høyden. God fornøyelse
08.04.2019 - 15:25
![]() Stephanie Philipps ha scritto:
Stephanie Philipps ha scritto:
Sehr tolle Anleitung habe nur eine Frage beim rumpfteil unter dem Arm die masche die neu angeschlagenen werden soll ich die am Anfang im rapport stricken oder nur links oder rechts
26.04.2018 - 10:25DROPS Design ha risposto:
Liebe Frau Philipps, die neuen unter dem Arm angeschlagenen Maschen werden wie im A.2 gestrickt, dh rechts oder links wie alle anderen Maschen in A.2, wenn Sie die Löcherrunde in A.2 stricken, werden diese Maschen rechts gestrikt (= ohne Löcher). Viel Spaß beim stricken!
26.04.2018 - 11:52
![]() Alvy ha scritto:
Alvy ha scritto:
Ok super merci là j'ai tout compris pour tricoter en rond ^^
25.10.2017 - 17:38
![]() Alvy ha scritto:
Alvy ha scritto:
Vous voulez bien dire les rangs "impairs" sont sur l'endroit et se tricotent donc à l'endroit sauf contre ordre
25.10.2017 - 12:46DROPS Design ha risposto:
Bonjour Alvy, en fait, ce modèle se tricote en rond, donc tous les rangs se lisent sur l'endroit, en commençant en bas à droite (et de droite à gauche). Ainsi, les rangss 1 et 2 (S, M et L) se tricotent à l'endroit, et le rang 6 se tricote à l'envers. Bon tricot!
25.10.2017 - 14:42
![]() Alvy ha scritto:
Alvy ha scritto:
Bonjour, pour être sûre, le motif A1 : le 1er rang est à l'endroit, le 2e rang à l'envers et ensuite tous les rangs pairs sont bien à l'envers sauf si mentionné autrement ? Merci par avance pour votre réponse
25.10.2017 - 10:33DROPS Design ha risposto:
Bonjour Alvy, les diagrammes comportent effectivement tous les rangs du point fantaisie, tous les rangs pairs se tricotent sur l'endroit (lisez-les de droite à gauche) et tous les rangs pairs sur l'envers (à lire de gauche à droite). Bon tricot!
25.10.2017 - 12:23
|
|||||||||||||
Shore Line#shorelinetop |
|||||||||||||
|
|
|||||||||||||
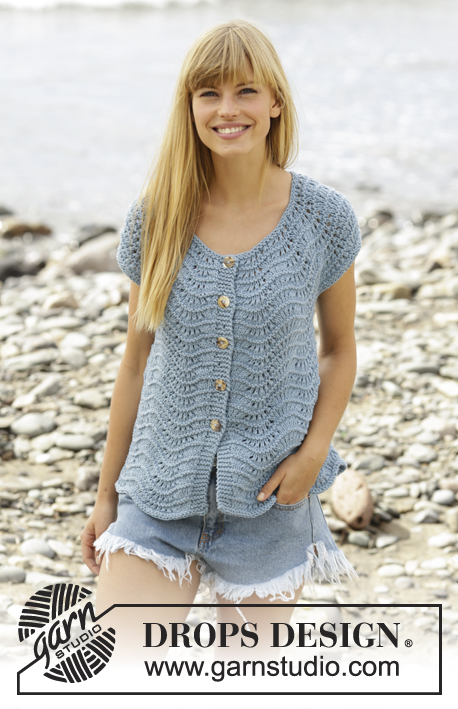
Top DROPS ai ferri, con maniche corte e motivo ondulato, in "Big Merino". Lavorato dall’alto verso il basso (top down). Taglie: Dalla S alla XXXL.
DROPS 168-30 |
|||||||||||||
|
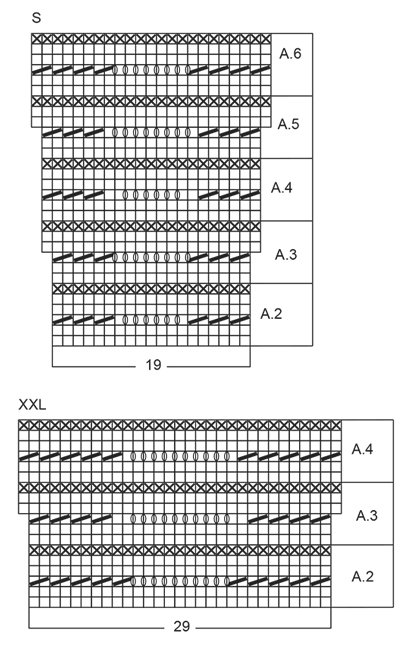
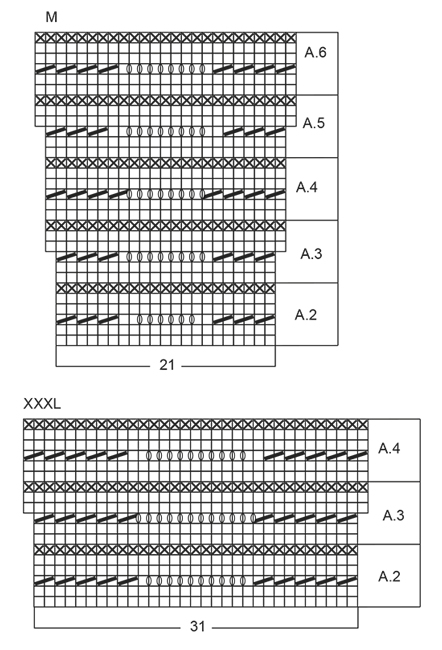
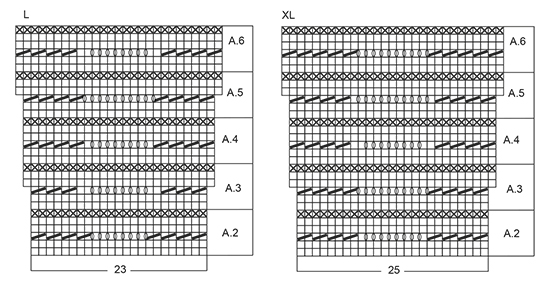
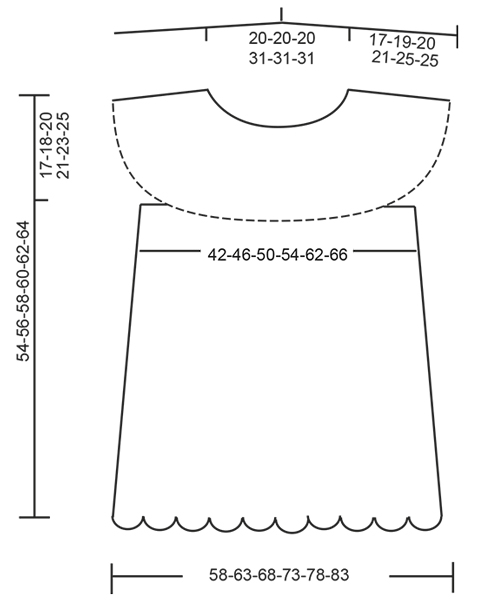
MOTIVO: Vedere i diagrammi da A.1 a A.6. Seguire il diagramma corrispondente alla propria taglia! PUNTO LEGACCIO (in tondo): Lavorare * 1 giro a dir e 1 giro a rov *, ripetere da *-*. 1 “costa” a legaccio = 2 giri ---------------------------------------------------------- TOP: Si lavora in tondo sui ferri circolari, dall’alto verso il basso. Avviare 98-98-98-154-154-154 m sui ferri circolari n° 5,5 con il filato Big Merino. Lavorare 1 COSTA A LEGACCIO - Vedere le spiegazioni sopra. Lavorare il diagramma A.1 (= 14 ripetizioni del diagramma A.1 in larghezza - vedere il segno corrispondente alla propria taglia). Dopo aver lavorato il diagramma A.1 1 volta in verticale, sui ferri ci sono 266-294-322-350-406-434 m. RICORDARSI LA TENSIONE DEL LAVORO! Seguire ora il diagramma A.2 finché il lavoro non misura 17-18-20-21-23-25 cm. Lavorare poi come segue: 38-42-46-50-58-62 m (= metà dietro), mettere in attesa su un ferma maglie le 57-63-69-75-87-93 m successive (= manica), avviare 7-7-7-7-9-9 nuove m, lavorare le 76-84-92-100-116-124 m successive a dir (=davanti), mettere in attesa su un ferma maglie le 57-63-69-75-87-93 m successive (= manica), avviare 7-7-7-7-9-9 nuove m, lavorare le ultime 38-42-46-50-58-62 m (= metà dietro) = 166-182-198-214-250-266 m. DAVANTI e DIETRO: = 166-182-198-214-250-266 m. DA ADESSO IN AVANTI MISURARE IL LAVORO DA QUESTO PUNTO. Continuare con il diagramma A.2, lavorare le nuove m ai lati a dir quando si lavora a dir nel diagramma A.2 e a rov quando si lavora a rov nel diagramma A.2. Quando il lavoro misura 3 cm, aumentare 1 m da ciascun lato delle 7-7-7-7-9-9 nuove m ai lati; ripetere questi aumenti ogni 2 cm altre 5-6-7-8-9-10 volte = 190-210-230-250-290-310 m. Lavorare ora 10 ripetizioni in larghezza del diagramma A.2. Dopo aver lavorato il diagramma A.2 una volta in verticale, lavorare il diagramma A.3 una volta in verticale su ogni ripetizione del diagramma A.2 = 210-230-250-270-310-330 m. Taglie S-M-L-XL: Lavorare 3 ripetizioni in verticale del diagramma A.4, poi lavorare il diagramma A.5 1 volta in verticale su ogni ripetizione del diagramma A.4 = 230-250-270-290 m. Lavorare poi il diagramma A.6 finché il lavoro non misura 37-37-38-39 cm (54-56-58-60 cm in tutto). Intrecciare le m senza stringere troppo il filo. Taglie XXL e XXXL: Lavorare il diagramma A.4 finché il lavoro non misura 39-39 cm (62-64 cm in tutto). Intrecciare le m senza stringere troppo il filo. BORDO DELLA MANICA: Si lavora in tondo sui ferri a doppia punta. Riportare sui ferri a doppia punta n° 5,5 le m messe in attesa sul ferma maglie e riprendere 1 m in ognuna delle 7-7-7-7-9-9 m sotto la manica = 64-70-76-82-96-102 m. Lavorare 3 coste a PUNTO LEGACCIO e, allo stesso tempo, nel corso del primo giro a dir, diminuire 6-8-10-12-22-24 m a intervalli regolari = 58-62-66-70-74-78 m. Intrecciare le m. Lavorare il bordo dell’altra manica in modo uguale. |
|||||||||||||
Spiegazioni del diagramma |
|||||||||||||
|
|||||||||||||
 |
|||||||||||||
 |
|||||||||||||
 |
|||||||||||||
 |
|||||||||||||
 |
|||||||||||||
Avete terminato questo modello?Allora taggate le vostre foto con #dropspattern #shorelinetop o inviatele alla #dropsfan gallery. Avete bisogno di aiuto con questo modello?Troverete 19 video tutorial, una sezione per i commenti/domande e molto altro guardando il modello su www.garnstudio.com © 1982-2026 DROPS Design A/S. Ci riserviamo tutti i diritti. Questo documento, compreso tutte le sue sotto-sezioni, è protetto dalle leggi sul copyright. Potete leggere quello che potete fare con i nostri modelli alla fine di ogni modello sul nostro sito. |
|||||||||||||


Con oltre 40 anni di esperienza nel design di modelli di maglia e uncinetto, DROPS Design offre la più estesa collezione di modelli gratuiti su internet - tradotti in 17 lingue. Ad oggi vi possiamo fornire 324 cataloghi e 12290 modelli - 9561 dei quali sono tradotti in Italiano.
Ci stiamo impegnando molto per darvi il meglio che vi possiamo offrire in termini di maglia e uncinetto, ispirazioni e consigli così come filati di grande qualità ad un prezzo incredibile! Volete utilizzare i nostri modelli per qualcosa d'altro oltre al vostro uso personale? Potete leggere tutto ciò che è consentito nel testo sul Copyright in basso su tutte le pagine dei nostri modelli. Buon lavoro!
Lasciare un commento sul modello DROPS 168-30
Noi saremmo felici di ricevere i tuoi commenti e opinioni su questo modello!
Se vuoi fare una domanda, fai per favore attenzione a selezionare la categoria corretta nella casella qui sotto per velocizzare il processo di risposta. I campi richiesti sono indicati da *.