
Categorie popolari
State cercando un filato?


Commenti / Domande (51)
![]() Sabrina ha scritto:
Sabrina ha scritto:
Hallo, ich habe eine Frage zu den Zunahmen.... Werden die automatisch durch die Lochmuster zu genommen ?
18.12.2024 - 19:46DROPS Design ha risposto:
Liebe Sabrina, ja genau, je nach der Lochreihe im Muster werden Sie entweder mehr Umschläge als Abnahmen (= so nehmen Sie zu, z.B. in A.1, A.3 und A.5), oder die selbe Anzahl von Umschlägen und Abnahmen = so bleibt die Maschenanzahl gleich, z.B. in A.2, A.4 und A.6. Viel Spaß beim Stricken!
19.12.2024 - 09:12
![]() Olga ha scritto:
Olga ha scritto:
Thank you for your reply. I am already knitting the sleeves. I finally figured out how not to lose the pattern on the back and front thanks to the videos and photos from Agnes on Instagram.
28.07.2024 - 15:07
![]() Olga ha scritto:
Olga ha scritto:
Hello. Does the pattern on the back get lost after the transition from the top to the body? The rapport does not end at the end of the row when I switch to scheme A2.
22.07.2024 - 09:26DROPS Design ha risposto:
Dear Olga, you should have 2 repeats in each mid back and 4 repeats in the front piece. Remember that the new stitches under the sleeves are knitted or purled in garter stitch, regardless of the chart. Then you increase in these knit/ purl sections. Later you should have space for 10 repeats of A.2 in total and then A.3. Happy knitting!
27.07.2024 - 19:42
![]() Bogi ha scritto:
Bogi ha scritto:
Guten Tag, denke Sie ich kann dieses Top auch mit der Belle, welches ja eine andere Garnguppe ist, bedekenlos nach Anleitung stricken? Vielen Dank für Ihre Antwort vorab, Liebe Grüsse, Bogi
17.04.2024 - 11:01DROPS Design ha risposto:
Liebe Bogi, dieses Modell wird mit Big Merino, dh ein Garn der Garngruppe C, gestrickt, DROPS Belle gehört der Garngruppe B und wird hier keine Alternative sein. Benutzen Sie den Garnumrechner um die Alternative sowie die neue Garnmenge zu finden. Viel Spaß beim Stricken!
17.04.2024 - 11:18
![]() Elena Schiwe ha scritto:
Elena Schiwe ha scritto:
Hallo, vielen Dank für tolle Anleitung! Habe aber eine Frage- stricke in Gr. L und bin am Anfang des Rumpfteils, habe 198 Maschen. Meine Frage ist- Wie oft in Höhe muss ich die Abschnitte A2 und A3 stricken? Vielen Dank
12.04.2024 - 20:58DROPS Design ha risposto:
Liebe Frau Schiwe, Stricken Sie so viele A.2 wie möglich am Rücken- und Vorderteile bis die Seiten, die Maschen an den Seiten, die nicht im A.2 gestrickt werden können stricken Sie rechts bzw links wie beim A.2 (aber nicht mit Abnahmen/Umschläge). Viel Spaß beim Stricken!
15.04.2024 - 07:01
![]() Mamie ha scritto:
Mamie ha scritto:
I don\'t understand how to reconcile the waves pattern in 168-30 to the stitch count in the small. 166 doesn\'t divide by 19, so the waves are off and start look goofy. I don\'t see how the stitch count ever catches up to the pattern to make it work. Am I supposed to continue working up the chart into the next section/size (A2 then A3, etc) or simply repeat the portion for my size? Was I supposed to do that on the bodice?
16.04.2023 - 07:56DROPS Design ha risposto:
Dear Mamie, you don't work A.2 over the 166 stitches. You continue the pattern established in the yoke: work A.2 over A.2, and knit or purl the other stitches (according to the round of A.2 you are working), the ones that you cast on under the sleeve. In that case, you work A.2 over 166-7-7 = 152 stitches, which divided by 19 gives us 8 repeats of A.2 on the round. Happy knitting!
16.04.2023 - 18:31
![]() Katka ha scritto:
Katka ha scritto:
Dobrý večer.Rozdělila jsem rukávy 42 ok.Mám pokračovat 2 řady hladce A.2 a napojit se na vzor,ale vzor nesedí :-( Děkuji
17.01.2022 - 22:26
![]() Ulppi ha scritto:
Ulppi ha scritto:
Missä vaiheessa kainaloon luotavilla(m koossa 7 silmukalla) aletaan neuloa mallineuletta? Alussahan mallikuvioon ei riitä silmukat, ja ohjeessa ei mainita tästä
09.08.2021 - 21:49DROPS Design ha risposto:
Hei, kainaloon luoduilla silmukoilla neulotaan oikeaa, kun muut silmukat neulotaan oikein, ja nurjaa, kun muilla silmukoilla neulotaan nurjaa.
06.10.2021 - 17:09
![]() Jacqueline Call ha scritto:
Jacqueline Call ha scritto:
What diagram is A2?
08.01.2021 - 19:46DROPS Design ha risposto:
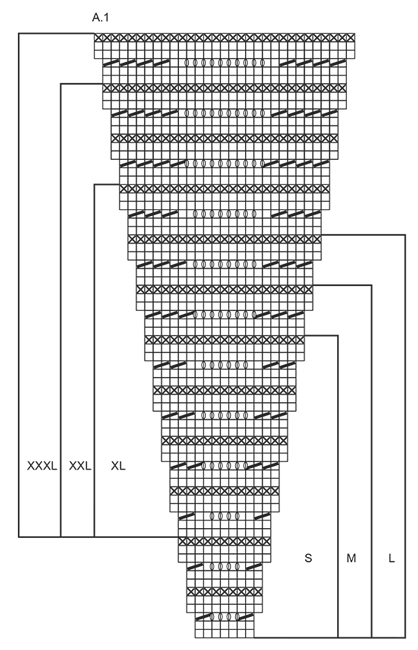
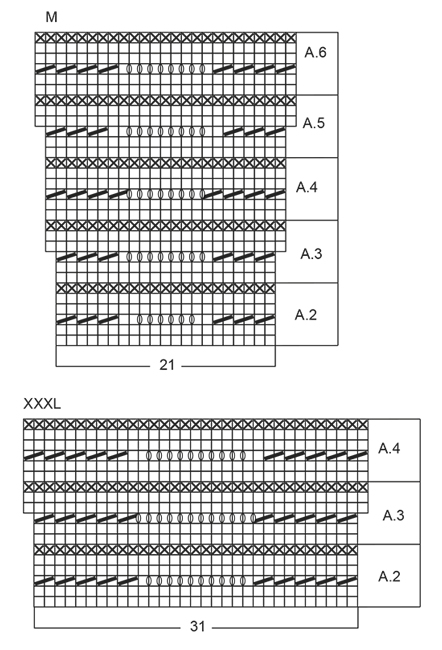
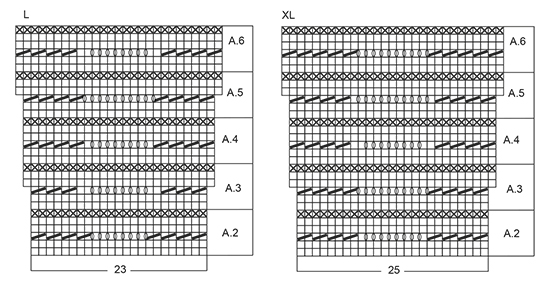
Dear Mrs Call, find diagram for your size, and then check out the name of the diagram on the right side: A.2 = the bottom 6 rows framed and called A.2. Happy knitting!
11.01.2021 - 11:13
![]() Manuela Zuin ha scritto:
Manuela Zuin ha scritto:
Salve, innanzitutto devo dirvi che garnstudio è un sito fantastico!!! Grazie a tutti voi che lo rendete così unico!!! Poi avrei una domanda: sto facendo questo modello, sono quasi alla fine😃, leggendo le istruzioni ho notato che sul fondo non và lavorato alcun tipo di bordo come invece c'è sulle maniche e all'inizio sul collo. Devo semplicemente chiudere alla fine del diagramma o devo fare qualche costa a legaccio? Grazie infinite e buona giornata a tutti. Manuela
05.08.2020 - 01:05DROPS Design ha risposto:
Buongiorno Manuela, grazie per la segnalazione, chiederemo una verifica al settore design. Le eventuali correzioni verranno apportate direttamente online. Nel frattempo, può lavorare un bordo a legaccio come quello per le maniche. Buon lavoro!
05.08.2020 - 10:04
|
|||||||||||||
Shore Line#shorelinetop |
|||||||||||||
|
|
|||||||||||||
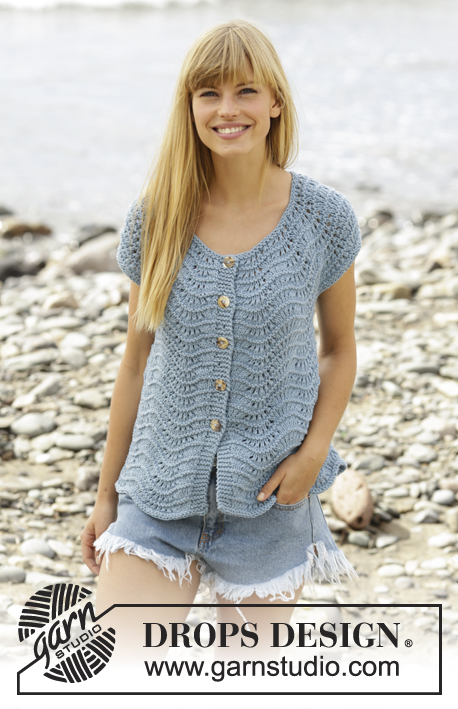
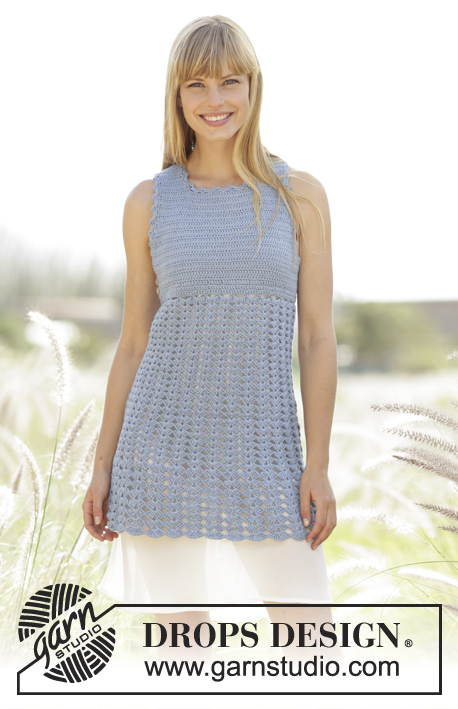
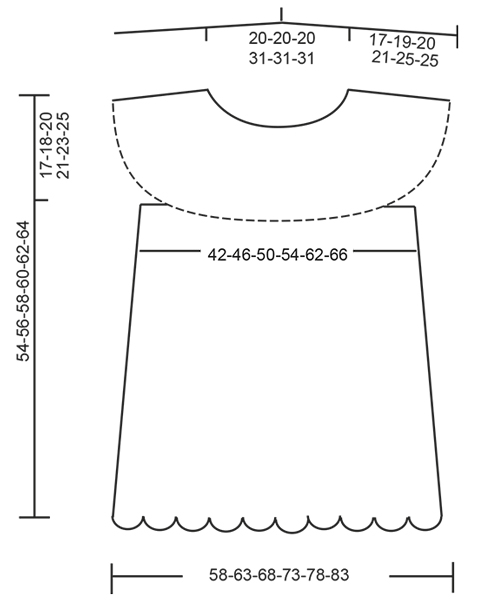
Top DROPS ai ferri, con maniche corte e motivo ondulato, in "Big Merino". Lavorato dall’alto verso il basso (top down). Taglie: Dalla S alla XXXL.
DROPS 168-30 |
|||||||||||||
|
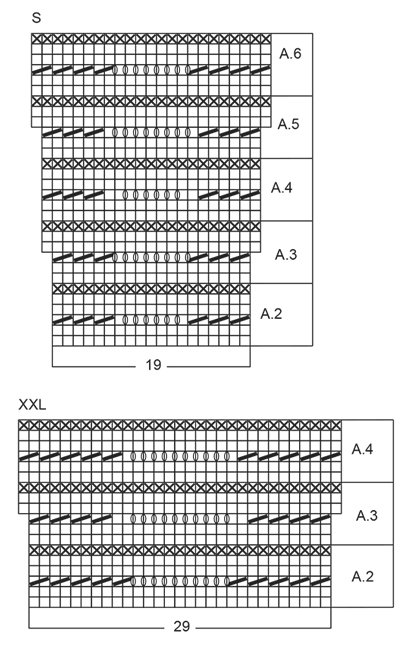
MOTIVO: Vedere i diagrammi da A.1 a A.6. Seguire il diagramma corrispondente alla propria taglia! PUNTO LEGACCIO (in tondo): Lavorare * 1 giro a dir e 1 giro a rov *, ripetere da *-*. 1 “costa” a legaccio = 2 giri ---------------------------------------------------------- TOP: Si lavora in tondo sui ferri circolari, dall’alto verso il basso. Avviare 98-98-98-154-154-154 m sui ferri circolari n° 5,5 con il filato Big Merino. Lavorare 1 COSTA A LEGACCIO - Vedere le spiegazioni sopra. Lavorare il diagramma A.1 (= 14 ripetizioni del diagramma A.1 in larghezza - vedere il segno corrispondente alla propria taglia). Dopo aver lavorato il diagramma A.1 1 volta in verticale, sui ferri ci sono 266-294-322-350-406-434 m. RICORDARSI LA TENSIONE DEL LAVORO! Seguire ora il diagramma A.2 finché il lavoro non misura 17-18-20-21-23-25 cm. Lavorare poi come segue: 38-42-46-50-58-62 m (= metà dietro), mettere in attesa su un ferma maglie le 57-63-69-75-87-93 m successive (= manica), avviare 7-7-7-7-9-9 nuove m, lavorare le 76-84-92-100-116-124 m successive a dir (=davanti), mettere in attesa su un ferma maglie le 57-63-69-75-87-93 m successive (= manica), avviare 7-7-7-7-9-9 nuove m, lavorare le ultime 38-42-46-50-58-62 m (= metà dietro) = 166-182-198-214-250-266 m. DAVANTI e DIETRO: = 166-182-198-214-250-266 m. DA ADESSO IN AVANTI MISURARE IL LAVORO DA QUESTO PUNTO. Continuare con il diagramma A.2, lavorare le nuove m ai lati a dir quando si lavora a dir nel diagramma A.2 e a rov quando si lavora a rov nel diagramma A.2. Quando il lavoro misura 3 cm, aumentare 1 m da ciascun lato delle 7-7-7-7-9-9 nuove m ai lati; ripetere questi aumenti ogni 2 cm altre 5-6-7-8-9-10 volte = 190-210-230-250-290-310 m. Lavorare ora 10 ripetizioni in larghezza del diagramma A.2. Dopo aver lavorato il diagramma A.2 una volta in verticale, lavorare il diagramma A.3 una volta in verticale su ogni ripetizione del diagramma A.2 = 210-230-250-270-310-330 m. Taglie S-M-L-XL: Lavorare 3 ripetizioni in verticale del diagramma A.4, poi lavorare il diagramma A.5 1 volta in verticale su ogni ripetizione del diagramma A.4 = 230-250-270-290 m. Lavorare poi il diagramma A.6 finché il lavoro non misura 37-37-38-39 cm (54-56-58-60 cm in tutto). Intrecciare le m senza stringere troppo il filo. Taglie XXL e XXXL: Lavorare il diagramma A.4 finché il lavoro non misura 39-39 cm (62-64 cm in tutto). Intrecciare le m senza stringere troppo il filo. BORDO DELLA MANICA: Si lavora in tondo sui ferri a doppia punta. Riportare sui ferri a doppia punta n° 5,5 le m messe in attesa sul ferma maglie e riprendere 1 m in ognuna delle 7-7-7-7-9-9 m sotto la manica = 64-70-76-82-96-102 m. Lavorare 3 coste a PUNTO LEGACCIO e, allo stesso tempo, nel corso del primo giro a dir, diminuire 6-8-10-12-22-24 m a intervalli regolari = 58-62-66-70-74-78 m. Intrecciare le m. Lavorare il bordo dell’altra manica in modo uguale. |
|||||||||||||
Spiegazioni del diagramma |
|||||||||||||
|
|||||||||||||
 |
|||||||||||||
 |
|||||||||||||
 |
|||||||||||||
 |
|||||||||||||
 |
|||||||||||||
Avete terminato questo modello?Allora taggate le vostre foto con #dropspattern #shorelinetop o inviatele alla #dropsfan gallery. Avete bisogno di aiuto con questo modello?Troverete 19 video tutorial, una sezione per i commenti/domande e molto altro guardando il modello su www.garnstudio.com © 1982-2026 DROPS Design A/S. Ci riserviamo tutti i diritti. Questo documento, compreso tutte le sue sotto-sezioni, è protetto dalle leggi sul copyright. Potete leggere quello che potete fare con i nostri modelli alla fine di ogni modello sul nostro sito. |
|||||||||||||


Con oltre 40 anni di esperienza nel design di modelli di maglia e uncinetto, DROPS Design offre la più estesa collezione di modelli gratuiti su internet - tradotti in 17 lingue. Ad oggi vi possiamo fornire 324 cataloghi e 12290 modelli - 9561 dei quali sono tradotti in Italiano.
Ci stiamo impegnando molto per darvi il meglio che vi possiamo offrire in termini di maglia e uncinetto, ispirazioni e consigli così come filati di grande qualità ad un prezzo incredibile! Volete utilizzare i nostri modelli per qualcosa d'altro oltre al vostro uso personale? Potete leggere tutto ciò che è consentito nel testo sul Copyright in basso su tutte le pagine dei nostri modelli. Buon lavoro!
Lasciare un commento sul modello DROPS 168-30
Noi saremmo felici di ricevere i tuoi commenti e opinioni su questo modello!
Se vuoi fare una domanda, fai per favore attenzione a selezionare la categoria corretta nella casella qui sotto per velocizzare il processo di risposta. I campi richiesti sono indicati da *.