
Categorie popolari
State cercando un filato?


Commenti / Domande (51)
![]() Hsu ha scritto:
Hsu ha scritto:
Bonjour, quelle est la taille recommandée par rapport au tour de poitrine ?
12.10.2025 - 23:49DROPS Design ha risposto:
Bonjour Mme Hsu, mesurez un vêtement similaire que vous avez et dont vous aimez la forme et comparez ces mesures à celles du schéma en bas de page pour trouver la taille correspondante. Retrouvez plus d'infos ici. Bon tricot!
15.10.2025 - 08:36
![]() Galina Wegelius ha scritto:
Galina Wegelius ha scritto:
Kiitos, hyvin inspiroituva malli!
24.08.2025 - 08:35
![]() Micha ha scritto:
Micha ha scritto:
Hallo Eine blöde Frage: liest man das Diagramm von unten nach oben oder von oben nach unten?!
03.07.2025 - 18:10DROPS Design ha risposto:
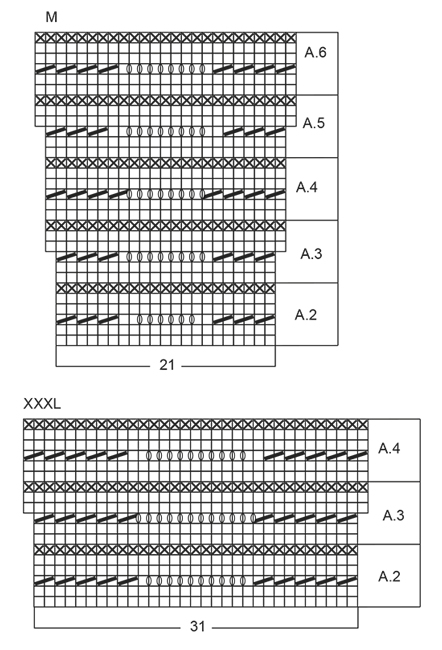
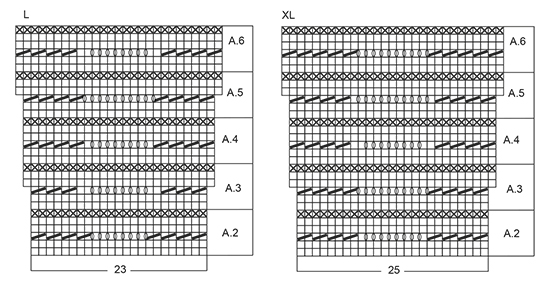
Hallo Micha, keine Frage ist blöd – im Gegenteil, es ist gut, wenn man nachfragt! 😊 Das Diagramm liest man von unten nach oben und beginnend von rechts nach links. Viele Grüße!
03.07.2025 - 19:06
![]() Cristina ha scritto:
Cristina ha scritto:
¿Cuántos centímetros miden la talla S, M y L en busto y cadera?
19.06.2025 - 19:13DROPS Design ha risposto:
Hola Cristina, las medidas se encuentran en el diagrama de medidas en la parte inferior del patrón. Las medidas en circunferencia están escritas por la mitad; por ejemplo, el busto es: 84-92-100 para las tallas S, M y L, respectivamente. Por otro lado, en la parte más ancha de la prenda, en la parte inferior, mide: 116-126-136 cm.
22.06.2025 - 18:48
![]() Marian Kelly ha scritto:
Marian Kelly ha scritto:
The wave pattern is working well. However, do you have a photo of what the sides of the pattern should look like for the increase part on the body? Instructions say K when working K and P when working P. If I'm understanding that correctly, then there is no "wave" pattern for about 6 inches on both sides of the garment.
09.03.2025 - 21:00DROPS Design ha risposto:
Dear Marian, the number of stitches cast on under the sleeves is too little to work even a single repeat of A.2. So these stitches are knitted in stocking stitch instead of the wave pattern. Happy knitting!
09.03.2025 - 21:15
![]() Marian Kelly ha scritto:
Marian Kelly ha scritto:
The wave pattern is working well. However, do you have a photo of what the sides of the pattern should look like for the increase part on the body? Instructions say K when working K and P when working P. If I'm understanding that correctly, then there is no "wave" pattern for about 6 inches on both sides of the garment.
09.03.2025 - 20:58DROPS Design ha risposto:
Dear Marian, the number of stitches cast on under the sleeves is too little to work even a single repeat of A.2. So these stitches are knitted in stocking stitch instead of the wave pattern. Happy knitting!
09.03.2025 - 21:15
![]() Vigdis ha scritto:
Vigdis ha scritto:
Er det mulig å få oppskriften nedenfra?
06.01.2025 - 22:13DROPS Design ha risposto:
Hei Vidigs. Design avd. har ikke muligheten til å tilpasse oppskrifter til hver enkelt bruker. Anbefaler deg å prøve ovenifra og ned, er ikke vanskeligere enn å strikke nedenifra og opp. Og har du spørsmål, hjelper vi deg underveis. mvh DROPS Design
07.01.2025 - 16:30
![]() Vigdis Klungsøyr ha scritto:
Vigdis Klungsøyr ha scritto:
Er det mulig å få mønster strikker nedenfra?
06.01.2025 - 22:11
![]() Sabrina ha scritto:
Sabrina ha scritto:
Dankeschön für die schnelle Antwort. Ich wünsche Euch schöne Weihnachten 🎄 LG Sabrina
19.12.2024 - 10:00
![]() Sabrina ha scritto:
Sabrina ha scritto:
Hallo, ich habe eine Frage zu den Zunahmen.... Werden die automatisch durch die Lochmuster zu genommen ?
18.12.2024 - 19:51
|
|||||||||||||
Shore Line#shorelinetop |
|||||||||||||
|
|
|||||||||||||
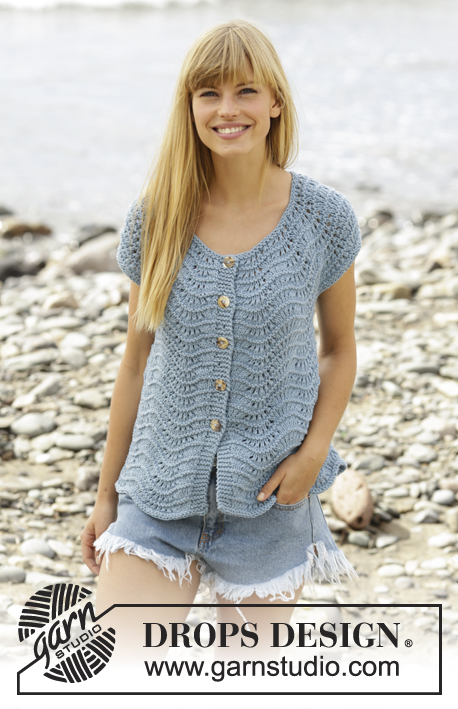
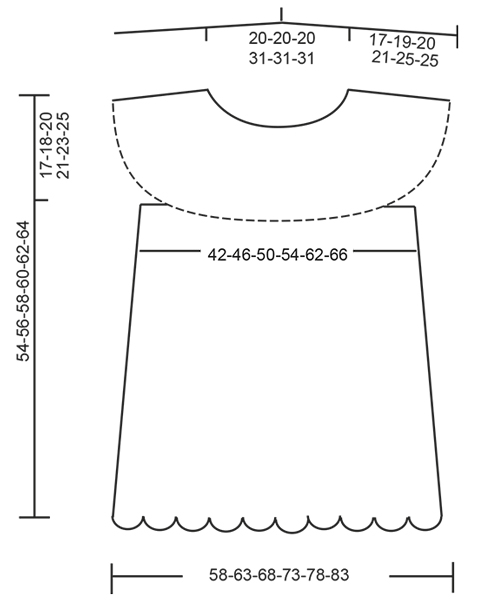
Top DROPS ai ferri, con maniche corte e motivo ondulato, in "Big Merino". Lavorato dall’alto verso il basso (top down). Taglie: Dalla S alla XXXL.
DROPS 168-30 |
|||||||||||||
|
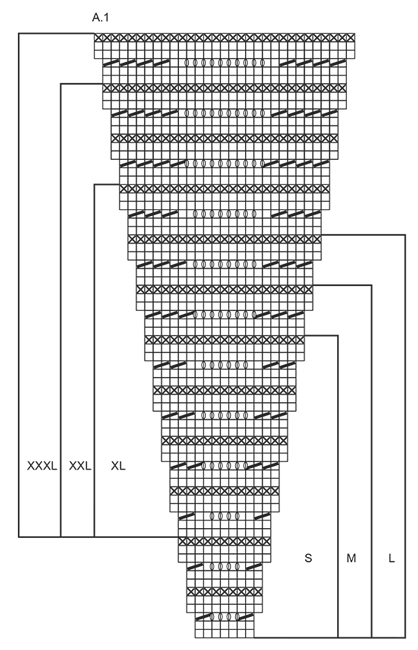
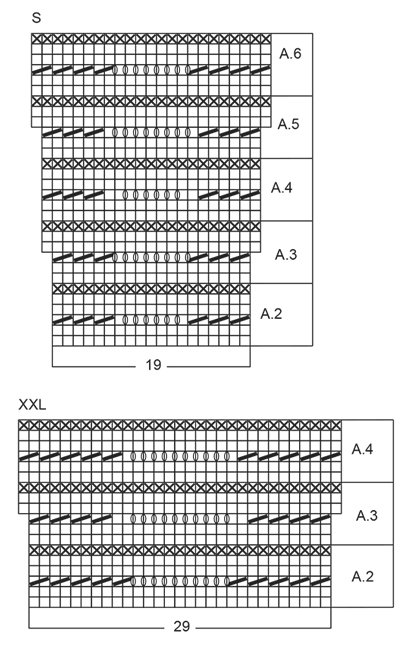
MOTIVO: Vedere i diagrammi da A.1 a A.6. Seguire il diagramma corrispondente alla propria taglia! PUNTO LEGACCIO (in tondo): Lavorare * 1 giro a dir e 1 giro a rov *, ripetere da *-*. 1 “costa” a legaccio = 2 giri ---------------------------------------------------------- TOP: Si lavora in tondo sui ferri circolari, dall’alto verso il basso. Avviare 98-98-98-154-154-154 m sui ferri circolari n° 5,5 con il filato Big Merino. Lavorare 1 COSTA A LEGACCIO - Vedere le spiegazioni sopra. Lavorare il diagramma A.1 (= 14 ripetizioni del diagramma A.1 in larghezza - vedere il segno corrispondente alla propria taglia). Dopo aver lavorato il diagramma A.1 1 volta in verticale, sui ferri ci sono 266-294-322-350-406-434 m. RICORDARSI LA TENSIONE DEL LAVORO! Seguire ora il diagramma A.2 finché il lavoro non misura 17-18-20-21-23-25 cm. Lavorare poi come segue: 38-42-46-50-58-62 m (= metà dietro), mettere in attesa su un ferma maglie le 57-63-69-75-87-93 m successive (= manica), avviare 7-7-7-7-9-9 nuove m, lavorare le 76-84-92-100-116-124 m successive a dir (=davanti), mettere in attesa su un ferma maglie le 57-63-69-75-87-93 m successive (= manica), avviare 7-7-7-7-9-9 nuove m, lavorare le ultime 38-42-46-50-58-62 m (= metà dietro) = 166-182-198-214-250-266 m. DAVANTI e DIETRO: = 166-182-198-214-250-266 m. DA ADESSO IN AVANTI MISURARE IL LAVORO DA QUESTO PUNTO. Continuare con il diagramma A.2, lavorare le nuove m ai lati a dir quando si lavora a dir nel diagramma A.2 e a rov quando si lavora a rov nel diagramma A.2. Quando il lavoro misura 3 cm, aumentare 1 m da ciascun lato delle 7-7-7-7-9-9 nuove m ai lati; ripetere questi aumenti ogni 2 cm altre 5-6-7-8-9-10 volte = 190-210-230-250-290-310 m. Lavorare ora 10 ripetizioni in larghezza del diagramma A.2. Dopo aver lavorato il diagramma A.2 una volta in verticale, lavorare il diagramma A.3 una volta in verticale su ogni ripetizione del diagramma A.2 = 210-230-250-270-310-330 m. Taglie S-M-L-XL: Lavorare 3 ripetizioni in verticale del diagramma A.4, poi lavorare il diagramma A.5 1 volta in verticale su ogni ripetizione del diagramma A.4 = 230-250-270-290 m. Lavorare poi il diagramma A.6 finché il lavoro non misura 37-37-38-39 cm (54-56-58-60 cm in tutto). Intrecciare le m senza stringere troppo il filo. Taglie XXL e XXXL: Lavorare il diagramma A.4 finché il lavoro non misura 39-39 cm (62-64 cm in tutto). Intrecciare le m senza stringere troppo il filo. BORDO DELLA MANICA: Si lavora in tondo sui ferri a doppia punta. Riportare sui ferri a doppia punta n° 5,5 le m messe in attesa sul ferma maglie e riprendere 1 m in ognuna delle 7-7-7-7-9-9 m sotto la manica = 64-70-76-82-96-102 m. Lavorare 3 coste a PUNTO LEGACCIO e, allo stesso tempo, nel corso del primo giro a dir, diminuire 6-8-10-12-22-24 m a intervalli regolari = 58-62-66-70-74-78 m. Intrecciare le m. Lavorare il bordo dell’altra manica in modo uguale. |
|||||||||||||
Spiegazioni del diagramma |
|||||||||||||
|
|||||||||||||
 |
|||||||||||||
 |
|||||||||||||
 |
|||||||||||||
 |
|||||||||||||
 |
|||||||||||||
Avete terminato questo modello?Allora taggate le vostre foto con #dropspattern #shorelinetop o inviatele alla #dropsfan gallery. Avete bisogno di aiuto con questo modello?Troverete 19 video tutorial, una sezione per i commenti/domande e molto altro guardando il modello su www.garnstudio.com © 1982-2026 DROPS Design A/S. Ci riserviamo tutti i diritti. Questo documento, compreso tutte le sue sotto-sezioni, è protetto dalle leggi sul copyright. Potete leggere quello che potete fare con i nostri modelli alla fine di ogni modello sul nostro sito. |
|||||||||||||


Con oltre 40 anni di esperienza nel design di modelli di maglia e uncinetto, DROPS Design offre la più estesa collezione di modelli gratuiti su internet - tradotti in 17 lingue. Ad oggi vi possiamo fornire 324 cataloghi e 12290 modelli - 9561 dei quali sono tradotti in Italiano.
Ci stiamo impegnando molto per darvi il meglio che vi possiamo offrire in termini di maglia e uncinetto, ispirazioni e consigli così come filati di grande qualità ad un prezzo incredibile! Volete utilizzare i nostri modelli per qualcosa d'altro oltre al vostro uso personale? Potete leggere tutto ciò che è consentito nel testo sul Copyright in basso su tutte le pagine dei nostri modelli. Buon lavoro!
Lasciare un commento sul modello DROPS 168-30
Noi saremmo felici di ricevere i tuoi commenti e opinioni su questo modello!
Se vuoi fare una domanda, fai per favore attenzione a selezionare la categoria corretta nella casella qui sotto per velocizzare il processo di risposta. I campi richiesti sono indicati da *.