
Categorie popolari
State cercando un filato?


Commenti / Domande (20)
![]() Marianne Gaarder ha scritto:
Marianne Gaarder ha scritto:
: Jeg har et spørgsmål til: Morning at Home by DROPS Design - Bluse Strikkeopskrift str. S - XXXL (KIT-168-28) Når der skal tages ud til raglan der hvor der skal strikkes dobbelt perlestrik på ryg og forstykke, skal udtagningerne så følge ret og vrang eller er alle udtagningerne i ret?
26.09.2020 - 09:30DROPS Design ha risposto:
Hei Marianne. Du fortsetter slik at de nye maskene passer med dobbelt perlestrikk. God Fornøyelse!
28.09.2020 - 11:40
![]() Franziska ha scritto:
Franziska ha scritto:
Kann ich den Pullover auch ohne Knopfleiste stricken (beide Seiten wie rechts), oder ist er dann zu eng zum anziehen?
27.02.2020 - 17:02DROPS Design ha risposto:
Liebe Franziska, wahrscheinlich können Sie diesen Pullover so anpassen - hier können Sie andere top down gestrickte Pullover (mit 21 M = 10 M) finden und vergleichen. Viel Spaß beim stricken!
28.02.2020 - 07:41
![]() Waveney Croft ha scritto:
Waveney Croft ha scritto:
I want to knit this pattern for my daughter, but she is extremely petite: I think approx 80cm bust. Do you have any suggestions? Would the small size be way too big on her? Would it be problematic if I cast on fewer stitches for the body of the sweater?
01.01.2020 - 17:42DROPS Design ha risposto:
Dear Waveney, this sweater is designed with a bit of positive ease, so it should sit somewaht loose on the wearere. You can find the measurements of the finished sweater on the schematics drawing at the bottom of the page. We usually suggest that you take a swetaer that is comfortable (and possibly similar style) and compare the measurements. Happy Knitting!
01.01.2020 - 21:48
![]() Gladys Malcomson ha scritto:
Gladys Malcomson ha scritto:
Just started this pattern. Can you please explain why the two sleeves have a different number of stitches, i.e. 16 and 14, and the back and front are different, 36 and 38, when placing the stitch markers at beginning of yoke.
26.10.2019 - 18:23DROPS Design ha risposto:
Dear Gladys, the difference is due to the buttonband, which is added to the left shoulder. Happy Knitting!
27.10.2019 - 01:45
![]() Päivi Anttila ha scritto:
Päivi Anttila ha scritto:
Kaunis malli ja lanka tekee pinnasta elävän ja nätin
28.07.2019 - 10:36Donna Hale ha scritto:
Hello I have just started the Morning at Home sweater. I am knitting the large size and after the first increase I have 132 stitches on the needle. When I piece for the next step, the pieces are 4, 46, 16, 48, 14, 4 which adds to 134 stitches. Please explain. Thank you
12.10.2017 - 03:27DROPS Design ha risposto:
Dear Mrs Hale, 4 + 46 + 16 + 48 + 14 + 4 = 132. Happy knitting!
12.10.2017 - 09:19
![]() Sarah ha scritto:
Sarah ha scritto:
Just wondering how to do increases in yoke when the front and back are supposed to be in double seed st. The increases will give 4 knit sts in a row, which will mess up the k2p2 pattern of the double seed st. Please advise.
02.01.2017 - 16:31DROPS Design ha risposto:
Dear Sarah, the increases have to be worked in double moss stitch on the body, double moss stitch shouldn't be displaced and new sts will be worked continuously following the pattern. Happy knitting!
02.01.2017 - 17:00
![]() Anja Simonsen ha scritto:
Anja Simonsen ha scritto:
Jeg skal strikke 4 ret som kantmasker i hver side - når jeg har lavet overdelen skal jeg lukke 2 masker af i hver side - hvad skal jeg med de sidste 2 masker i hver side? Altså har jeg 4 masker i overskud - skal jeg bare putte dem på henholdsvis det ene ærme og forstykket eller hvad? vh Anja Simonsen
13.10.2016 - 21:02DROPS Design ha risposto:
Hej Anja, De er talt med i de 84-92-102-112-124-136 m du har til forstykket og i de 62-66-70-74-78-82 m du har til ærmet. God fornøjelse!
29.03.2017 - 15:20
![]() Martha Klein ha scritto:
Martha Klein ha scritto:
After increasing to 320 sts, the next row says to work the front piece, then slip three different sections to three different holders, then bind off 2 sts. Do you work the sts first before slipping them to the holders or not? If you work the sts, the live yarn is on the end away from the section to be worked. I you don't work the sts, how do you bind off the two at the end of the row? I appreciate any help you can give. Thanks.
28.06.2016 - 07:18DROPS Design ha risposto:
Dear Mrs Klein, when there are 320 sts cast off the first 2 sts, then work the next 92 sts (= front piece) and keep them on needle, work the next 66 sts and slip them on a st holder (= 1st sleeve), work the next 92 sts (= back piece) and slip them on a st holder, work the next 66 sts and slip them on a st holder (= 2nd sleeve), cast off the last 2 sts = 92 sts on needle for front piece. Each piece will be now worked separately, starting with front piece. Happy knitting!
28.06.2016 - 08:35
![]() Kerstin Bergen ha scritto:
Kerstin Bergen ha scritto:
Liebes DROPS-Team, eine tolle Anleitung und ein leicht zu strickender Pullover. Es hat mir sehr viel Spaß gemacht, und ich konnte die Arbeit immer nur schwer weglegen. Das DROPS Belle ist ein sehr schönes Garn, was sich gut verstricken lässt. Da ich sehr fest stricke, musste ich die Nadelstärke 5 nehmen, und das war perfekt.
12.06.2016 - 21:59
|
|
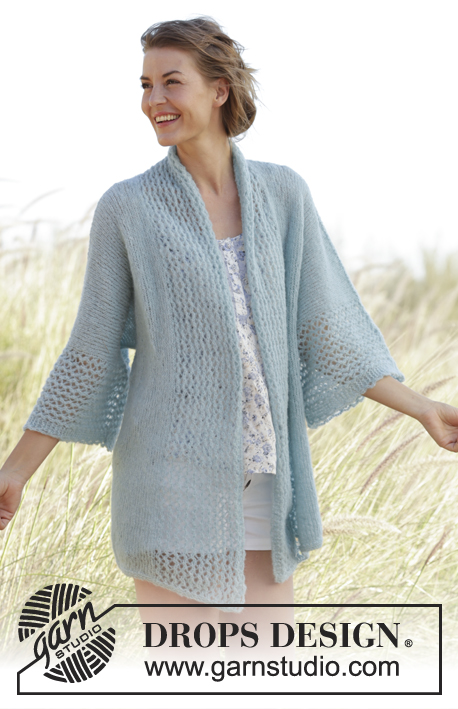
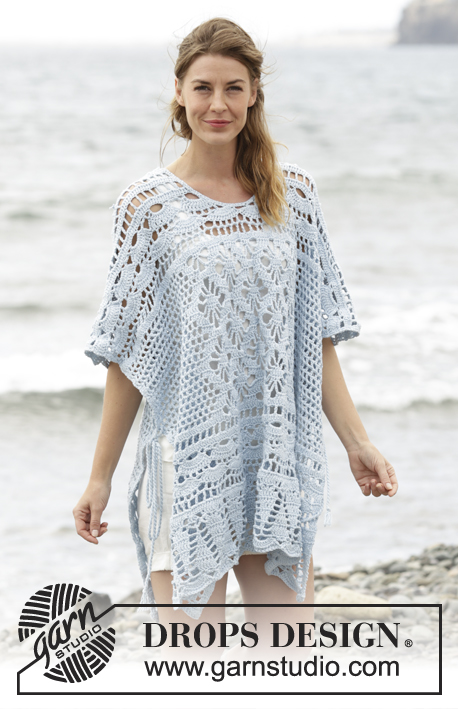
Morning at Home#morningathomesweater |
|
|
|
|
Maglia DROPS ai ferri, a grana di riso doppia, con raglan, in "Belle". Si lavora dall’alto verso il basso (top down). Taglie: Dalla S alla XXXL.
DROPS 168-28 |
|
|
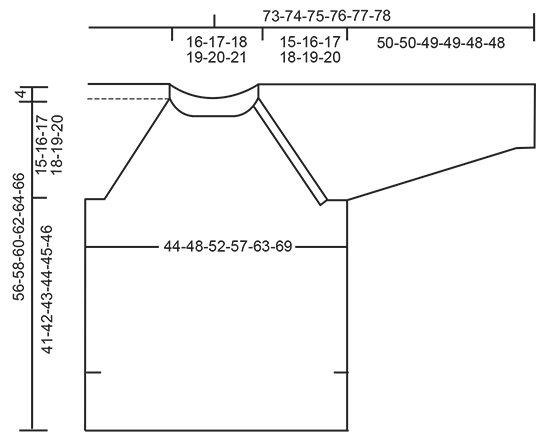
PUNTO LEGACCIO (avanti e indietro sui ferri): Lavorare tutti i ferri a dir. 1 “costa” a legaccio = 2 ferri a dir. PUNTO LEGACCIO (in tondo): Lavorare * 1 giro a dir e 1 giro a rov *, ripetere da *-*. 1 “costa” a legaccio = 2 giri GRANA DI RISO DOPPIA: Ferro 1: * 2 m dir, 2 m rov *, ripetere da *-*. Ferro 2: lavorare a dir le m diritto e a rov le m rov. Ferro 3: lavorare a rov le m dir e a dir le m rov Ferro 4: lavorare come il ferro 2. Ripetere i ferri da 1 a 4. SUGGERIMENTO PER GLI AUMENTI PER IL RAGLAN: Aumentare 16 m come segue: Aumentare 2 m dopo il primo segno, 2 m da ciascun lato del secondo, terzo e quarto segno e 2 m prima del quinto segno. AUMENTARE COME SEGUE PRIMA DEL SEGNO: Iniziare 2 m prima del segno: Lavorare la prima m 2 volte a dir, 1 m gettata, 1 m dir, segno. AUMENTARE COME SEGUE DOPO IL SEGNO: segno, 1 m dir, 1 m gettata e lavorare la m successiva 2 volte a dir. Al giro successivo, lavorare le m gettate a rov per formare dei buchi. Aumentare 8 m come segue: Aumentare 1 m dopo il primo segno, 1 m da ciascun lato del secondo, terzo e quarto segno e 1 m prima del quinto segno. AUMENTARE COME SEGUE PRIMA DEL SEGNO: Iniziare 1 m prima del segno: 1 m gettata, 1 m dir, segno. AUMENTARE COME SEGUE DOPO IL SEGNO: segno, 1 m dir, 1 m gettata. Al giro successivo, lavorare le m gettate a rov per formare dei buchi. ASOLE: Intrecciare le m per le asole sul bordo per i bottoni destro. 1 asola = lavorare insieme a dir la 2a e la 3a m dal bordo e fare 1 m gettata. Intrecciare le m per le asole quando il lavoro misura (misurare dal ferro di avvio delle m): TAGLIA S: 2, 6, 10 e 13 cm TAGLIA M: 2, 6, 10 e 14 cm TAGLIA L: 2, 6, 10 e 15 cm TAGLIA XL: 2, 6, 10 e 16 cm TAGLIA XXL: 2, 7, 12 e 17 cm TAGLIA XXXL: 2, 7, 12 e 18 cm ---------------------------------------------------------- MAGLIA: Si lavora avanti e indietro sui ferri circolari, dall’alto verso il basso. SPRONE: Avviare 104-108-116-120-124-132 m (comprese 4 m da ciascun lato per il bordo per i bottoni) sui ferri circolari n° 4 con il filato Belle. Lavorare 2 coste a PUNTO LEGACCIO - vedere le spiegazioni sopra. Lavorare 1 ferro a dir sul diritto del lavoro e, ALLO STESSO TEMPO, aumentare 8-12-16-24-36-44 m a intervalli regolari - ATTENZIONE: lavorare le prime 4 e le ultime 4 m a dir e non aumentare su queste m (= m per il bordo per i bottoni) = 112-120-132-144-160-176 m. Il lavoro inizia sul lato sinistro, tra la manica e il davanti. Inserire 5 segni nel lavoro come segue (sul rovescio del lavoro): 4 m dir (= m per il bordo), inserire 1 segno, 36-40-46-52-60-68 m rov (= davanti), inserire 1 segno, 16 m rov (= manica), inserire 1 segno, 38-42-48-54-62-70 m rov (= dietro), inserire 1 segno, 14 m rov (= manica), inserire 1 segno, e finire con 4 m dir (= m per il bordo). Intrecciare le m per le ASOLE sul bordo per i bottoni destro - vedere le spiegazioni sopra. Proseguire a GRANA DI RISO DOPPIA sulle m del davanti e del dietro, lavorare le m delle maniche a maglia rasata. Lavorare le m dei bordi per i bottoni a punto legaccio e, ALLO STESSO TEMPO, aumentare per il RAGLAN - VEDERE IL SUGGERIMENTO PER GLI AUMENTI PER IL RAGLAN. Aumentare ogni 2 ferri (= quindi ad ogni ferro sul diritto del lavoro) come segue: aumentare 16 m 2-2-3-4-4-5 volte e poi aumentare 8 m 19-21-21-21-23-23 volte. RICORDARSI LA TENSIONE DEL LAVORO! Terminati tutti gli aumenti per il RAGLAN, sui ferri ci sono 296-320-348-376-408-440 m e il lavoro misura ca.15-16-17-18-19-20 cm dal ferro di avvio delle m. Lavorare il ferro successivo come segue, sul rovescio del lavoro: Intrecciare le prime 2 m, lavorare 84-92-102-112-124-136 m (= davanti), mettere in attesa su 1 ferma maglie le 62-66-70-74-78-82 m successive (= manica), mettere in attesa su 1 ferma maglie le 84-92-102-112-124-136 m successive (= dietro), mettere in attesa su 1 ferma maglie le 62-66-70-74-78-82 m successive (= manica), intrecciare le ultime 2 m. DAVANTI: Si lavora avanti e indietro sui ferri. = 84-92-102-112-124-136 m. DA ADESSO IN AVANTI, MISURARE IL LAVORO DA QUESTO PUNTO. Proseguire a grana di riso doppia e, nel corso dei primi 2 ferri, avviare 4 nuove m da ciascun lato = 92-100-110-120-132-144 m. Continuare a grana di riso doppia con 4 m a punto legaccio da ciascun lato. Quando il lavoro misura 40-41-42-43-44-45 cm, lavorare 2 coste a punto legaccio su tutte le m, poi intrecciare le m. DIETRO: Riportare sui ferri circolari n° 4 le 84-92-102-112-124-136 m messe in attesa sul ferma maglie. Lavorare come indicato per il davanti. MANICHE: Si lavorano in tondo sui ferri a doppia punta. Riportare sui ferri a doppia punta n° 4 le 62-66-70-74-78-82 m messe in attesa sul ferma maglie e avviare 8 m sotto la manica = 70-74-78-82-86-90 m. Inserire 1 segno al centro delle 8 nuove m avviate. Proseguire a maglia rasata, DA ADESSO IN AVANTI, MISURARE IL LAVORO DA QUESTO PUNTO! Quando il lavoro misura 3 cm, diminuire 1 m da ciascun lato del segno; ripetere queste diminuzioni ogni 2½-2½-2-2-2-2 cm altre 14-15-16-17-18-19 volte = 40-42-44-46-48-50 m. Quando il lavoro misura 49-49-48-48-47-47 cm, lavorare 2 coste a PUNTO LEGACCIO - vedere le spiegazioni sopra! Intrecciare le m. Lavorare l’altra manica in modo uguale. CONFEZIONE: Cucire le aperture sotto le maniche. Mettere le 4 m del bordo per i bottoni sulla manica sotto le 4 m del bordo sul davanti e cucire. Cucire i lati nel filo più esterno della m vivagno ma lasciare aperti gli ultimi 16 cm in basso = spacchi laterali. Attaccare i bottoni sul bordo della manica sinistra. |
|
 |
|
Avete terminato questo modello?Allora taggate le vostre foto con #dropspattern #morningathomesweater o inviatele alla #dropsfan gallery. Avete bisogno di aiuto con questo modello?Troverete 28 video tutorial, una sezione per i commenti/domande e molto altro guardando il modello su www.garnstudio.com © 1982-2026 DROPS Design A/S. Ci riserviamo tutti i diritti. Questo documento, compreso tutte le sue sotto-sezioni, è protetto dalle leggi sul copyright. Potete leggere quello che potete fare con i nostri modelli alla fine di ogni modello sul nostro sito. |


Con oltre 40 anni di esperienza nel design di modelli di maglia e uncinetto, DROPS Design offre la più estesa collezione di modelli gratuiti su internet - tradotti in 17 lingue. Ad oggi vi possiamo fornire 324 cataloghi e 12290 modelli - 9561 dei quali sono tradotti in Italiano.
Ci stiamo impegnando molto per darvi il meglio che vi possiamo offrire in termini di maglia e uncinetto, ispirazioni e consigli così come filati di grande qualità ad un prezzo incredibile! Volete utilizzare i nostri modelli per qualcosa d'altro oltre al vostro uso personale? Potete leggere tutto ciò che è consentito nel testo sul Copyright in basso su tutte le pagine dei nostri modelli. Buon lavoro!
Lasciare un commento sul modello DROPS 168-28
Noi saremmo felici di ricevere i tuoi commenti e opinioni su questo modello!
Se vuoi fare una domanda, fai per favore attenzione a selezionare la categoria corretta nella casella qui sotto per velocizzare il processo di risposta. I campi richiesti sono indicati da *.