
Categorie popolari
State cercando un filato?


Commenti / Domande (166)
Nicky ha scritto:
Hi. I've knitted the body and now I\'m wanting to start knitting the sleeves. I don't understand what "worked in the round on double pointed needles" means. Is this knitting on a circular needle?? How do you work "in the round" on simple straight, double pointed needles? In the pattern instruction description at the top, for Garter Stitch (worked in the round), it says *K 1 round and P 1 round* repeat from *-*. What on earth does that mean please?!
12.05.2018 - 04:33DROPS Design ha risposto:
Dear Nicky, if you click on THIS LINK, you will find a video that will show you, how to knit with garter stitch on the round. Happy Knitting!
12.05.2018 - 08:14
![]() Nancy Burstad ha scritto:
Nancy Burstad ha scritto:
The pattern says to start adding button holes at 14 1/4\\\" from the bottom. This makes the first button hole way above the start of the cables. The picture shows them starting much earlier. The pattern also says to dec for button hole just after the decrease 11 6 times on purl side section. Also, how far apart do I make the button holes? I\\\'m making the XL size. I\\\'m not sure what to do.
07.04.2018 - 02:49DROPS Design ha risposto:
Dear Mrs Burstad, the buttonholes will be opened in size XL when pieces measures 7½", 11", 14 1/4", 17 1/4", 20½", 23½"., ie the first is at 7½", and the third one at 14 1/4". Happy knitting!
09.04.2018 - 09:36
![]() Marianne Ålstig ha scritto:
Marianne Ålstig ha scritto:
Jag ska nu föra över maskorna från ärmarna till samma rundsticka som bak och framstycke. Hur gör jag??
03.04.2018 - 13:59DROPS Design ha risposto:
Hej, du ska sticka in ärmarnas maskor där det avmaskats för ärmhål i varje sida. Du stickar då maskorna från framst, sedan ärm, bakst, ärm och det andra framst.
03.04.2018 - 17:07Susan ha scritto:
Hi I now have all my stitches on and markers 1st Dec is on the sleeve do I knit 2 from side front then marker knit 2tog from sleeve I'm a bit confused if I could have a answer asap so I can get my project finished many thanks
31.03.2018 - 09:51DROPS Design ha risposto:
Dear Susan, if you are at the pont when you have all your pieces on one needle, the stitch markers should be at the transitions between the sleeve and body pieces. Then You should have two stitches (one on each side of the markers) knitted in stockinett, and do the decreases before and after these two stitches. I hope this helps. Happy Knitting!
01.04.2018 - 12:28
![]() Virginie Dupuis ha scritto:
Virginie Dupuis ha scritto:
Bonjour, Je fais la taille S et je ne comprend pas ce que vous attendez de nous quand vous parlez des diminutions devant/dos...Est-ce que ces diminutions sont celles où on a rattaché les manches sur le devant du tricot ? De plus, je viens d\'entamer ma 11ème et dernière pelote et je n\'en aurai pas assez pour terminer mon ouvrage, j\'ai commandé 2 autres pelotes en espérant que cela suffise... Vous devriez préconiser plus de pelotes pour faire cet ouvrage...Merci !
27.03.2018 - 18:57DROPS Design ha risposto:
Bonjour Mme Dupuis, vous en êtes aux diminutions du raglan, exact? En taille S, vous allez diminuer pour les manches: 1 m au début et à la fin de chaque manche, 16x tous les 2 rangs et 4 x tous les rangs et, en même temps, vous diminuez sur les devants (= 1 m) et le dos (= 2 m): 4x tous les 4 rangs et 11x tous les 2 rangs. Vous diminuerez ainsi à un rythme différent sur les manches et sur le dos/les devants (= parfois 4 m seulement (manches uniquement) parfois 8 m (= partout)). Pensez à bien conserver la même tension que pour l'échantillon, soit 17mx 22 rangs = 10 x 10 cm. Bon tricot!
28.03.2018 - 15:17Susan ha scritto:
Hi it's Susan I would really appreciate if you would answer my previous question I am up to joining the sleeve
27.03.2018 - 16:29DROPS Design ha risposto:
Dear Susan, see answer below - happy knitting!
28.03.2018 - 15:09Susan ha scritto:
Hi how many markers should there be between sleeves and back and fronts and do I knit the sleeves or slip then on
26.03.2018 - 19:53DROPS Design ha risposto:
Dear Susan, when you knit the yoke, you will insert a total of 4 markers: right front piece, marker, right sleeve, marker, back piece, marker and left front piece. Happy knitting!
28.03.2018 - 14:48Susan ha scritto:
How many markers should there be between sleeves and back and fronts
21.03.2018 - 21:41Susan ha scritto:
Hi it's me again I cannot go any further till I know if 49cm is correct for the small size look forward to hearing from you
15.03.2018 - 12:07DROPS Design ha risposto:
Dear Susan, you work sleeve until it measures 49 cm in the smaller size (= size S) and then cast off 6 sts mid under sleeve on next row, put aside and work 2nd sleeve. Happy knitting!
15.03.2018 - 15:52Susan ha scritto:
Hi I am on the sleeve and doing the small size have I to knit to 49cm
14.03.2018 - 13:31
|
||||||||||
Romantic Twist#romantictwistcardigan |
||||||||||
 |
 |
|||||||||
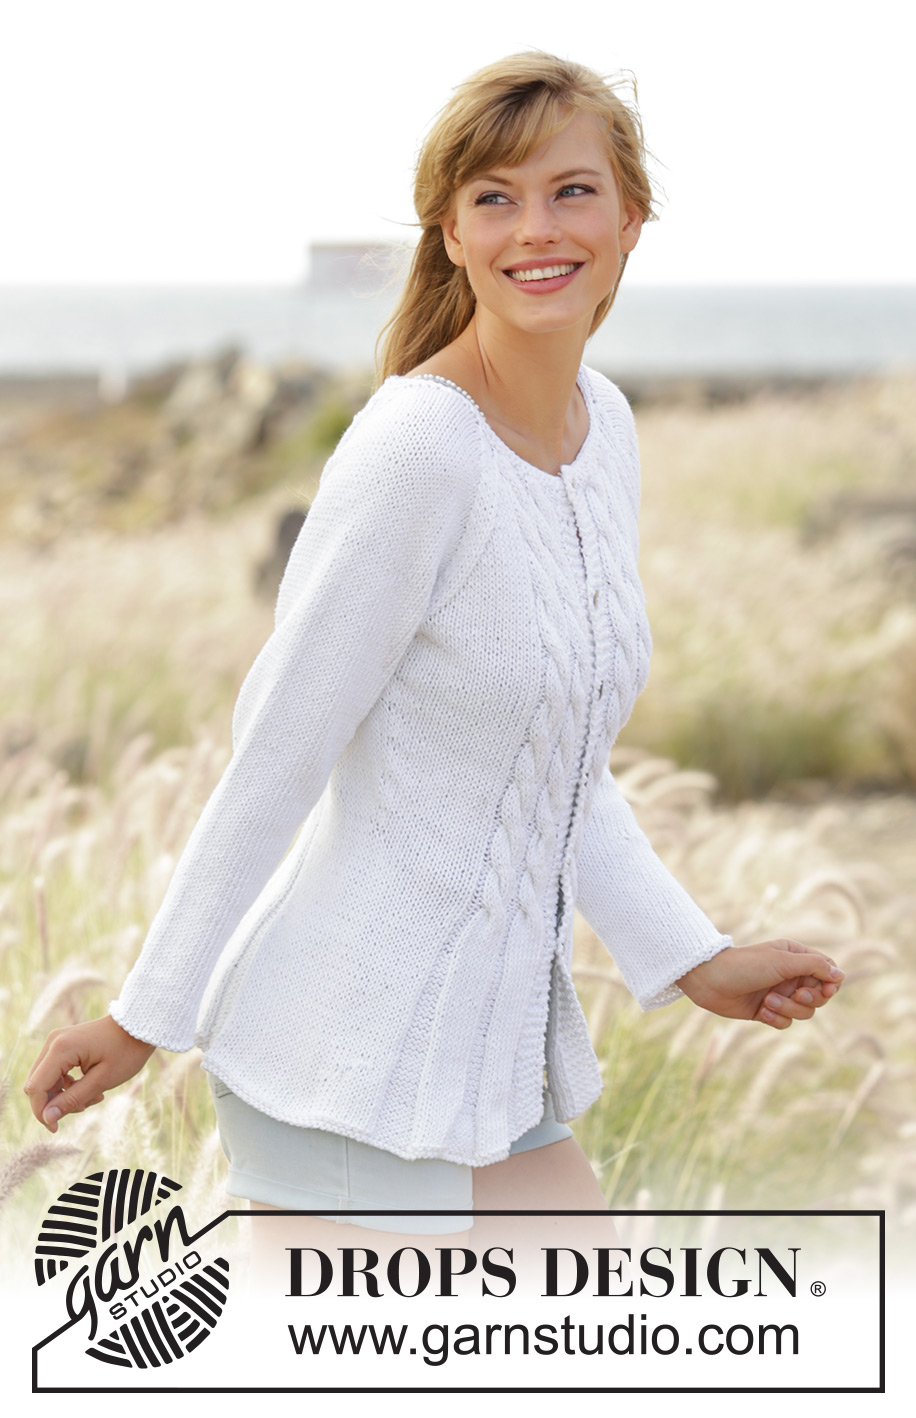
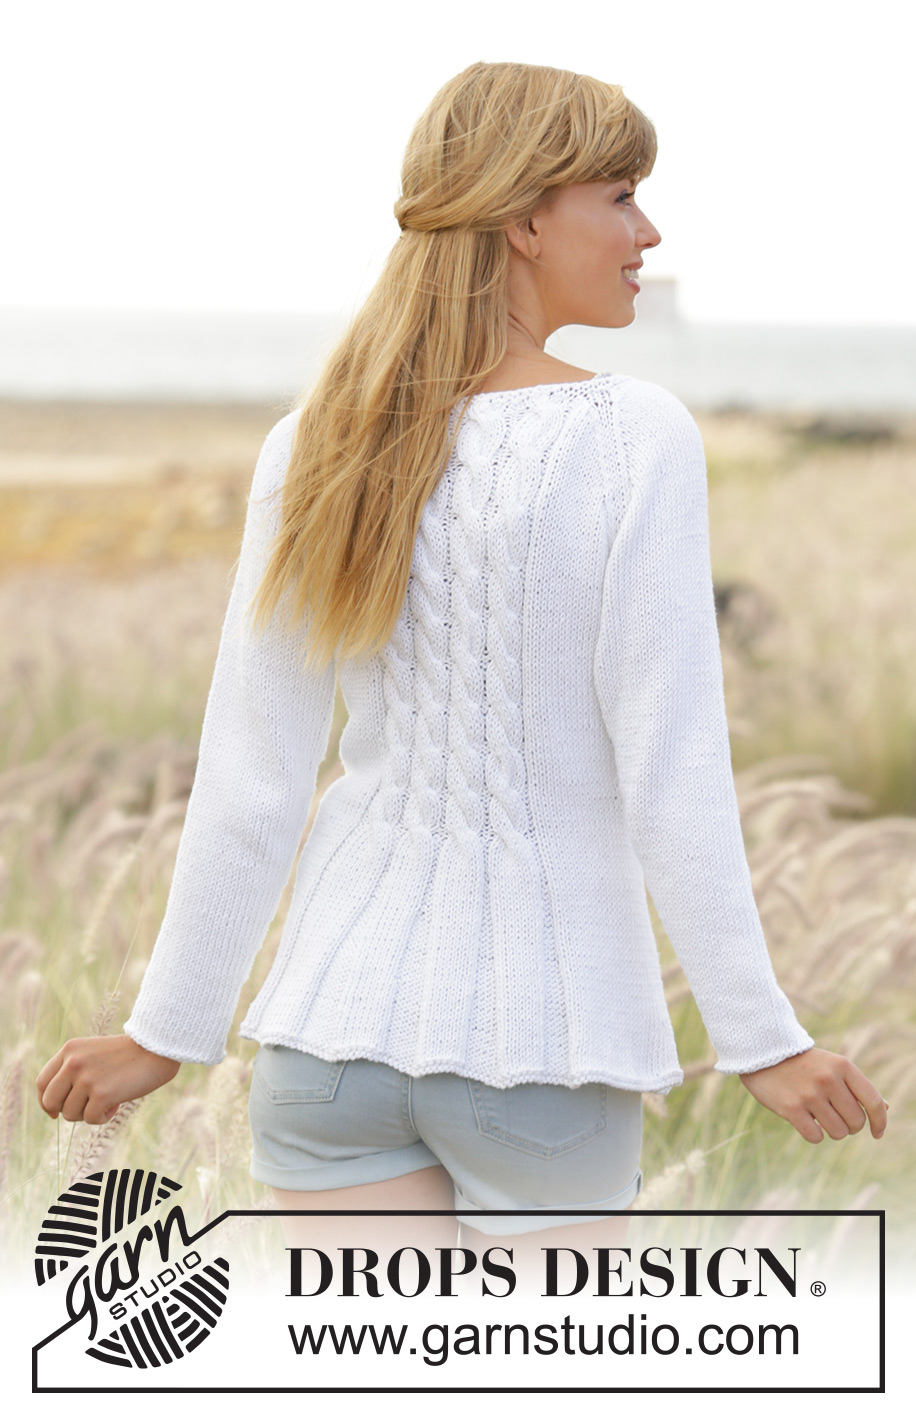
Cardigan aderente DROPS lavorato ai ferri con trecce e raglan in ”Paris”. Taglie: S - XXXL.
DROPS 169-1 |
||||||||||
|
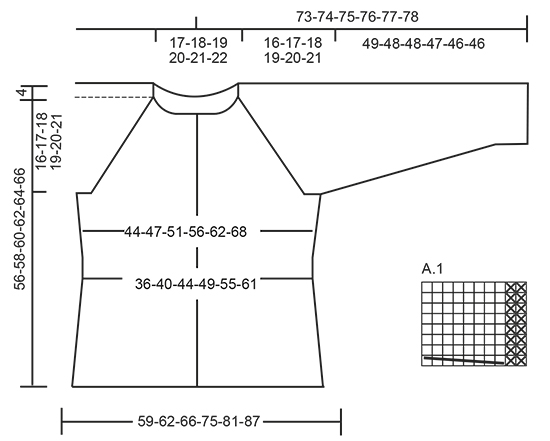
M LEGACCIO (avanti e indietro): Lavorare tutti i f a dir. 1 “costa” a m legaccio = 2 f dir. M LEGACCIO (lavorata in tondo): 1 “costa” a m legaccio = 2 giri. * 1 giro dir e 1 giro rov *, ripetere *-*. SUGGERIMENTO PER LE DIMINUZIONI: Diminuire 1 m lavorando 2 m insieme a rov. Diminuire in modo alternato all’inizio e alla fine delle sezioni a rov. MOTIVO: Vedere il diagramma A.1. Il diagramma mostra tutti i f del motivo visti dal diritto del lavoro. RAGLAN: Diminuire 2 m in ogni punto di passaggio tra il corpo e le maniche. Diminuire come segue dal diritto del lavoro: lavorare 2 m insieme a dir, 2 m dir (il segnapunti è tra queste m), passare 1 m a dir senza lavorarla, 1 m dir, accavallare la m passata sopra quella appena lavorata. Diminuire come segue dal rovescio del lavoro: 2 m insieme a rov ritorto, 2 m rov (il segnapunti è tra queste m), 2 m insieme a rov. SUGGERIMENTO PER IL LAVORO: Se la tensione del lavoro non è corretta in altezza e il lavoro risulta troppo tirato, le diminuzioni del raglan saranno troppo corte e lo scalfo troppo piccolo. Ciò può essere aggiustato lavorando 1 ferro in più senza diminuzioni distribuito in modo uniforme tra le diminuzioni. ASOLE: Diminuire per le asole sul bordo destro. 1 asola = lavorare insieme a dir la 2° e la 3° m dal centro davanti, poi fare 1 gettato. Diminuire per le asole quando il lavoro misura: TAGLIA S: 19, 26, 33, 40, 47 e 54 cm. TAGLIA M: 19, 26, 33, 40, 48 e 56 cm. TAGLIA L: 19, 26, 34, 42, 50 e 58 cm. TAGLIA XL: 19, 28, 36, 44, 52 e 60 cm. TAGLIA XXL: 19, 26, 33, 40, 47, 54 e 62 cm TAGLIA XXXL: 19, 26, 33, 40, 48, 56 e 64 cm ---------------------------------------------------------- CORPO: Lavorato avanti e indietro sui f circolari dal centro davanti. Avviare 216-228-240-266-286-306 m (comprese 5 m per il bordo a ogni lato verso il centro davanti) con i f circolari n° 5 mm con Paris. Lavorare 1 “costa” a M LEGACCIO – leggere la spiegazione sopra, poi lavorare come segue – dal diritto del lavoro: 5 m a m legaccio, * 8 m rov, 8 m dir *, ripetere *-* 2 volte in totale, 8 m rov, 27-33-39-44-54-64 m a m rasata, * 8 m rov, 8 m dir *, ripetere *-* 4-4-4-5-5-5 volte in totale, 8 m rov, 27-33-39-44-54-64 m a m rasata, * 8 m rov, 8 m dir *, ripetere *-* 2 volte in totale, 8 m rov, 5 m a m legaccio. Ripetere questo motivo verso l’alto. FARE ATTENZIONE ALLA TENSIONE DEL LAVORO! Quando il lavoro misura 5 cm, diminuire 1 m in tutte le sezioni a rov (= 11-11-11-12-12-12 diminuzioni per giro di diminuzioni) – LEGGERE IL SUGGERIMENTO PER LE DIMINUZIONI. Ripetere le diminuzioni ogni 3 cm altre 5 volte = 150-162-174-194-214-234 m. Diminuire per le ASOLE sul bordo destro – leggere la spiegazione sopra. Quando il lavoro misura 21 cm, lavorare come segue: 5 m a m legaccio, A.1 2 volte, 2 m rov, m rasata sulle 27-33-39-44-54-64 m successive, A.1 4-4-4-5-5-5 volte, 2 m rov, m rasata sulle 27-33-39-44-54-64 m successive, A.1 2 volte, 2 m rov, 5 m a m legaccio. Inserire 2 segnapunti nel lavoro; 40-43-46-51-56-61 m all’interno di ogni lato (dietro = 70-76-82-92-102-112 m). Quando il lavoro misura 23 cm, aumentare 1 m a ogni lato di tutti i segnapunti (= 4 aumenti), ripetere gli aumenti ogni 2½-3-3-3½-3½-4 cm altre 5 volte = 174-186-198-218-238-258 m. Quando il lavoro misura 40-41-42-43-44-45 cm, lavorare il f successivo (dal diritto del lavoro) come segue: lavorare 43-46-49-54-59-64 m, intrecciare le 6 m successive, lavorare 76-82-88-98-108-118 m, intrecciare le 6 m successive e lavorare le 43-46-49-54-59-64 m rimaste. Mettere il lavoro da parte e lavorare le maniche. MANICA: Lavorata in tondo con i f a doppia punta. Avviare 32-34-36-38-40-42 m con i f a doppia punta n° 5 mm con Paris. Lavorare 1 “costa”, poi lavorare a m rasata. Inserire 1 segnapunti all’inizio del giro (= centro sotto la manica). Quando il lavoro misura 8 cm, aumentare 2 m al centro sotto la manica. Aumentare ogni 3-2½-2½-2½-2-2 cm altre 13-13-14-15-16-16 volte = 60-62-66-70-74-76 m. Quando il lavoro misura 49-48-48-47-46-46 cm (misure più corte per le taglie più grandi a causa dell’arrotondamento della manica più lungo), intrecciare 6 m al centro sotto la manica = 54-56-60-64-68-70 m. Mettere il lavoro da parte e lavorare l’altra manica. SPRONE: Trasferire le maniche sullo stesso f circolare del corpo dove sono state intrecciate le m per gli scalfi = 270-286-306-334-362-386 m. Inserire un segnapunti in tutti i punti di passaggio tra le maniche e il corpo. Continuare il motivo come prima, ALLO STESSO TEMPO diminuire per il RAGLAN – leggere la spiegazione sopra. Diminuire in modo diverso sul corpo e sulle maniche. RAGLAN SULLE MANICHE: Diminuire a f alterni 16-17-17-18-18-19 volte, poi su ogni f 4-4-6-7-9-9 volte (= 20-21-23-25-27-28 volte in totale). RAGLAN SUL CORPO: Diminuire ogni 4 f 4-2-0-0-0-0 volte, a f alterni 11-16-19-21-19-16 volte, poi su ogni f 0-0-2-0-7-15 volte (= 15-18-21-21-26-31 volte in totale). Alla fine di tutte le diminuzioni, rimangono 130-130-130-150-150-150 m sul f. Sul f successivo diminuire 2 m su ogni treccia in A.1 = 114-114-114-132-132-132 m. Lavorare 2 “coste” su tutte le m, sul 1° f distribuire 20-16-12-26-22-18 diminuzioni in modo uniforme = 94-98-102-106-110-114 m. Intrecciare. CONFEZIONE: Cucire le aperture al centro sotto le maniche. Attaccare i bottoni sul bordo sinistro. |
||||||||||
Spiegazioni del diagramma |
||||||||||
|
||||||||||
 |
||||||||||
Avete terminato questo modello?Allora taggate le vostre foto con #dropspattern #romantictwistcardigan o inviatele alla #dropsfan gallery. Avete bisogno di aiuto con questo modello?Troverete 26 video tutorial, una sezione per i commenti/domande e molto altro guardando il modello su www.garnstudio.com © 1982-2026 DROPS Design A/S. Ci riserviamo tutti i diritti. Questo documento, compreso tutte le sue sotto-sezioni, è protetto dalle leggi sul copyright. Potete leggere quello che potete fare con i nostri modelli alla fine di ogni modello sul nostro sito. |
||||||||||


Con oltre 40 anni di esperienza nel design di modelli di maglia e uncinetto, DROPS Design offre la più estesa collezione di modelli gratuiti su internet - tradotti in 17 lingue. Ad oggi vi possiamo fornire 324 cataloghi e 12284 modelli - 9555 dei quali sono tradotti in Italiano.
Ci stiamo impegnando molto per darvi il meglio che vi possiamo offrire in termini di maglia e uncinetto, ispirazioni e consigli così come filati di grande qualità ad un prezzo incredibile! Volete utilizzare i nostri modelli per qualcosa d'altro oltre al vostro uso personale? Potete leggere tutto ciò che è consentito nel testo sul Copyright in basso su tutte le pagine dei nostri modelli. Buon lavoro!
Lasciare un commento sul modello DROPS 169-1
Noi saremmo felici di ricevere i tuoi commenti e opinioni su questo modello!
Se vuoi fare una domanda, fai per favore attenzione a selezionare la categoria corretta nella casella qui sotto per velocizzare il processo di risposta. I campi richiesti sono indicati da *.