
Categorie popolari
State cercando un filato?


Commenti / Domande (19)
Carmen Tisoc Rasmussen ha scritto:
La parte de arriba no entiendo su esplicacion no hay video por favor
13.06.2018 - 06:35DROPS Design ha risposto:
Hola Carmen. Primero se trabaja la elevación en la espalda y después se trabaja la parte de arriba del cuerpo de ida y vuelta. Esto se hace para que la prenda coja mejor forma. En este momento no hay video para esta parte del patrón.
23.06.2018 - 19:42
![]() Katharina ha scritto:
Katharina ha scritto:
Hallo und guten Tag, ich bin dabei das Modell "Erendruid" (Poncho mit Kapuze) zu häkeln. Die ersten 18 cm (nur Stäbchen) hat auch alles gepasst. Jetzt bin ich bei dem Muster und nach den ersten 4 Reihen merke ich schon, dass sich alles zieht und die ersten 18 cm ziehen Falten. Ich erkläre mir das durch die vielen Lm die ja enger sind als Stäbchen. Was mache ich falsch, oder wie kann ich das beheben? Vielen Dank im voraus für eine Antwort. Viele Grüße Katharina
09.10.2017 - 14:17DROPS Design ha risposto:
Liebe Katharina, versuchen Sie die Lm genauso breit wie die Stäbchen zu häkeln, damit Muster A.2 ca 9 cm in der Breite mißt. Gerne können Sie auch Ihrem Laden Ihr Häkelprojekt zeigen, damit Sie Ihnen weiterhelfen können. Viel Spaß beim häkeln!
09.10.2017 - 15:22Mahtab ha scritto:
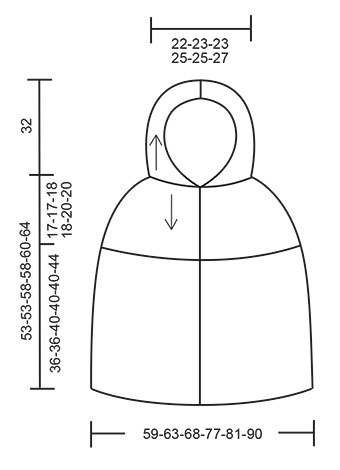
Hello. I did the same thing. I checked the schematic bellow the pattern. However, this schematic has measurements for the lower edge of the poncho, and information regarding the bust size are not included. This is what makes choosing the right size difficult.
08.08.2017 - 07:03Mahtab ha scritto:
Hello. I find it difficult to find the right size of the pattern. I usually find the right size according to bust measurements. As an example, which bust size does M sizecrefer to? Thank you for your reply in advance.
05.08.2017 - 05:56DROPS Design ha risposto:
Dear Mahtab, the finished size always depend on the style of the given piece, so please refer to the schematics at the end of each pattern and check the measurements given there. Happy Crafting!
06.08.2017 - 10:18
![]() Marlou ha scritto:
Marlou ha scritto:
Na de opzetlussen, moet je keren en dan haak je in elke 4 de lus 1 stokje, hoe kan je dan op in mijn geval op 58 steken eindigen ?
29.01.2016 - 19:38DROPS Design ha risposto:
Hoi Marlou. Je begint dus met 73 lossen. Dan haak je: Keer en haak 1 stk in 4e l vanaf haak (= 2 stk), 1 stk in elke van de volgende 4 l, * sla 1 l over, 1 stk in elke van de volgende 4 l *, herhaal van *-*. Dus 2 stk + 4 stk en voor elk 5 l, haak je 4 stk (je slaat 1 l over). Je haakt dit over 65 l = 13 herhalingen = 52 stk + 6 stk van het begin = 58 stk.
01.02.2016 - 16:15
![]() Janice Kern ha scritto:
Janice Kern ha scritto:
Thank you very much for the video! Your patterns are the best but complex for me so, I realize how much time these videos take, but what a great help! :)
25.01.2016 - 02:48Caroline Brooke ha scritto:
I find it difficult to follow the Drops method of pattern writing in terms of increasing. Can someone explain to me how I go about increasing '17 sts evenly' on a total of 48 sts? How do you work out this kind of instruction? It's obviously not simple as 48 cannot be divided by 17? Apologies, I love your designs but as a UK knitter this is very unusual method of pattern writing, and NOT easy!
24.11.2015 - 12:52DROPS Design ha risposto:
Dear Mrs Brooke, please click here for more informations about how to dec/inc evenly on a row. Remember you can also get personnal andd individual help, tips & advices from your DROPS store. Happy knitting!
24.11.2015 - 14:33
![]() Katie ha scritto:
Katie ha scritto:
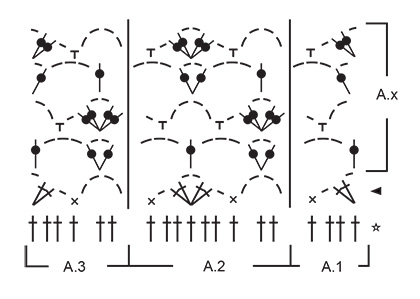
Well,what I don't understand is how many stitches are in A.2 ,and is A.x all 3 sections or just the first section? For my size it says to do A.2 14 times total and my numbers aren't adding up. Sorry ,but I've given myself a headache trying to figure this out and I know it can't be that hard lol. Thank you.
02.11.2015 - 00:53DROPS Design ha risposto:
Dear Katie, A.1 will be worked over the first 4 sts, then A.2 will be worked over the next 9 sts, and A.3 over 6 sts. Inserting a marker after each repetition can help to follow diagram. Remember you will also get individual help from your DROPS store. Happy knitting!
02.11.2015 - 09:47
![]() Katie ha scritto:
Katie ha scritto:
I can't figure out the chart,especially A.x . Any way the charts could be written out? I really want to finish this beautiful poncho. Thank you,any help will be greatly appreciated.
30.10.2015 - 01:55DROPS Design ha risposto:
Dear Katie, each symbol represent 1 stitch - see diagram text where it states if st has to be worked in or around st from previous row. Work A.1 over the first sts on row (after the 4 dc for band sts), then repeat A.2 over the next sts, and finish with A.3 + 4 dc for band sts. Happy crocheting!
30.10.2015 - 10:24
|
|||||||||||||||||||||||||
Erendruid |
|||||||||||||||||||||||||
 |
 |
||||||||||||||||||||||||
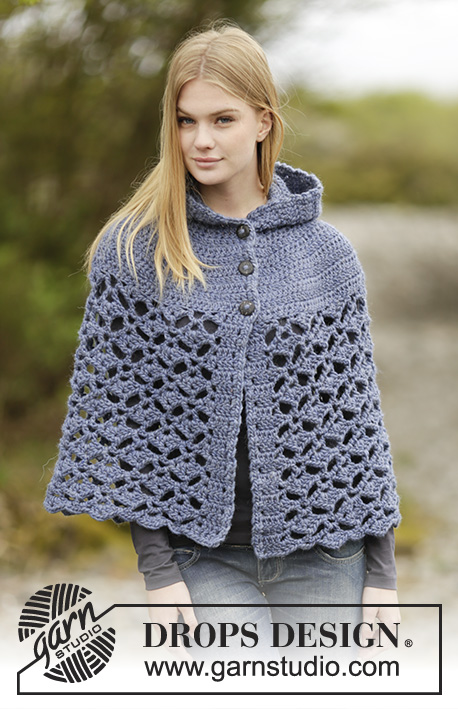
Poncho DROPS all’uncinetto, lavorato dall’alto verso il basso (top down), con cappuccio e motivo a ventaglio, in "Andes". Taglie: Dalla S alla XXXL.
DROPS Extra 0-1166 |
|||||||||||||||||||||||||
|
MOTIVO: Vedere i diagrammi da A.1 a A.3. I diagrammi mostrano tutte le righe del motivo, viste sul diritto del lavoro. INFORMAZIONI PER IL LAVORO: Sostituire la prima m.a all’inizio di ogni riga di m.a con 3 cat. SUGGERIMENTO PER GLI AUMENTI: Per aumentare 1 m.a, lavorare 2 m.a nella stessa m.a. ATTENZIONE: Non aumentare sulle 4 m.a ai lati (= maglie dei bordi davanti). BOTTONI: Misurare dalla riga di avvio e attaccare i bottoni sul bordo davanti sinistro, come segue: TAGLIE S-M-L-XL: 2, 9 e 16 cm TAGLIE XXL-XXXL: 2, 10 e 18 cm ---------------------------------------------------------- PONCHO: Lavorare avanti e indietro, dall’alto verso il basso, a partire dallo scollo. Lavorare il cappuccio in un secondo momento. Con l’uncinetto n° 7 ed il filato Andes, avviare 66-68-68-73-73-78 cat (comprese 3 cat per girare il lavoro). Girare e lavorare 1 m.a nella 4a cat dall’uncinetto (= 2 m.a), 1 m.a in ognuna delle 2-4-4-4-4-4 cat successive, * saltare 1 cat, 1 m.a in ognuna delle 4 cat successive *, ripetere da *-* = 52-54-54-58-58-62 m.a (comprese 4 m per il bordo davanti da ciascun lato). Girare. VEDERE LE INFORMAZIONI PER IL LAVORO ! Lavorare 1 riga con 1 m.a in ogni m.a e, allo stesso tempo, aumentare - VEDERE IL SUGGERIMENTO PER GLI AUMENTI - 17-17-17-23-23-23 m.a in modo uniforme = 69-71-71-81-81-85 m.a. Girare. RICORDARSI LA TENSIONE DEL LAVORO! Proseguire con 1 m.a in ogni m.a e, allo stesso tempo, aumentare 12 m.a in modo uniforme ad ogni riga 2-3-4-5-5-7 volte in tutto = 93-107-119-141-141-169 m.a. Girare. Continuare con 1 m.a in ogni m.a e, allo stesso tempo, aumentare 6 m.a in modo uniforme ad ogni riga 5-4-4-3-4-2 volte in tutto = 123-131-143-159-165-181 m.a. Girare. Lavorare ora 1 riga con 1 m.a in ogni m.a e, allo stesso tempo, aumentare 3-4-1-3-6-8 m.a in modo uniforme = 126-135-144-162-171-189 m.a. Girare. Il lavoro misura ca.17-17-18-18-20-20 cm. DA ADESSO IN AVANTI, MISURARE IL LAVORO DA QUESTO PUNTO ! Proseguire a lavorare il motivo sul diritto del lavoro, come segue: 1 m.a in ognuna delle prime 4 m.a (= m per il bordo davanti), diagramma A.1 - vedere le spiegazioni sopra, ripetere il diagramma A.2 12-13-14-16-17-19 volte in tutto in orizzontale, diagramma A.3, 1 m.a in ognuna delle ultime 4 m.a (= m per il bordo davanti). Ripetere ora il diagramma A.x in verticale. RICORDARSI LA TENSIONE DEL LAVORO! Proseguire in questo modo finché il lavoro non misura ca. 36-36-40-40-40-44 cm, aggiustare dopo una riga sul diritto del lavoro. Tagliare il filo. CAPPUCCIO: Lavorare avanti e indietro lungo la catenella di base: Lavorare 1 m.a in ogni cat con una m.a nella prima riga del poncho – vedere le INFORMAZIONI PER IL LAVORO = 52-54-54-58-58-62 m.a. Proseguire con 1 m.a in ogni m.a finché il cappuccio non misura ca.32 cm in verticale. Tagliare il filo. Piegare il cappuccio in due e cucire la parte in alto del cappuccio - cucire nel filo esterno delle m in modo che la cucitura sia piatta. BORDO ALL’UNCINETTO: Lavorare ora un bordo lungo i bordi davanti e intorno al cappuccio. Iniziare sul diritto del lavoro, in basso, sul bordo destro, e lavorare come segue: Fissare il filo con 1 m.b intorno alla prima riga di m.a, * 2 cat, 1 m.b intorno alla riga di m.a successiva *, ripetere da *-* lungo il bordo destro, intorno al cappuccio e lungo il bordo sinistro. Tagliare il filo. CONFEZIONE: Attaccare i bottoni lungo il bordo davanti sinistro - vedere le spiegazioni sopra. Abbottonare attraverso i buchi del bordo all’uncinetto sul davanti destro. |
|||||||||||||||||||||||||
Spiegazioni del diagramma |
|||||||||||||||||||||||||
|
|||||||||||||||||||||||||
 |
|||||||||||||||||||||||||
 |
|||||||||||||||||||||||||
Avete terminato questo modello?Allora taggate le vostre foto con #dropspattern o inviatele alla #dropsfan gallery. Avete bisogno di aiuto con questo modello?Troverete 7 video tutorial, una sezione per i commenti/domande e molto altro guardando il modello su www.garnstudio.com © 1982-2026 DROPS Design A/S. Ci riserviamo tutti i diritti. Questo documento, compreso tutte le sue sotto-sezioni, è protetto dalle leggi sul copyright. Potete leggere quello che potete fare con i nostri modelli alla fine di ogni modello sul nostro sito. |
|||||||||||||||||||||||||


Con oltre 40 anni di esperienza nel design di modelli di maglia e uncinetto, DROPS Design offre la più estesa collezione di modelli gratuiti su internet - tradotti in 17 lingue. Ad oggi vi possiamo fornire 324 cataloghi e 12220 modelli - 9487 dei quali sono tradotti in Italiano.
Ci stiamo impegnando molto per darvi il meglio che vi possiamo offrire in termini di maglia e uncinetto, ispirazioni e consigli così come filati di grande qualità ad un prezzo incredibile! Volete utilizzare i nostri modelli per qualcosa d'altro oltre al vostro uso personale? Potete leggere tutto ciò che è consentito nel testo sul Copyright in basso su tutte le pagine dei nostri modelli. Buon lavoro!
Lasciare un commento sul modello DROPS Extra 0-1166
Noi saremmo felici di ricevere i tuoi commenti e opinioni su questo modello!
Se vuoi fare una domanda, fai per favore attenzione a selezionare la categoria corretta nella casella qui sotto per velocizzare il processo di risposta. I campi richiesti sono indicati da *.