
Categorie popolari
State cercando un filato?


Commenti / Domande (11)
![]() Pascale ha scritto:
Pascale ha scritto:
Je n’ai pas compris ce que voulait dire « 1er rang = sur l’envers », au début de l’ouvrage. Après réflexion, j’ai commencé par un rang envers. Et c’est au moment de tricoter en rond que j’ai compris. Donc j’ai dû défaire 2 rangs pour me retrouver dans le bon sens. Je regrette que les explications n’aient pas été plus détaillées, comme dans certains modèles. C’est la 1ère fois qu’elle je me retrouve bloquée avant même de commencer 😁
17.11.2022 - 07:57
![]() Rafael ha scritto:
Rafael ha scritto:
Hello again! Thanks for the immediate replies so far. Please could you elaborate on your last message as I am a beginner? My question is that I did put both pieces on the same needle and hence I have two tails. I will be using one of these tails to knit in the round but what am I supposed to do with the other tail?
24.06.2020 - 16:16DROPS Design ha risposto:
Dear Rafael, after you have worked first piece (back piece) and put aside, you can cut the yarn (you then just have to weave it in). Then you work front piece and you work both pieces together in the round with the same ball (= the one from front piece). Happy knititng!
24.06.2020 - 17:08
![]() Rafael ha scritto:
Rafael ha scritto:
Hello! According to pattern, I've done the front and back pieces of the poncho and now I am supposed to slip stc them together in the same needle. How do I do it? I've seen a couple of videos of what slip stc is but how do I to put them together? I'm a bit confused with that part. Should I slip stc the sides of each piece together? Should I to do something with the stics that were kept "alive"? Could someone guide me through? Thank you very much.
22.06.2020 - 18:25DROPS Design ha risposto:
Dear Rafael, work one row from Right side over stitches on front piece, then at the end of this row, work the stitches of back piece from right sided and, when the last of the stitches on back piece has been worked, insert a marker on the needle (= to mark beg of round) and work stitches on front piece = you have joined pieces in the round, continue now knitting all stitches (as before). Happy knitting!
23.06.2020 - 08:58
![]() Rafael ha scritto:
Rafael ha scritto:
Hello! In the pattern it says "leave it aside" about the front piece and the same goes for the back piece as well. Does that mean that I have to cast off the last row of each piece? Because later on pattern says that they need to be joined together with slip stitch. So I'm a bit confused. Thanks.
23.12.2019 - 12:49DROPS Design ha risposto:
Dear Rafael, the phrase +leave it (or put it) aside means that you should either leave the stitches on the needle and make the other pieces with another one, or put the stitches on a stitch holder or a piece of leftover yarn, while making the other bits. It is important that you dont bind off the stitches, but keep them "alive" so you can continue knitting them later. Happy Knitting!
24.12.2019 - 17:02
![]() Belén Ramón ha scritto:
Belén Ramón ha scritto:
Podría mandarme a que talla corresponde cada L o XL . Si la L corresponde a talla 46 o 48.... desgraciadamente varía depende de los fabricantes. Creo que sería muy útil. Gracias!!!!
04.12.2019 - 17:34DROPS Design ha risposto:
Hola Belen. Bajo cada modelo tienes un diagrama de la prenda con las medidas en cm, que es mejor orientación que las tallas. Ante de la duda entre dos tallas, siempre recomendamos elegir la talla más grande . No se puede concretar la correspondencia a las tallas porque esta varia dependiendo del país.
09.12.2019 - 23:54
![]() Rafael ha scritto:
Rafael ha scritto:
Hello! pattern suggets: "Work 3 rows in GARTER ST . K 1 row. " Could you please explain to me that? I know that garter st is a pattern rather than a technique and K stands for knit stitch which is the standard knitting stitch (i saw the videos that you also include here). My question is: Do I knit all stitches for the next 3 rows after casting on and then i knit 1 more row? or do i create 3 ridges through garter stitch, which essentially means to knit 6 rows and then knit 1 more row?
21.11.2019 - 19:49DROPS Design ha risposto:
Dear Rafael, you should in fact work 3 ridges (= knit 6 rows), then work one more row knitting all stitches, and on next row (8th row from the cast on), work in stocking stitch with 5 sts in garter stitch on each side. Pattern will be edited. Thank you, Happy knitting!
22.11.2019 - 08:07Ylva Forss ha scritto:
Jag beställde rundstickor nr 5, 40 cm ( trä, kantiga). De har inte kommit. Skulle komma v. 11. Jag har redan betalat dem.
21.03.2017 - 13:25DROPS Design ha risposto:
Hej Ylva. Du kan bedre kontakte butikken hvor du har bestilt for at höre hvor lang tid der gaar endnu.
21.03.2017 - 14:47YlvavForss ha scritto:
Håller på att sticka denna poncho och jag stickar slätstickning nerifrån, enl. instruktionerna skall jag börja sticka mönsterstickning då arbetet mäter 34 cm i mitt fall, men nu måste väl arbetet i sin helhet vara 15 + 34?
17.03.2017 - 18:23
![]() Claudia Carolina ha scritto:
Claudia Carolina ha scritto:
Mi affascina questo modello e il filato non l'ho ancora usato, sono molto curiosa e spero prossimamente sperimentare l'emozione "Neuquén". Grazie Drops per tanto spunti meravigliosi. Claudia
22.03.2016 - 11:46
![]() Claudia Carolina ha scritto:
Claudia Carolina ha scritto:
Mi affascina questo modello e il filato non l'ho ancora usato, sono molto curiosa e spero prossimamente sperimentare l'emozione "Neuquén". Grazie Drops per tanto spunti meravigliosi. Claudia
22.03.2016 - 11:46
|
|||||||||||||||||||
Neuqu |
|||||||||||||||||||
|
|
|||||||||||||||||||
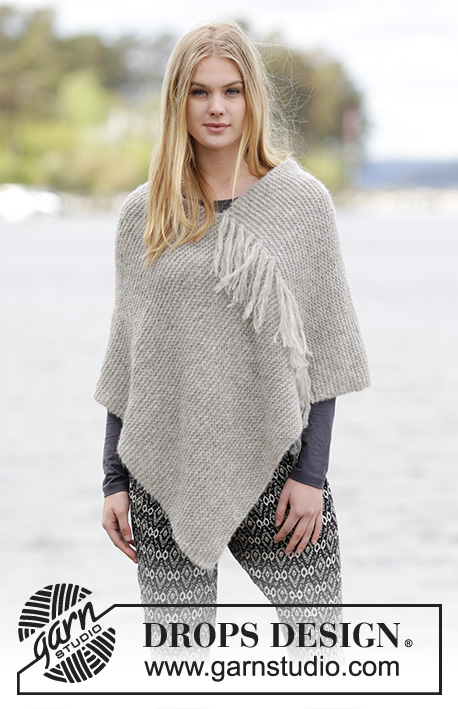
Poncho DROPS ai ferri, con motivo jacquard nordico, in "Nepal". Taglie: Dalla S alla XXXL.
DROPS Extra 0-1164 |
|||||||||||||||||||
|
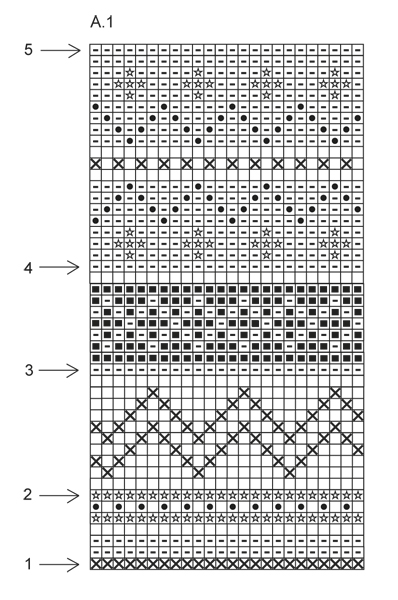
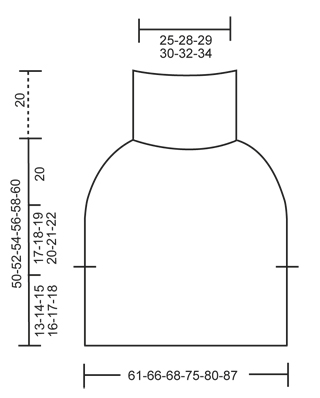
PUNTO LEGACCIO (avanti e indietro sui ferri): Lavorare tutti i ferri a dir. 1 “costa” a legaccio = 2 ferri a dir. MOTIVO: Vedere il diagramma A.1. Lavorare tutto il motivo jacquard a maglia rasata. SUGGERIMENTO PER IL LAVORO: Per evitare che il motivo jacquard sia troppo stretto, è importante non tirare troppo i fili sul rovescio del lavoro. Se il motivo risulta troppo stretto, potete lavorarlo usando ferri di misura più grande. SUGGERIMENTO PER LE DIMINUZIONI: Per calcolare ogni quante m diminuire, dividere il numero complessivo delle m sul giro (p.es: 264 m) per il numero di diminuzioni da fare (p.es 32) = 8,25. Quindi, in questo caso, bisogna lavorare insieme a dir ogni 7a e 8a m ca. SUGGERIMENTO PER GLI AUMENTI: Per aumentare 1 m, fare 1 m gettata; al giro successivo, lavorare la m gettata ritorta (quindi lavorarla nel filo posteriore e non in quello anteriore) per evitare che si formi un buco. ---------------------------------------------------------- PONCHO: Si lavora avanti e indietro sui ferri circolari fino agli spacchi laterali; si prosegue poi in tondo. DIETRO (fino agli spacchi): Si lavora avanti e indietro sui ferri circolari. Avviare 106-114-118-130-138-150 m sui ferri circolari n° 5 con il colore grigio chiaro. Lavorare 3 coste a PUNTO LEGACCIO - vedere le spiegazioni sopra (1° ferro = rovescio del lavoro). Lavorare 1 ferro a dir. Proseguire a maglia rasata con 5 m a punto legaccio da ciascun lato. RICORDARSI LA TENSIONE DEL LAVORO! Quando il lavoro misura 13-14-15-16-17-18 cm, diminuire 1 m vivagno da ciascun lato, assicurarsi che il ferro successivo sia sul diritto del lavoro = 104-112-116-128-136-148 m. Lasciare il lavoro in sospeso e lavorare il davanti fino agli spacchi. DAVANTI (fino agli spacchi): Avviare le m e lavorare come indicato per il dietro. DAVANTI e DIETRO: Si lavorano in tondo. Trasferire le m del davanti e del dietro sugli stessi ferri circolari = 208-224-232-256-272-296 m. Proseguire a maglia rasata con il colore grigio chiaro finché il lavoro non misura 30-32-34-36-38-40 cm. Proseguire con il motivo jacquard seguendo il diagramma A.1 e, ALLO STESSO TEMPO, nel giro indicato nel diagramma dalla freccia 1, diminuire 6-8-8-10-10-12 m in modo uniforme - VEDERE IL SUGGERIMENTO PER LE DIMINUZIONI e il SUGGERIMENTO PER IL LAVORO = 202-216-224-246-262-284 m. Proseguire con il motivo jacquard. Nel giro indicato nel diagramma dalla freccia 2, diminuire 18-24-24-30-30-36 m in modo uniforme = 184-192-200-216-232-248 m. Proseguire con il motivo jacquard. Nel giro indicato nel diagramma dalla freccia 3, diminuire 32-32-32-36-44-48 m in modo uniforme = 152-160-168-180-188-200 m. Proseguire con il motivo jacquard. Nel giro indicato nel diagramma dalla freccia 4, diminuire 32-34-36-42-44-50 m in modo uniforme = 120-126-132-138-144-150 m. Proseguire con il motivo jacquard. Nel giro indicato nel diagramma dalla freccia 5 (= ultimo giro), diminuire 34-30-34-36-36-34 m in modo uniforme = 86-96-98-102-108-116 m. Lavorare 1 giro con il colore grigio chiaro e, allo stesso tempo, aumentare 4-6-4-6-6-4 m in modo uniforme - VEDERE IL SUGGERIMENTO PER GLI AUMENTI = 90-102-102-108-114-120 m. Proseguire in tondo e a coste = 2 m dir / 4 m rov con i ferri circolari corti. Quando le coste misurano ca.20 cm, intrecciare le m senza stringere troppo il filo, lavorando a dir le m dir e a rov le m rov. |
|||||||||||||||||||
Spiegazioni del diagramma |
|||||||||||||||||||
|
|||||||||||||||||||
 |
|||||||||||||||||||
 |
|||||||||||||||||||
Avete terminato questo modello?Allora taggate le vostre foto con #dropspattern o inviatele alla #dropsfan gallery. Avete bisogno di aiuto con questo modello?Troverete 20 video tutorial, una sezione per i commenti/domande e molto altro guardando il modello su www.garnstudio.com © 1982-2026 DROPS Design A/S. Ci riserviamo tutti i diritti. Questo documento, compreso tutte le sue sotto-sezioni, è protetto dalle leggi sul copyright. Potete leggere quello che potete fare con i nostri modelli alla fine di ogni modello sul nostro sito. |
|||||||||||||||||||


Con oltre 40 anni di esperienza nel design di modelli di maglia e uncinetto, DROPS Design offre la più estesa collezione di modelli gratuiti su internet - tradotti in 17 lingue. Ad oggi vi possiamo fornire 324 cataloghi e 12290 modelli - 9561 dei quali sono tradotti in Italiano.
Ci stiamo impegnando molto per darvi il meglio che vi possiamo offrire in termini di maglia e uncinetto, ispirazioni e consigli così come filati di grande qualità ad un prezzo incredibile! Volete utilizzare i nostri modelli per qualcosa d'altro oltre al vostro uso personale? Potete leggere tutto ciò che è consentito nel testo sul Copyright in basso su tutte le pagine dei nostri modelli. Buon lavoro!
Lasciare un commento sul modello DROPS Extra 0-1164
Noi saremmo felici di ricevere i tuoi commenti e opinioni su questo modello!
Se vuoi fare una domanda, fai per favore attenzione a selezionare la categoria corretta nella casella qui sotto per velocizzare il processo di risposta. I campi richiesti sono indicati da *.